background image

11

CHAPTER 1

In

stallation

3. Setting-Up

8

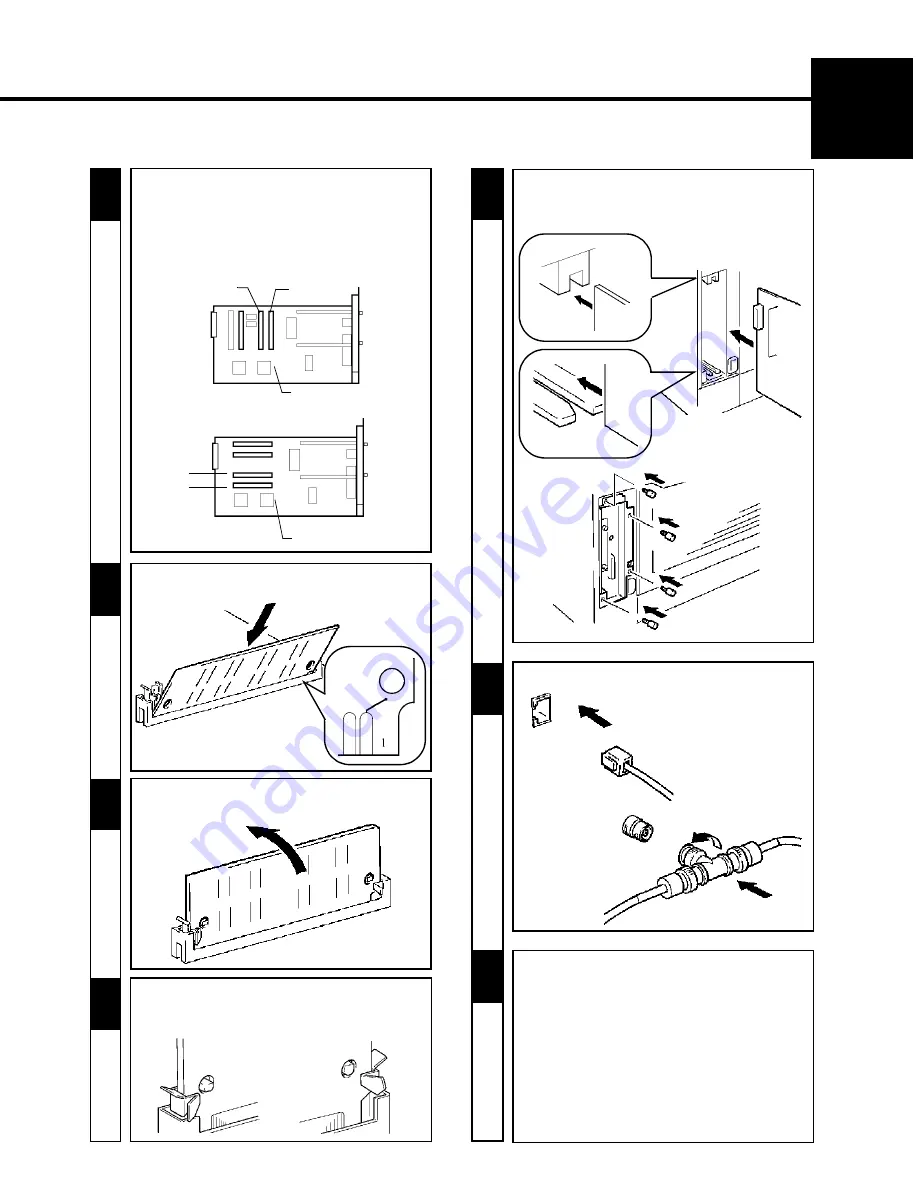
Check that the expansion memory is mounted

securely.

7

5

-

Insert the controller board into the guide rails.

Secure the controller board in position with the

four screws.

Take the Expansion Memory out of its carton.

Check which type of Controller board is installed 
in your printer.

Mount the expansion memory in the socket 
(SIMM3 or 4) at the location shown on the 
controller board.

10

9

6

- Push the expansion memory down in the 

direction of the arrow.

This completes the procedure to mount the

expansion memory in the printer.

You now change the setting for <Installed 

memory> that is one of the setup items of the
printer driver on the host computer

.

For details, see the Printer Driver 
Operator's Manual separately provided (that is
shipped together with the accessories that come
with this printer set).

Reconnect the interface cable or network cable.

Insert the expansion memory pin into the socket.

11

SIMM4

Controller board (a)

SIMM3

Left Side

Right Side

Controller board (b)

SIMM3

SIMM4

Summary of Contents for Color PageWorks

Page 1: ...Color PageWorks User s Manual 0990 7701 02...

Page 2: ......

Page 3: ...r Trademark acknowledgments Color PageWorks is a trademark of Minolta in the U S and Canada Minolta is a registered trademark of MINOLTA CO LTD Adobe and PostScript are trademarks of Adobe Systems Inc...

Page 4: ...Health and Human services DHHS Radiation Perfor mance Standard according to the Food Drug and Cosmetic Act of 1990 This means that the printer does not produce hazardous laser radia tion CDRH Regulat...

Page 5: ...mmuni cations and is prohibited under FCC rules The design and production of this unit conform to FCC regulations and any changes or modifications must be registered with the FCC and are subject to FC...

Page 6: ...ICES 003 ISSUE 2 WARNING Note Color PageWorks printer with Minolta Network option install This Class A digital apparatus meets all requirements of the Canadian Interference Causing Equipment Regulati...

Page 7: ...lly friendly Ozone free Power save mode Energy Star compliant 4 Paper handling versatility OHP labels thick paper envelopes 5 Compact size Width 505mm 20 Depth 527mm 20 3 4 Height 403mm 15 3 4 7 Easy...

Page 8: ...You Need Using the Master Table of Contents The master table of contents gives an overview of how this manual is organized so that you can quickly locate the information you need It provides you with...

Page 9: ...ge Number Used to locate your page Note Calls your attention to a particular point in the procedure Step No Sequential number to follow in performing the procedure Index Used to locate your chapter qu...

Page 10: ...ROM SIMM option Setting Up 12 Network Board option Setting Up 14 Chapter 2 Using the Printer 17 1 Printer Parts and Accessories 28 Printer 18 Accessories 19 Control Panel keys 20 Operation and warnin...

Page 11: ...Fusing Unit and Transfer Roller Unit 62 Changing the Image Transfer Belt Unit 66 2 Cleaning the Printer 70 Chapter 5 Troubleshooting 73 1 How to Troubleshooting 74 2 A Problem Exists in the preparatio...

Page 12: ...x 7701...

Page 13: ...her Country Users This printer meets the EPA s ENERGY STAR Guidelines for energy efficiency The U S Environmental Protection Agency What is an Energy Star Printer Energy Star Printers have a feature t...

Page 14: ...Requirements 3 2 Precautions for Use 4 Operating Environment 4 Using the Printer Properly 4 Care of Printer Supplies 5 Moving the Printer 5 3 Setting Up 6 Checking print operation 6 Connecting Printe...

Page 15: ...nt receiving electrical shocks in the case of electrical leakage always ground the printer Consult your Technical Representa tive if you are unable to make grounding connections Connect the grounding...

Page 16: ...lation 11 3 4 inch 21 3 4 inch You must provide open space on all sides of the Printer Allow at least 300mm 11 3 4 inch of space above the printer as well so that you can open the printer cover to rep...

Page 17: ...VER remove any panel or cover which is secured The printer contains a high voltage component inside which can cause an electrical shock NEVER remodel the printer as a fire or electrical shock could re...

Page 18: ...the reach of children If your hands become soiled with toner wash them with soap and water immediately Use the following precautions when handling the printer supplies Toner Cartridge Drum Cartridge a...

Page 19: ...rform the steps according to the setting up procedure for each option Expansion Memory p 10 Adobe PostScript ROM SIMM p 12 Network Board p 14 For the parts that come with the Printer and Third Cassett...

Page 20: ...NE Once 9 Check that the data on the following demonstration page is printed Press the On Line key on the control panel Check that READY appears on the Message Display Make sure that the On Line Indic...

Page 21: ...type of computer used This printer set does not contain an interface cable Study the operator s manual of your computer and purchase the correct interface cable applicable to this printer and compute...

Page 22: ...shipped together with the accessories that come with this printer set and install the printer driver according to the operating system of the host computer to be used Serial Interface connector Inter...

Page 23: ...board NOTE When the Controller board is taken out of the printer hold it by the edges to avoid touching the terminals or the patterned surfaces After removing the options or Controller board be sure t...

Page 24: ...ler board 10 9 6 Push the expansion memory down in the direction of the arrow This completes the procedure to mount the expansion memory in the printer You now change the setting for Installed memory...

Page 25: ...TION Remove the four screws that secure the controller board on the back of the printer Slide out the controller board NOTE When the Controller board is taken out of the printer hold it by the edges t...

Page 26: ...hown on the controller board 10 9 6 Push the PostScript ROM down in the direction of the arrow This completes the procedure to mount the PostScript ROM in the printer You now install the printer drive...

Page 27: ...uminum foil CAUTION Remove the two screws that secure the network board panel on the back of the printer Remove the network board panel NOTE When the Network Board is taken out of its conductive bag o...

Page 28: ...perator s Manual separately provided that is shipped together with the accessories that come with the Network Board set connect the network cable and set the network environment variable through the h...

Page 29: ...16 CHAPTER 1 Installation 3 Setting Up...

Page 30: ...Paper 24 Type 24 Size 24 Capacity 24 Print Area 25 Care of paper 25 4 Loading the Printing Paper 26 Loading Plain Paper Recycled Paper 26 TRAY 1 Multi Purpose Tray 26 TRAY 2 Second Cassette TRAY 3 Th...

Page 31: ...vided on each side of the printer four in all Used to hold the printer when installing or moving it The printer should be lifted by two persons p 5 Power Cord Socket Connect the power cord of the prin...

Page 32: ...Transfers the image created by the Drum Cartridge onto paper Handle with utmost care p 66 Drum Cartridge The image is formed on it Handle with utmost care Replace this Cartridge with a new one when i...

Page 33: ...changes the state between on line and off line If the key is pressed while in the Menu mode the printer exits the menu and returns on line All keys except this key are valid during the off line state...

Page 34: ...printer returns to On Line and when the Menu key is pressed the next Menu selection is displayed p 38 Item Key These two keys display the next or the previous setting for the current menu item If the...

Page 35: ...are preset to reach the time to change simultaneously Replace these three Units at the same time Clearing Paper Misfeed in Paper Path Describes how to remove paper using the Misfeed Removal Cover and...

Page 36: ...the mode OFF no power save through the CONFIG MENU For details see Chapter 3 Changing the Printer Settings p 35 The printer will be ready to make a print approx 90 sec after the Power Switch is turne...

Page 37: ...is designed to print the following types of paper Any other types of paper must not be used Type Size L Lengthwise Standard size Non Standard size TRAY 1 only Paper Feeding Port Plain Paper weighing 6...

Page 38: ...se surfaces have a special coating such as carbon paper heat sensitive paper and pressure sensitive paper Sheets of paper varying in size Paper not cut at right angles Paper bound by gluing stapling o...

Page 39: ...surfaces have a special coating such as carbon paper heat sensitive paper and pressure sensitive paper Sheets of paper varying in size Paper not cut at right angles Paper bound by gluing stapling or c...

Page 40: ...rre sponding size the printed image may not be printed at the correct size When you have changed the paper size always reset the Paper Size Indicator without fail To Be Continued 2 2 Slide out the TRA...

Page 41: ...r take out the remaining paper and stack it on the additional paper Then fan the paper and load it We recommend replenishing the paper supply only when the Paper Tray is empty 11 Load the paper stack...

Page 42: ...he material used and the operating environment If they cannot be fed successfully it is recommended not to load several sheets at a time but to load them one by one The Following transparencies are re...

Page 43: ...loaded A4 Letter Trailing Edge Guide 1 2 5 Pressing the Paper Guide Lock Lever adjust the Paper Guides to fit the size of the Paper 6 Set the Paper Size Indicator to fit the size of the paper used A4...

Page 44: ...he OHP forcibly it may cause a misfeed Face up White OK NG 2 4 Loading the Printing Paper Load the standard OHP stack in the Cassette facing down its corners are under the Paper Separator and its lead...

Page 45: ...ave a special coating such as carbon paper heat sensitive paper and pressure sensitive paper Sheets of paper varying in size Paper not cut at right angles Paper bound by gluing stapling or clipping Po...

Page 46: ...ny 7 4 Loading the Printing Paper When printing Envelopes fold their flaps securely and load them on the Tray with their flap side down 5 Face up remaining paper and stack it on the additional paper T...

Page 47: ...n the printer on Turning ON and OFF the Printer p 23 Paper can be fed for printing either from the TRAY 1 Multi Purpose Tray the TRAY 2 Second Cassette or the TRAY 2 Third Cassette optional As availab...

Page 48: ...1 COPIES TRAY1 PAPER MANUAL FEED TRAY SWITCHING PAPER SOURCE PAPER SIZE TRAY1 MEDIA TRAY2 MEDIA TRAY3 MEDIA ORIENTATION FORM LENGTH CONFIG MENU 42 PERSONALITY AUTO CONTINUE I O TIMEOUT POWER SAVE DISP...

Page 49: ...B5 LEGAL EXECUTIVE COM10 C5 DL MONARCH J POST 7 TRAY1 MEDIA PLAIN PAPER TRANSPARENCY THICK PAPER ENVELOPE 8 TRAY2 MEDIA PLAIN PAPER TRANSPARENCY 9 TRAY3 MEDIA 4 PLAIN PAPER TRANSPARENCY 10 ORIENTATIO...

Page 50: ...VN INTL VN US MS PUBL MATH 8 PS MATH VN MATH PI FONT LEGAL ISO 4 ISO 6 ISO 11 ISO 15 ISO 17 ISO 21 ISO 60 ISO 69 and WIN 3 0 8 PS MENU 1 1 PRINT PS ERROR OFF ON 9 MAINTE NANCE MENU 1 TOTAL PRINT OUTS...

Page 51: ...3 times Example Print Menu Menu key Group Once RESET MENU Twice TEST PRINT MENU 3 times PRINT MENU 4 times CONFIG MENU 5 times IMAGE MENU 6 times PCL MENU 7 times 1 PS MENU 8 times 2 MEMORY MENU 9 tim...

Page 52: ...ay Make sure that the On Line Indicator lights up READY Once NOTE 9 To quit the MENU function while you are in any step from step 3 through 6 press the On Line key Pressing the On Line key cancels the...

Page 53: ...n menu Pressing the Enter key when PRINT CONFIG is displayed activates the printout 2 PCL FONT LIST Select PCL FONT LIST to print the internal and any external fonts stored or accessible to the printe...

Page 54: ...e the printer will automatically switch to the other tray if it contains the same size and type of paper 5 PAPER SOURCE The default TRAY is selected The factory default is the Second Cassette TRAY2 Th...

Page 55: ...nter environment under normal use excluding the net work settings 1 PERSONALITY The default personality is selected Automatic PCL5C PostScript When the PostScript SIMM ROM is not installed the menu Se...

Page 56: ...more Expansion Memory and PostScript ROM SIMM is not installed When the settings for MEMORY MENU are changed the message CONTEXT SAVE CHANGE appears on the display If the message is on the display pre...

Page 57: ...mono space scalable font For example a mono space scalable typeface is COURIER for the given 45 LaserJet compatible fonts When COURIER is selected as the default the factory default setting is 10 00 p...

Page 58: ...y for printing Since these fonts reside in printer memory they are called resident fonts This printer uses two types of resident fonts scalable fonts and bitmap fonts In addition to resident fonts you...

Page 59: ...46 CHAPTER 3 Changing the Printer Settings 3 Outline of the MENU Utilities...

Page 60: ...er 1 Changing Cartridges 48 Changing the Toner Cartridge 48 Auto Mode 48 Manual Mode 52 Changing the Drum Cartridge Waste Bottle and Oiling Roller 56 Changing the Fusing Unit and Transfer Roller Unit...

Page 61: ...idge by the following procedure The Toner Cartridges can be changed by using either the Auto mode or Manual mode of the Maintenance Menu each having a specific procedure Use the correct procedure acco...

Page 62: ...hat READY TO REPLACE XXXXX The Message Indicator starts blinking Example Color Toner Cartridge Magenta Red 7 9 Hold the handle of the used Toner Cartridge and pull it toward you Twice Example Color To...

Page 63: ...idge into the green installation guide of the Rack 15 Green pin Green instal lation guide Then insert the green pin on the left side of the Car tridge into the green installation guide of the Rack 16...

Page 64: ...nt Cover Do not close it violently because a printer breakdown could result You will hear the sound of the printer operating 19 20 PUSH DOWN ONLY ON THE GREEN SQUARES on the top face of the Drum Cartr...

Page 65: ...ack is in another position never install or remove the Toner Cartridge 4 To confirm the Rack position for removing the Cartridge use the position confirmation window beside the Dial The removal positi...

Page 66: ...left side of the Toner Cartridge first Then raise the right side of the Toner Cartridge 10 Green installation guide When installing the Cartridge hold the Rack Dial with your left hand to prevent the...

Page 67: ...not close it violently because a printer breakdown could result You will hear the sound of the printer operating 16 Make sure that the sound of the printer operation has died away indicating that the...

Page 68: ...55 Maintaining Your Printer CHAPTER 4 1 Changing Cartridges...

Page 69: ...e end of its reliable life DRUM ALMOST USED is displayed to indicate that the Drum Cartridge will soon reach the end of its life soon Prepare a new Drum Cartridge When the Drum Cartridge reaches the e...

Page 70: ...ons with the slots inside the printer frame To Be Continued 14 PUSH DOWN ONLY ON THE GREEN SQUARES on the top face of the Drum Cartridge The Cartridge clicks into place when it is installed correctly...

Page 71: ...when it is installed correctly Make sure that the Hook of the Waste Bottle is engaged securely with the pins of the Image Transfer Belt Unit 13 Hook Pins Make sure that the Shutter at the toner exit...

Page 72: ...Changing Cartridges Loosen the installation screws 2 places in the Oiling Roller NOTE The Fusing Unit is hot Be careful not to touch the area carrying the WARNING HIGH TEMPERATURE label Before changin...

Page 73: ...using Unit Lock Release Lever is pushed up as shown OK LOCKED NG UNLOCKED 2 Close the Rear Cover The Rear Cover will click when it is closed correctly Make sure that the Rear Cover Lock Release Lever...

Page 74: ...61 Maintaining Your Printer CHAPTER 4 1 Changing Cartridges...

Page 75: ...n 6 Grasp and pull down the Front Cover Lock Release Lever to swing open the Front Cover Image Transfer Roller Bearings The Image Transfer Roller Unit and Fusing Unit can provide up to about 100 000 A...

Page 76: ...e falls and make sure that the temperature is safe for replacement 12 PUSH DOWN ONLY ON THE GREEN SQUARES on the top face of the Drum Cartridge The Cartridge clicks into place when it is installed cor...

Page 77: ...nstalled correctly Make sure that the button of the Fusing Unit Lock Release Lever is pushed up as shown Install the Fusing Unit by inserting the dowel of the mount into the Fusing Unit installation h...

Page 78: ...65 Maintaining Your Printer CHAPTER 4 23 Make sure that the button of the Rear Cover Lock Release Lever is pushed up as shown OK NG LOCKED UNLOCKED 1 Changing Cartridges...

Page 79: ...local requirements or return it to your sales representative 6 1 4 Grasp and pull down the Front Cover Lock Release Lever to swing open the Front Cover 2 1 2 Hold the grip and pull out the Drum Cartri...

Page 80: ...ing bracket LOCK 0990U261 LOCK OPEN Turn the belt fixing bracket on the right side of the Image Transfer Belt Unit to the position shown to unlock the bracket Pull out the belt fixing bracket 0990U161...

Page 81: ...ce of the Waste Bottle The Bottle clicks into place when it is installed correctly Make sure that the Hook of the Waste Bottle is engaged securely with the pins of the Image Transfer Belt Unit 18 Hook...

Page 82: ...ng the Drum Cartridge Doing so may damage the Drum Cartridge 23 24 Gently close the Front Cover Do not close it violently because a printer breakdown could result You will hear the sound of the printe...

Page 83: ...re starting the cleaning procedure be sure to turn OFF the Power Switch and unplug the power cord from the outlet Use a soft cloth for cleaning Do not use abrasives or corrosive detergent ATTENTION Th...

Page 84: ...to reduced print quality 5 Press down on the green labels on the top face of the Drum Cartridge The Cartridge clicks into place when it is installed correctly 7 Gently close the Front Cover Do not cl...

Page 85: ...72 Maintaining Your Printer CHAPTER 4 2 Cleaning the Printer...

Page 86: ...to Troubleshoot 74 2 A Problem Exists in the preparation stage and during a Print Cycle 75 A Problem Exists in the Preparation Stage 75 A Problem Occurs When You Attempt to Start a Print Cycle 75 Whe...

Page 87: ...occurs before the printout data is sent from the computer Typical symptoms include The printer is not turned ON See p 75 for such problems A Problem Occurs When You Attempt to Start a Print Cycle This...

Page 88: ...action p 76 The print cycle cannot be inter rupted The Data Indicator remains on Print data is in memory Press the On Line key to set the printer into the Off Line state Run Job Memory available from...

Page 89: ...key This prints one page TRAY X EMPTY Tray1 Tray2 or Tray3 is paper empty Add paper p 26 TONER LOW XXXXX The toner is low but still can print Ready a new Toner Cartridge for replacement TONER EMPTY XX...

Page 90: ...d the paper exit section RESET TO SAVE During the printing cycle one or more printer settings were changed If you want the current printing cycle to use the new setting stop the printing cycle using t...

Page 91: ...urred at the localTalk port INTERFACE ERROR NETWORK An error occurred at the network interface INSUFFICIENT RAM NEED MORE RAM The RAM size is insufficient Install an optional Expansion Memory FATAL ER...

Page 92: ...79 Troubleshooting CHAPTER 5 2 A Problem Exists in the Preparation Stage and During a Print Cycle...

Page 93: ...PERATURE label 4 5 Open the Rear Cover Push and hold the Fusing Unit Lock Release Lever Button and slide out the Fusing Unit Pull out the paper misfed in the Paper Exit Port toward you 6 While turning...

Page 94: ...the Drum Cartridge is not exposed to light 14 Hold the Lock Release Lever Button and push the Fusing Unit in The Fusing Unit will click into place when it is installed correctly Make sure that the bu...

Page 95: ...ller It may lead to reduced print quality Push down the Misfeed Clearing Lever NOTE 16 15 Lift the Misfeed Clearing Lever Pull out the paper misfed in the rollers toward the back side PUSH DOWN ONLY O...

Page 96: ...e paper misfed in the paper path toward the front 28 Pull out the paper misfed in the Paper Path toward the front 29 23 Gently close the Front Cover Do not close it violently because a printer breakdo...

Page 97: ...rtridge may be defective The Image Transfer Belt Unit may be defective The Image Transfer Roller Unit has reached its replacement time Change the Image Transfer Roller Unit p 62 Toner smudges The Tone...

Page 98: ...de the printer is dirty Make several prints The Toner Cartridge may be defective Remove and check the Cartridge for damage Install a new Cartridge if needed The Toner Cartridge p 48 The Drum Cartridge...

Page 99: ...g Unit has reached its replacement time Change the Fusing Unit p 62 Incorrect image registration Lines are broken or charac ters are out of correct posi tion The print parameters and paper settings of...

Page 100: ...CHAPTER 6 Chapter 6 Appendices 1 Quick Reference Guide of MENU 88 2 List of MENU Utilities 90 3 Specifications of Printer 92 4 Specifications of 250 sheet Third Cassette Unit 95 5 Index 96 87 Appendi...

Page 101: ...T 1 PCL DEMO PAGE PS DEMO PAGE 1 PRINT MENU COPIES TRAY1 PAPER MANUAL FEED TRAY SWITCHING PAPER SOURCE PAPER SIZE TRAY1 MEDIA TRAY2 MEDIA TRAY3 MEDIA 2 ORIENTA TION FORM LENGTH IMAGE MENU PRINT MODE R...

Page 102: ...L PRINT OUTS REPLACE TONER NOTES 1 Quick Reference Guide of MENU 1 The range of items to choose from when the printer is equipped with an Adobe Postscript ROM SIMM 2 The range of items to choose from...

Page 103: ...OFF ON 4 TRAY SWITCHING ON OFF 5 PAPER SOURCE TRAY1 TRAY2 4 TRAY3 6 PAPER SIZE 2 A4 A5 3 LETTER INVOICE JIS B5 LEGAL EXECUTIVE COM10 C5 DL MONARCH J POST 7 TRAY1 MEDIA PLAIN PAPER TRANSPARENCY THICK P...

Page 104: ...KTOP PS TEXT VN INTL VN US MS PUBL MATH 8 PS MATH VN MATH PI FONT LEGAL ISO 4 ISO 6 ISO 11 ISO 15 ISO 17 ISO 21 ISO 60 ISO 69 and WIN 3 0 8 PS MENU 1 1 PRINT PS ERROR OFF ON 9 MAINTE NANCE MENU 1 TOTA...

Page 105: ...24 1 4 to 41 3 4 lbs OHP sheet Labels Letterhead Envelopes J Post postcard 100 148 mm 4 5 3 4 Paper Capacity 3 Specifications of Printer Paper Feeding Port A4 JIS B5 A5 Legal 1 Letter Execu tive Invoi...

Page 106: ...1284 Type B connector LocalTalk RS 422 Only can use with optional PostScript ROM SIMM Ethernet IEEE 802 3 TCP IP SPX IPX EtherTalk NetBIOS Only can use with Network Board Font Agfa Intelifont 35 font...

Page 107: ...000 images Image Transfer Roller Unit life 100 000 prints Fusing Unit life 100 000 prints Dimensions Width 505 mm 20 Depth 530 mm 20 3 4 Height 407 mm 16 Weight Approx 40 kg 77 1 4 lbs including the...

Page 108: ...egal 8 1 2 14 All paper sizes are Lengthwise only Paper Capacity Plain Paper and Recycled Paper 250 sheets OHP sheet 50 sheets Power supply Supplied from the printer Dimensions Width 505 mm 20 Depth 4...

Page 109: ...menu 40 List of menu utilities 36 90 Loading OHP sheets labels TRAY 1 29 Loading OHP sheets labels TRAY 2 TRAY 3 30 Loading plain paper recycled paper TRAY 1 26 Loading plain paper recycled paper TRAY...

Page 110: ...hundred fifty 250 sheet second cassette tray 2 19 27 30 Two hundred fifty 250 sheet third cassette tray 3 19 27 30 Two hundred fifty 250 sheet third cassette unit 19 U Understanding Fonts 45 Up down k...

Page 111: ...Appendices CHAPTER 6 CHAPTER 1 CHAPTER 2 CHAPTER 3 CHAPTER 4 CHAPTER 5 CHAPTER 6 Installation Using the Printer Changing the Printer Settings Maintaining Your Printer Trouble shooting Appendices Inde...

Page 112: ...ed in Japan 3 13 2 chome Azuchi machi Chuo ku Osaka 541 Japan MINOLTA CO LTD 7 8 The information contained in this manual is subject to change without notice to incorporate improvements made on the pr...

Reviews: