19
G
ETTING STARTED
18
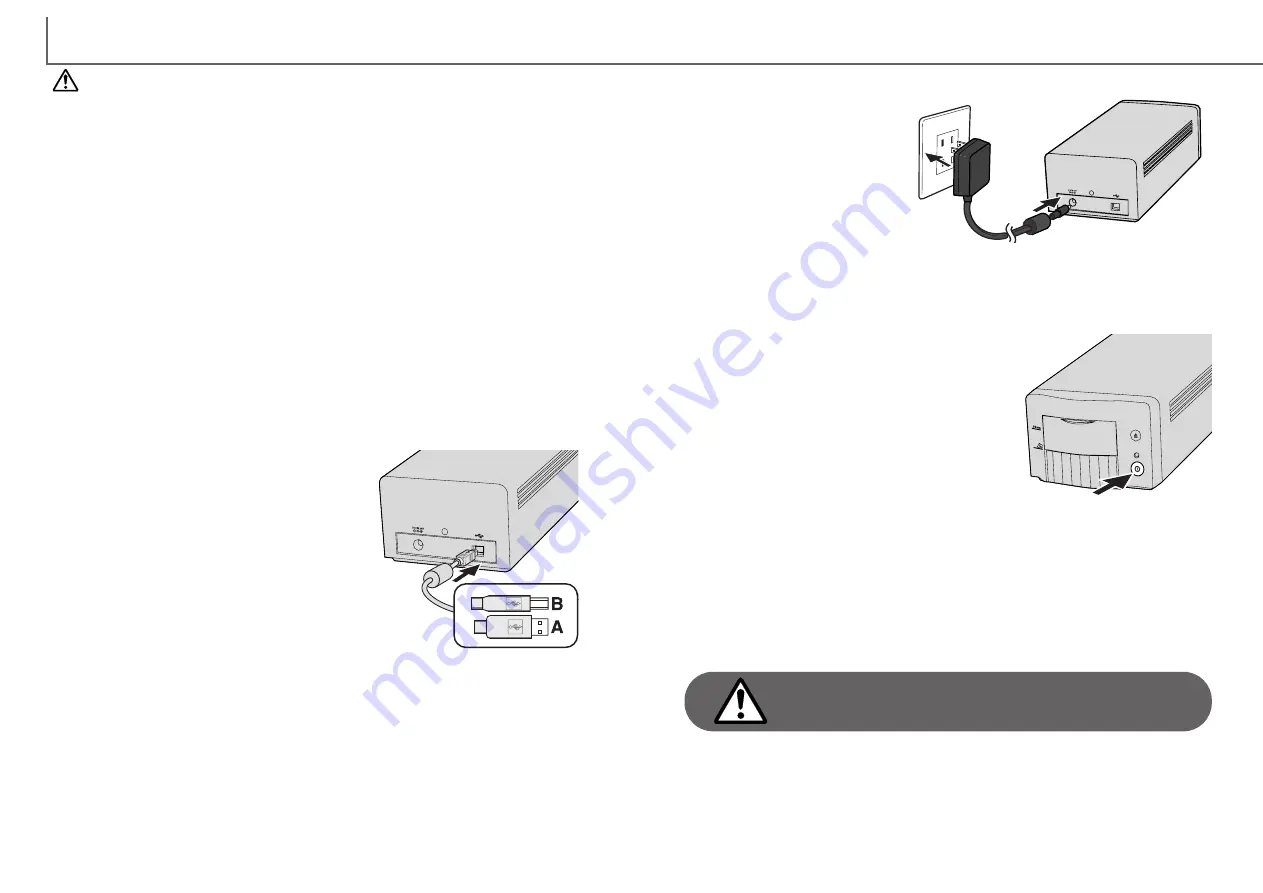
Securely plug the B connector of the USB cable
into the scanner’s USB port and the A connector
into the computer’s USB port.
The scanner should be connected directly to the
computer. Attaching the scanner to a USB hub
may prevent proper operation.
When the scanner is initially connected to a
computer with a Windows 98, 98SE (Second
Edition), or 2000 Professional operating system,
the found-new-hardware wizard will appear
briefly. No action is required. With Windows
2000, the “Digital Signature Not Found…” message may appear. Click the yes but-
ton to complete the scanner installation.
When the scanner is initially connected to a computer with a Windows XP operating
system, the found-new-hardware wizard will appear. Click the next button. The “not
passed Windows Logo testing” message appears. Click the continue-anyway button
to complete the scanner installation.
Connecting the USB cable
Before connecting the DiMAGE Scan Dual III to a computer, the scanner utility soft-
ware must first be installed; if the scanner is connected to the computer before the
CD-ROM is installed, the computer may not recognize the scanner unit. Read page
12 for the installation procedure.
The scanner should be placed on a level surface free from vibrations. It should be
located away from direct sunlight and in a clean, dry, well-ventilated area.
The easiest and safest way to connect the scanner is to turn off the computer and all
peripheral devices before attaching the cable. When connecting the scanner with the
computer and peripheral devices on, follow the cautions below:
• Never connect or disconnect the cable while the computer, the scanner, or other
devices are operating or transferring data.
• Do not connect or disconnect the cable while the computer is starting up or shut-
ting down; the computer or scanner may not operate properly.
• An interval of at least five seconds is required between disconnecting and con-
necting the scanner.
Before scanner setup
Check the scanner is securely connected to the computer. With the front door
closed, turn on the scanner with the power switch. Start up the computer.
When launching the utility software, the front door
must be closed during initialization; the indicator lamp
will blink when the scanner is initializing. Once the
indicator lamp glows steadily, the scanner can be
used.
Connect the output plug of the AC
adapter to the scanner’s DC ter-
minal (1). Plug the adapter unit
into a standard household outlet
(2).
Connecting the AC adapter
Turning on the scanner
1
2
The following instructions are based on the procedures to connect the scanner with
the computer and all peripheral devices off.
Never disconnect the scanner when the indicator
lamp is blinking.
The easiest and safest way to disconnect the scanner from the computer is to turn
off both devices as well as any peripheral devices and remove the cable. When con-
necting the scanner with these devices on, quit the utility software first, then discon-
nect the cable.
Disconnecting the scanner
Close the utility software and press the main switch
on the front of the scanner unit. Unplug the scanner
when cleaning or when the product is not in use for
extended periods.
Turning off the scanner
Summary of Contents for AF-2840
Page 1: ...INSTRUCTION MANUAL E...


