background image

Setting Up MimioBoard

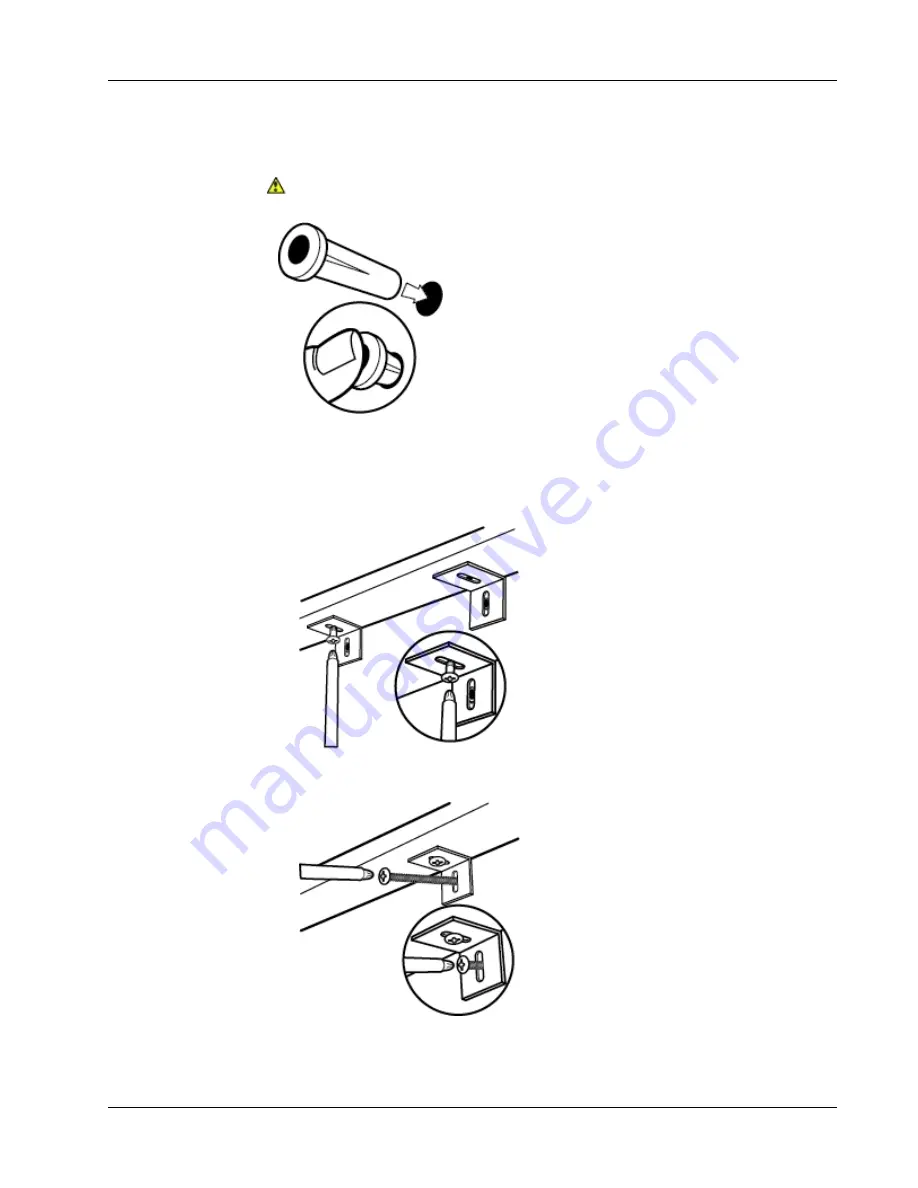
13. Insert a drywall anchor into each of the two holes so that each anchor is flush with the

surface of the wall.

The included anchors are for use with drywall only. For concrete walls, use concrete
anchors (not included).

14. For each of the brackets, do the following:

a. Align the slot in the bracket with the hole on the bottom of the MimioBoard and

the drywall anchor.

b. Using a screw driver and an #6x⅜ in (M3x8.5mm) screw, securely fasten the bracket

to the bottom of the MimioBoard.

c. Using a screw driver and a #10x2½ in (M5x60mm) screw, securely fasten each

bracket to the wall.

9

Summary of Contents for MimioBoard ME-77

Page 1: ...MimioBoard ME 77 ME 87 User Guide mimio com ...

Page 2: ...eans or translated into another language without the prior written consent of Mimio Mimio MimioClassroom MimioTeach MimioCapture MimioVote MimioView MimioHub MimioBoard MimioPad MimioMobile MimioProjector and MimioStudio are registered marks in the United States and other countries All other trademarks are the property of their respective holders ...

Page 3: ...esktop 14 Calibrating Interactive Mode 14 Using MimioBoard 17 Using the Stylus 17 Using MimioStudio Tools 17 Caring for MimioBoard 19 Cleaning MimioBoard 19 Cleaning the MimioBoard Dry Erase Surface 19 Cleaning the MimioBoard Frame and Stylus 19 Replacing the MimioTeach Bar 20 Technical and Environmental Information 21 Environmental Information 21 Safety Precautions for Lithium Ion Rechargeable Ba...

Page 4: ...iv This page intentionally left blank for double sided printing ...

Page 5: ...d deliver lessons and presentations directly from your MimioBoard Using the included stylus you can control the movement of your computer cursor much like you would with a mouse at your computer What s Included The MimioBoard package contains the following items 1 MimioBoard 8 Mounting bar 2 MimioTeach 9 L brackets 3 USB power adapter 10 Drywall anchors 4 USB cable 11 10x2 in M5x60mm screws 5 Mimi...

Page 6: ...MimioBoard If you are missing any of the items above contact Customer Support 2 ...

Page 7: ...able n ME 77 Aspect ratio 4 3 Board size 48 2 in x 71 2 in 1225 mm x 1809 mm Active view size 45 9 in x 61 2 in 1167 mm x 1555 mm n ME 87 Aspect ratio 16 10 Board size 48 2 in x 83 5 in 1225 mm x 2120 mm Active view size 45 9 in x 73 5 in 1167 mm x 1867 mm The following figure shows the major components of the MimioBoard 1 Dry erase magnetic projection surface 5 Calibrate Interactive mode 2 Tools ...

Page 8: ... Solid Amber MimioBoard cannot find an available MimioHub Flashing Amber MimioBoard is searching for an available MimioHub About MimioStudio MimioStudio provides multiple authoring and editing tools for creating almost any type of content You can use MimioStudio Notebook with MimioStudio Tools to create a variety of objects including text boxes freehand writing and drawing lines arrows and many ba...

Page 9: ... information about installing and connecting your MimioBoard n Installing MimioBoard n Connecting MimioBoard Installing MimioBoard Only a qualified technician should install MimioBoard The technician must be familiar with the structure of the room and the procedures for mounting objects to the wall Two people are required to safely lift and install MimioBoard To mount your MimioBoard to the wall y...

Page 10: ...mounting bar with the horizontal line and make a mark on the wall in the center of four of the holes in the mounting bar The mounting bar must be securely attached to studs or other solid support The mounting bar supports the full weight of the MimioBoard Extra care must be taken to ensure that the full weight of the board can be supported 4 Drill a hole at each mark using a in 6 35 mm drill bit 6...

Page 11: ...ncluded 6 Place the mounting bar against the wall so that the holes in the bar align with the four drywall anchors 7 Using a screw driver and four 10x2 in M5x60mm screws securely fasten the mounting bar to the wall 8 Hang the MimioBoard from the mounting bar Two people are required to safely lift and position the MimioBoard 9 Ensure that the MimioBoard is securely attached to the wall and that all...

Page 12: ...wo holes on the bottom of the MimioBoard and do the following for each of the two holes a Align the slot in the L bracket with the hole on the bottom of the MimioBoard b Make a mark on the wall in the center of the slot in the L bracket that is touching the wall 12 Remove the L brackets and drill a hole at each mark using a in 6 35 mm drill bit 8 ...

Page 13: ...rete walls use concrete anchors not included 14 For each of the brackets do the following a Align the slot in the bracket with the hole on the bottom of the MimioBoard and the drywall anchor b Using a screw driver and an 6x in M3x8 5mm screw securely fasten the bracket to the bottom of the MimioBoard c Using a screw driver and a 10x2 in M5x60mm screw securely fasten each bracket to the wall 9 ...

Page 14: ... Make a mark on the wall in the center of the slot in the L bracket that is touching the wall 16 Remove the L brackets and drill a hole at each mark using a in 6 35 mm drill bit 17 Insert a drywall anchor into each of the two holes so that each anchor is flush with the surface of the wall The included anchors are for use with drywall only For concrete walls use concrete anchors not included 10 ...

Page 15: ...screw securely fasten the bracket to the top of the MimioBoard c Using a screw driver and a 10x2 in M5x60mm screw securely fasten each bracket to the wall Connecting MimioBoard MimioBoard is powered using the included USB cable and power adapter Your MimioBoard comes pre linked to the included MimioHub You can also use this MimioHub to connect other MimioClassroom devices to your computer such as ...

Page 16: ...mioBoard cable 3 Plug the power adapter into a power outlet 4 Plug the MimioHub into an available USB port on your computer If you do not want to connect your MimioBoard to your computer wirelessly you can link the board to your computer using the included USB cable without the power adapter MimioBoard will be powered by USB through your computer 12 ...

Page 17: ...om the body of the stylus 2 Remove the plastic strip from the stylus 3 Replace the top onto the body of the stylus and turn clockwise to attach Setting Up Interactive Mode Using MimioStudio Interactive mode you can create and deliver lessons and presentations directly from your MimioBoard To use Interactive mode you need a projector a MimioBoard and a stylus Combined these devices make for a power...

Page 18: ...eractive and then click Exit l Start MimioStudio Settings select Interactive and then click Disable Calibrating Interactive Mode Each time Interactive mode is enabled you are prompted to calibrate using the stylus When using MimioBoard with a permanently installed projector you do not need to recalibrate Interactive mode after the first session To calibrate Interactive mode 1 If the calibration sc...

Page 19: ...Setting Up Interactive Mode The calibration target disappears and the next calibration target appears When the calibration screen disappears Interactive mode is enabled 15 ...

Page 20: ...16 This page intentionally left blank for double sided printing ...

Page 21: ...tylus to control your desktop from the MimioBoard To execute Do this Left mouse click Click in the projected area at the desired location with the tip of the stylus Double left mouse click Quickly click twice in the projected area at the desired location with the tip of the stylus Right mouse click Press the B button on the stylus and then click in the projected area at the desired location with t...

Page 22: ...hape Recognition Eraser Insert file Screen clipping Color picker More colors Object Fill Outline and Fill color Thickness slider Color palette Solid Line Dash Line Square Dot Line Transparency Gallery Applications see below Right click Interactive Mouse Screen Annotation From the Applications tool you can access the following Reveal Spotlight Text Tools Class Manager Control Quick Collaborate Quic...

Page 23: ... more than two days You can easily clean the dry erase surface using the following items n Whiteboard eraser n Liquid whiteboard cleaner n Lint free cloth To clean the dry erase surface 1 Using the eraser clear all writing from the dry erase surface 2 Wipe the surface with a clean cloth moistened with liquid whiteboard cleanser 3 Rinse the surface with warm clear water to remove any cleanser resid...

Page 24: ... cable from the MimioTeach bar 3 Using the included allen wrench do the following a Remove the screw below the MimioTeach bar b Remove the screw above the MimioTeach bar 4 Remove the MimioTeach bar from the MimioBoard There are two metal plates on the back of the MimioTeach bar 5 Using a screw driver remove the two screws that hold each of the metal plates in place 6 Remove the metal plates from t...

Page 25: ...ate take back systems Those systems will reuse or recycle most of the materials of your end life equipment in a sound way The crossed bin symbol marked in your device invites you to use those systems If you need more information on the collection reuse and recycling systems please contact your local or regional waste administration You can also contact Mimio for more information on the environment...

Page 26: ...e to fire or inside the car where temperature may be over 60 C Caution l Do not charge in a place that generates static electricity l Battery can only be used within 20 C 60 C temperature range Contacting Mimio Mimio maintains an Internet Web site that offers support for MimioClassroom products In addition Mimio s Technical Support department is available by phone Web site www mimio com Phone 877 ...

Page 27: ... needed and so on n Suggestions for how to correct or improve the documentation We also welcome your suggestions for additional topics you would like to see covered in the documentation Send email feedback to documentation mimio com Please keep in mind that this email address is only for documentation feedback If you have a technical question please contact Customer Service 23 ...

Page 28: ...24 This page intentionally left blank for double sided printing ...

Reviews: