background image

12


Mighty Mule 362-D Installation Instructions 

rev 12-14-15

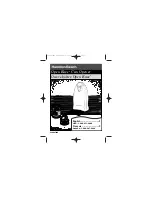
Closed Position Stop Plate mounted

on the SECOND GATE

Closed Position Stop Plate

Low Profile

Ground Stop

in Near the Center of Driveway

FACING VIEW

SIDE VIEW

Mount Vertically

Closed Position

Stop Plate

Low Profile Ground Stop

Closed Position

Stop Plate

Step 4 

Using appropriate hardware for your type of gate, attach the vertical 

closed position stop plate to the SECOND gate frame at the point 

where it will come in contact with the low profile ground stop. Do not 

tighten it completely at this time. You must slide the closed position 

stop plate toward the low profile ground stop until they touch. Once 

you have moved the stop plate to the correct position, tighten its 

hardware completely. 

Step 5

Return the gates to their open positions and 

reattach the gate openers to the gates.

Control Box

1.

KEE

P CLE

AR! G

ate may mo

ve at a

ny tim

e.

2.

Do not allow c

hildre

n to op

erate

 gate or 

play in gat

e area.

3.

This gate is

 for vehic

les on

ly. P

edest

rian

s

must

 use a se

parate

 entra

nce.

Moving Ga

te Can

 Ca

use

Injury O

r Dea

th

WARNING

!

Control Box

Piece of Wood

for Mounting

Mount the Control Box

Step 1 

Mount the control box using the screws 

(provided) or another secure mounting 

method. The control box must be mounted 

at least 3 feet above the ground to protect it 

from rain splash, snow, etc., and at least 3 feet 

from an AC power source to prevent electrical 

interference. 

Step 2 

Remove the control box cover by removing the 

four (4) screws.

Step 3 

Attach antenna to control box cover. First, 

remove the Phillips screw (labeled ANT) from 

the control box cover. Place one end of the 

antenna coil over the antenna plug (antenna 

wire will fit into groove). Tighten the Phillips 

screw to secure antenna.

Summary of Contents for MM362-D

Page 1: ...ot in agreement with this disclaimer or do not feel capable of properly following all installation and safety instructions you may return this product for full replacement value READ ALL INSTRUCTIONS...

Page 2: ...perator or system intended for use in a commercial location or building such as a multifamily housing unit five or more single family units hotel garages retail store or other building servicing the g...

Page 3: ...Installation Overview for Pull To Open Gates 6 Installation of the First Gate Opener 7 Install Post Bracket Assembly and Gate Bracket 8 Attach Opener Arm 10 Install the Closed Position Stop Plates 11...

Page 4: ...on You will need to adjust the stall force for your particular application The Mighty Mule Gate Opener also has an adjustable auto close feature After the gate reaches the fully open position it can b...

Page 5: ...symbol The symbol identifies conditions that can result in damage to the opener or its components serious injury or death Because GTO automatic gate openers are only part of the total gate operating...

Page 6: ...er is proper for the type and size of gate its frequency of use and the proper class rating 2 Make sure the gate has been properly installed and swings freely in both directions Repair or replace all...

Page 7: ...e Area Driveway 10 10 10 10 10 10 NEVER INSTALL any control device within gray area III After Installation 1 Attach the warning signs included to each side of the gate to alert the public of auto mati...

Page 8: ...cting GTO Access Systems LLC at 3121 Hartsfield Road Tallahassee Florida 32303 or by calling 1 800 543 4283 and requesting a duplicate copy One will be provided to you free of charge Required Safety P...

Page 9: ...quency RF signals to the gate opener for entrapment protection functions shall be located where the transmission of the signals are not obstructed or impeded by building structures natural landscaping...

Page 10: ...0 XXXXXX Gates That Open LLC Tallahassee Florida USA TO MANUALLY OPEN AND CLOSE THE GATE 1 Turn opener power switch OFF 2 Disconnect front and rear mount from mounting brackets 3 Remove opener from mo...

Page 11: ...circuits A circuit on the control board regulates charging Sleep draw is 15 mA active draw is 2 to 5 A Auto memorization of digital transmitter code GTO RF receiver tuned to 318 MHz Opener length wit...

Page 12: ...ransformer is intended for indoor use If the transformer can only be plugged into an outside electrical outlet a weatherproof cover or housing must be used If your gate is more than 1000 from an AC po...

Page 13: ...should have ball bearing hinges with grease fittings The gate post should be be secured in the ground with concrete so it will minimize twist or flex when the opener is activated The addition of a ho...

Page 14: ...Opener 2 Installation DVD 1 Gate Bracket 2 Post Pivot Bracket 2 3 8 Bushings 2 Customer Support Card 1 Post Bracket 2 Closed Position Stop Plate 2 2 Mounting Screw 6 E Z GATE OPE NER Transformer 1 RB...

Page 15: ...istance between the transformer power supply and the control box Page 13 26 If your gate is more than 1000 away from an AC power source you will need to use at least one 10 watt Solar Panel FM123 to c...

Page 16: ...and brackets allows for 1 of clearance between the gate and the opener in both the open and closed position at the same time maintaining a maximum distance of 13 from the end of the retracted opener a...

Page 17: ...netrate the post On wood posts place a metal plate or washer not supplied between the nuts and the post to prevent the thrust of the opener from pulling the bolts and washers out of the wood The post...

Page 18: ...ener with a clevis pin and a 3 8 bushing Secure the clevis pin with a hairpin clip Step 4 With the gate in the fully open position and the opener arm fully retracted adjust the post bracket assembly a...

Page 19: ...move the 5 16 x 11 2 bolt and readjust the post pivot bracket TIP Turn the post pivot bracket over for more hole alignment options You can also move the entire post bracket assembly to different posit...

Page 20: ...Post Remove excess bolt length with hacksaw or bolt cutters SIDE VIEW TOP VIEW EXAMPLES Gate Bracket Mounting Examples Attach Opener Arm Step 1 Attach the opener to the securely bolted post bracket as...

Page 21: ...gates and move the gates to the closed position Step 2 Using appropriate hardware for your type of gate U bolts for tube or chain link screw or bolts for wood or metal attach the closed position stop...

Page 22: ...to their open positions and reattach the gate openers to the gates Control Box 1 KEE P CLE AR Gat e may mov e at any time 2 Do not allo w chil dre n to ope rate gate or play in gate are a 3 This gate...

Page 23: ...RE The only wire acceptable for use with GTO products is 16 gauge multi stranded low voltage direct burial wire This particular gauge enables the transformer to provide an adequate charge through the...

Page 24: ...nnected to the 14VAC OR SOLAR terminals regardless of color polarity Tighten set screws against exposed end of wires A dab of household petroleum jelly on each terminal will help prevent corrosion Fir...

Page 25: ...marked BATT and BATT Step 2 Run the battery harness wires into the control box through a strain relief slot leaving enough wire to reach the battery wire plugs Step 3 Plug the BLACK battery harness wi...

Page 26: ...ould be protected by a weatherproof cover Set the CLOSED Position Limit for PULL TO OPEN Installation Your transmitter must be able to operate the gate If not see Personalize Your Transmitter Setting...

Page 27: ...he Stall Force potentiometer on the control board operates like a volume control on a radio Use a small flat blade screwdriver to turn the arrow in the center of the potentiometer Adjust the sensitivi...

Page 28: ...less than 5 feet FCC WARNING Changes or modifications to this unit not expressly approved by the party responsible for compliance could void the user s authority to operate the equipment In accordanc...

Page 29: ...ition This mounting position will give the opener the most efficient leverage point for operation and provides the least possible pinch area C After verifying that you have the best position for the p...

Page 30: ...n the gates reached the desired open position limit Use the JOG OPEN and CLOSE buttons to fine tune the gate position if neccessary C Press and HOLD the SECOND Opener OPEN button on the control board...

Page 31: ...p 2 Insert one solar panel wire into a 14VAC OR SOLAR terminal Insert the other solar panel wire into the remaining 14VAC OR SOLAR terminal The wires can be connected to the 14VAC OR SOLAR terminals r...

Page 32: ...on Control According to Application Gate Opening Sensor Refer to Sensor manual for additional information if needed Edge Sensor Automatic Gate Lock ON 1 2 3 4 5 6 7 8 9 10 DIP NO COM NC V V LOOP LOOP...

Page 33: ...s input will cycle the operation as follows OPEN STOP CLOSE STOP OPEN 4 EDGE Typically for use with contact edge sensor Activation of this input while gate is moving will cause it to reverse direction...

Page 34: ...s beep after power up Unit has learned new transmitter code releasing the transmitter button will shut off the alarm or Unit has entered LEARN LIMIT mode releasing the transmitter button will shut off...

Page 35: ...o solve the problem call the GTO Service Department at 800 543 1236 or 850 575 4144 Refer to the serial number located on the back of opener arm and date of purchase when calling for assistance 4 If r...

Page 36: ...fers hands free operation of the Mighty MuleGate Openor with a 12 ft radius of detection of vehicles in motion A wireless version of the Gate Opening Sensor is available FM130 Automatic Gate Lock FM14...

Reviews: