background image

The ideal temperature and humidity

65

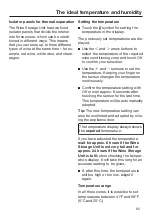
Isolator panels for thermal separation

The Wine Storage Unit has two fixed
isolator panels that divide the interior
into three zones, which can be condi-
tioned in different ways. This means
that you can store up to three different
types of wine at the same time – for ex-
ample, red wine, white wine, and cham-
pagne.

Setting the temperature

Touch the 

 symbol for setting the

temperature in the display.

The previously set temperatures are dis-
played.

Use the 

 and 

 arrow buttons to

select the temperature of the required
wine conditioning zone and touch 

OK

to confirm your selection.

Use the 

 and 

 sensors to set the

temperature. Keeping your finger on
the sensor changes the temperature
continuously.

Confirm the temperature setting with

OK

 or wait approx. 8 seconds after

touching the sensor for the last time.
This temperature will be automatically
adopted.

Tip: 

The new temperature setting can

also be confirmed and adopted by clos-
ing the appliance door.

The temperature display always shows
the 

required

 temperature.

If you have adjusted the temperature,

wait for approx. 6 hours if the Wine
Storage Unit is not very full and for
approx. 24 hours if the Wine Storage
Unit is full

 before checking the temper-

ature display. It will take this long for an
accurate reading to be given.

If, after this time, the temperature is
still too high or too low, adjust it
again.

Temperature range

In all three zones, it is possible to set
temperatures between 41°F and 68°F
(5°C and 20°C).

Summary of Contents for KWT 2601 SF

Page 1: ...Operating and Installation Instructions Wine Conditioning Unit To prevent accidents and machine damage read these instructions be fore installation or use en US CA M Nr 10 785 220 ...

Page 2: ... Checking the installation niche 23 Pushing the wine conditioning unit into the niche 28 Securing the wine conditioning unit in the niche 32 Aligning the appliance door 34 Adjusting the door opening angle optional accessory 37 Electrical connection 38 How to save energy 41 Guide to the appliance 43 Start screen 44 Settings mode 45 Symbols in settings mode 46 Accessories 47 Accessories supplied 47 ...

Page 3: ...lecting the intensity of the Ambient Lighting 62 Selecting Ambient Display 63 The ideal temperature and humidity 64 Temperature 64 Isolator panels for thermal separation 65 Setting the temperature 65 Humidity 66 Increasing the humidity 66 Not increasing the humidity 67 Door alarm 68 Storing wine bottles 69 Moving the wooden shelves 70 Labeling the wooden racks 70 Maximum capacity 71 Automatic defr...

Page 4: ...Contents 4 Technical Service 85 Contact in case of fault 85 Warranty 85 Declaration of conformity 86 Copyright and licenses 87 ...

Page 5: ...th these instruc tions Keep these instructions in a safe place and ensure that new users are familiar with the contents Pass them on to any future owner DANGER of injury The wine conditioning unit is very heavy and can tip forwards when the appliance door is open Keep the appliance door shut until the wine conditioning unit has been built in and secured in the installation niche in accordance with...

Page 6: ...ing unit is not suitable for storing and keeping cool medicines blood plasma laboratory preparations or other such materials or products Incorrect use of the wine conditioning unit for such purposes can cause deterioration of the items stored The wine conditioning unit is not suitable for use in areas where there is a risk of explosion Miele cannot be held liable for damage resulting from improper...

Page 7: ...only be guaranteed when correctly grounded It is essential that this stan dard safety requirement is met If in any doubt please have the elec trical installation tested by a qualified electrician Reliable and safe operation of the wine conditioning unit can only be guaranteed if it is connected to the power supply The electrical outlet must not be concealed behind the wine con ditioning unit and m...

Page 8: ...ning unit for any visible damage Do not operate or install a damaged appliance To ensure safe operation use the wine conditioning unit only when it has been installed The wine conditioning unit must be disconnected from the power supply during installation side by side heater installation mainte nance and repair work The appliance is only disconnected from the power supply if the circuit breaker h...

Page 9: ...age to the appliance If the wine conditioning unit is used for storing food which con tains fat or oil make sure that it does not come into contact with plastic components as any spillages of oil or fat could cause stress cracks to the plastic and cause it to break or split Do not store explosive materials in the wine conditioning unit or any products containing propellants e g spray cans Electric...

Page 10: ...IMPORTANT SAFETY INSTRUCTIONS 10 The surface is easily scratched Even magnets can cause scratch ing ...

Page 11: ...Do not use a steam cleaning appliance to clean this wine condi tioning unit The steam could reach electrical components and cause a short cir cuit Sharp edged or pointed objects will damage the evaporator caus ing irreversible damage to the wine conditioning unit Do not use sharp edged or pointed objects to remove frost and ice remove labels stickers etc ...

Page 12: ...inside DANGER of electric shock Cut the plug off the power cord Cut the power cord off the old appliance Dispose of them separately from the appliance Ensure that the wine conditioning unit is not stored in the vicinity of gasoline or inflammable gases and liquids during and after dis posal Make sure that the coolant pipework is not damaged during dis posal to avoid uncontrolled leakage of oil and...

Page 13: ... by disposing of them in your household waste can be harmful to your health and the environment There fore please do not dispose of your old appliance with regular household waste and follow local regulations on proper disposal Consult with local authorities dealers or Miele in order to dispose of and recycle electrical and electronic appliances Miele assumes no responsibility for deleting any per...

Page 14: ...eat Di rect sunlight should also be avoided The higher the room temperature the longer the compressor has to run and the higher the energy consumption is When installing the wine conditioning unit please note The electrical outlet must be easily accessible in an emergency and not concealed behind the appliance The plug and cord must not touch the back of the wine conditioning unit as they could be...

Page 15: ...onments with high humidity condensation may appear on the ex ternal surfaces of the wine condition ing unit Condensate can cause corrosion on external appliance walls For prevention it is advisable to in stall the wine conditioning unit with sufficient ventilation in a dry and or air conditioned room After installation make sure that the appliance door closes properly the air vents are not covered...

Page 16: ... you need to change the door hinge to the other side please contact the Technical Service department On no account should you attempt to change the door hinge yourself Adjoining cabinets units The wine conditioning unit is screwed to the adjoining cabinets units to the side and above For this reason it is es sential that all cabinets units are fixed to the ground and or wall Ventilation WARNING Fi...

Page 17: ...s must be at least 5 8 16 mm thick Each wine conditioning unit appliance must be built into its own niche using the installation parts supplied If the partition wall a is narrower than 6 5 16 160 mm you need the heating mat from the side by side merging kit to prevent condensation from forming and any resulting damage If the partition wall a is more than 6 5 16 160 mm thick you don t need the side...

Page 18: ...allation dimensions The electrical connection must not be positioned higher than 9 above the floor The electrical outlet must not be concealed behind the appliance and must be easily accessible in an emergency ...

Page 19: ...19 24 610 mm 3 4 19 mm 24 610 mm 84 85 3 16 2134 2164 mm 1 3 16 30 mm 7 8 22 mm 10 5 16 262 mm 4 102 mm 4 102 mm 3 5 8 92 mm Installation dimensions side view ...

Page 20: ...Dimensions when the appliance door is opened opening angle 90 Installation dimensions 20 ...

Page 21: ...Installation dimensions Dimensions when the appliance door is opened opening angle 115 115 11 3 4 299 mm 26 5 8 677 mm 21 ...

Page 22: ...ecured in its installation niche in accordance with the operating and installation instructions The wine conditioning unit is both large and heavy Installation must be carried out by two people The wine conditioning unit must be in stalled in accordance with local regula tions If local regulations are not avail able the following regulations must be observed in the USA the National Electrical Code...

Page 23: ...niche must be at least 5 8 16 mm thick The surrounding walls must be se curely fixed to the floor or wall The shortened side walls must be at least 4 100 mm thick The baseboard must be at least 1 2 13 mm thick preferably 3 4 19 mm Checking the installation niche Check the installation dimensions Check the position of the electrical connections see Electrical connec tion Check that all adjacent cab...

Page 24: ...when installing the wine conditioning unit secure an off cut of flooring or similar material to the floor in front of the installation area Installing the wine conditioning unit DANGER of tipping over Please bear in mind that the wine conditioning unit is no longer se cured to the pallet Unscrew the brackets that are fix ing the wine conditioning unit to the delivery pallet With the help of severa...

Page 25: ...once it is built into the niche Using the installation equipment Parts required for installation of the wine conditioning unit are supplied with the wine conditioning unit The plastic bags supplied are marked with letters for easy identification When performing the individual as sembly steps observe the letters specified and use the matching plas tic bag with the required installation equipment Se...

Page 26: ...ceed 2 51 mm Place a wooden wedge behind the anti tip brackets if necessary While holding the anti tip brackets in place mark the necessary drill holes on the rear wall of the installation niche Retaining screws for different uses and types of material are supplied in the accompanying pack 2 2 Securing to a concrete wall Securing to a wooden wall 26 ...

Page 27: ...Installing the wine conditioning unit 2 Securing with a wooden wedge Secure the installation niche to the wall using the anti tip brackets 27 ...

Page 28: ... grate in the base board on both sides and use it to push the internal plastic latches out wards to release the baseboard 5 Affix edge protection to the adja cent cabinet fronts Insert the plug connector at the back of the appliance see Electrical con nection Insert the plug into the electrical outlet The electrical outlet should be close to the appliance and easily accessi ble Otherwise it must b...

Page 29: ...to the niche because the floor is uneven for example unscrew the rear feet slightly see Aligning the ap pliance and slide the appliance into the niche Remove the edge protection from the adjacent cabinet fronts Aligning the wine conditioning unit Align the wine conditioning unit with neighboring cabinet fronts The adjustable feet at the front and back of the wine conditioning unit can all be adjus...

Page 30: ...ing unit Position the supplied spacers on both sides on the markings next to the adjustable feet at the front of the wine conditioning unit Adjust the rear feet with a ratchet at tachment 5 16 8 mm socket or a TX 20 screwdriver 30 ...

Page 31: ... on the spacer The standard dimension of 1 1 4 32 mm relates to a niche height of 84 2134 mm It is important to align the feet to a height of at least 1 1 4 32 mm so that the wine conditioning unit s venti lation works properly via the base Risk of damage Unscrew the feet only until the marking on the base is aligned to a maximum of 2 7 16 62 mm max niche height of 85 3 16 2164 mm Otherwise the re...

Page 32: ...ioning on both sides In a side by side combination only the external panels of the two appli ances can be secured to the cabinet wall Securing the base cover plate and the baseboard Do not cover the vents in the base This will damage the appliance Remove the film from the base cover plate Secure the base cover plate to the baseboard 32 ...

Page 33: ...Installing the wine conditioning unit Click the baseboard onto the bot tom of the appliance base 33 ...

Page 34: ...n the appli ance door with adjacent cabinetry fronts To do this check the gaps to the adja cent cabinetry fronts If necessary use the spacers pro vided and place them on both sides of the appliance door Remove the cover on the bottom fixing bracket Slightly loosen the screws on the fixing bracket ...

Page 35: ...oning unit 35 Remove the covers from both sides of the appliance door Slightly loosen the screws in the angle trims on both sides Remove the cover from the light contact switch Remove the nuts and washers from the threaded bolts ...

Page 36: ...e appliance door via the gaps in the angle trims Close the appliance door and check the distance between the door and adjacent cabinetry fronts again Then re tighten all screws and Place the washers and nuts back on the threaded bolts and tighten the nuts The appliance door is now secured Reattach the covers and Remove the spacers from the ap pliance door ...

Page 37: ...oor opening an gle optional accessory Depending on the installation site it may be necessary to adjust the door opening angle to 90 Open the door Insert the banking pin through the holes and drive in with a hammer The door opening angle is now limited to 90 ...

Page 38: ...he power supply This allows coolant and refrigerator oil to settle in accor dance with regulations Ensure that the voltage of the power supply corresponds to the connection voltage of the wine conditioning unit A power supply of 110 120 V 60 Hz and 10 16 Amps which is protected by a power switch or a fuse is required to operate the wine conditioning unit The manufacturer recommends operat ing the ...

Page 39: ...his could result in a short circuit Do not plug in other appliances behind the wine conditioning unit Do not connect the wine conditioning unit to a stand alone inverter such as those used with an autonomous energy source for example solar power When the wine conditioning unit is switched on power surges could result in a safety switch off The electronic unit could be damaged The wine con ditionin...

Page 40: ...conditioning unit Make sure that the plug has clicked into position correctly Insert the plug into the electrical out let and switch on The wine conditioning unit is now con nected to the electricity supply Follow the steps described in Switch ing the appliance on and off section Switching on the appliance ...

Page 41: ...nlight Away from heat sources ra diator range oven Near a heat source radiator oven Where the ideal room tem perature is approx 68 F 20 C Where the ambient room temperature is above 77 F 25 C Air vents uncovered and dusted regularly Where the ventilation open ings are blocked and full of dust Temperature setting 50 to 54 F 10 to 12 C The lower the temperature in the appliance the higher the energy...

Page 42: ... necessary and for as short a time as possible Store wine bottles in an organized way Frequent opening of the door for long periods will cause a loss of coldness The wine conditioning unit works harder to cool down and the compressor runs for longer periods Do not overfill the appliance in order to allow the air to circulate Poor air circulation will cause a loss of coldness ...

Page 43: ...a Display b On Off switch c Wooden shelves with labels d Interior lighting e Isolator plate for thermal separation of the wine conditioning zones f Glass door with UV filter g Automatic door opening Push2Open Pull2Open mechanism ...

Page 44: ... three wine conditioning zones b sensor For setting the temperature and humidity c sensor For switching the interior lighting on and off when the door is closed d Display for Miele home connection status only visible when Miele home has been set up e Sensor control for adjusting various settings in settings mode ...

Page 45: ...checked for faults or malfunctions see Selecting additional settings Door Assistant Switch on Push2Open or Pull2Open or switch off see Selecting additional settings Miele home Set up deactivate or query WiFi connection sta tus see Selecting additional settings Demo Mode Switch off only visible when Demo Mode is switched on see Selecting additional settings Factory Default Reset to default settings...

Page 46: ...Guide to the appliance 46 Symbols in settings mode Scroll in settings mode or select a setting Change a setting e g display brightness OK Confirm a setting Exit the menu level ...

Page 47: ...tainless steel front panels in stainless steel look give your appliance a high quality appearance Optional accessories A range of useful Miele accessories and care products are available for your wine conditioning unit Side by side merging kit and top frame KTF For installing two or more appliances next to each other Optional accessories are available from Miele your Miele dealer or online via the...

Page 48: ...it Cleaning Please refer to the relevant instruc tions in Cleaning and care Clean the inside of the wine condi tioning unit and the accessories Choosing the right Door Assistant Push2Open Pull2Open The Door Assistant helps you to open the appliance door You can choose between the two Door Assistants Push2Open and Pull2Open see Switching on Door Assistant in Selecting additional settings The defaul...

Page 49: ...e colored back ground is always the selected setting it can be confirmed directly with OK Select if you wish to switch to the previous menu level or terminate the process Every touch of the display is con firmed with an audible keypad tone You can switch off this keypad tone in settings mode Starting up for the first time Open the door of the wine condition ing unit Turn the wine conditioning unit...

Page 50: ...ct setting and touch OK to confirm your selection Select if you want to return to the previous menu level Set up Successfully Completed appears in the display Confirm the first use with OK Your appliance has been successfully set up and is ready for use The main screen appears on the dis play You cannot terminate the initial start up process The only way to terminate the process is to switch off t...

Page 51: ... the On Off switch The cooling and interior lighting are switched off Please note The wine conditioning unit is not disconnected from the power supply when the On Off switch is in the Off position Turning off for longer periods of time If the wine conditioning unit will not be used for a longer period of time turn off the wine conditioning unit unplug the power cord or trip the cir cuit breaker cl...

Page 52: ...tments in settings mode In settings mode use the and arrow buttons to select Keypad Lock and touch OK to confirm your selec tion Use the arrow buttons and to switch the keypad lock On or Off and confirm your selection with OK The keypad lock will not be activated until you close the door of the wine conditioning unit Nothing will appear in the display to in dicate that the keypad lock is switched ...

Page 53: ...ance briefly switches off and then back on automatically Self test completed appears in the dis play Confirm the message with OK The main screen appears on the display again Switching on Door Assistant You can choose between the two Door Assistants Push2Open and Pull2Open The default Door Assistant is Push2Open The Push2Open Door Assistant is suit able for cabinet fronts without handles The door w...

Page 54: ...K to confirm your selection Use the and sensor controls to select the duration 5 to 30 seconds and touch OK to confirm your selec tion To protect against inadvertent open ing if you do not pull the appliance open it will close again by itself after a duration defined by you see Set Au toClose duration Pull2Open In settings mode use the and arrow buttons to select Door Assistant and select OK to co...

Page 55: ...a Miele user account The user ac count can be created via the Miele mobile app The Miele mobile app will guide you as you connect your wine conditioning unit to your home WiFi network Once your wine conditioning unit is connected to your WiFi network you can use the app to carry the following activities for example Make certain settings on your wine conditioning unit Display information on the ope...

Page 56: ...nds on the availability of the Miele home service in your country The Miele home service is not avail able in every country For information about availability please visit www miele com Connecting your wine conditioning unit via the Miele mobile app You will also require the following to log in the password to your WLAN network the password to your appliance Your appliance s password is its serial...

Page 57: ... buttons to select Miele home and select OK to confirm your selec tion Set up will appear in the display Confirm your selection with OK Use the and arrow buttons to select via WPS and touch OK to con firm your selection Now follow the instructions in the dis play Confirm the process with OK To be able to use the Miele home functions you also have to register your Wine Storage Unit in the app As so...

Page 58: ...In settings mode use the and arrow buttons to select Miele home and touch OK to confirm your selec tion Use the and arrow buttons to select Activate and touch OK to con firm your selection Activation successful appears in the dis play Confirm the message with OK If the WiFi connection is active will appear in the display Checking the WLAN connection sta tus In settings mode use the and arrow butto...

Page 59: ...lows the Wine Storage Unit to be presented in the showroom without the cooling system being switched on Do not activate this set ting for domestic use If Demo mode has been switched on as a default setting will show in the display In settings mode use the and arrow buttons to select Demo Mode and select OK to confirm your selec tion Press OK for 4 seconds to deactivate ap pears in the display Foll...

Page 60: ...essage with OK The initial start up process restarts see Starting up for the first time The appliance s settings will be reset to the following values Function Default settings Language English Display Brightness Average value 4 of 7 segments Color Scheme Dark Buzzer Tones Average value 4 of 7 segments Keypad Tone Average value 4 of 7 segments F C Tempera ture Unit Fahrenheit Keypad Lock Switched ...

Page 61: ...e the and arrow buttons to select On or Off and touch OK to con firm your selection When Sabbath Mode is switched on appears in the display and the display brightness is reduced the display does not change when the appliance door is closed When Sabbath Mode is switched on the following functions are switched off Door Assistant for cabinet fronts without handles the appliance door will have to be p...

Page 62: ... Lighting You can set the intensity of the Ambient Lighting in settings mode You can also choose the wine condi tioning zones in which the Ambient Light ing should be switched on In settings mode use the and arrow buttons to select Ambient Lighting and select OK to confirm your selection Use the and arrow buttons to select the correct setting Ambience 1 Ambience 5 Ambience 1 Ambience 3 Weak to str...

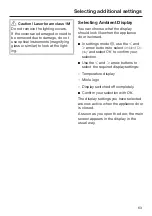
Page 63: ...lay should look like when the appliance door is closed In settings mode use the and arrow buttons to select Ambient Dis play and select OK to confirm your selection Use the and arrow buttons to select the required display settings Temperature display Miele logo Display switched off completely Confirm your selection with OK The display settings you have selected are now active when the appliance do...

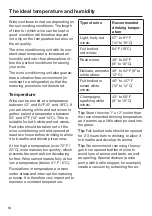
Page 64: ...develop its aroma At too high a temperature over 72 F 22 C wine matures too quickly which prevents the aromas from developing further Wine cannot mature fully at too low a temperature below 41 F 5 C Fluctuations in temperature put wine under stress and interrupt the maturing process It is therefore very important to maintain a constant temperature Type of wine Recommended drinking temper ature Lig...

Page 65: ...mperature Keeping your finger on the sensor changes the temperature continuously Confirm the temperature setting with OK or wait approx 8 seconds after touching the sensor for the last time This temperature will be automatically adopted Tip The new temperature setting can also be confirmed and adopted by clos ing the appliance door The temperature display always shows the required temperature If y...

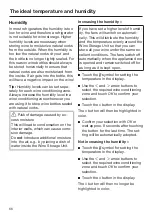
Page 66: ...e into the air e g by placing a dish of water inside the Wine Storage Unit Increasing the humidity If you have set a higher level of humid ity the fans will switch on automati cally This will distribute the humidity and the temperature evenly around the Wine Storage Unit so that you can store all your wine under the same ex cellent conditions The fans switch off automatically when the appliance do...

Page 67: ...The ideal temperature and humidity 67 Confirm your selection with OK or wait approx 8 seconds after touching the button for the last time The set ting will be automatically adopted ...

Page 68: ... closed the alarm will stop and the message in the display will go out Turning the door alarm off early If the alarm disturbs you it can be turned off early Touch the OK sensor control in the display The alarm stops and the message dis appears from the display After a certain time the alarm will sound again and the message will reappear in the display until the appliance door is closed ...

Page 69: ...at the natural corks can be kept moist on the inside and air is prevented from getting into the bottles Tip We also recommend increasing the humidity level inside the Wine Storage Unit for wine bottles with natural corks see Increasing the humidity in The ideal temperature and humidity Danger of injury Take care that wine bottles do not fall out of the appliance when a wooden shelf is pulled out W...

Page 70: ...t Press down on the back of the wooden shelf so that it clicks into place at the back Labeling the wooden racks For quick and easy identification of the wines stored you can write on the blackboard painted surface of the strips on the wooden racks You can write directly on the strip or re move it from the wooden rack To do so Hold the strip by the sides and pull it forwards The strip can be wiped ...

Page 71: ...apacity Risk of damage Do not exceed the maximum load bearing capacity of 77 lb 35 kg for each wooden shelf Do not stack bottles on the wooden shelves Up to 104 Bordeaux bottles 0 75 L 25 4 fl oz can be stored in the Wine Storage Unit ...

Page 72: ...72 WARNING DANGER of injury and damage Do not use any mechanical or other types of aids which are not recom mended by the manufacturer to ac celerate the defrosting process The wine conditioning unit defrosts au tomatically ...

Page 73: ...event of a service call Cleaning agents To avoid damaging the surfaces of your appliance do not use Cleaning products containing soda ammonia acid or chloride lime scale removers abrasive cleaning products such as scouring powder scouring liquid or pumice stones cleaners containing solvents stainless steel cleaners dishwasher detergent Oven sprays glass cleaner except on the glass in the appliance...

Page 74: ...ns or food immediately Do not allow them to dry and stick to the appliance Clean the interior with a solution of lukewarm water and liquid dish soap Rinse all parts by hand Do not wash in a dishwasher After cleaning wipe with clean water and dry with a soft cloth The wooden shelves should only be wiped with a well wrung out damp cloth They must not be allowed to get wet Risk of damage Please follo...

Page 75: ...move soiling from the appliance front immediately All surfaces are easily scratched Contact with unsuitable cleaning agents can alter or discolor the sur faces See the information on Cleaning agents at the beginning of this sec tion Clean the surfaces with a clean sponge and a solution of warm water and liquid dish soap A clean damp microfiber cloth without cleaning agent can also be used for clea...

Page 76: ... should be cleaned on a regular basis with a brush or vacuum cleaner you could use a Miele vac uum cleaner dusting brush for exam ple After cleaning Replace all parts in the wine condi tioning unit Reconnect to the power and switch the wine conditioning unit back on Place the wine bottles back in the wine conditioning unit and close the door ...

Page 77: ... checked for any faults or malfunctions Any errors identified during the Self Test are shown on the display Perform a Self Test see Additional settings sec tion Performing a Self Test Contact Technical Service and inform them of the error message s on the display The Wine Storage Unit is not getting cold and the interior lighting does not come on when the appliance door is opened The Wine Storage ...

Page 78: ... while the temperature will return to normal by itself The ambient temperature is too high The higher the ambient temperature the longer the compressor has to run See Installation location in Installation informa tion The Wine Storage Unit has not been installed properly in the niche See Installing the Wine Storage Unit in Installa tion information The compressor comes on less and less often and f...

Page 79: ...en Door Assistant is switched on but the Wine Storage Unit has a handle free cabinet front For handle free cabinet fronts switch on the Push2Open Door Assistant see Switching on the Door Assistant in Selecting additional settings The door cannot be opened when Sabbath Mode is switched on The Push2Open Door Assistant is switched on at the same time as Sabbath Mode When Sabbath Mode is switched on t...

Page 80: ...uption to the power supply Rectify the cause of the alarm The alarm stops and the fault message disappears from the display The warning sounds and the message Close the door appears in the display The appliance door is open Close the appliance door If you wish to turn the alarm off early touch the sensor control OK in the display The alarm will stop The temperature display is out and is shown in t...

Page 81: ...oo high low Observe the connection data under Electrical connections Contact Technical Service if necessary To turn the alarm off touch the symbol The error message does not disappear from the dis play until the error has been rectified is shown in the dis play The machine does not get cold but the machine controls are working Demo Mode is switched on Demo mode allows the appliance to be presented...

Page 82: ... a fault Risk of electric shock There are live electrical components under the lighting cover The LED lighting may only be repaired or replaced by the Technical Service department Risk of injury from LED lighting The light inten sity corresponds to laser beam class 1 1M The lighting covers must not be removed or dam aged or be removed due to damage This could cause injury to your eyes Do not look ...

Page 83: ...ue The slats on the wooden shelves are warping Volume change due to moisture absorption or drying out is a typical characteristic of wood An increase in humidity will cause wooden components to warp which can lead to cracking Knots and wavy grain are characteristic for wood and cannot be avoided A white deposit has formed on the wine bot tle corks The corks have oxidized due to contact with the ai...

Page 84: ...g sound can be heard when material inside the wine conditioning unit expands Please bear in mind that a certain amount of noise is unavoidable from the com pressor and the coolant circulating through the system Noises that you can easily elimi nate Possible cause Solution Rattling clinking The wine conditioning unit is uneven Realign the wine condition ing unit using a spirit level by raising or l...

Page 85: ...t information for Miele Techni cal Service can be found at the end of this document Please quote the model and serial num ber of your appliance when contacting Miele Both pieces of information can be found on the data plate You will find the data plate inside your appliance Warranty For more information about warranty conditions please contact Miele Tech nical Service ...

Page 86: ...Declaration of conformity 86 Frequency band 2 412 GHz 2 462 GHz Maximum trans mitting power 100 mW ...

Page 87: ...ing disassembling and other such reductions of software Components which fall under GNU General Public Licence and further Open Source licenses are integrated into the software An overview of the integrated Open Source components and a copy of the current license can be obtained at http www miele com device software licenses You will need to enter the specific product name Miele will provide the s...

Page 88: ......

Page 89: ......

Page 90: ......

Page 91: ...Service Canada Importer Miele Limited Headquarters and Miele Centre 800 843 7231 609 419 4298 Technical Service Support Phone Fax TechnicalService mieleusa com 161 Four Valley Drive Vaughan ON L4K 4V8 www miele ca 800 999 1360 888 586 8056 Customer Care Centre Phone customercare miele ca 800 565 6435 905 532 2272 International Headquarters Miele Cie KG Carl Miele Straße 29 33332 Gütersloh Germany ...

Page 92: ...M Nr 10 785 220 00 en US CA KWT 2601 SF KWT 2611 SF ...

Reviews: