background image

This appliance conforms to current
safety requirements. Incorrect use
can, however, lead to personal injury
and damage to the appliance.

Before installation and using the ap-
pliance for the first time, read the op-
erating instructions carefully.
They contain important notes on in-
stallation, safety, operation and care
of the appliance. This way you will
avoid the risk of accidents and dam-
age to the appliance.

Keep these instructions in a safe
place and pass them on to any fu-
ture user.

Installation and connection

The appliance must be installed
and connected by a suitably quali-

fied and competent person in strict ac-
cordance with local and national safety
regulations. The manufacturer cannot
be held liable for damage caused by
incorrect installation or connection.

The electrical safety of this appli-
ance can only be guaranteed when

continuity is complete between the ap-
pliance and an effective earthing sys-
tem, which complies with local and na-
tional safety regulations. It is most im-
portant that this basic safety require-
ment is tested by a qualified electrician.
The manufacturer cannot be held liable
for the consequences of an inadequate
earthing system (e.g. electric shock).

Do not connect the appliance to
the mains electricity supply by an

extension lead. Extension leads do not
guarantee the required safety of the ap-
pliance (e.g. danger of overheating).

This equipment is not designed for
maritime use or for use in mobile

installations such as caravans, aircraft
etc. However it may be suitable for
such usage subject to a risk assess-
ment of the installation being carried
out by a suitably qualified engineer.

Warning and Safety instructions

8

Summary of Contents for H 399 B

Page 1: ...rating instructions Oven H 399 B To avoid the risk of accidents or damage to the appliance it is essential to read these instructions before it is installed or used for the first time GiZr M Nr 05 741 710 ...

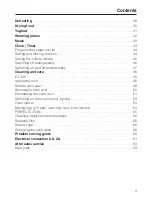
Page 2: ...lly 17 Operation 18 Selecting oven functions 18 Oven function chart 19 Altering the pre set temperature 20 Runner levels 21 Trays pans and racks 22 Handle 22 Safety lock 23 Door contact switch 25 Safety switch off 25 Baking 26 Roasting 29 Roasting chart 29 Roasting with the roast probe 32 How it works 32 Altering the pre set recommended final core temperature 35 Altering the pre set recommended ov...

Page 3: ...ning and care 48 E Cloth 48 Appliance front 48 Rubber door seal 49 Removable oven door 50 Dismantling the oven door 51 Switching on the oven interior lighting 53 Oven interior 54 Baking tray grill pan oven tray rack side runners 54 PERFECTCLEAN 55 Cleaning catalytic enamel surfaces 56 Roasting filter 58 Roast probe 58 Changing the oven lamp 58 Problem solving guide 59 Electrical connection UK ZA 6...

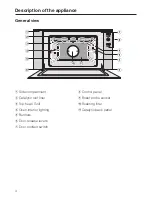
Page 4: ...artment bCatalytic roof liner cTop heat Grill dOven interior lighting eRunners fDoor release levers gDoor contact switch hControl panel iRoast probe socket jRoasting filter kCatalytic back panel Description of the appliance 4 ...

Page 5: ...door re lease closing mechanism u uDoor release closing mechanism vData plate lTemperature display with symbols for z Oven operation e Roast probe a Lock mTemperature button n button o button pProgramme selector qTimer display with symbols for l Minute minder f Start time g Duration End time m Time of day rTimer button s button t button Description of the appliance 5 u v ...

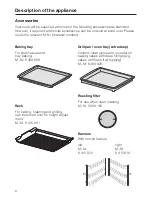
Page 6: ... and tray baking M Nr 8 439 890 Rack For baking roasting and grilling can be turned over for height adjust ment M Nr 8 415 901 Grill pan oven tray extra deep Collects meat juices and is useful for baking cakes with deep fillings e g cakes with fresh fruit topping M Nr 8 439 920 Roasting filter For use when open roasting M Nr 3 939 160 Runners With non tip feature left right M Nr M Nr 8 415 920 8 4...

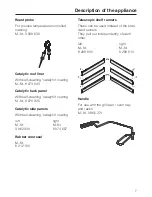
Page 7: ... Nr 8 076 925 Catalytic side panels With self cleaning catalytic coating left right M Nr M Nr 3 982 430 8 074 657 Rubber door seal M Nr 8 212 180 Telescopic shelf runners These can be used instead of the stan dard runners They pull out independently of each other left right M Nr M Nr 8 299 800 8 299 810 Handle For use with the grill pan oven tray and racks M Nr 3 985 271 Description of the applian...

Page 8: ... by incorrect installation or connection The electrical safety of this appli ance can only be guaranteed when continuity is complete between the ap pliance and an effective earthing sys tem which complies with local and na tional safety regulations It is most im portant that this basic safety require ment is tested by a qualified electrician The manufacturer cannot be held liable for the consequen...

Page 9: ...damage caused by incorrect or im proper use of the appliance Do not use the appliance to heat up the room Due to the high tem peratures radiated objects near the ap pliance could catch fire The life of the appliance could also be considerably reduced Do not let children access the ap pliance or its controls Supervise its use by the elderly or infirm If allowing older children to use the appliance ...

Page 10: ...s will increase considerably They can also cause damage to the appli ances e g by blocking the heat When heating up or cooking larger items of deep frozen food such as pizza place them directly on the rack Do not use the baking tray or grill pan oven tray as these can distort with the temperature fluctuations However smaller items of deep frozen food such as oven chips or potato croquettes can be ...

Page 11: ... supplied with the appliance Any other could damage the electronic controls The cover flap to the roast probe socket should be closed after use to protect the socket from moisture Wait until the appliance has cooled down before you do so to prevent the risk of burning yourself To prevent the risk of damage do not leave the roast probe in the oven when it is not being used When using the roast prob...

Page 12: ...verse circumstances the alcohol can catch light on the hot heating elements Alco hol should be burnt off before the dish is placed in the oven to avoid this dan ger When cleaning the roof of the oven wait until the grill element has cooled down before lowering it Danger of burning Appliance faults In the event of any damage or de fect switch the appliance off im mediately and disconnect from the m...

Page 13: ...troyed by thorough cooking therefore when cooking or reheating foods e g poultry it is particularly important that the food is fully cooked through If in doubt select a longer cooking or re heating time Do not use plastic containers These melt at high temperatures and could catch fire Before discarding an old appli ance switch off and disconnect it from the power supply Cut off and ren der any plu...

Page 14: ...nce is sup plied with this documentation It should be stuck into the space provided at the end of the instruction book Keep these instructions in a safe place for reference and pass them on to any future user Before using for the first time 14 ...

Page 15: ...s away please ensure they are of fered for recycling Old appliances contain materials which can be reclaimed or recycled Please contact your dealer your local waste collection centre or scrap merchant about potential recycling schemes Ensure that the appliance presents no danger to children while being stored for disposal Before discarding an old appliance switch off and disconnect it from the pow...

Page 16: ...amme selector to Top and Bot tom heat A and increase the pre set temperature from 190 C to 275 C see section on Adjusting the pre set temperature It is important to ensure that the room is well ventilated We recommend that you vacate the room while you are heating the oven up for the first time Metal components have a protective coating which may give off a slight smell when heated up for the firs...

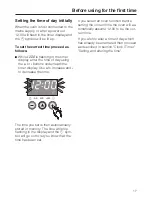
Page 17: ... display Use to increase and to decrease the time The time you set is then automatically stored in memory The time will stop flashing in the display and the m sym bol will go out to let you know that the time has been set It you select an oven function before setting the correct time the oven will au tomatically assume 12 00 to be the cor rect time If you wish to alter a time of day which has alre...

Page 18: ... mended temperature will appear in the temperature display See the section on Altering the pre set temperature for more information The oven will start heating up a few seconds later The temperature display will then alter nate to show the actual temperature in the oven e g 25 C The temperature display shows the temperature of the oven rising Operation 18 B C A D F G N m 0 ...

Page 19: ... gratin dishes meringues or browning soufflés n Infra red full grill 275 For toasting browning a top ping au gratin dishes and grilling under the full width of the grill m Economy grill 275 For toasting browning a top ping au gratin dishes and grilling under the inner grill area only F Intensive baking 160 For pizza savoury flans quiches cheesecakes N Fan Grill 165 For roasting larger joints of me...

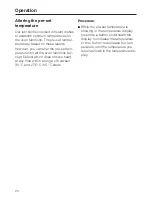
Page 20: ...t tem peratures for all the oven functions ex cept Defrost which does not use heat at any time within a range of between 30 C and 275 C in 5 C steps Procedure While the pre set temperature is showing in the temperature display press the button underneath the display to increase the temperature or the button to decrease the tem perature until the temperature you require shows in the temperature dis...

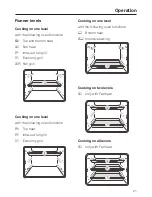
Page 21: ...conomy grill N Fan grill Cooking on one level with the following oven functions C Top heat n Infra red full grill m Economy grill Cooking on one level with the following oven functions B Bottom heat F Intensive baking Cooking on two levels D only with Fan heat Cooking on all levels D only with Fan heat Operation 21 b b d c b c d ...

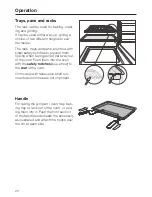
Page 22: ...ipping when being pulled part way out of the oven Push them into the oven with the safety notches see arrow to the rear of the oven On models with telescopic shelf run ners these notches are not important Handle For taking the grill pan oven tray bak ing tray or rack out of the oven or putt ing them into it Push the front section of the handle underneath the accessory as illustrated and attach the...

Page 23: ...oven is switched off then the oven cannot be switched on again If the safety lock is activated when the oven is in operation then the appli ance can only be used as follows The oven temperature which has al ready been set can be decreased but not increased Once the oven is switched off it can not be switched back on again Changing to another oven function automatically switches the oven off 0 will...

Page 24: ... lock is activated 0 ap pears briefly in the temperature display for a few seconds To de activate the safety lock Press the temperature button until the lock symbol a and 0 ap pear in the temperature display Press the button under the display The lock a symbol and 4 bars will appear in the display for a few sec onds The safety lock has now been de activated Operation 24 ...

Page 25: ... below 50 C After that it will switch off automatically Safety switch off Your oven is fitted with a safety switch off device in case you forget to switch it off yourself If the oven has been left on the same setting for an unusually long period of time it will switch itself off automatically Set Oven switches off Temperature automatically after up to 100 C 12 hours over 100 C 6 hours The fault me...

Page 26: ...50 60 50 70 150 170 150 170 150 170 150 170 60 80 50 70 50 70 50 70 Whisked mixture Thick flan base Thin flan base Swiss roll 175 190 175 190 175 190 35 45 25 35 15 20 150 170 150 170 150 170 35 45 25 35 15 20 Rubbed in mixture Biscuits Apple pie Cheese Cake 175 190 175 190 150 170 20 30 50 70 55 65 150 170 150 170 130 150 20 30 50 70 55 65 Egg white mixture Macaroon Meringue 130 150 100 110 30 50...

Page 27: ...as been pre heated the baking time can be reduced by up to 10 minutes Temperatures and times given are suggestions only and may vary ac cording to personal taste See the cookbook supplied with your oven for further details When baking on several levels at the same time using Fan heat baking times may need to be increased by about 5 10 minutes The roasting filter should be re moved when baking usin...

Page 28: ...ect the heat away so cakes take longer to cook and do not brown evenly Bread dough can be put in the oven to rise Turn the programme selector to Fan heat D and reduce the pre set tem perature to 30 C Cover the con tainer Energy saving tips When using Top and Bottom heat A only pre heat the oven if the baking time is less than 30 minutes or for mixes which require a pre heated oven e g biscuits Whe...

Page 29: ...Neck 80 90 68 75 C medium rare Shoulder 100 110 110 120 120 130 75 80 C well done Leg cut 100 110 110 120 120 130 75 80 C well done Fillet 45 55 55 60 60 65 60 65 C medium rare Lamb Rack of lamb 55 60 68 75 C medium rare Shoulder of lamb 130 140 75 80 C well done Poultry Chicken 50 60 well done Duck 80 90 90 100 well done Goose 120 150 80 85 C well done Turkey 130 150 80 85 C well done Game Saddle...

Page 30: ...system N Always defrost meat before cooking Never cook from frozen If adding salt to meat only do so shortly before roasting to prevent the meat losing its juices Since there is no need to baste when roasting with the Fan grill system N salt and seasoning should be rubbed into the meat before roasting Adding a little oil makes it easier to rub dry herbs into the meat Put joints for roasting e g po...

Page 31: ...tter taste If a recipe calls for broth stock or water to be added e g half way through cooking time this should al ways be heated first before adding to the roast Allow a standing time of approx 10 minutes after the end of cooking so that the meat juices are evenly dis tributed Tips on saving energy It is not necessary to pre heat the oven before roasting More than one piece of meat can be roasted...

Page 32: ...l oven functions except Defrost Infra red full grill and Economy grill If the meat is very heavily marbled with fat select the highest core temperature given in the roasting chart The roast probe should not be used for poultry or game birds as these contain a lot of bone Ensure that the roasting filter is fitted in front of the fan in the back of the oven when roasting on the rack or in an open di...

Page 33: ...s and that the tip is not sticking into a layer of fat Place the roast in the middle of the oven on the rack with the grill pan oven tray underneath or in the grill pan oven tray Raise cover flap and insert the probe plug into the socket until it engages Make sure the probe cable cannot come into contact with the grill ele ment Roasting 33 ...

Page 34: ...es separated by a colon The actual temperature of the meat e g 30 C lights up to the left of the colon Note that the display will only show an actual food temperature if it is above 20 C The final core temperature 80 C ap pears on the right of the colon If no further entries are made the oven will start automatically after a few sec onds using these settings The rise in temperature in the roast wi...

Page 35: ...as the two temperature val ues appear in the display use the or buttons to alter the pre set rec ommended final core temperature on the right of the colon in 1 C steps e g to 76 C The final core temperature can be al tered between 50 C and 99 C Altering the pre set recommended oven temperature The pre set recommended oven tem perature can only be changed if it is showing in the display If the core...

Page 36: ...lector to 0 immediately as the roast should be left to stand for a further 10 minutes in the warm oven This way the roast will retain more juices when it is carved At the end of the standing time a second audible tone will sound The roast can now be taken out of the oven and the programme selector turned to 0 Note during standing time the temper ature of a thick joint can rise by about 3 C and by ...

Page 37: ...ound the programme se lector goes out A few seconds later the actual time of day will reappear in the timer display and the f symbol will light up The temperature values e g 30 80 in the temperature display will go out and the e symbol will light up Once the start time has been reached the light ring around the programme se lector will come on and the oven will start In the temperature display the...

Page 38: ...a guide Tips on grilling Pre heat the grill n m for 5 10 min utes Select the Infra red full grill n for grilling several items across the whole width of the grill Select Economy grill m for grilling only in the centre of the grill Place the rack on the middle shelf level for thick cuts e g chicken pieces and on the top shelf level for thinner items e g steaks Always push the rack in as far as it w...

Page 39: ...l pan oven tray underneath the rack to catch the defrosted liquid so that the meat is not lying in this liquid It is particularly important to observe food hygiene rules when defrosting poultry Do not use the liquid from defrosted poultry Pour it away and wash the tray the sink and your hands Danger of salmonella Where possible remove the packag ing and put the food to be defrosted on a baking tra...

Page 40: ...are the fruit mushrooms or herbs and space them out on the parchment Do not overload the rack and only use one shelf level at a time to ensure sufficient drying Place the grill pan oven tray under neath to catch any drips of juice or moisture Select Fan heat D Lower the pre set temperature to be tween 40 80 C see chart Dry with the oven door closed If the food still feels slightly moist after the ...

Page 41: ...in the oven and place the covered dishes on the rack Select Fan heat D and lower the pre set temperature to between 40 60 C The yoghurt will be ready in about 5 hours Allow the yoghurt to cool and then place in the refrigerator where it will keep for approx 1 week It will not achieve its maximum set until it has been thoroughly chilled Yoghurt prepared in this way can be used to prepare new yoghur...

Page 42: ...e for longer Proceed as follows Place the plates on the rack or on the floor of the oven Switch on Fan heat D and then lower the pre set temper ature to between 60 70 C Individual items take approx 10 minutes and stacks of plates approx 20 min utes to warm up Warming plates 42 ...

Page 43: ...and energy saving Proceed as follows Place the various dishes next to one another or one above the other on the rack placed on the lowest runner level Ensure containers are suitable and that lids and handles are oven proof a Soup c Roast b Vegetables d Potatoes Meals 43 b c d e ...

Page 44: ...Then use the or buttons to alter the time shown If the time is being set for the first time please read the section Setting the time of day initially Setting and altering the time It is sometimes necessary to adjust the time e g from Winter to Summer time The time of day cannot be set if an oven programme has been selected Proceed as follows Press the timer button twice The m symbol will appear in...

Page 45: ...e set for the minute minder counts down unseen in the back ground At the end of the set time an audible tone will sound 5 times and the l sym bol will flash for approx 1 minute You can switch the audible tone and the flashing symbol l off early by pressing the button under the timer display To change Press the timer button The l symbol and the minute minder time will appear in the timer display Th...

Page 46: ... show that the oven is in automatic mode the g symbol lights up in the timer display The oven will switch itself off automati cally at the end of the set cooking time and an audible tone will sound several times The g symbol will flash in the timer display until the programme selector is turned to 0 An audible tone sounds once a minute to remind you to switch the oven off To change Press the timer...

Page 47: ...he relevant or buttons set the required end of cooking time e g to 12 00 Shortly after setting the time The display automatically reverts to showing the current time of day The g and symbols appear in the display to show you that the oven is op erating automatically The oven will not switch on until the start time it has calculated is reached e g 11 20 The light ring around the programme selector ...

Page 48: ...eaned using a mild solution of hot water with a little washing up liquid ap plied with a damp cloth Wipe dry using a soft cloth On aluminium ovens see data plate parts of the appliance front made from aluminium and the metal coloured lac quered controls are susceptible to damage from scratches and abrasion as well as from alkaline and acidic sub stances It is therefore essential to clean these wit...

Page 49: ...ll it off Start at a corner and take care around its fixing points To replace the seal Replace the seal and use a blunt knife to push the fixing points back into the holes in the frame of the oven Do not clean the seal in a dishwasher It should be cleaned by hand using a mild solution of hot water with a little washing up liquid applied with a sponge Wipe dry using a soft cloth Cleaning and care 4...

Page 50: ... shut the door until the raised levers touch the oven frame Holding the door evenly with both hands lift the door up and off the hinges To put the oven door back on Do the above in the reverse order Place the door on the hinges Open the door fully Then push the levers back down Close the door The oven door is heavy It should be gripped firmly at the sides when be ing removed or refitted Cleaning a...

Page 51: ...and the lay the oven door on the cloth with the inner glass panel a facing upwards and the oven handle facing towards you Maintain a gap of approx 30 cm be tween yourself and the edge of the door If you decide not to dismantle the door take extra care when disman tling the panels that the door does not drop open or close by mistake as this could result in damage to the glass panels Using both hand...

Page 52: ...y thoroughly with a soft cloth To reassemble Hold the middle panel b with the printed side on top Insert the middle panel b into the clips at the front d and then lower the panel carefully and locate se curely in position at the rear Slide in the middle panel b back as far as it will go Then push the inner panel a back into its retainer until it clicks into posi tion see detail Flip the top panel ...

Page 53: ...ened and stays on for some time before switching off If you want the oven light on for longer for cleaning the oven you can use the door contact to switch the lighting on again as often as necessary Proceed as follows Press the door contact see arrow in wards to switch the lighting on Cleaning and care 53 ...

Page 54: ...ouration of the sur faces Baking tray grill pan oven tray rack side runners The surfaces of these accessories have also been treated with the new PERFECTCLEAN enamel They should be cleaned after each use to preserve the very good anti stick properties Clean as described in the section on PERFECTCLEAN Food can be taken off it more easily and soiling from baking and roasting is easier to remove Howe...

Page 55: ...aning may even be come impossible Stubborn soiling e g from roasting should be soaked first and removed as soon as possible after cooking If nec essary use a soft sponge soft nylon brush or a scaper suitable for glass sur faces to loosen the soiling After cleaning rinse thoroughly with clean water The water must run off the surface easily Any residual cleaning agents will hinder this effect Using ...

Page 56: ...st temperature pos sible Run the oven for approximately 1 hour The length of time will depend on the level of soiling It is a good idea to set the finish time for the process using the timer see Switching off automatically This way you will not forget to switch the oven off at the end However deposits of spices syrups and similar substances are not re moved by the catalytic cleaning These are best...

Page 57: ...er Remove the side shelf runners Use a suitable screwdriver to loosen the screws in the back panel and re move the panel Insert a new panel and screw in firmly Re fit the side shelf runners and if required the roasting filter Do not operate the oven without the catalytic back panel fitted This could cause considerable injury To replace the catalytic side panels First remove the side runners as de ...

Page 58: ... C Socket E 14 Disconnect the appliance from the power supply Switch off at the isola tor or the mains fuse box See Warning and Safety Instructions Carefully remove the glass cover as shown in the illustration using a wide flat object e g a spatula if neces sary Take care to use even pressure as otherwise the glass could break and there would be danger of being injured Unscrew the lamp and replace...

Page 59: ...The tempera ture will fall faster with the door open the oven does not heat up after be ing switched on Check whether the safety lock is activated the timer has been programmed the mains fuse has blown If none of the above is the case then disconnect the appliance from the elec tricity supply for approx 1 minute To do this switch it off at the isolator or withdraw the mains fuse Reconnect to the m...

Page 60: ...inal position The oven will now con tinue to operate as normal If you wish to set a different oven func tion you must first turn the programme selector back to 0 and de activate the safety lock see the section on Safety lock You can then select a different oven function F and a number appear in the temperature display F05 F 06 The temperature thermostat is faulty This caused the oven to switch its...

Page 61: ...plate located inside the side compartment Ensure that these match the household mains sup ply Please quote these data and the model and serial number when contact ing the Miele Service dept Connection of this appliance should be made via a suitable isolator which com plies with national and local safety reg ulations and the on off switch should be easily accessible after the appliance has been bui...

Page 62: ... of this appliance can only be guaranteed when continu ity is complete between the appliance and an effective earthing system which complies with local and national regula tions It is most important that this basic safety requirement is tested by a quali fied electrician The manufacturer can not be held liable for the consequences of an inadequate earthing system such as an electric shock The manu...

Page 63: ...te the model and serial num ber of your appliance These are shown on the data plate located inside the side compartment Please note that telephone calls may be monitored and recorded to improve our service Data plate Space in which to stick the extra data plate supplied with the appliance Ensure that the model number is the same as the one on the front of these operating in structions After sales ...

Page 64: ...M Nr 05 741 710 V02 Alteration rights reserved 3902 This paper consists of cellulose which has been bleached without the use of chlorine ...

Reviews: