background image

Once you have entered all the contents for your custom CD, click on 

Create

to

start the "Image Writer". This module completes the process for generating the
new virtual CD.

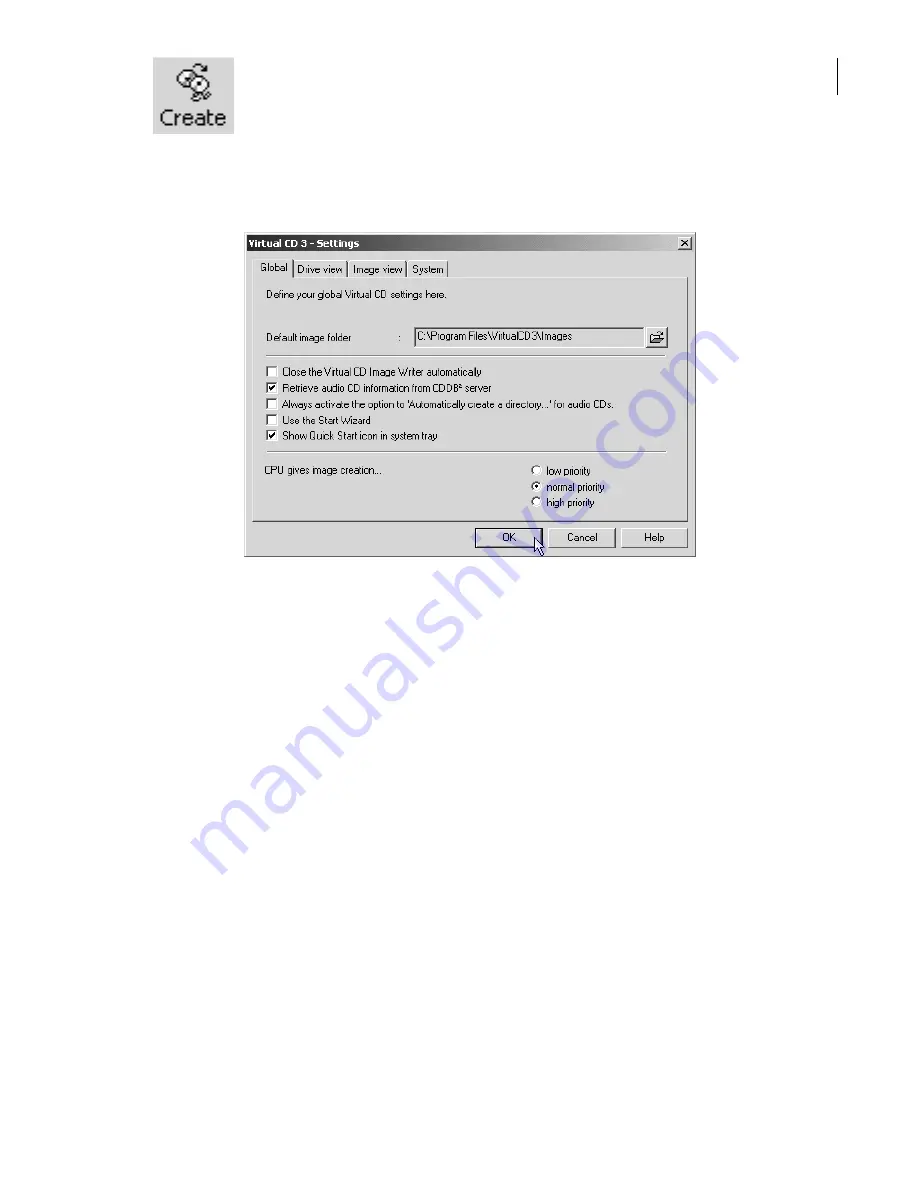
Global Virtual CD Settings

To configure your VCD program, select 

View 

-> 

Virtual CD settings

... in the Management program:

The 

Default image folder

defines which directory on your disk is automatically used for image

files. When you enter only a file name in the Image Wizard, without a path, the new image file is
stored here.

If you activate the option to 

Close Image Writer automatically

, the Image Writer closes as soon as

a new custom virtual CD has been written - unless an error occurs during writing, in which case the
Image Writer remains open and an error message is displayed.

The option to 

Retrieve audio CD information from CDDB server

enables Virtual CD to download

album and track titles as well as artists' names from the CDDB Service. If your computer does not
have Internet access, you should deactivate this option.

When you make a virtual CD, the Image Wizard offers to 

Automatically create a directory for the

new image file.

This is especially practical for music CDs, since the image file will contain separate

files for each audio track. The VCD global settings give you the option of having this function activa-
ted automatically for all audio CDs.

If the Start Wizard is active when you start VCD, a window opens listing the main programs and fun-
ctions so you can choose where to begin. The global setting lets you define whether this Wizard is
active or not.

The option to 

Show Quick Start icon in System Tray

lets you define whether this icon is added to

your system tray. By the way, the Quick Start module is also responsible for the hotkey functions
that automatically load virtual CDs, so if you suppress it in the system tray, these hotkeys will not
work.

The 

Priority

referred to in the last of the global settings defines how much processor time VCD is

allowed to occupy while creating virtual CDs.

17

Summary of Contents for VIRTUAL CD v3

Page 1: ...Manual Network Edition...

Page 2: ...hat are under license and you create multiple virtual images of such CDs or if you use a physical CD and a virtual version of the same CD simultaneously on different computers you may be in violation...

Page 3: ...on 6 First Steps 7 Creating a Virtual CD 7 Inserting a Virtual CD 13 Using the Virtual CD Management Program 13 Starting the Virtual CD Management Program 13 Deleting Virtual CDs 14 Adding Existing Vi...

Page 4: ...CDs on hard disks using highly efficient data compression techniques The first step is to create virtual CDs from your original CDs These are stored on your hard disk in container files also called i...

Page 5: ...nction System Requirements Virtual CD generally works on all systems that run Windows since it is a Windows device driver that requires few resources Your system should meet the following minimum spec...

Page 6: ...f this is not the case double click on My Computer in your Explorer and then on the symbol for the drive where you inserted the Virtual CD program CD Now you should see the contents of the program CD...

Page 7: ...t the original CD from which you want to create a virtual image into your CD drive Make sure the CD is not scratched or dirty Wait a few seconds for Windows to detect the CD Note Make sure the CD is n...

Page 8: ...to do this Virtual CD has to know which directory to store the new image file in and under what name Virtual CD will suggest a path which is actually a default you can configure in the Virtual CD Man...

Page 9: ...or music CDs so you won t have to worry about it again Click on Next to continue In this window you can select the tracks from the source CD to be included on the virtual CD This window also shows tec...

Page 10: ...nly a slight reduction in data volume it s best not to use data com pression at all select None This is because data compression uses up processor capacity not only when you create the virtual CD but...

Page 11: ...rference If this happens try the analog option With this option the CD is played and then recorded from the computer s sound card Use the Test recording function to check the volume settings Click on...

Page 12: ...leave this option de selected and have you load the CD manually when it s finished The Start program option is described in detail in the on line Help program Click on Finish to begin the actual copyi...

Page 13: ...mand a list of all your vir tual CDs is shown The one you choose here is loaded into the virtual CD drive selected Now you can work with your virtual CD as though it was a real CD Using the Virtual C...

Page 14: ...f you have a virtual CD that you no longer need you can delete it using the Virtual CD Management program Select the virtual CD you want to delete in the upper right hand window pane and click on the...

Page 15: ...n the Search button the following dialog box opens Enter the directory that the Manager should Search in and click on Start searching The image files found are listed in the lower half of the dialog b...

Page 16: ...CD the CD contents are shown here Select the desired track s The option to Store audio tracks in buffer is very useful if for example you want to create a virtual CD with tracks from different source...

Page 17: ...he CDDB Service If your computer does not have Internet access you should deactivate this option When you make a virtual CD the Image Wizard offers to Automatically create a directory for the new imag...

Page 18: ...d read me file under Start Programs Virtual CD 3 read me for assistance Up to date information about the program is posted our Web site at www virtualcd online com where you can also download any Serv...

Reviews: