background image


28 

Chapter 5: EDIT MENU 


5.1  CHANGING EDIT OPTIONS  

 
There are several sub-menus that let you edit the audio sources in the HD Block. To access these, you must 
be at the main audio screen that shows the selected track and times (sections 4.3 and 4.4), and have selected 
the track you want to edit and the Program List Switch must be set to OFF.  Then, do the following: 
 
1.  Press Play, then Pause, to enter track pause mode. 
2.  While paused, press 

Menu/Edit.


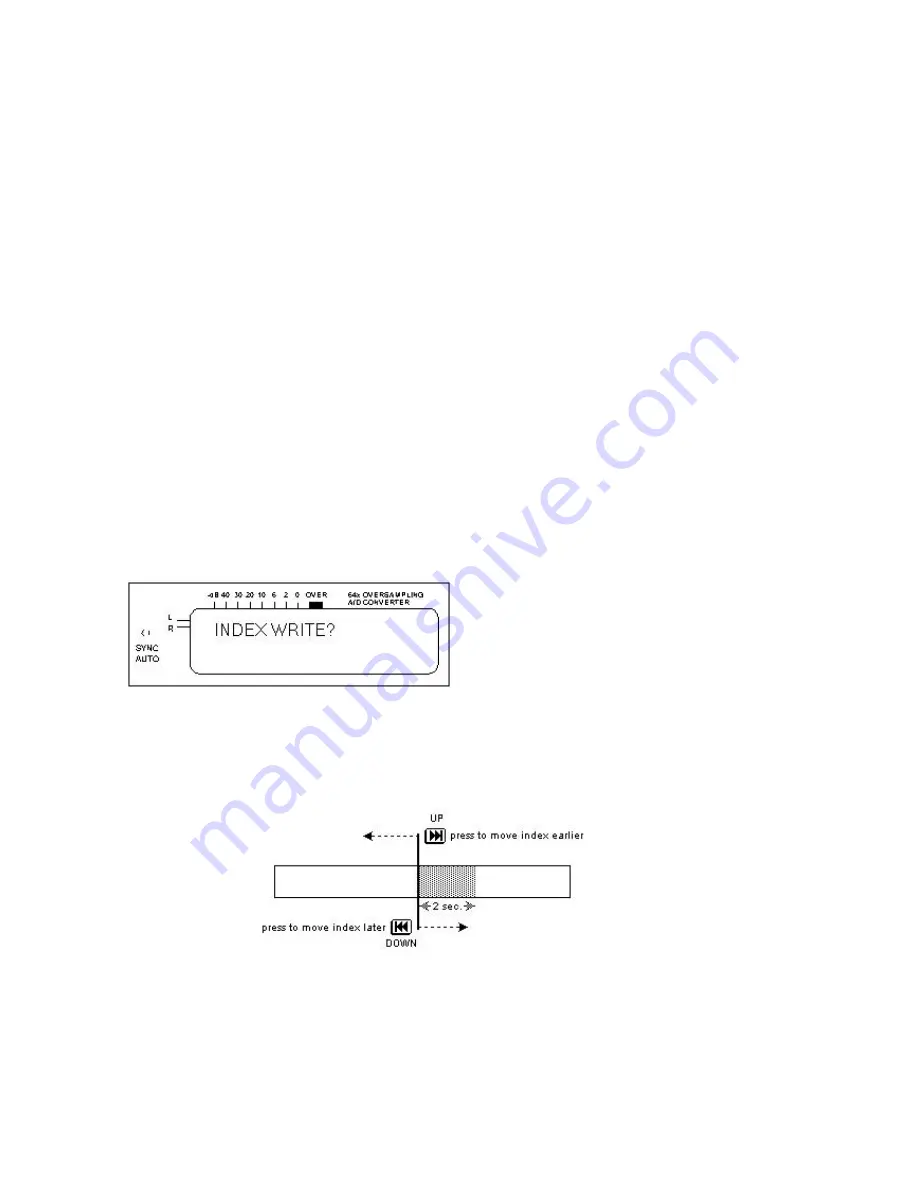
3.  The screen show 

INDEX WRITE?,

 the first edit menu.  

4.  Use the 

Down/Up

 buttons to cycle through the sub-menus that contain various edit options. 

5.  When the display shows the sub-menu with the desired edit menu, press 

OK/Enter. 

(To return the 

previous screen, press

 Cancel/Display

.) 

6.  Press 

OK/Enter

 to enter the changed edit menu parameter in the StartREC 400’s memory. 

 
Following is a list of edit sub-menus and their available parameters. These menus are available with the 
Play List set to OFF.  

5.1.1  INDEX WRITE 

 
You can divide one track into two by inserting a new index mark at the split point. Before entering into the 
Edit menu section, select where you want to write the Index mark. For example, to place an index mark in 
the middle of a long track, play up to that point, or press and hold the 

>>| 

and 

|<<

 buttons to fast forward 

or rewind respectively to the point where you want to write the index point. Then press 

Pause.


Note that index markers must be separated by more than 4 seconds. 


1.  At the 

INDEX WRITE?

 Screen, press 

OK/Enter.


2.  The 

TRACK?

 prompt appears. 

3.  Press 

OK/Enter

.

 A sample of the audio will play, starting with where the index point will be entered, 

and playing for two seconds past that point. To move the index point earlier, press the 

Up

 button 

repeatedly until the audio sample plays back from the desired point. To move the index point later, 
similarly press the 

Down

 button. The following diagram shows graphically how to edit the index point. 


4.  Press 

Cancel/Display

 if you want to cancel the index marking process.   

5.  If you do not press the 

Down 

or 

Up

 button during six “loops” of the two-second audio segment, the 

index marker will be written automatically. You may also press 

OK/Enter

 at any time to enter the 

index marker immediately. 

Summary of Contents for StartREC

Page 1: ...Reference Manual Microboards 1721 Lake Drive West Chanhassen MN 55317 Phone 952 556 1614 Fax 952 556 1620 Web http www microboards com...

Page 2: ...XLR connector 8 2 Coaxial SPDIF format digital audio RCA phono connector 8 3 Optical SPDIF format digital audio TOSLINK 8 4 Balanced analog audio XLR connectors 8 5 Unbalanced analog audio RCA phono c...

Page 3: ...ASE ALL 25 4 5 3 SCMS CHANGE 25 4 5 4 REC MODE CHANGE 25 4 5 5 SILENCE CHANGE 26 4 5 6 PROGRAM LIST FEATURE 26 4 6 PLAY AND RECORD TIME DISPLAYS 27 CHAPTER 5 EDIT MENU 28 5 1 CHANGING EDIT OPTIONS 28...

Page 4: ...3 This page is left blank intentionally...

Page 5: ...audio professionals we are sure you will find it a valuable partner in your work For StartREC 400 news and updates visit the Microboards web site at www microboards com 1 2 PACKAGE CONTENTS Your pack...

Page 6: ...ww microboards com mail Microboards 1721 Lake Drive West Chanhassen MN 55317 If calling please have your StartREC 400 powered up and near your phone to expedite the troubleshooting process 1 5 CONVENT...

Page 7: ...utomatically Auto Mark mode upon receiving a signal at any digital input It will also place an index marker at the beginning of the audio The Sync Rec LED indicates that Auto Mark is active If the LED...

Page 8: ...When editing parameters this button steps forward through functions and parameters 10 Edit Menu switch Press this switch repeatedly to cycle through the three main top level editing modes Audio Track...

Page 9: ...Phones Level control You can monitor the HD audio this control sets the level 18 Phones jack Plug in headphones here Low impedance headphones will give somewhat lower level than higher impedance head...

Page 10: ...the internal HD to the CD Recorder drives Supported formats include standard audio Red Book Windows data Macintosh data Multi Session etc Optional verification comparison is also available Audio Sets...

Page 11: ...he display will state HD A to CD 10 Press Cancel The display will state Copy Start HD A to CD 11 Place blank CD R discs into the CD Recorder drives and close the trays 12 Wait for the busy lights to g...

Page 12: ...Menu Copy Menu or Trk Ext Menu Press the Menu button until the Trk Ext Menu is displayed 3 Press the OK Enterbutton to load the Trk Ext Menu 4 Place the Master CD you with to extract audio from into t...

Page 13: ...oggle among the Audio Copy and Track Extract menus press the Menu Editbutton To toggle between these jobs press the Cancel Display button 2 2 MAKING CD COPIES You will likely want to change some of th...

Page 14: ...that the StartREC 400 can also verify or copy verify CDs using the CD DA format However audio data entering the system via the Audio menu changes the CD s TOC so thatit cannot be verified against the...

Page 15: ...ERWRITEerases all data within that Block This data cannot be recovered Make sure you copy the Block data to at least one CD if you will need to use this data later The data in other Blocks remains int...

Page 16: ...WRITE SPEED x2 Writes data twice as fast as real time e g duplicating a 60 minute audio CD takes approximately 30 minutes WRITE SPEED x1 Writes data in real time e g duplicating a 60 minute audio CD t...

Page 17: ...gnized formats CD G FORMAT Select this if the CD to be copied uses the CD G format Note The StartREC 400 defines CD EXTRA and ENHANCED CD formats as 1st track CD DA 2 nd track CD ROM XA If your CD EXT...

Page 18: ...Track Extraction session exiting the session automatically fixes the CD and no more tracks can be added This is true even if you remove the CD and use it in a computer with software designed for multi...

Page 19: ...Following is a list of sub menus and their parameters 3 3 1 MODE CHANGE This defines the copy destination the extraction source is always the source CD drive After pressing OK Enter at the MODE CHANG...

Page 20: ...Blocks remains intact 3 3 3 SUB INDEX After pressing OK Enter at the SUB INDEX prompt select from the following options with the Down Up buttons ON Extracts Sub Index information from the source CD to...

Page 21: ...y shows DISC ANALYZE Press OK Enter StartREC 400 now analyzes the source CD This may take a few seconds The Select Track display appears The top line shows the track number total track time and cumula...

Page 22: ...tartREC 400 compares the target media s capacity with the total time for the selected tracks If you mix media with different capacities e g 74 and 80 minute recordable CDs StartREC will write only as...

Page 23: ...ected to the StartREC 400 monitoring system audio source etc before patching them together Never turn off the StartREC 400 while it is recording Microboards strongly recommends purchasing an uninterru...

Page 24: ...ain audio screen which shows the track number and total recorded time Initially this will show T00 000 00 2 Each press of the Inputswitch cycles through the available audio inputs AES EBU format digit...

Page 25: ...t any settings you change are retained indefinitely unless you change them again or load new firmware Following is a list of sub menus and their available parameters 4 5 1 HD BLOCK CHANGE The StartREC...

Page 26: ...Block 4 5 3 SCMS CHANGE Note This function is not available in firmware versions 1 00b or below Please check with Microboards for upgrade availability The StartREC 400 ignores SCMS Serial Copy Managem...

Page 27: ...and the display reverts to the main SILENCE CHANGE screen 4 5 6 PROGRAM LIST FEATURE This menu enables or disables the StartREC Program List feature SW ON enables the Program List SW OFF disables Prog...

Page 28: ...TOT mmm ss Total remaining time all tracks TOT XX mmm ss Total time of all tracks this does not vary while playing REM mmm ss Remaining Block capacity While recording pressing Cancel Display toggles...

Page 29: ...serting a new index mark at the split point Before entering into the Edit menu section select where you want to write the Index mark For example to place an index mark in the middle of a long track pl...

Page 30: ...d unless you first move one or both of the tracks section 5 1 3 so that they are consecutive Note If your copied CD has too many index marks exceeding the maximum of 99 allowed by the Red Book CD stan...

Page 31: ...ACK You can erase the track that is currently paused When recording pressing Cancel Display after the REM display will end recording and update the Table of Contents CAUTION This function erases the t...

Page 32: ...ny track recorded on HD The fade time is variable from 1 to 15 seconds 1 Before entering the Edit menu section use the transport controls to locate the position where the fade out should start 2 Press...

Page 33: ...t alter hard disk data Once you execute a fade the original audio cannot be recovered 3 At the FADE IN screen press OK Enter 4 The FADE IN 3Sec default prompt appears 5 Press the Upbutton to increase...

Page 34: ...pgrade the StartREC 400 1 Press and hold the OK ENTERkey while turning on power to the StartREC 400 2 Keep holding the key until the display shows PROGRAM DISC to MASTER DRIVE 3 The Master CD tray ope...

Page 35: ...it powered up on for a while then restart it All inserted target discs are not copied Check ifthe problematic target drive s busy LEDs lights up after inserting the target disc If not the drive or con...

Page 36: ...D ERROR There has been an error reading the CD in the master drive This could be caused by dirt on the CD NOT PROGRAM DISC The disc that is loaded is not a firmware disc for upgrading the StartREC 400...

Page 37: ...NGE 24 00 INVALID FIELD IN CDB 25 00 LOGICAL UNIT NOT SUPPORTED 26 00 INVALID FIELD IN PARAMETER LIST 28 00 NOT READY TO READY TRANSITION 29 00 POWER ON RESET OR BUS DEVICE RESET OCCURRED 2A 01 MODE P...

Page 38: ...LE SERVO FAILURE 09 04 HEAD SELECT FAULT 0A 00 ERROR LOG OVERFLOW 0B 00 WARNING 0B 01 WARNING SPECIFIED TEMPERATURE EXCEEDED 0B 02 WARNING ENCLOSURE DEGRADED 0C 00 WRITEERROR 0C 07 WRITE ERROR RECOVER...

Page 39: ...05 PERMANENT WRITE PROTECT 28 00 NOT READY TO READY CHANGE MEDIUM MAY HAVECHANGED 28 01 IMPORT OR EXPORT ELEMENT ACCESSED 29 00 POWER ON RESET OR BUS DEVICE RESET OCCURRED 29 01 POWER ON OCCURRED 29...

Page 40: ...DIAGNOSTIC FAILURE ON COMPONENT NN 80H FFH 43 00 MESSAGE ERROR 44 00 INTERNAL TARGET FAILURE 45 00 SELECT OR RESELECT FAILURE 46 00 UNSUCCESSFUL SOFT RESET 47 00 SCSIPARITYERROR 48 00 INITIATOR DETEC...

Page 41: ...ESSION FIXATION ERROR 72 01 SESSION FIXATION ERROR WRITING LEAD IN 72 02 SESSION FIXATION ERROR WRITING LEAD OUT 72 03 SESSION FIXATION ERROR INCOMPLETE TRACK IN SESSION 72 04 EMPTY OR PARTIALLY WRITT...

Page 42: ...41 OPERATIONAL FLOW CHART...

Reviews: