background image


 Assembly and Installation 


Installing Ink Cartridges 

Supported Ink Cartridges 

The PF-3 Print Factory uses 1 tri-color ink cartridge and 1 black ink cartridge.  The part numbers for 
these cartridges are V102C (color) and V101B (black).  If other cartridges are installed, the PF-3 Print 
Factory will not function.  These cartridges are available from any Microboards reseller. 

Refill kits or non-Microboards ink cartridges are not recommended for use in the PF-3 Print 

Factory system.  Use of non-Microboards cartridges will cause the printer to fail.  Use of 
refilled cartridges may cause the PF-3 Print Factory to fail and may affect your warranty. 

Loading / Replacing Ink Cartridges 

Cartridges can be changed while the PF-3 Print Factory is on.  The Out of Ink LED will light if any 
cartridge is beginning to run low on ink. 


With the printer on, open the front cover and wait for the print carriage to move to the center 
of the printer.  


Lift the cartridge latch by lifting the center of the front of the latch.     


If replacing an empty ink cartridge, remove the cartridge that needs changing by sliding the 
cartridge towards the front of the Printer. 


Remove each new print cartridge to be installed from its packaging.  


Remove the protective covering from the printheads before installing the cartridges. 


Slide the correct ink cartridge into the correct slot – color on the left, black on the right. 

  Lower the cartridge latch until it locks into place by applying gentle pressure to the finger 

depression.  

Do not try to force the latch down.


Close the front cover.   

Any time you change ink cartridges, you should always wait until the printer has primed the 
cartridges before sending it a print job.  The priming cycle will take 70-80 seconds to complete 
after the door is closed. 


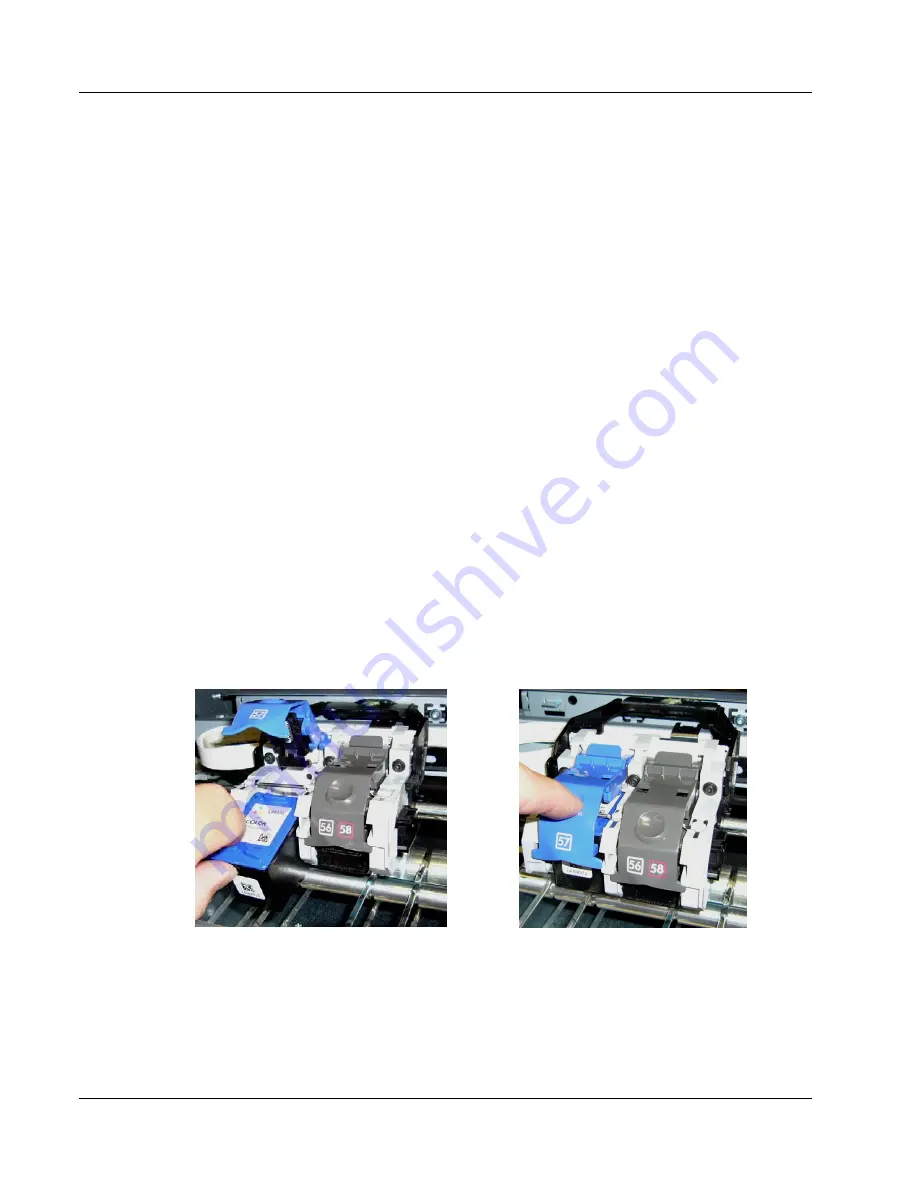
Lowering the Cartridge Latch


The latch on the right in is the 

correct position.  The left latch is 

being closed. 

Inserting or Removing a Cartridge


After lifting the cartridge latch,  

slide the cartridge back to insert,  

or forward to remove. 

Summary of Contents for PF3-1000

Page 1: ...PF 3 Print Factory For Microsoft Windows Vista XP 2000 Users Manual Microboards Technology LLC Version 2 00 ...

Page 2: ... Introduction 2 ...

Page 3: ...ecommendations 12 COLOR TAB 13 Color Options 13 Color Space 13 DIAMETER SETTINGS TAB 13 INK TAB 14 ALIGNMENT TAB 14 Alignment 14 ABOUT TAB 14 THE MICROBOARDS PRINTER TOOLBOX 15 CLEANING 15 PEN CALIBRATION 15 AUTOMATIC MARGIN CALIBRATION 16 PRINT TEST DISC 16 EXERCISE BELT 16 USING SURETHING DISC LABELER 16 Creating New Labels 16 Printing Labels 16 SOFTWARE RE INSTALLATION 17 TOOLBOX RE INSTALLATIO...

Page 4: ... Introduction 4 ...

Page 5: ...he ability to print at 4800 x 1200 dpi on both DVD and CD media With the included design software users can enjoy its benefits whether making a few discs or a few hundred What s Included When unpacking your PF 3 Print Factory system the following items should be included PF 3 Print Factory print system PF 3 Print Factory Quick Start Guide Users Manual This document Power Cord USB 2 0 Printer Cable...

Page 6: ...d confirm you received all of the items Place the PF 3 Print Factory on a stable flat surface You will need room both in front and behind the system as discs will be accessed from both locations Install the 2 long input bin posts into the input hopper by screwing them down onto the screw mounts on the left side of the input hopper Install the wide post on the right side of the input hopper Install...

Page 7: ...flash amber when a media feed issue is occurring o Out of Ink LED This LED will be on if the cartridges are missing or if there is an issue with either of the cartridges Loading Discs The PF 3 Print Factory will accept CD or DVD 120 mm 12 cm inkjet printable discs If the disc does not have an inkjet printable surface the ink will not adhere to the surface of the disc The PF 3 Print Factory will on...

Page 8: ...e to the center of the printer Lift the cartridge latch by lifting the center of the front of the latch If replacing an empty ink cartridge remove the cartridge that needs changing by sliding the cartridge towards the front of the Printer Remove each new print cartridge to be installed from its packaging Remove the protective covering from the printheads before installing the cartridges Slide the ...

Page 9: ...erform these steps 1 Open the front door of the PF 3 Print Factory 2 When the carriage moves to center remove the ink cartridge specified in the message 3 Replace the cartridge and close the front door 4 Press the Cancel button on the front printer control panel 5 Wait for the printer to prime the cartridge The priming cycle will take approximately 70 80 seconds to complete Do not perform the next...

Page 10: ...eference Guide will show you the order in which the installation will occur Installation should always be done when logged in as a user with full Administrator rights Connecting to a PC DO NOT CONNECT YOUR PF 3 PRINT FACTORY TO A COMPUTER BEFORE RUNNING THE INSTALLER LOCATED ON THE INSTALLATION DISK The connection between the PC and the Microboards PF 3 Print Factory is done with one USB cable 1 C...

Page 11: ...e installed the hardware will need to be installed using the Hardware Wizard Please follow the directions below Windows XP Hardware Installation The Windows Found New Hardware Wizard will appear during any installation including when using the Installer Please follow all directions in the order in which they appear when using the Installer Insert the Microboards PF 3 Print Factory CD into a drive ...

Page 12: ...ck each tab to see the available settings Print Quality Tab The Print Quality tab controls the print resolution Print Modes Text and Graphics Photo Print Quality Max DPI Photo Only Best Normal Fast Normal Printing Recommendations Text and Graphics mode is used for printing mainly text information and small graphics Photo Mode should be used when printing on the entire disc a quality setting of Bes...

Page 13: ...of printable surface area available on media without having to modify the print image itself Moving from non hub printable media to hub printable media for instance would only require that you lower the Inner Diameter setting The Enable Masking option must be checked to use this feature The Outer and Inner Diameters will change the size of the area to be printed To avoid excessive ink buildup thes...

Page 14: ...ining Also on the Ink tab are the Ink Cartridge Replacement model numbers Alignment Tab The Alignment tab allows you to change the printer alignment Alignment The Resolution setting will specify whether the alignment values are measured in 1mm or 0 1mm increments The 0 1mm setting is more precise and should always be used The Alignment values will move the print image on the disc Increasing the To...

Page 15: ...ink and taking the least amount of time to complete Clean uses more ink and takes more time Super Clean uses the most ink and takes the longest time to complete After each of the cleanings a disc will be printed to verify the cleaning results Running this process more than once may be required if the quality does not improve after cleaning one time Pen Calibration The print pens may occasionally n...

Page 16: ...any media for this utility Using SureThing Disc Labeler SureThing Disc Labeler is included with the PF 3 Print Factory and will be installed during the PF 3 Installation For more information on using SureThing please refer to the SureThing Help menu Creating New Labels Any label you create in SureThing must use the Microboards template to print correctly 1 To create a new label either click New Pr...

Page 17: ...ation of the Toolbox can be verified by the presence of the Toolbox icon on your Windows desktop There are 2 methods of reinstalling the Toolbox should the need arise A Recommended Load the Installation CD and select the Repair option when the installer starts Click the Microboards PF 3 Toolbox button to reinstall the Toolbox or the Install Both Applications button to reinstall both SureThing Disc...

Page 18: ...ange the default Install directory it can be done here Click Next when completed 4 Click Next to add a shortcut in the Start Menu 5 Choose to add an icon to your desktop and or a folder in the Start Menu Once selected click Next 6 Click Install to begin copying the files 7 Remove the check to launch SureThing at this time then click Finish B Alternately you can open the Applications directory on t...

Page 19: ...2 possible causes 1 If there are gaps or overlaps when printing you may be printing Text Graphics mode Change Mode to Photo See page 12 for details 2 The print pens may need to be recalibrated Please refer to page 13 for details Printing off the Printable Surface If the print image is printing off the printable surface of the media there are 2 possible causes 1 The printer is not aligned correctly...

Page 20: ...nel 5 Wait for the printer to prime the cartridge The priming cycle will take approximately 70 80 seconds to complete Do not perform the next step until the priming cycle completes 6 After the disc ejects click the OK button on the Out of Ink message If you do not wait for the cartridge priming cycle to complete and you have additional print jobs waiting in the print queue you may have to clear th...

Page 21: ...th the limits for a Class B digital device pursuant to Part 15 of the FCC Rules These limits are designed to provide reasonable protection against harmful interference in a residential installation This equipment generates uses and can radiate radio frequency energy and if not installed and used in accordance with the instructions may cause harmful interference to radio communications However ther...

Page 22: ...52 556 1628 support microboards com www microboards com Europe PH 44 0 845 230 7800 www microboards co uk Japan PH 03 3561 2266 www microboards co jp Please have the Model and Serial Number of your PF 3 Print Factory available when contacting Technical Support Date of Purchase Place Purchased Serial Number Replacement Ink Cartridges V102C color and V101B black Notes ...

Page 23: ...MICROBOARDS TECHNOLOGY LLC PF 3 PRINT FACTORY 23 ...

Reviews: