16
10.1.2 - Checking settings via a radio transmitter
With a radio transmitter memorised in Mode 1 the user can check settings
at any time for each parameter, as follows:
To display the parameters, see Table 5:
01.
Press T1 and T2 simultaneously on the radio transmitter for at least
5 s.
02.
Release the two keys.
03.
Within three seconds, complete the action as specified in
Table 5
according to the parameter to be checked.
04.
Release the key when the flashing light starts to flash.
05.
Count the number of flashes and, according to the number, check
the corresponding value on Table 3.
Example: After pressing T1 and T2 for 5 s followed by T1, if the flashing
light flashes three times, the pause time is set at 40 s.
To display the parameters, see Table 6:
01.
Press T1 and T3 simultaneously on the radio transmitter for at least
5 s.
02.
Release the two keys.
03.
Within three seconds, complete the action as specified in
Table 6
according to the parameter to be checked.
04.
Release the key when the flashing light starts to flash.
05.
Count the number of flashes and, according to the number, check
the corresponding value on Table 4.
10.2 - OPTIONAL ACCESSORIES
As well as the devices in WS2S, there are a number of optional accessories
which may be used to integrate the automation system.
PR1:
24 V buffer battery; in the event of a mains power failure, this guar-
antees at least 10 complete cycles.
PF:
24 V solar power system; useful in cases in which there is no electri-
cal mains power.
PT50:
Pair of columns (height 500 mm) with photocell
PT100:
Pair of columns (height 1,000 mm) with two photocells
For information on the new accessories, refer to the MHOUSE catalogue
or visit the website www.mhouse.com.
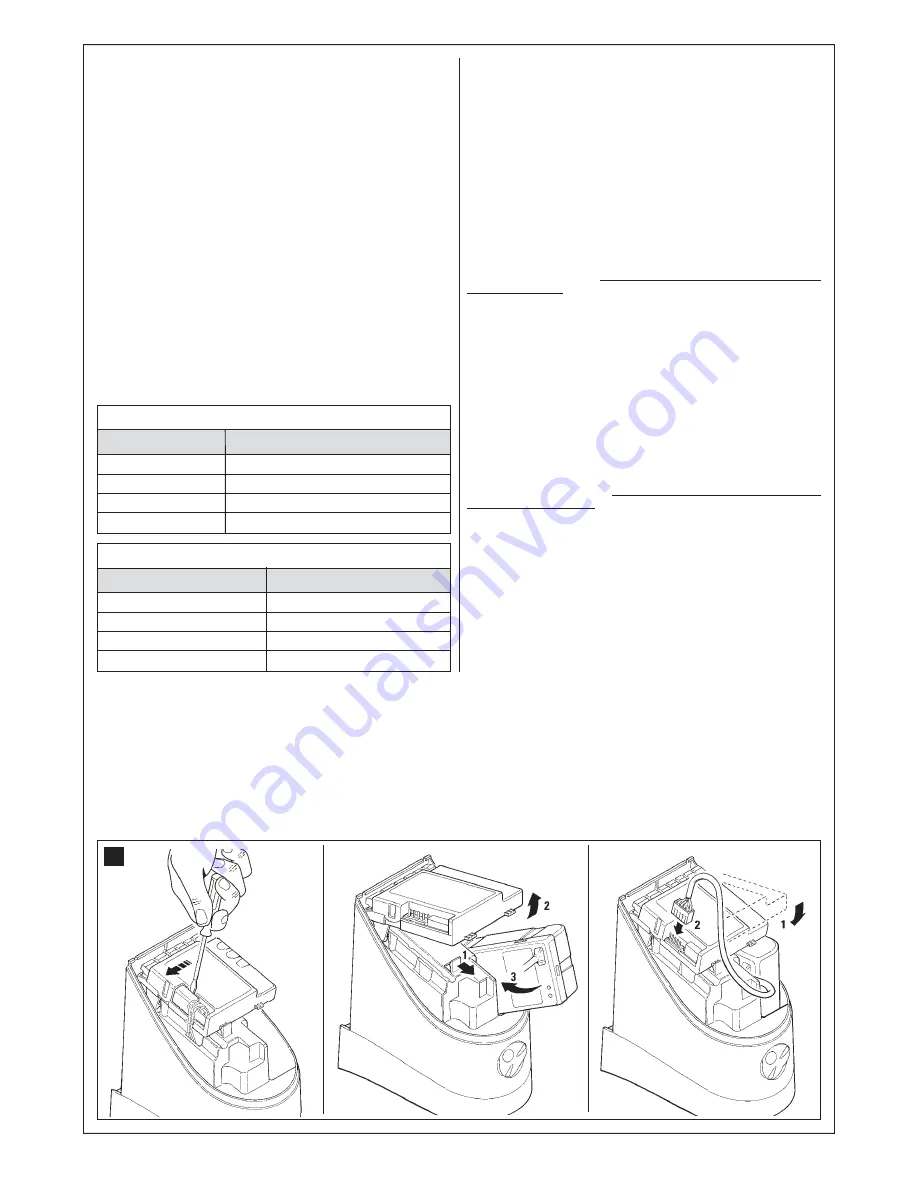
10.2.1 - Installing the PR1 buffer battery (fig. 31)
CAUTION! - The electric connection of the battery to the control
unit must only be made after completing all installation and pro-
gramming phases, as the battery constitutes an emergency power
supply.
To install and connect the buffer battery PR1 to the control unit, refer to
fig. 31
and the PR1 instruction manual.
When the automation is powered by the buffer battery, 60 seconds after
a manoeuvre is completed, the control unit automatically switches off the
output “ECSbus” (and all connected devices), output Flash and all leds,
with the exception of the ECSbus led, which flashes at slower intervals;
this indicates the “Standby” function. When the control unit receives a
command, it restores normal operation (with a short delay). This function
is used to reduce consumption; an important factor when the unit is pow-
ered by battery.
10.2.2 - Installing the PF solar power supply system (fig. 32)
CAUTION! - When the automation is powered exclusively by the
solar power system “PF”, IT MUST NEVER BE POWERED at the
same time by the mains.
To connect the PF solar power system to the control unit, refer to
fig. 32
and the PF instruction manual.
When the automation is powered by the solar panel, 60 seconds after a
manoeuvre is completed, the control unit automatically switches off the
output “ECSbus” (and all connected devices), output Flash and all leds,
with the exception of the ECSbus led, which flashes at slower intervals;
this indicates the “Standby” function. When the control unit receives a
command, it restores normal operation (with a short delay). This function
is used to reduce consumption; an important factor when the unit is pow-
ered by photovoltaic panels.
31
1
2
3
Parameter
Pause Time
Pedestrian opening
Motor force
“OPEN” function
Action
Press T1 and hold it down
Press T2 and hold it down
Press T3 and hold it down
Press T4 and hold it down
TABLE 5
Parameter
Discharge on closing Motor 1
Discharge on opening Motor 1
Discharge on closing Motor 2
Discharge on opening Motor 2
Action
Press T1 and hold it down
Press T2 and hold it down
Press T3 and hold it down
Press T4 and hold it down
TABLE 6
Summary of Contents for MhouseKit WS2S
Page 2: ......
Page 7: ...5 D G B C D D E F a d g d e f b b c 1 3 4 5 A B E H F I 2 L G D C A...
Page 9: ...7 8 10 NO 11 E D C 12 13 9 A B F G...
Page 10: ...8 M L 15 17 N O P 16 Blue Yellow Green Brown 18 19 I 14 H H...
Page 30: ...28...
Page 34: ......
Page 35: ......


