MGI Zip Navigator AT User Manual Download Page 3

1.0 Registration

It is important you register your MGI Zip Navigator AT online 
immediately as registration:

•  Records your Zip Navigator AT for warranty purposes
•  Speeds up any servicing required on your Zip Navigator AT
•  Assists us to contact you with any updates to your  
 

Zip Navigator AT

To register your Zip Navigator AT, visit 

www.mgigolf.com

You will need to record your MGI serial number. This is found on 
the Zip Navigator AT battery base or in the top box compartment.

Please keep this user manual on file for your own reference  
and a copy of your serial number;

My MGI Zip Navigator AT Serial Number is


[example AZXAT1190001234]

Purchased Date

 /  / 

You may be required to show proof of purchase so we 
recommend you keep your receipt with this manual.
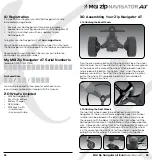
2.0 What‘s Included

•  MGI Zip Navigator AT
•  24v Lithium Battery
•  Battery Charger
•  GPS Holder
•  MGI Pouch with: 
 

– User Manual 


– Accessory Guide

3.0 Assembling Your Zip Navigator AT


3.1 Attaching the Rear Wheels

Press the grey release button on the wheel hub. Place the wheel 
onto the axle. You will need to match up the inner female groove 
on the axle and the male of the wheel. When placed in position 
simply release the button. You hear a “click” when the wheel is 
properly secured. To check that the wheel is properly in position 
pull on the wheel. If it is properly in position it will not slide off. 
Repeat for the other wheel.

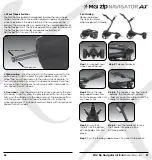
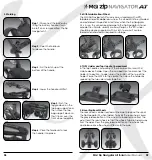
3.2 Attaching the Front Wheels

The two front wheels need to be attached to your MGI Zip 
Navigator AT. There is no difference between each front wheel 
so either can be placed on the left or right side. Simply line up 
the silver pin (with the black O Ring) on the front wheel with the 
Zip Navigator AT and push into the frame until you hear a positive 
click. A black button at the front of the Zip Navigator AT frame just 
above the wheel connection will pop out to confirm the wheel 
is in the correct position. You can test the wheel is in position by 
pulling firmly on the wheel. It should not move out of position. 

04


MGI Zip Navigator All Terrain 

User Manual


05

Black O Ring

Black  

Button

Summary of Contents for Zip Navigator AT

Page 1: ...User Manual VERSION 3 0 ...

Page 2: ... Included 04 3 0 Assembling Your Zip Navigator AT 05 3 1 Attaching the Rear Wheels 05 3 2 Attaching the Front Wheels 05 3 3 Rear Wheel Positions 06 3 4 Unfolding 07 3 5 Folding 08 3 6 Fifth Foldable Rear Wheel 09 3 7 GPS Holder and Top Handle Compartment 09 3 8 Inverting Rear Wheels 09 4 0 Battery Charging Connection 10 4 1 Initial Charge 10 4 2 Connecting the Battery onto the Zip Navigator AT 10 ...

Page 3: ...ttaching the Rear Wheels Press the grey release button on the wheel hub Place the wheel onto the axle You will need to match up the inner female groove on the axle and the male of the wheel When placed in position simply release the button You hear a click when the wheel is properly secured To check that the wheel is properly in position pull on the wheel If it is properly in position it will not ...

Page 4: ...k the wheel into the groove closest to the end of the axle To do this press the grey release button on the wheel hub push the wheel on to the axle and push the release button onto the groove To test for free wheel position try rolling the wheel backwards The wheel should spin freely with no resistance Repeat for both wheels 3 4 Unfolding Please see below the steps to unfold a Zip Navigator AT Hand...

Page 5: ...ezing the two sides closer together 3 8 Inverting Rear Wheels The rear wheels can be inverted on the axle to reduce the size of the Zip Navigator AT when folded To invert the rear wheels press the grey release button on the wheels hub and remove from the axle Invert the rear wheels so that the wheels hub protrudes away from the axles Press the grey release button on the wheels hub and release once...

Page 6: ...g the Battery after use Disconnect the battery by lifting the handle The battery can be left on or removed from the Zip Navigator AT for charging Plug the charger AC lead into a power point the green LED illuminates to indicate the charger is on Plug the charger output connection into the connector on the front of the battery the red LED illuminates to indicate charging When the charging LED indic...

Page 7: ...ce again please note that the battery will still be connected to the Zip Navigator AT and will continue to drain whilst connected 4 To reactivate the Top Box Display whilst the battery is connected hold down the Start Stop Speed Control Button and Left Hand Distance Mode Button for four seconds and the display will turn on thereby enabling the Top Box 5 To fully shut down the Zip Navigator AT and ...

Page 8: ...ight will stay on and stop flashing To charge the remote plug the USB cord into the USB port at the base of the remote as pictured in the diagram The cable then needs to be plugged into your PC or Laptop for charging Alternatively you can plug the cable into an AC adaptor not provided To check the level of power in the remote press any button to talk to the digital top box and the remote control b...

Page 9: ...to be paired as follows 1 Disconnect the Zip Navigator AT battery 2 Hold down the Stop Button on the remote until both the lock and unlock buttons are illuminated then release the Stop Button 3 Reconnect the Zip Navigator AT battery 4 The remote will synchronise with the Top Box the process will be complete once the lock and unlock buttons are no longer illuminated Please note if you do not connec...

Page 10: ...authorised service centre is to replace parts that are part of the maintenance schedule the owner will be charged for the parts and labour If the work to be carried out is part of warranty MGI will bear the cost 10 1 Cleaning Your Zip Navigator AT See Maintenance Schedule For years of good operation your Zip Navigator AT requires care and attention Keep your Zip Navigator AT clean by using a cloth...

Page 11: ...Replace upper and lower bag straps BO BO Zip Navigator AT owner can carry out this work SC Charged work to be carried by approved service centre BO SC The six monthly service can be completed by either an authorised service centre or the owner of the Zip Navigator AT 10 6 Service Record 6 month inspection Date Invoice Serviced by Signature 1 year inspection Date Invoice Serviced by Signature 1 yea...

Page 12: ...ocate you local service centre MGI USA Service Email serviceusa mgigolf com Live Chat visit www mgigolf com Telephone 1800 617 2990 Servicing Enquiries Telephone 1888 391 0200 MGI GLOBAL Sales Email globalsales mgigolf com Service Email customerservice mgigolf com Live Chat visit www mgigolf com 14 0 Contacting Local Agent Please refer to www mgigolf com to find the distributor in your country 15 ...

Page 13: ... MGI USA T 1800 617 2990 E salesusa mgigolf com SERVICE 1888 391 0200 SERVICE serviceusa mgigolf com MGI GLOBAL E globalsales mgigolf com Follow us on Absolute attention has been taken to ensure this manual is correct at time of printing Specifications images and statistics may change at any time Visit www mgigolf com for the most current model information Version 3 0 ...

Reviews: