background image

119

Connecting

With this generation of device there is 
no possibility to replay an analogue 
PC signal, for example, from a 15-pin

VGA connector.

The AV device menu is factory set to 
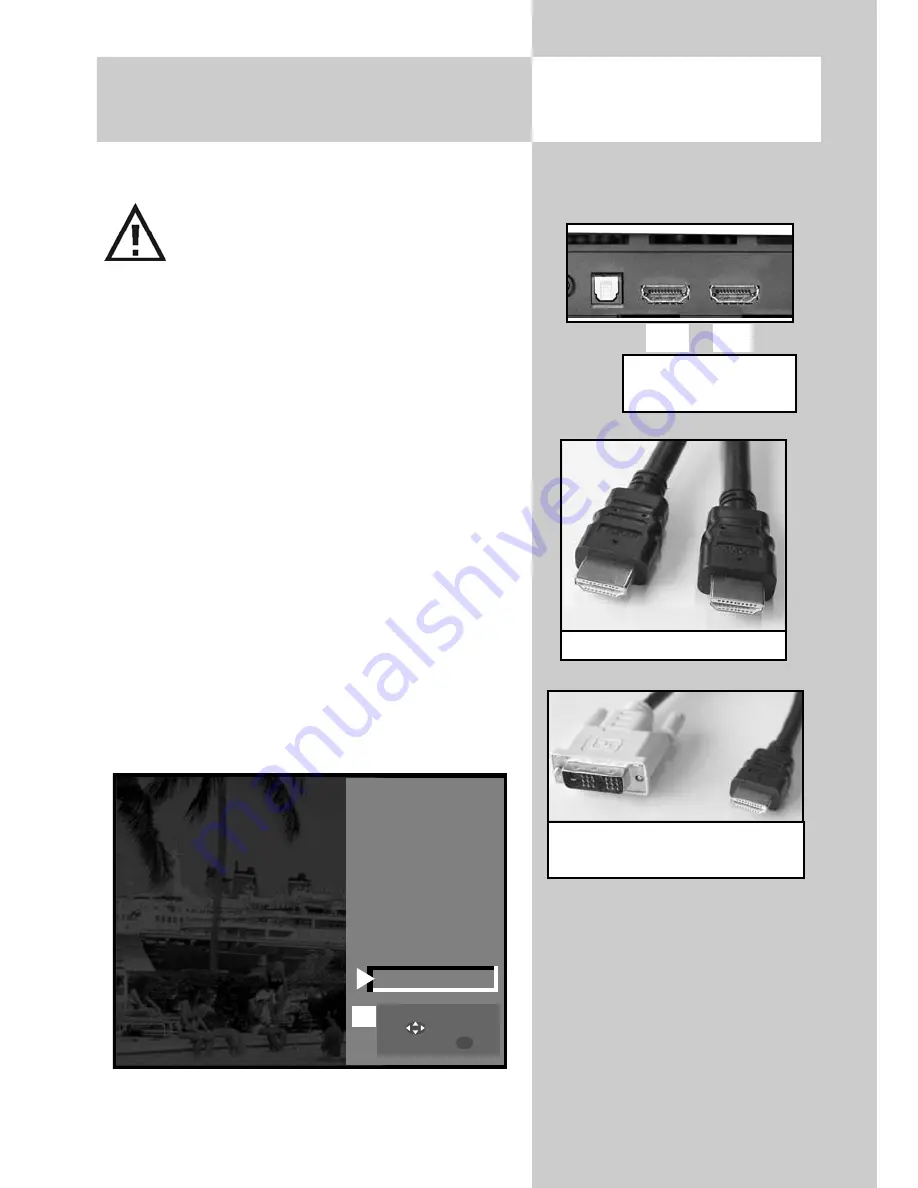
connect a PC via the HDMI 2 connector.

HDMI [PC] to HDMI [TV set]

Switch the PC and TV set on with the power switch
and use an HDMI cable to connect the HDMI sok-
ket of the PC to the HDMI 2 socket of your TV set.
After connecting the PC, data is exchanged bet-
ween the graphics card and the TV. The possible
resolutions are determined during this process.

Using the TV set as a PC monitor

Press the AV key. The choice of possible devices
and/or connectors is shown.
Press the numeric key 1 as shown in the example
or use the cursor control key 

to move the cursor

to the PC option, then press 

OK

.

The device selection menu will disappear and you
will see the PC picture.

+

32 Connecting a PC to the 

TV set: HDMI 

HDMI

Opening the menu

5  

Front-HDMI

4  

HDMI2

3  

EURO1

2  

Camcorder/Foto

1

 PC

AV

HDMI sockets

Back side of TV set

IN1

IN2

HDMI cabel

DVI-D - HDMI adapter cable

(see also chapter 32.1)

Select with 

...

or       .

Confirm with      .

OK

Summary of Contents for Linea LED 100

Page 1: ...O P E R AT I N G I N S T R U C T I O N S Linea FHDTV 100 Linea LED 100 with Chassis 611 Metz immer erstklassig 611 47 2018 A1 11 36 08 ...

Page 2: ...anorama mode 31 11 1 Programmes via TV Menu 32 11 2 Programmes via station table 33 12 General Sound Settings 34 12 1 for Progr via TV Menu 38 12 2 for Prog via the Stat Table 40 12 3 Mute function 41 12 4 HiFi Amplifier HiFi output 42 12 5 Sound via speaker hi fi surround 43 12 6 Overview 44 12 7 Connecting headphone 47 Foreword Dear customer thank you for selecting a Metz LCD TV set We have equi...

Page 3: ...ion search 84 manuelle Suche 85 21 4 Set up satellite system 86 Antenna system 86 Unicable 87 LNB supply voltage 88 DiSEqC System 89 selecting Satellit 90 21 5 DVB S automatic station search 91 manual station search 92 Updating the Data 94 21 6 DVB Prog Info Signalquality 95 21 7 DVB C and DVB S Portal stations 96 22 Station Logo 97 23 Sorting Stations 98 24 Initial Programme Position 100 25 DVB R...

Page 4: ...d Furthermore only specialists should carry out such work The TV set should not be mounted on the ceiling To prevent injuries the TV set must be fas tened safely to the floor wall in accor dance with the installation instructions Strong tobacco consumption at the installation location of the TV can lead to nicotine and soot deposits behind the panel glass and thus to an impair ment of the image qu...

Page 5: ...tching on Switch on the TV set with the main switch the TV set switches to programme position 1 or to the programmed initial programme position see page 104 If no other command is received from the remote control a message will appear after approx 10 minutes asking for one of the remote control keys to be pressed If no command is received from the remote control the TV set is switched to stand by ...

Page 6: ... wall unit leave sufficient space on all sides for the circulation of cooling air Do not place the TV set close to a radi ator since this would effect adequate cooling Switching on from stand by mode Use the numeric keys of the remote con trol to select any programme Programme position 1 is selected by pres sing the key or TV If an initial pro gramme position has been configured this will be switc...

Page 7: ...for the reception and reproduction of picture and sound signals The TV set may be operated only from a mains voltage of 230 240V VAC 50 Hz Australia 240 VAC For maintenance and repair work the power plug or the power cord input of the TV represents a means to disconnect the device from the mains and must therefore be kept in a usable state in line with appli cable standards Lay the power cable so ...

Page 8: ... infrared headphones Sunlight falling directly on the TV set may interfere with the operation of the remote con trol since the TV set cannot detect the infrared signals from the remote control under these conditions The TV set must be switched on with the main power switch before it can be controlled with the remote control The most important keys for normal use ON Switches the TV set on with prog...

Page 9: ...u Open the electronic programme guide EPG Open the Teletext window Mute Freeze frame Back to the previously selected station In the TV menu open the Configuration menu Display the date and time In the TV menu open the Timer window Display the station table In the TV menu open the station table or the station features window Display the sound functions In the TV menu open the AV devices window Disp...

Page 10: ...ns see picture appears on the bottom left of the screen Select the desired function with the rocker switch and adjust it with the key The individual sound characteristics can also be saved as default values for all programmes See Chapter 12 for this The settings that are made here are only tem porary and are not saved If the TV set is swit ched to stand by mode or switched off all settings will be...

Page 11: ...me For example enter FER and all station names are listed in which the character string FER occurs e g hr fernsehen SWR Fernsehen 11 5 Station selection and management of programme positions 5 Selecting stations from the station table The TV set can store the settings for up to 3000 TV stations and 3000 radio stations in so called programme positions You can select any of these programme posi tion...

Page 12: ... the cursor up key to select the last underlined item Use the cursor down key to select the menu lines and then press the OK key to display the explanation of the selected item You can select any underlined word in the table of contents the index or the explanation of a selec ted item with the cursor Pressing the OK key then displays the explanation for this word You can also scroll forwards and b...

Page 13: ...h the oval cursor control key or with the numeric keys When you press the OK key the current setting for the selected item is shown in the Setting win dow below the card file and can be adjusted with the key You can save the new setting by pressing the OK key which also returns you to the list of sec tions If you do not want to save the new setting press the MENU key to return to the correspon din...

Page 14: ...age After pressing the coloured pre selec tion key you can step through the sub jects sections or pages with the cursor control key or with the numeric keys If you wish to select a specific page enter its page number on the numeric keys If sub pages exist for the selected page the page numbers are displayed in black In the example shown here there are five sub pages You can step through these sub ...

Page 15: ... displayed page This function is useful on index pages such as pages 100 200 etc in order to select a page you want to see After positioning the cursor on the desi red page number press the OK key to display its contents Setting marks in Teletext 6 Up to 10 marks can be set for each programme position As a user of Teletext you will probably want to visit certain pages such as stock market news new...

Page 16: ...s is a TOP Text station the card file is dis played Press the OK key and open any avai lable page Use the numeric keys to enter the number of the page containing the subtitles 8 Videotext 6 Not possible with an external receiver 9 Selecting the Operating Mode TV AV R You can switch the TV set between its various ope rating modes with the keys TV AV and R You can also switch from standby mode to th...

Page 17: ...tory to ON for all EURO sockets Press the MENU key The TV menu appears on the screen Press the red key The menu Configuration is displayed Use the corresponding numeric key in this example or the cursor control key to select the menu item EURO sockets Press the OK key and then in the setting win dow use the key to select Programme change on Press the OK key to save the new setting Press the EXIT k...

Page 18: ...he max possible selection is dis played Use the corresponding numeric key to select the AV device you want to use The TV set now changes from the current programme to the selected playback device Start the replay function on the AV device This AV selection remains active until you switch to any other programme position After watching the film from the AV device press the TV key to return to normal...

Page 19: ...ect the menu item Pict settings for Pr Press the F1 key to display the entire selection Use the corresponding numeric key in the example to select the menu item VCR Use the key to select Opt 1 If this setting does not produce a satisfactory result you can try using Opt 2 Press the OK key to save the new setting Press the EXIT key to close the TV menu Opening the menu MENU AV OK EXIT The number of ...

Page 20: ...ettings for Picture pro file selection Save the changed setting with the key OK Close TV menu with the key EXIT The picture profile can also be temporarily changed during a programme without the change being saved See Chapter 4 for this Opening the menu 3 See glossary for an explanation 7 Available only for analogue stations 10 2 AV Playback Picture profile Picture profile assignment Brillant VCR3...

Page 21: ...the exam ple to select the func tion Picture format Use the key to set the picture format setting to Automatic Press the OK key to save the new setting Press the EXIT key to close the TV menu Picture format Auto mode VCR3 Signal adjustment Picture forma3 Colour standard3 7 Colour offset3 7 Noise reduction3 MPEG noise reduction Picture sharpness Picture profile Colour intensity Picture profile adju...

Page 22: ...ure settings gen is pre selec ted Use the cursor control key to select the menu item Pict set prog posn and then press OK Use the corresponding numeric buttons in this example it is for noise reduction to select the individual menu items In the setting window change the setting with the button Press the OK button to save the new settings Clear the TV menu with the EXIT button Opening the menu 10 4...

Page 23: ... line Save as standard values If you wish to save the new setting use the key to select Yes Press the OK key to save the changed setting as a standard value Press the EXIT key to close the TV menu If the standard values do not provide a satisfac tory picture in some programme positions you can make settings for these positions which dif fer from the standard values See the next sec tions 11 1 and ...

Page 24: ...mation or Press the MENU key The TV menu appears on the screen Press the blue key The menu Picture and sound and the menu item General picture settings are pre selected Use the cursor control key to select the menu item power options and press the OK button Use the key to select the Eco Mode Pre sentation or Picture Quality setting Opening the menu MENU OK 11 General Picture Settings Select power ...

Page 25: ...nd c picture content dependent The level control indicates the level of backlighting brightness currently in operation The backlighting lamps that light up the screen is adjusted automatically depending on the power option selected The brightness of the lamps has an influence on the device s power consumption Press the EXIT key to close the TV menu OK EXIT Picture Volume Picture profile adjustment...

Page 26: ...e selec ted Use the corresponding numeric button in the exam ple to select the menu item Pict set prog posn Use the corresponding numeric button in the exam ple to select the menu item MPEG noise reduction Set the MPEG noise reduction with the button Save the setting by pressing the OK button Clear the TV menu with the EXIT button 3 See glossary for an explanation 7 Available only for analogue sta...

Page 27: ...nu item Brightness Use the cursor control key to select the line Signal adjustment In the setting window use the key to change the setting Use the cursor control key to select the third line Save as standard value If you wish to save the new setting use the key to select Yes Press the OK key to save the new setting Press the EXIT key to close the TV menu 11 General Picture Settings Signal adjustme...

Page 28: ...rding to your individual taste Picture profile2 settings Press the MENU key The TV menu appears on the screen Press the blue key The menu Picture and sound and the menu item Picture settings gen are pre selected Press the numeric key to select the Picture profile settings menu option Use the assigned numeric key to access the pic ture profile that is to be changed Use the cursor control key to acc...

Page 29: ...e the new settings Clear the TV menu with the EXIT button The picture profile can also be temporarily changed during a programme without the change being saved See Chapter 4 for this OK EXIT Profile Standard2 Picture profile adjustment Sound set prog posn Sound settings gen Pict set prog posn Picture settings gen Picture Volume 11 General Picture Settings selected picture profile Signal adjustment...

Page 30: ...responding numeric keys in this example for Zoom Panorama to select the desired menu items Use the cursor control key to select the desired menu items Use the key to change the settings for Bor der colour Press the OK key to save the new settings The picture shows the factory settings Press the EXIT key to close the TV menu The setting is only possible if the function Panorama is set to No Opening...

Page 31: ... menu items Use the key to change the settings for Zoom Panorama Press the OK key to save the new settings The picture shows the factory settings Press the EXIT key to close the TV menu The functions Panorama and Zoom can be combined with each other OK EXIT Zoom value 0 Panorama Yes Picture pos vert 0 Pan mode Non linear Automatic zoom off Signal adjustment Picture profi selectl Zoom Panorama Nois...

Page 32: ...picture settings you wish to change Press the MENU key The TV menu appears on the screen Press the blue key The menu Picture and sound and the menu item General picture settings are pre selected Use the cursor control key to select the menu item Pic settings for Pr And press the OK key Use the corresponding numeric keys in this example for noise reduction to select the desired menu items In the se...

Page 33: ...e cursor control key to select the desired function Use the key to change the setting gen means here that the new setting will overwrite the related general picture setting see page 23 The individual settings made here which differ from the general settings remain saved Press the OK key to save the new settings Press the EXIT key to close the TV menu OK EXIT 3 See glossary for an explanation 5 Ava...

Page 34: ...t hand column Press the OK key to open the selected menu item for editing In the setting window use the key to change the setting Use the cursor control key to select the third line Save as standard value If you wish to save the new setting use the key to select Yes Press the OK key to save the new settings as standard values Press the EXIT key to close the TV menu If the standard values do not pr...

Page 35: ...ure settings are pre selected Use the corresponding numeric key in the exam ple to select General sound settings Use the corresponding numeric key in the example to select Volume correction In the setting window use the key to change the setting Press the OK key to save the new setting Press the EXIT key to close the TV menu The function Volume correction in the menu General sound settings does no...

Page 36: ...le to select Equali zer Press Cursor control key and adjust each slider in turn Change the setting with the key With the cursor control key activate the line As standard To save the new value press the key and select Yes Press the OK key to save the new setting Press the EXIT key to close the TV menu Opening the menu OK EXIT 3 See glossary for an explanation MENU Equalizer Use a default value No P...

Page 37: ...nd settings for Pr Use the corresponding numeric key in the exam ple to select Volume headphones In the setting window use the key to change the setting Press the OK key to save the new settings Press the EXIT key to close the TV menu Opening the menu 12 General Sound Settings OK EXIT 3 See glossary for an explanation MENU Picture Volume Picture profile adjustment Sound set prog posn Sound setting...

Page 38: ... appears on the screen Press the blue key The menu Picture and sound and the menu item General picture settings are pre selected Use the corresponding numeric key in the exam ple to select Sound settings for Pr Press the OK key and then in the setting widow use the key to change the setting Press the OK key to save the new settings Press the EXIT key to close the TV menu Individual sound settings ...

Page 39: ...Press the blue key The menu Picture and sound and the menu item General picture settings are pre selected Use the corresponding numeric key in the exam ple to select Sound settings for Pr Use the corresponding numeric key in the example to select Tone settings In the setting window use the key to change the setting Press the OK key to save the new settings Press the EXIT key to close the TV menu I...

Page 40: ...In the setting window use the cursor control key to select the desired functions The use of the key to change the selected set ting gen means here that the new setting will overwrite the general sound settings see pages 34 The individual settings made here which differ from the standard values remain saved Press the OK key to save the new settings Press the EXIT key to close the TV menu MENU F2 OK...

Page 41: ...In normal TV mode the mute key is used as follows Press it once to reduce the volume by 12 scale divisions Press it again within five seconds to reduce the volume to 00 Pressing the key once again restores the volume to its original level Preset value Audio Discription During films for the blind the scenes are descri bed in the dialogue intervals Under Dual chan nel select Audio 2 if you want to r...

Page 42: ...s the MENU key to open the TV menu Press the red button to open the Configura tion menu Use the cursor control key to access Init prog position Select the menu option hi fi output with the assigned numeric key In the exam ple it is Set the desired parameters in the settings window with the key Press the OK button to save the new settings Press the EXIT key to clo se the TV menu For normal TV mode ...

Page 43: ... window use the cursor control key to access the Speakers menu option Set Centre speaker with the key Press the OK button to save the new settings Clear the TV menu with the EXIT button For TV mode the yellow but ton and the key can be used to set Speakers tempo rarily 12 5 Sound Settings Speakers Opening the menu MENU OK EXIT Function for F3 Function for F2 EURO sockets DVB C DVB T DVB S Analog T...

Page 44: ...Off The volume on the AUDIO OUT sockets on the back of the TV set remains constant at the value set in the menu The sound is not output via the speakers of the TV set The symbol for the mute setting appears on the screen ı The volume cannot be changed with the button of the remote control Function for F3 Function for F2 EURO sockets DVB C DVB T DVB S Analog TV Country Language Operating Configurat...

Page 45: ... output via the speakers of the TV set The symbol for the mute setting appears on the screen ı The volume on the AUDIO OUT sockets can be changed with the button of the remote control Function for F2 Function for F1 Change with Accept value with OK Mute two stage on Speakers on Preselection of Sound 1 Function for F3 Function for F2 EURO sockets DVB C DVB T DVB S Analog TV Country Language Operati...

Page 46: ... adjustable The sound is not output via the speakers of the TV set The symbol for the mute setting appears on the screen ı The volume on the AUDIO OUT sockets can be changed with the button of the remote control The headphone out put on the front or side will also be changed HiFi output Sound settings Function for F2 Function for F1 Change with Accept value with OK Mute two stage on Speakers off P...

Page 47: ...phones volume can be saved as a default value see Chapter 12 Setting the volume too high when using headphones or ear phones can result in damage to the ears including the complete loss of hearing When receiving a dual language pro gramme you can switch between the two sound channels In TV mode press and hold the yellow key until the sound function Sound mode is selected Then use the key to select...

Page 48: ...e the cursor control key to select the menu item Brightness Use the corresponding numeric key in the exam ple to select the func tion Zoom Panorama Use the cursor control key to select the menu item Automatic zoom Use the key to change the setting Press the OK key to save the new setting Press the EXIT key to close the TV menu MENU OK EXIT Zoom value 0 Panorama Yes Picture pos vert 0 Pan mode Non ...

Page 49: ...to open the menu Timer Use the cursor control key to select Settings and press the OK key In the setting window use the cursor control key to select the menu item Acti vate and then use the key to set the childlock to Active Use the cursor control key to select Code and enter your personal 4 digit code with the numeric keys Make a note of this code Press the OK key to save the new setting Press th...

Page 50: ...your personal code password with the numeric keys Make a note of this code since the child lock can be deactivated only if the correct code is entered Press the OK key to save the settings Press the EXIT key to close the TV menu Switch off the TV set with the key The childlock is not fully activated until the TV set is switched off Deactivating the childlock If the childlock is active a window req...

Page 51: ... the numeric keys Press the OK key to save the setting Press the EXIT key to close the TV menu At the programmed on time the TV set is switched on from the standby state red LED lights You must con firm this automatic action by pressing any key on the remote control If this is not done the TV set will switch back to the standby state after 10 minutes This ensu res that the TV set does not stay on ...

Page 52: ... clock precisely by pressing the OK key when the time you have entered is reached Press the numeric key to select Current date In the setting window enter the date with the numeric keys Press the OK key to save the settings Press the EXIT key to close the TV menu The local time offset is the difference between the local time where the TV set is installed and Greenwich Mean Time GMT The TV set norm...

Page 53: ...MENU key to open the TV menu Press the green key to open the Timer menu Use the corresponding numeric key in the example to select the menu item Recording control Use the cursor control key to select the desired menu item Press the OK key and then in the setting win dow use the key to set the desired lead or overrun time Press the OK key to save the settings Press the EXIT key to close the TV menu...

Page 54: ...e to 10 minutes At the programmed start time minus the pro grammed lead time of three minutes the TV set is either switched on from the standby state red LED lights with the programme position for ITV selec ted whereby the screen remains dark but the programme is sent via the EURO socket to your recorder or switched to the programme position for ITV if it is already switched on At the programmed e...

Page 55: ...pho tograph display The JPEG photograph display menu appears on the screen Use the cursor control keys to select the des ired image folder Press the OK key to open the image folder Use the cursor control keys to select the individual images Press the OK key to open the selected image Using the green key the selected image can be rotated clockwise with the red key it can be rotated counter clockwis...

Page 56: ...eys to move the red zoom quadrangle in the image in order to determine the image section to be magnified Press the OK key for a magnified display of the selected image section Use the cursor control keys to scroll the magnified image section Return to the full screen picture by pressing the OK key The rectangular red frame will be display ed on the screen The red frame will be hidden if you press ...

Page 57: ... start the slide show During the slide show the II key has the Pause function Press the II key to resume the slide show When the slide show is finished or stopped with OK or EXIT the photo graph viewer appears again Press EXIT to return to the TV picture OK F2 OK Slide Show Photo Viewer Start Stop Pause II Endless Time 3s Pictures W Fuchs Aida Nacht Beduinen Claudia Strobo Schlitten à F2 OK II EXI...

Page 58: ...he timer menu Press the F1 key The cursor is located at the left of the first line Record Use the key to set this menu item to Yes If desired press cursor control key and use the key to activate the reminder function If the reminder function is active a reminder window is displayed on the screen one minute before the start time programmed for the timer Use the numeric keys to select the programme ...

Page 59: ... Press the F2 key Press numeric key to open the timer menu Use the cursor control key to select the timer you wish to clear and press II to mark it for deletion A window is dis played on the screen asking whether you really want to clear this timer Confirm the intended action by pressing the appropriate key 17 Special Functions Recording a programme with a timer Opening the menu Recording Yes Remi...

Page 60: ...e selec tions are displayed Press numeric key to open the timer menu window The timer menu window dis plays the programme position the date and the EPG data for the current pro gramme or for the next two hours Press the OK key to save the settings On the recording device e g video recorder select the AV programme position and start the recording by pressing the appropriate button REC OTR etc Recor...

Page 61: ...menu remain acti ve until you switch to a different pro gramme position or switch off the TV set Zoom Picture position After selecting the function Zoom you can adjust the zoom factor with the key In addition you can move the pictu re position 4 up and down on the screen in order for example to keep the station logo or the subtitles visible To change the picture position press and hold the F3 key ...

Page 62: ...eactivated in the menu item General picture settings of the menu Picture and sound 16 9 Full picture This function serves to display pictures from exter nal devices such as a 16 9 video recorder with the correct aspect ratio Automatic The TV set automatically chooses the optimum pic ture format with DVB stations this is dependent on the programme 17 Special Functions Picture format Standard 4 3 Pa...

Page 63: ...n F3 for about two seconds all possible selections are dis played Press numeric key to select the function Picture position vertical You can now use the key to move the picture up and down on the screen so that for example the station logo or the subtitles are visible This setting is not saved If you wish to save it as a global setting use the procedure described in Section 11 to set it 17 Special...

Page 64: ...ng function keys Press F2 for approx 3 seconds and the max pos sible selection is displayed Press numeric key and select the Programme language function Select a language with the cursor control key Symbol in grey Other audio options e g dd Dolby digital are available but are not selected Symbol in white One of the audio options has been selected Pr 30 Stereo arte 05 04 07 Ä Ä 17 Special Functions...

Page 65: ...m In the settings window use the key to set the Subtit les function to on If desired a language can be selected here Save the changed setting with the key OK Close TV menu with the key EXIT Displaying subtitles see next page 65 17 Special Functions Select Subtitle Opening the menu Untertitel Ein Sprachauswahl Deutsch Sprachauswahl English Sprachauswahl Français Konfiguration OK OK EXIT MENU Functi...

Page 66: ...possible selection is displayed Use the numeric key to call up the Subtitles function Use the cursor control keys to make a selec tion if this is offered by the station or the pro gram The station or program is exclusively responsible for offering and displaying subtitles 17 Special Functions Select Subtitle Opening the menu Special functions2 1 Normal Sprache 2 Language of prog 3 Subtitle 9 Timer...

Page 67: ...con trol key to select one of the available func tions Press the OK key to assign this function to the selected function key the selected function is marked with X Press the EXIT key to close the TV menu If a function key is pro grammed with a func tion this function can be called by briefly pressing the function key Pressing and hol ding the function key displays a list of all available functions...

Page 68: ... pressing the button marked EPG Factory EPG settings EPG On DVB SI selection TV Prog selection in the channel table all free slots In the menu retain is dis played i e when you make an adjustment this change is displayed in plain text after it is confir med by selecting OK in the menu Retain is then displayed in the menu as an indication that the pre viously confirmed setting has been retained MEN...

Page 69: ...on table and shown in the program guide unless you make a different selection in the station table The data collection operation is interrupted if the TV set is switched off with the power switch the Teletext function is called a recording is programmed in the menu AV recording a timer recording is active or will start within one hour the Teletext function Subtitles is activated If the TV set is s...

Page 70: ...l table appears with the active program slot selected Press F2 to permit editing of the channel list Press to switch to the menu page Using and select Include channel in EPG and dedeselect rows marked 7 with OK To exclude other channels from the EPG pro gram guide use and to select the channel and repeat the procedure Not possible with a set top box Sound correction Picture quality Picture correct...

Page 71: ...he steps described under 23 Sort channels to sort and save your favourite chan nels so that they appear at the top of the list for example sort 1 50 and save them Select EPG Settings from the Configuration menu and under Prog select in the channel table select Channels 1 50 using the key and save by pressing OK 19 2 Collecting EPG data Not possible with a set top box ...

Page 72: ...scroll time of day forwards in F2 status scroll stations forwards green in F1 status scroll time of day backwards in F2 status scroll stations backwards red The selected programme is ready to be recorded see pg 69 EXIT Back to TV picture Day of week forwards backwards F2 F1 F2 F3 Opening the menu EPG Not possible with an external receiver OK EXIT F2 F3 F1 Sort station table Sort selected station S...

Page 73: ...Areas of interest can be set in the EPG TV guide To do this Press the yellow button or if you want to change interests press the button twice use the cursor control key or the assigned numeric key to access one of the themes Use the cursor control key to change to the other page Use the cursor control key to access the theme and mark it with the OK button 7 The markings 7 can be deleted again with...

Page 74: ...een key to view addi tional information about the pro gramme currently showing provided the respective station broadcasts such information Repeatedly press the green key to view additional information about the following programme provided the respective station broadcasts such information To hide the information press EXIT Not possible with an external receiver 19 3 Using the EPG Opening the menu...

Page 75: ...ch on the video recorder Insert a cassette Press the red key on the remote control If a normal video recorder is connected Switch on the video recorder Insert a cassette Press the red key on the remote control to programme the TV timer see also Direct recording OTR On the AV programme position of the video recorder programme a timer with the data and time of the programme which will be provided by...

Page 76: ...key to open the TV menu Press the red key to open the menu Configura tion Use the corresponding numeric keys to select Language or Country Press the OK key and then use the cursor control key to select the desired language or country Press the OK key to con firm your selection Press the EXIT key to close the TV menu Opening the menu MENU Selected language English Dansk Suomi Norsk Português Españo...

Page 77: ...rther details please consult your local cable provider or TV dealer or search for DVB C in the Internet DVB S for HD TV The digital broadcasting technology that can be received via a satellite Ask your local TV dealer about it or find out more at www lyngsat de Select the reception mode to match the broadcasting tech nology available in your area Setting the reception mode Press the MENU key to op...

Page 78: ... in the exam ple to select Analogue TV The menu item Search settings is already selected Press the OK key and in the setting window use the key to select the desired TV stan dard Press the OK key to confirm your selection Press the EXIT key to close the TV menu 21 1 Setting Stations TV Standard for analogue stations Opening the menu The number of subjects and sections depends on the selected scope...

Page 79: ...etting window confirm the menu item Start station search by pressing the OK key The TV set starts to search for available stations A station table with the newly found stations is displayed on the left half of the screen If a sta tion table already existed before the search the newly found stations are automatically appen ded after the last existing station After completion of the search all stati...

Page 80: ...e desired colour stan dard or to step through the available colour standards until the picture is displayed clearly Press the OK key to confirm your selection Press the EXIT key to close the TV menu 21 1 Setting Stations Colour standard for analogue stations 3 See glossary for an explanation 5 Can only be selected for DVB stations 7 Available only for analogue stations Opening the menu MENU F2 EXI...

Page 81: ...ntenna or a community antenna Setting the antenna supply voltage Press the MENU key to open the TV menu Press the red key to open the Configuration menu Use the corresponding numeric key in the example to select the function DVB T Press the OK key and in the setting window use the key to select the antenna supply voltage Press the OK key to save the new settings Press the EXIT key to close the TV ...

Page 82: ...figuration Use the corresponding nume ric key in the example to select DVB T Make a selection with the assigned numeric key in the example Automatic search Press key OK and confirm the question about the sta tion search with the corres ponding numeric key freely receivable programmes3 all programmes3 free CICAM programmes3 After pressing the corresponding numeric key the programme search begins 21...

Page 83: ...e the setting to manual using the key Additional data can now be entered After entering the programme data with the cursor control key select Start programme search Press key OK and confirm the question about the station search with the corresponding numeric key freely receivable programmes3 all programmes3 free CICAM programmes3 After pressing the corresponding numeric key the programme search be...

Page 84: ...is setting of the symbol rates does not lead to the desired result other symbol rates must be set and saved with the key Ok Ask your cable network provider or the person setting up the system about this Fine search is required if the stations are not tuned to the channel centre Select the menu line Start programme search with the cursor control key Press key OK and confirm the question about the s...

Page 85: ...s Modulation and Symbol rate and change the setting using the key or with the numeric keys Select Start programme search with the cursor control button in the setting window Press key OK and confirm the question about the station search with the corresponding numeric key freely receivable programmes3 all programmes3 free CICAM programmes3 After pressing the corresponding numeric key the programme ...

Page 86: ...nd is designed to receive the full programme selection For this purpose each receiver is assigned one specific frequency in the satellite frequency range 950 2150 MHz The channel router has multiple fixed frequencies SCR Freq saved in a frequency bank See the user s guide for the channel router The satellite antenna splitter 010ZR1199 is required for all satellite single cable solu tions 21 4 Set ...

Page 87: ...e it is Press the OK button and the Arial facility setup window opens Use the cursor control buttons to select Antenna and then the button to select Unicable Use the cursor control buttons to select the SCR data for each receiver Enter the required data with the numeric buttons Confirm the setting by pressing the OK button Clear the TV menu with the EXIT button 21 4 Set up of satellite system Unic...

Page 88: ...hange settings Call up the TV menu with the MENU button Use the red button to open the Configuration menu Select the menu option DVB S with the assigned numeric buttons In the example it is Press the OK button and the Arial facility setup window opens Use the cursor control buttons to select LNB supply voltage and then use the button to set the LNB supply voltage on or off Confirm the setting by p...

Page 89: ... to open the TV menu Press the red key to open the menu Configuration Press the appropriate nume ric key in this example to select DVB S Press the OK button and the Arial facility setup window opens Use the cursor control but tons to select DiSEqC and then use the button to set DiSEqC on or off Press the OK key to confirm the new setting Press the EXIT key to close the TV menu i Opening the menu O...

Page 90: ...r the other together with the symbol rates for each one Depending on the satellite it may be neces sary to set additional symbol rates manually if the selected satellite uses different symbol rates and you wish to find the related transponders in an automatic station search Use the cursor control key to select Low band or High band The settings depend on the components installed in the satellite a...

Page 91: ...to open the TV menu Press the red key to open the menu Configuration Press the appropriate nume ric key in this example to select DVB S Press the appropriate nume ric key in this example to select Automatic search In the setting window use the key to select the desired satellite Use the cursor control key to move to the menu line Start station search Press key OK and confirm the question about the...

Page 92: ... polarisation of the station for which you want to search Executing the manual search Press the MENU key to open the TV menu Press the red key to open the menu Configuration Press the appropriate numeric key in this exam ple to select DVB S Select the menu option Manual search with the assigned numeric keys In the example it is The cursor then moves to Satellite If more than one satellite is avail...

Page 93: ...ponding numeric key freely receivable programmes3 all programmes3 free CICAM program mes3 After pressing the correspon ding numeric key the pro gramme search begins If necessary the stations can also be sorted moved or deleted See Chapter 23 for this 21 5 Setting the stations Manual search Opening the menu OK MENU Satellite Astra 19 2 Frequency 11836 MHz Symbol rates 27500 Polarisation H Start sta...

Page 94: ...tion Press the appropriate nume ric key in this example to select DVB S The cursor is located on the line LNB supply voltage Press the appropriate nume ric key in this example to select General settings In the setting window use the key to set Update data to On Press the OK key to confirm the new setting Press the EXIT key to close the TV menu 21 5 Setting the stations Updating the data OK EXIT Op...

Page 95: ...nu page Use the assigned numeric keys to select the DVB prog info or the signal quality menu option Clear the TV menu with the EXIT button 21 6 DVB Prog Info signal quality Opening the menu MENU F2 Sound corrections Picture quality Picture corrections Enter logo Station contained in EPG CA module5 Signal quality5 DVB prog info5 0010 Hessen 3 0009 Südwest 0008 MDR 0007 PRO 7 0006 RTL 2 0005 RTL 000...

Page 96: ... channels quickly If you select a portal station via the sta tion table see p 11 a suitcase symbol appears next to the station logo This suitcase can be opened by pres sing the white button repeatedly All optional channels included in this suit case then appear in the station table Other stations are not shown simultane ously In this way you can switch quickly bet ween the optional channels 96 21 ...

Page 97: ...with the aid of the cursor control key You can delete single cha racters with the red key or the complete logo with the II key Set the desired logo by repeatedly pressing the various numeric keys The lowercase letters are displayed after the uppercase letters Press the OK key to save the new logo Press the EXIT key to close the TV menu Opening the menu MENU F2 EXIT OK _ ABC DEF GHI JKL MNO RTL 2 P...

Page 98: ...ser ted Use the key to copy the station Move When moving select the programme position where the programme position is to be moved Use the key to move the station Delete If the station is to be deleted then press the ll button When you are finished clear the TV menu using the EXIT button Opening the menu MENU EXIT Markieren mit langer Tastendruck Block markieren Neue Position mit Cursor bestimmen ...

Page 99: ...elect the programme position after which the stations are to be inserted Use the key to copy the block of stations Move When moving afterwards use the cursor to select the programme position after which the stations are to be re inserted Use the key to move the block of stations Delete If the marked block of stations is to be deleted then press the II button When you are finished clear the TV menu...

Page 100: ...ou have selected TV as the mode of operation you can now set the desired pro gramme e g 004 for RTL With the AV mode of operation you can select an external AV connection like EURO 2 HDMI etc as an external AV connection Press the OK button to save the new settings Clear the TV menu with the EXIT button If the TV set is now switched on with the power button on the set or the button on the remote c...

Page 101: ...tting DVB radio stations The available DVB radio stations are automa tically detected during a station search see Section 21 and stored in a separate station table at the operating level for radio mode The radio station table can be sorted see Section 23 and the station logos can be changed see Section 22 DVB radio stations are administered in the same basic way as DVB TV stations Chapters 12 14 1...

Page 102: ... Selection of programme positions with the nume ric keys the oval rocker key or the white key Opening Teletext Displaying help information INFO Playing back films from a video recorder or DVD player by pressing the AV key Selecting Special functions 2 by pressing the F2 key Selecting Special functions 3 by pressing the F3 key Selecting connected AV devices by pressing the AV key Calling the standa...

Page 103: ...r persons who are interested in technology who want to be able to use the full range of functions of the TV set Setting the scope of operation Press the MENU key to open the TV menu Press the red key to open the menu Confi guration Use the cursor control key to move to the menu line Initial programme position Press the numeric key to select Scope of operation In the setting window use the key to s...

Page 104: ...n Keep the surface of the screen clean For cleaning the case and the screen use only a soft dry cloth For removing stubborn marks you may moisten the cloth slightly Cleaning and care The surface of the screen may be clean ed only with a soft dry cloth such as a microfleece duster If any marks cannot be removed with this dry cloth you may moisten the cloth slightly Take care that no water or other ...

Page 105: ...socket diameter 3 5 mm Slot for the CA module See also chapter 31 for more information on using a CA module MECA link USB port for connection e g of Metz Soundsystem 80 Metz Soundsystem 100 mecaHome USB port to connect a memory stick or external harddisk Photo Viewer USB Recording HDMI connector Signal type HDMI Video Audio digital ...

Page 106: ...le available from your dealer the digital audio signal AC3 provided by the TV set can be extracted for external processing Connecting The audio signal of the TV set is always available in digital SPDIF and analo gue without having to configure any additional settings Digital use an optical audio cable Toslink to connect the SPDIF digital sound output socket of the TV set to the SPDIF digital sound...

Page 107: ...n Use the key in Connection Type to activate the option Loudspeakers off The loudspeakers of the TV set will now be muted The sound will be reproduced via the loudspeakers of the hi fi system 28 1 Connecting a Hifi Amplifier AV Receiver Metz LCD TV HiFi Amplifier AV Receiver MULTI CH OUT Digital audio signal formats depending on the source analogue audio signal R L stereo ...

Page 108: ...evices Use the cursor control key to select the AV device you wish to register and press the OK key Press numeric key and set the signal types OUT IN that apply to the AV device with the key and then confirm with the OK button There are different signal types for the transmission of picture signals See next page i Opening the menu Caution Connection of a new device may cause an existing connection...

Page 109: ...g applies YC Better quality through separation of brightness and colour information SVHS Hi8 video recorder when connecting a VHS video recor der analogue Sat receiver decoder etc via a Scart or EURO AV cable or a Hosiden cable RGB Signal type with three video basic colours Red green blue Is usually needed to control a screen HDMI Using this interface digital picture and sound signals are transmit...

Page 110: ...ntrol key to select the AV device whose signal type you wish to change and press the OK key Press numeric key use the cursor control key to select Signal OUT and use the key to change the setting to RGB Press the OK key to confirm your selection Press the EXIT key to close the TV menu Caution This may cause an existing con nection diagram to be modified If so you must reconnect the AV devices acco...

Page 111: ...ress numeric key use the cursor control key to select Signal OUT and use the key to change the setting to HDMI Press the OK key to con firm your selection Press the EXIT key to close the TV menu Caution This may cause an existing con nection diagram to be modified If so you must reconnect the AV devices accordingly 29 2 Registering AV Devices Setting signal type HDMI Opening the menu The number of...

Page 112: ... of the video recorder when the TV set is switched to the standby state Registering a Data Logic video recorder on the TV set In the menu AV devices check X to the left of the field Data Logic for DVD Videorec 1 and connect the video recorder to the EURO socket Press the MENU key to open the TV menu Press the yellow key to open the menu AV devi ces Use the cursor control key to select the AV devic...

Page 113: ...O socket Data Logic transferring the station table Press the MENU key to open the TV menu Press the red key to open the menu Confi guration Press numeric key to select Analogue TV Press the OK key and then press numeric key to select Data Logic Press the OK key to trans fer the programme positions from the TV set to the video recorder Press the EXIT key to close the TV menu Opening the menu Start ...

Page 114: ...rog position Select the menu option DataLogic settings with the assigned numeric key In the example it is Set the desired parameters in the settings window using the key Press the OK key to confirm your selection Press the EXIT key to close the TV menu OK EXIT MENU 29 4 Registering AV Devices Data Logic Settings Opening the menu Data Logic mode 2 Subtitle Data Logic adjustm CI dialogue via EPG set...

Page 115: ...ve and press the OK key The cursor is on the line Connect Press the OK key again to remove the connected device Press the EXIT key to close the TV menu Caution This may cause an existing con nection diagram to be modified If so you must reconnect the AV devices accordingly 29 5 Removing AV Devices Opening the menu EXIT OK MENU Connect as follows Videorecorder DataLogic Name Signal types Connect Fr...

Page 116: ...ogramme position of the connected camcorder Press the F2 button for approx 3 seconds the Special Functions 2 menu appears Press numeric key The recording menu opens The AV programme slot Front the current date the start and end time and also the recording device are dis played Use the cursor key to select the menu option and enter the date start and end time Now select the recording device line If...

Page 117: ...gured to pass on the signal provided by the player to the recording device If you want to see the television program me that is currently running simply press the TV key The copy process will continue running in the background If you want to review the copy process press the AV key and select Front camcorder player using the respective numeric key End direct recording After the copy process has fi...

Page 118: ...hand side card reader for a Smartcard or deco ding card Insert the CA module into the slot and push until it snaps into place Now insert your Smartcard decoding card into the CA module The TV set is now ready to decode the encoded station To remove pull the Smartcard and the CA module out ...

Page 119: ...he graphics card and the TV The possible resolutions are determined during this process Using the TV set as a PC monitor Press the AV key The choice of possible devices and or connectors is shown Press the numeric key 1 as shown in the example or use the cursor control key to move the cursor to the PC option then press OK The device selection menu will disappear and you will see the PC picture 32 ...

Page 120: ...e configured as shown in Figure 1b Exit the TV menu with the EXIT key For PC sound from the spea kers of your TV set see also chapter 32 2 When the start up procedure is finished you can set the resolution as you wish recommended 1920 x 1080 60 Hz in the Windows menu Display characteristics 120 32 1 Setup DVI D HDMI connection Opening the menu Signal OUT DVI D Signal IN No signal Name Signal types...

Page 121: ...is must however be supported by the HDMI output of the graphics card of your PC Or if you have connected your PC via a DVI D to HDMI adapter cable Use a standard audio cable 3 5 mm stereo jack to 3 5 mm stereo jack to connect the Audio Line output of the sound card of your PC to the Audio In input of the TV Audio IN Ø 3 5 mm ...

Page 122: ... Speech the bass and treble components of the sound signal are set to make speech as easy to understand as possible The setting Normal is recommended for music programmes AV programme position AV devices have one or more connection sockets depending on the model The designations of these sockets are marked on the device e g AV1 On the AV device you can select which socket you want to use The selec...

Page 123: ... baud rate The symbol or baud rate describes the data volume that is transmitted per second The time required for the search function increases in proportion to the symbol rate Search setting 1 freely receivable programmes all non encrypted stations are sought 2 all programmes all non encrypted and encrypted stations are sought If a CA module and smart card are inserted the corresponding encrypted...

Page 124: ...e is set in the Configu ration Operation Sound settings TV menu In the Configuration Operating Sound settings TV menu set Speakers on 34 Problem Possible cause Remedy The message Enter code is displayed when the TV set is switched on The childlock is active and was programmed to disable all stations Enter the code you used when programming the childlock The TV set will not switch to a selected pro...

Page 125: ...iagram A film in 16 9 format is played back from an AV device but is displayed in 4 3 for mat The picture format for this pro gramme position has not been set correctly in the TV menu Select the AV program me position and set the picture format to 16 9 or Automatic See Ch 11 General Picture Settings The menu of a connected AV device such as a DVD play er is not visible on the TV screen The AV devi...

Page 126: ... Metz Soundsystem LS 5 1 W 014LR5143 The Metz sound system 80 100 is upgraded with a rear speaker system This turns a 2 1 Surround System into a 5 1 Surround System mecaHome radio control unit 017ZR10G3 Innovative technology from Metz and Moeller ensures effective couch management For further information and other retrofit kits ple ase contact your TV dealer You can also find further information o...

Page 127: ...a input 75 Ohms unbalanced DIN 45325 Channel coverage Standard channels 2 12 21 69 Special channels S1 S20 S21 S41 S42 S46 Belgium chan nels OIR Operating temperature range 5 C to 35 C at 75 air humidity Energy consumption per hour Wh See accompanying datasheet ...

Page 128: ...z HDMI Audio Linear PCM Stereo 32kHz 44 1kHz 48kHz EURO1 RGB IN 576i 50Hz 480i 60Hz Y C IN PAL 576i 50Hz NTSC 480i 60Hz FBAS IN PAL 576i 50Hz NTSC 480i 60Hz SECAM 576i 50Hz PAL 60 FBAS OUT Yes format is source dependent Audio IN Analog Stereo Line IN Audio OUT Analog Stereo Line OUT DIGITAL AUDIO OUT SPDIF Linear PCM Stereo bzw Dolby Digital depending on source AUDIO OUT Analog Stereo Line OUT AUD...

Page 129: ...ttery contains lead Cd the battery contains cadmium Hg the battery contains mercury Li the battery contains lithium Metz Werke GmbH Co KG Postfach 1267 D 90506 Zirndorf Germany Fon 49 911 97060 Fax 49 911 9706340 www metz de info metz de Errors excepted Subject to changes Your Metz product was developed and manufactured with high quality materials and components which can be recycled and or re use...

Page 130: ...ecording OTR 60 116 DiSEqC system 89 Display configuration 105 107 Double font size 15 Electronic Programme Guide EPG 68 Enercy mode Öco mode 24 25 Equalizer 36 EURO sockets 17 106 Exclude stations from EPG 70 Freeze frame 9 Functions keys 6 7 9 Glossary 122 HDMI 104 105 Headphones 37 44 45 103 Help 12 HiFi amplifier 107 HiFi output 42 107 High band 90 Info Information 12 Initial programme positio...

Page 131: ... 40 Sound effects 34 Sound settings 10 34 46 Station logo 97 Station search automatic 82 84 91 Station search manual 83 85 92 Station selection 11 Station table 11 Stations moving copying 98 Stations sorting deleting 98 Sub page 14 Subtitle 65 Summer time see time settings 52 Switching voltage devices with 17 Switching voltage devices without 18 Technical data 127 Teletext 14 Teletext clearing mar...

Page 132: ...nce in the areas of electronics and plastics technology to form the basis of the excellent reputation of the Metz Werke that has been built up throughout the world over a period of many decades Metz offers quality made in Germany Consumer electronics mecablitz flash units plastics technology and industrial electronics Service Centre Training Centre Administration and development Storage Dispatch M...

Reviews: