background image

Operating Instructions 
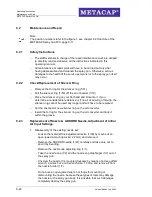
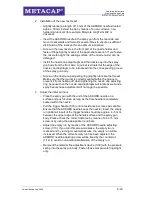
Maintenance and Care 
METACAP Spray Gun D/A 


9-24 


Version/Edition July 2008 

9.2.4 

(Dis-)Assembly of Nozzle Holder , Replacement of Sealing Ring 


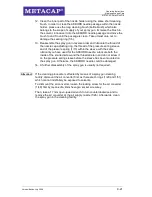
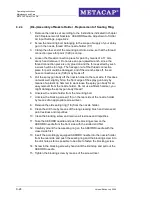
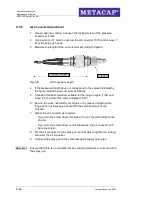
1.  Remove the nozzle set according to the instructions indicated in chapter 

9.2.3 Replacement of Nozzle &  AKKORD Needle, Adjustment of Initial 
Air Input Settings , page 9-22. 

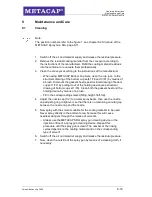
2.  Screw the mounting bolt, belonging to the scope of supply of your spray 

gun, in the nozzle thread of the nozzle holder (1/7). 

3.  Clamp the other end of the mounting bolt into a vise, so that the thread 

connection piece for paint (1/29) is on top. 

4.  Loosen the thread connection piece for paint by means of a 17 mm-

wrench and remove it. Do not use an open-jawed wrench, since the 
thread connection piece is only glued on and the force exerted by such 
a wrench will be too high. The hexagon nut of the thread connection 
piece for paint could be damaged, and if the wrench slips off, the air 
hose connection piece (1/28) may break off. 

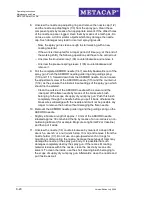
5.  Pull the spray gun body off the nozzle holder to the rear side. If this does 

not work well, slightly hit on the front edge of the spray gun body by 
means of a plastic tip hammer to work loose the spray gun body for an 
easy removal from the nozzle holder. Do not use a fitter's hammer, you 
might damage the spray gun body thread! 

6.  Unscrew the nozzle holder from the mounting bolt. 

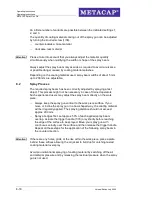
7.  Unscrew the blocking screw (1/5) on the rear side of the nozzle holder 

by means of an appropriate screw driver. 

8.  Remove the old sealing ring (1/6) from the nozzle holder. 

9.  Clean the drill hole by means of the long cleaning brush and remove all 

paint residues and impurities. 

10.  Clean the blocking screw and remove all residues and impurities. 

11.  Take the AKKORD needle and push the blocking screw on the 

AKKORD needle from the front side with the slotted end first. 

12.  Carefully mount the new sealing ring on the AKKORD needle with the 

closed side first. 

13.  Insert the accordingly equipped AKKORD needle into the nozzle holder 

from the rear side and push the sealing ring and the blocking screw into 
the drill hole as far as possible to be able to fasten the blocking screw.  

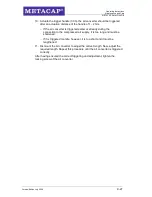
14.  Screw in the blocking screw by hand until the limit stop and pull out the 

AKKORD needle. 

15.  Tighten the blocking screw by means of the screw driver. 

Summary of Contents for D/A

Page 1: ...Operating Instructions METACAP Spray Gun D A...

Page 2: ...6 1 Description 6 10 6 2 Structure of the METACAP Spray Gun D A 6 11 6 3 Spare Parts List for the METACAP Spray Gun D A 6 12 6 4 Functioning 6 13 7 Initial Operation 7 14 8 Operating Instructions 8 15...

Page 3: ...keep this operating manual accessible Failure to observe the instructions of this operating manual will render the manufacturer free of any legal liabilities 1 2 Scope of Supply of the METACAP Spray...

Page 4: ...Bottom cup sets for 0 5 and 1 0 L item no 101115A and 101115B Recommended air pressure 3 6 bar for at least 300 L min of efficient air supply The compressed air must be dry and oil free Minimum inner...

Page 5: ...2 Incorrect Use Never point the spray beam and or air jet at living things There is a risk of injury Never exceed the admissible working pressures of the coating device of the spray gun Use accessori...

Page 6: ...out prior authorization of the manufacturer if other than original spare parts are used if the user tries to eliminate warranty deficiencies on his own without prior written consent of the manufacture...

Page 7: ...will have to be observed and all requirements of the employer s liability insurance associations regarding the protection against fire and explosions must be met Caution Solvents basing on halogenate...

Page 8: ...ur conductive twin hoses for combination e g 1 5m item no 30073 5 2 Personal Protection Toxic vapors When spraying coating materials dangerous vapors or clouds aerosols which are detrimental to your h...

Page 9: ...tinuous noise level of more than 85 db A it is recommended to wear an appropriate ear protection see the respective rules for prevention of accidents Please contact the manufacturer for more detailed...

Page 10: ...erent coating materials can be processed using only one nozzle set avoiding the annoying nozzle change and the purchase of further nozzle sets Furthermore the AKKORD needle is a pipe through which an...

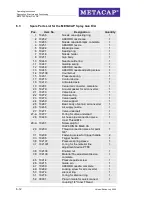
Page 11: ...erating Instructions Description Structure and Functioning METACAP Spray Gun D A Version Edition July 2008 6 11 6 2 Structure of the METACAP Spray Gun D A Figure 1 Structure of the METACAP Spray Gun D...

Page 12: ...converter 1 21 10273 Valve block 1 22 10272 Valve spring 1 23 10270 Valve needle 1 24 10269 Valve support 1 25 10267 Basic body of venturi air converter 1 26 10268 Air supply nozzle 1 27 10271 Valve u...

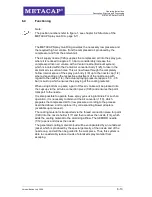
Page 13: ...the actual spraying pressure approx 0 3 0 5 bar is built up which ensures the spraying of the coating material When using bottom cup sets a part of this air volume will be pressed into the cupcup via...

Page 14: ...ince the handling and operation of the METACAP Spray Gun D A are different compared to other spray gun types it is recommended to practice the manipulation and adjustment of this spray gun using water...

Page 15: ...is not required to set the material supply under pressure This will be effected automatically by starting the spraying process by means of the spraying pressure let off by the spray gun When the spra...

Page 16: ...of atomized spray material to escape 6 Now adjust the required spray beam as described below Necessary adjustments to modify the spray beam The shape circular or wide of the spray beam will be directl...

Page 17: ...Never tighten the nozzle cap adjusting ring too firmly If you tighten the nozzle cap adjusting ring too firmly the nozzle cap is directly positioned on the nozzle Thus the atomizing airflow is blocked...

Page 18: ...ry in case of trained operators Such experienced users may adjust the spray beam directly on the work piece Always keep the spray gun vertical to the work piece surface If you move or incline the spra...

Page 19: ...ng it out of the holding device see structural drawing of bottom cup set 1 79 Clean both the gasket sheet and the holding device by means of a brush Fill in the corresponding solvent filling height ha...

Page 20: ...f the spray gun which should not be altered Clean the outside of the AKKORD needle with a solvent and the inner part of the flare needle by means of the brass wire brush belonging to the scope of supp...

Page 21: ...ressure spring 1 15 within the sleeve with the same lubricant you have used for the AKKORD needle Lubricate both the inside of the knurled screw and the threaded stern and do not screw it on the press...

Page 22: ...esistance or if no air at all will go through the silencer ring cannot be used any longer and will have to be replaced Put the checked or new silencer ring on the air converter Install the O ring for...

Page 23: ...within the groove to prevent it from shearing off when tightening the nozzle cap adjusting ring because then the nozzle cap diaphragm will rotate as well and a spray beam shape adjustment will no long...

Page 24: ...oes not work well slightly hit on the front edge of the spray gun body by means of a plastic tip hammer to work loose the spray gun body for an easy removal from the nozzle holder Do not use a fitter...

Page 25: ...nsure that the thread connection piece for paint is glued in by means of an appropriate thread safety glue If it is not glued in coating material might flow out of the thread Reassemble the nozzle set...

Page 26: ...Choose a flat tip screwdriver suitable for the plug in nipple 1 52 and insert it in the slot of the valve underpart 1 27 6 Secure the valve head with your fingers or by means of appropriate tongs Whe...

Page 27: ...ed earlier or already during the connection to the compressed air supply it is too long and must be shortened If it is triggered too late however it is too short and it must be lengthened 11 Dismount...

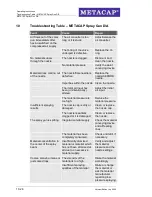
Page 28: ...tentionally altered Adjust the initial air input The material pressure is too high Reduce the material pressure Insufficient spraying results The nozzle cap is dirty or damaged Clean or replace the no...

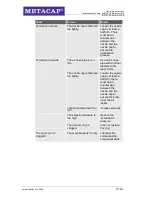
Page 29: ...louds The air hose pipe is too thin Use an air hose pipe with an inner diameter of at least 9 mm The nozzle cap is fastened too tightly Loosen the nozzle cap by at least a half turn there must be an a...

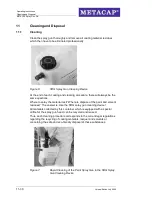
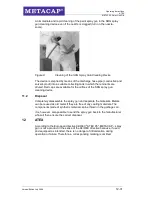
Page 30: ...me questions Where to spray the material rest Where to dispose of the paint and solvent residues The answer is Use the SRG spray gun cleaning device All materials collected by this container which is...

Page 31: ...fices of the SRG spray gun cleaning device 11 2 Disposal Completely disassemble the spray gun and separate the materials Metals can be reused as old metal if they are free of any coating materials The...

Page 32: ...5B is designed for the installation into another machine for the assembly with other machine parts or hardware for the linkage with other machines The initial operation is prohibited as long as the as...

Reviews: