P 5
Please retain product label and instructions for future reference
10
11
50mm
screw
Pre drill
hole
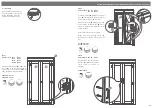
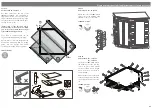
Step 8
Parts needed - No. 10 QTY 1
No. 11 QTY 1
Place the front
(No. 11)
and rear
(No. 10)
panel frames onto the window panels and
fix in place using 3x50mm screws.
6x50mm Screws
28
28
28
9
30mm
screw
Pre drill
hole
9
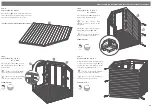
Step 9
Parts needed - No. 9 QTY 1
No. 28 QTY 2
Position the support bar
(No. 9)
across
the building from the left window panel
upright framing to the opposite framing
on the plain panel right as shown in the
diagram.
Fix the support bar the framing on both
panels using the L bracket
(No. 28)
and
4x30mm screws per bracket as shown in
the bubble diagram.
8x30mm Screws
6
40mm
screw
Pre drill
hole
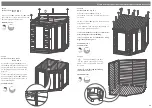
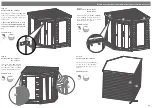
Step 10
Parts needed - No. 6 QTY 1
Place the roof panel
(No. 6)
on top of
the building, ensure the roof framing slots over
each side.
Fix the roof panel
(No. 6)
onto the wall panels
using 40mm screws.
Screw 6x60mm screws through the framing on
the roof and into the support bar.
* It is recommended to cut the roof felt sheets
before fixing the roof to the building.
*The roof panel can be identified as being
bigger than the floor panel.
21x40mm Screws
6x60mm screws
Step 11
Secure the building to the floor
. Fix the panels onto the floor using
50mm screws in alignment with the
floor joists
*
Ensure to screw through the framing
into the floor bearers.
20x50mm Screws
50mm
screw
Pre drill
hole


