background image

P 4

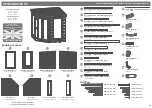
Please retain product label and instructions for future reference


For assistance please contact customer care on: 01636 821215

Mercia Garden Products Limited, 

Sutton On Trent, 

Newark, 

Nottinghamshire, 

NG23 6QN

www.merciagardenproducts.co.uk

5

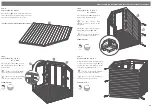
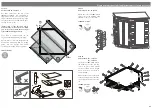
Step 4

Parts needed - No. 5 QTY 1 

Place the floor 

(No. 5) 

on a firm and level base, 

ensure the base has suitable drainage, free from 

areas where standing water can collect.

*The floor panel is smaller than the roof panel.

Pre drill 

hole

60mm 

screw

Step 5

Parts needed - No. 1   QTY 1


   No. 2   QTY2

Place the Door Panel 

(No. 1)

 and 

the Two Window Panels 

(No. 2)


onto the floor.


Fix the corners with 50mm 

screws as shown in the illustration.


Do not secure the building 

to the floor until the roof is fitted.

6x60mm Screws

2

2

1

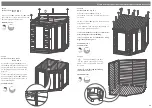
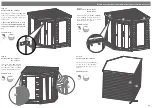
Step 6

Parts needed - No. 4      QTY 1


   No. 14   QTY 1

Place rear panel left 

(No. 4) 

against

the floor and the window side. 


Fix the corners with 

3x50mm screws as shown in the 

illustration.

Attach the panel joint into place 

with 3x50mm screws 

(No. 14).

          Do not secure the building to 

the floor until the roof is fitted.

6x50mm Screws

4

14

50mm 

screw

Pre drill 

hole

Step 7

Parts needed - No. 3  QTY 1

Using the same method outlined in Step 

3 place the rear panel right 

(No. 3)


against the floor and window panel 

securing using 6x50mm screws.


Fix the corners with 3x50mm 

screws as shown in the illustration,


Do not secure the building to 

the floor until the roof is fitted.

6x50mm Screws

50mm 

screw

Pre drill 

hole

3

Summary of Contents for 03TGCOR0707-V5

Page 1: ...arden building underneath large trees to prevent the tree causing damage to the building TIMBER As with all natural materials timber can be affected during various weather conditions For the duration...

Page 2: ...1212mm 17 Cover Trim 12x40x1918mm QTY 4 S1240 1918mm 18 Rain Guard 28x44x680mm QTY 2 RG2844 680mm Rear Cover Trim 12x60x1800mm QTY 2 S1260 1800mm 19 20 Rain Guard 28x44x990mm QTY 1 RG2844 990mm 1 2 3...

Page 3: ...x30mm Screws 7 Step 2 Parts needed No 23 QTY 2 No 27 QTY 1 Position press lock No 27 on the master door No 8 align with key hole and fix into position using 4x10mm screws Fit the barrel bolts No 23 to...

Page 4: ...until the roof is fitted 6x60mm Screws 2 2 1 Step 6 Parts needed No 4 QTY 1 No 14 QTY 1 Place rear panel left No 4 against the floor and the window side Fix the corners with 3x50mm screws as shown in...

Page 5: ...No 28 and 4x30mm screws per bracket as shown in the bubble diagram 8x30mm Screws 6 40mm screw Pre drill hole Step 10 Parts needed No 6 QTY 1 Place the roof panel No 6 on top of the building ensure th...

Page 6: ...s shown in diagram at the dotted lines use fascia width as a cutting guide Cut the triangle with 50mm overhang again using fascia as a guide 100x Felt Tacks 29 F r o n t Corner Corner Triangle 3 HANDL...

Page 7: ...12 Step 16 Parts needed No 12 QTY 1 No 13 QTY 1 Secure the front No 13 and rear No 12 roof framing to the underside of the roof fixing in place using 6x40mm screws 6x40mm Screws 40mm screw Pre drill...

Page 8: ...to the top and sides of the doors frames Make sure that the edges are flush with the edge of the framing Fix with 4x30mm screws per strip 12x30mm Screws Pre drill hole 30mm screw 22 21 21 22 21 It is...

Page 9: ...2 1 3 4...

Page 10: ...1 2 REGISTER FOR YOUR ANTI ROT GUARANTEE TODAY PLEASE SCAN HERE...

Reviews: