background image

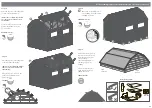
Step 5

Lay the plain back panel and the remaining 

gable top on a level floor place the gable 

top on top of the plain back panel ensure 

they are level at the top then fix together 

using 60mm screws. Stagger the screws so 

they do not collide.

8x60mm Screws

Pre drill 

hole

60mm 

screw

5

12

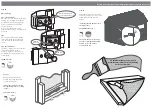
Step 6

Line the remaining Gable Strip up to the 

assembled gable. Ensure the bottom of 

the strip lines up with the underneath of 

the plain back panel framing as shown in 

the illustration and fix in place using   40mm 

screws.

6x40mm Screws

Pre drill 

hole

40mm           

screw

a

a

P 4

For assistance please contact customer care on: 01636 880514

Mercia Garden Products Limited, 

Sutton On Trent, 

Newark, 

Nottinghamshire, 

NG23 6QN

www.merciagardenproducts.co.uk

Please retain product label and instructions for future reference


Please retain product label and instructions for future reference


Pre drill 

hole

Pre drill 

hole

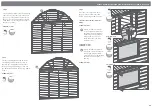
Step 7

Place the cover strip 13mm above

the gap in the window panel and

fix into place using 3x30mm screws.

*Measure and trim the strip before

fitting.

6x30mm Screws


If you would like the widows


to open attach the window to


the strip using 2x butt hinges.


Fix the hinges to the window


using 3x16mm screws per


hinge and to the strip with


3x30mm screws.

12x16mm Screws

12x30mm Screws


If you would like the window 


to be fixed, secure the window


into the gap using 4x30mm


screws. Ensure to screw through


the window into the panel


framing.

8x30mm Screws

b

a

11

Opening Window

Fixed Window

30mm 

screw

30mm 

screw

16mm 

screw

30mm 

screw

22

16

Pre drill 

hole

a

b

Summary of Contents for 01GRODB1008-V3

Page 1: ...based treatment this only helps to protect the product during transit and for upto 3 months against mould To validate your guarantee and ensure longevity of the product it is ESSENTIAL the building is...

Page 2: ...x16 16mm Screws x14 Pre Assembly Remove transportation blocks from the bottom of each panel before beginning assembly Each Panel should have two blocks 20mm Screw x22 P 2 01GRODB1008 V3 Overall Dimens...

Page 3: ...r panel framing as shown in the illustration and fix in place using 40mm screws 6x40mm Screws Pre drill hole 40mm screw 15 14 14 Step 3 Fix the door strips onto the front gable using 4x30mm screws for...

Page 4: ...and instructions for future reference Please retain product label and instructions for future reference Pre drill hole Pre drill hole Step 7 Place the cover strip 13mm above the gap in the window pan...

Page 5: ...a tongue and groove fixing 8x50mm Screws 8 8 Step 9 Place the assembled plain gable and first plain side onto the floor and fix in place Fix the corners with 50mm screws Do not secure the building to...

Page 6: ...e lrg roofs onto the gables as shown in the illustration Ensure the roof framing sits into the cut out sections and rest on the framing Fix each sml roof section to the gable using 7x30mm screws per r...

Page 7: ...a boards to the front and rear of the building using 3x40mm screws per fascia Ensure to screw through the boards into the framing 24x40mm Screws Pre drill hole 40mm screw Step 18 Fix the barge boards...

Page 8: ...ernal horizontal framing ensure alignment with the pre drilled holes before fixing Align Lock keep with lock and fix with screws provided Do not over tighten the screws otherwise the locking mechanism...

Reviews: