background image

19U QSFP SDR/DDR/QDR InfiniBand Switch Platform User’s Manual

Rev 1.7

Mellanox Technologies

23

3.2.2.1 Installing the Bottom Shelf

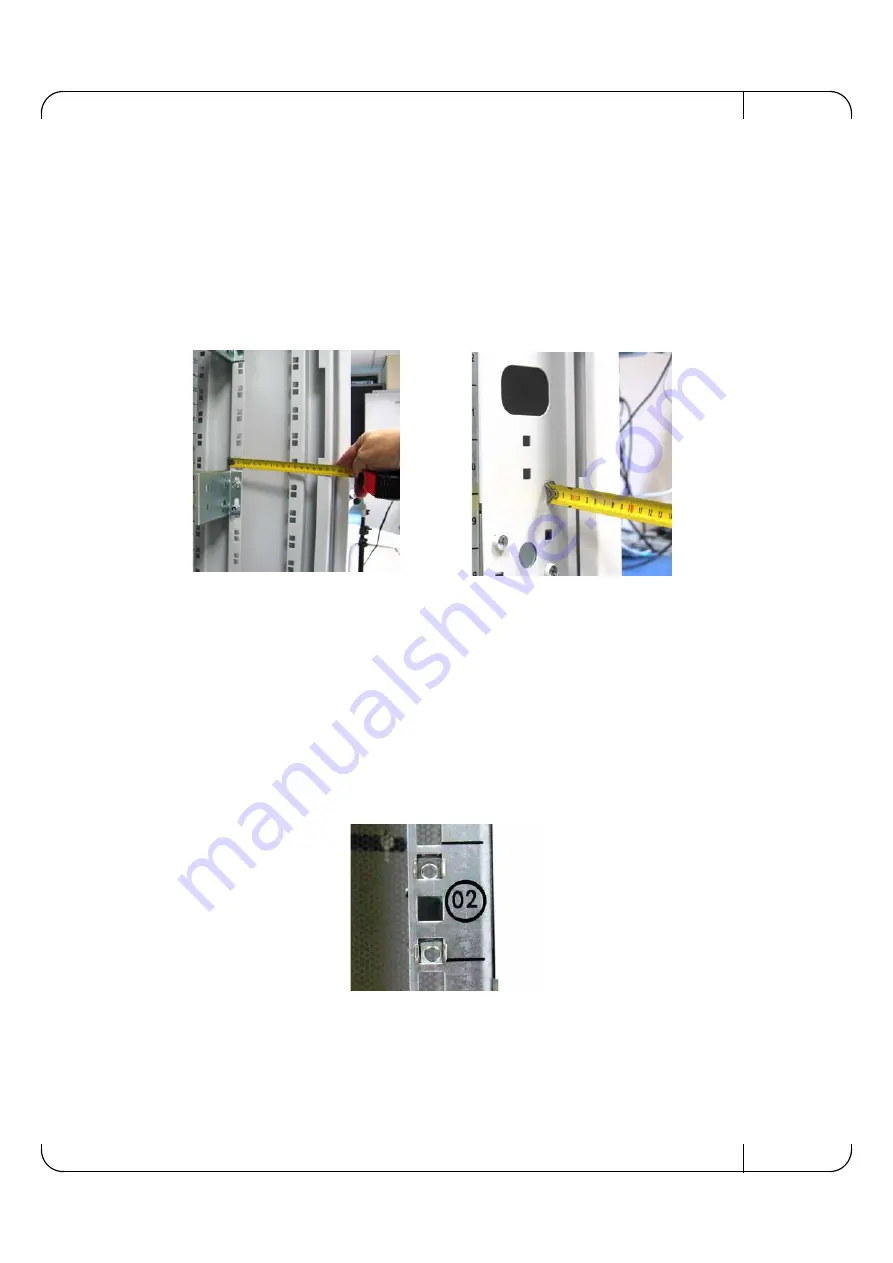
1. Select the location in the rack. Try to keep the chassis as low as possible to keep the center of 

gravity low. 

Choose which way you want the chassis to face in the rack. Keep in mind that one side of the chas-
sis can have up to 324 cables connected. The other side of the chassis will have power cables. The 
distance between the rack and the door will be small on one side of the rack as opposed to the other 
side of the rack.

Figure 11: Vertical Rails to Cabinet Measurement

Note: The side of the chassis with the power supply units will sit flush with the vertical supports 
of the rack. The side of the chassis with the QSFP connectors will sit at the edge of the shelf 
closer to the center of the rack.   

Note: place the chassis as low as possible in the rack to keep the center of gravity as low as pos-
sible.

2. Insert four caged nuts into the rack on the side you plan to have the connectors. Note the U num-

ber on the rack.

Figure 12: Caged Nut Insertion

3. Screw the rail slides onto the rack.

Summary of Contents for MTS3610D-6UNC

Page 1: ...www mellanox com 324 PORT QDR InfiniBand Switch Platform User s Manual PN MTS3610Q 6UNC MTS3610D 6UNC Rev 1 7...

Page 2: ...OR THE PURPOSE OF AIDING THE CUSTOMER IN TESTING APPLICATIONS THAT USE THE PRODUCTS IN DESIGNATED SOLUTIONS THE CUSTOMER S MANUFACTURING TEST ENVIRONMENT HAS NOT MET THE STANDARDS SET BY MELLANOX TECH...

Page 3: ...assis 21 3 2 3 Ground Connections 26 3 2 4 Installing the Cable Holder 27 3 2 5 Power Connections 27 3 2 6 InfiniBand QSFP Cable Installation 30 Chapter 4 Switch Power Up 31 4 1 Power Supply and Spine...

Page 4: ...ing 47 9 1 Power Supply Unit 47 9 2 LeafBoard 47 9 3 ManagementModule 48 9 4 SpineBoard 48 9 5 ManagementModule 49 Appendix A 19U QSFP DDR QDR IB Switch Specification Data 50 Appendix B Mechanical Dra...

Page 5: ...24 Figure 14 Shelf Installation 24 Figure 15 Mechanical Lifting Device 24 Figure 16 Face Plate Mounting Bolt Locations 25 Figure 17 Lock Down Bar 26 Figure 18 Ground Connection 26 Figure 19 Electrica...

Page 6: ...nual 8 Table 3 Switch Rack Mechanical and Environmental Requirements Fully Populated Chassis 10 Table 4 LEDs Display for Normal Operation 18 Table 5 HCA Cards Certification Status 50 Table 6 Switch Sp...

Page 7: ...s Note that the Switch System described in this manual is based on Mellanox Technologies InfiniScale IV switch device FabricIT Enterprise Fabric Management Software CLI User s Manual Talk to your Mell...

Page 8: ...power cable type to parts list 1 6 May 2009 Added WEEE Disposal section Added Disassembly instructions Explanation of the Mammoth Chassis GUID Minor formatting changes Removed line 5 Make sure the Lea...

Page 9: ...and requires an InfiniBand compliant Subnet Manager run ning from one of the hosts All that is required for normal operation is to follow the usual precau tions for installation and to connect the sw...

Page 10: ...and rear sides fully populated Table 3 Switch Rack Mechanical and Environmental Requirements Fully Populated Chassis Rack Height Rack Width Rack Depth Weight Max Power 324 x QSFP Ports Ambient Temp 19...

Page 11: ...fit in the chassis Spine Fan Module with four internal fans Two management Modules Up to 8 Power Supply Units 6 Required and 2 for redundancy to allow hotswapping The chassis needs all nine spines for...

Page 12: ...a mechanical lift to avoid injuries This equipment should not be operated in an area with an ambient tem perature exceeding the maximum recommended 45 C 113 F More over to guarantee proper air flow a...

Page 13: ...nings instructions When this product is mounted or serviced in a rack special precautions must be taken to ensure that the system remains stable In general you should fill the rack with equipment star...

Page 14: ...connecting this device to the power line the protective earth terminal screws of this device must be connected to the protective earth in the building installation This device must be installed accord...

Page 15: ...con nector When the Green board status LED labelled PWR is on this indicates that there is power to the leaf board If the Green LED is off uninstall and reinstall the leaf board When the Yellow board...

Page 16: ...oards Each leaf board is connected by two links to each spine module These are displayed on the spine as link A and link B The two status LEDs for the spine have the configuration shown in Figure 7 Th...

Page 17: ...he condition of the leaf as follows Link A and Link B Each of the leafs is connected to each of the spines through two links Yellow indicates that there is a logical connection to the spines through t...

Page 18: ...alt values for the configuration are implemented Figure 8 Management Module Status Indications The management module LEDs display the switch system operating conditions Table 5 LEDs Display for Normal...

Page 19: ...detected fan broken can t reach full RPMs Green MASTER SLAVE off no power Green Management module is operating as a master i e the other management module is a Slave Yellow Management module is operat...

Page 20: ...nagement modules according to the amount ordered If only 1 management module is ordered then one management module blank will be in the package 1 power cable for each PSU Type B 13ft US 125V 15A Right...

Page 21: ...ulated Chassis Note A 20U mounting space is required for proper installation of the switch platform 3 2 1 ESD Connection Before starting any procedure on the MTS3610 Switch system 1 Put an ESD prevent...

Page 22: ...cluded in the installation kit Figure 10 Installation Kit Parts Before starting the procedure put the ESD strap on connect it to a valid ground 1 shelf 5 Allen head screws 1 lock down bar 5 washers 4...

Page 23: ...rack and the door will be small on one side of the rack as opposed to the other side of the rack Figure 11 Vertical Rails to Cabinet Measurement Note The side of the chassis with the power supply unit...

Page 24: ...ur bolts and keep them within reach 6 Slide the shelf onto the rail slides 7 Connect the shelf to the rack Figure 14 Shelf Installation 8 Tighten all eight bolts into the caged nuts 3 2 2 2 Inserting...

Page 25: ...nuts into the vertical rack support at the locations corresponding to the holes in the chassis faceplate Figure 16 Face Plate Mounting Bolt Locations 8 Slide the chassis onto the shelf until the face...

Page 26: ...otential discharge A ground wire of AWG 6 or 4mm diameter is recommended for grounding this device The chassis is concurrently grounded through each of the PSUs Only connect the PSU cords to properly...

Page 27: ...ring 1000W supply units The slots for the eight power supply units PSUs are on the front panel and are labelled 1 8 Three are placed horizontally across the top and five are mounted vertically along t...

Page 28: ...e load over at least two or three circuits Figure 19 Electrical Cable Clamp The switch system requires at least six PSUs to operate a fully populated platform The seventh and eighth PSUs provide a fai...

Page 29: ...for concern and must be dealt with immediately CAUTION Risk of electric shock and energy hazard The PSUs are all independent Disconnect all power supplies to ensure a powered down state inside of the...

Page 30: ...r onto the port receptacle until the connector is firmly seated The green LED indicator above the port will light when the physical connection is established when both ends of the cable are properly c...

Page 31: ...e OFF 2 There is a green Status LED per spine board per leaf board and per management module that indicates power supplies are good 3 Spine Board indicators will display status of internal links to th...

Page 32: ...stem features up to 25 9 Tbit sec IB ports in QDR mode Constant Bisectional Bandwidth CBB Fat Tree topology that the Subnet Manager will discover and con figure to enable a full cluster to operate For...

Page 33: ...n be extracted without bringing down the system At least five PSUs must remain working during a hotswap The power required to run the switch system is equally divided between all of the working PSUs W...

Page 34: ...the two screws Note The green indicators should light If not extract the PSU and re insert it again 5 3 Leaf Boards The leaf boards are numbered from top to bottom with corresponding numbers displayed...

Page 35: ...t the leaf board into the side guide rails and slowly slide the board into the chassis until the ejectors begin to engage on the chassis edge 3 Press the ejectors inward until the locks snap This indi...

Page 36: ...2 Inserting a Spine Board The top of the spine is the side with the model number and the two spine LEDS 1 Hold the spine board with the top up with one hand supporting its bottom and the other graspin...

Page 37: ...hould a single fan fail the LED on the man agement module will light indicating the necessity to replace the fan module The air flow through the module is outside air is brought through the fan module...

Page 38: ...t module is off indicating that all fans are rotating 4 Screw back the four captive screws 5 5 2 Spine Fan Modules The spine fan module contains four individual fans Should a single fan fail the LED o...

Page 39: ...s 5 6 1 Extracting a Management Module Management modules are located on the rear side at the bottom of the switch system There are two places to install the management modules Note Only one managemen...

Page 40: ...jectors inward until the locks snap This indicates that the board is fully seated 4 Screw in the captive retaining screws on the outside of each ejector to lock the management module in place 5 7 Repl...

Page 41: ...ert the management module in the chassis 5 8 Over temperature Shutdown Mechanism Each leaf board and each spine board has its own on board thermal sensor to track PCB tempera ture If a PCB s temperatu...

Page 42: ...holding down the lock down bar on the rear side of the chassis Figure 27 Lock Down Bar 9 Remove the lock down bar 10 Remove the 10 screws holding the chassis to the rack These screws are located in th...

Page 43: ...e bolts to the four corners of the top of the chassis 2 Connect the eye bolts to a mechanical lifting device Figure 29 Mechanical Lifting Device 3 Raise the chassis 2 cm 1 above the level of the shelf...

Page 44: ...ve the four caged nuts 4 Remove the rail slides from the rack Figure 31 Rail Slide Removal 5 Remove the four caged nuts 6 2 Disposal According to the WEEE Directive 2002 96 EC all waste electrical and...

Page 45: ...manage ment via FabricIT EFM The chassis comes with a module that will completely manage your chas sis An optional management module in combination with the licensing fee for full access to the Fabric...

Page 46: ...and documentation please visit the following Web page FabricIT http www mellanox com content pages php pg fabric_it_login Note that you will need to enter the License Entitlement number and the chassi...

Page 47: ...the OK power LED is off or the FAIL LED is on Replace the PSU 9 2 Leaf Board The power LED for the Leaf board is off 1 Make sure that at least six PSUs are showing DC OK 2 Uninstall and reinstall in...

Page 48: ...holes 2 If you find dust blocking the holes it is recommended to clean the fan unit and remove the dust from the front and rear panels of the switch using a vacuum cleaner 3 Remove and reinstall the...

Page 49: ...ment Module 1 Check that there is power to the management module 2 Remove and reinstall management module Make sure the mating connectors of the unit is free of any dirt and or obstacles See Section 5...

Page 50: ...spines SerDes Speeds Connector Types 33 15 x 19 x 25 7 inches 842 mm x 482 6mm x 652 8mm 105 68 kg minimum configuration 233 lbs minimum configuration 153 kg full configuration 337 lbs full configura...

Page 51: ...Canada ICES Class A EU EN55022 Class A EU EN55024 Class A EU EN61000 3 2 Class A EU EN61000 3 3 Class A Japan VCCI Class A EU IEC 60068 2 64 Ran dom Vibration EU IEC 60068 2 29 Shocks Type I II EU IE...

Page 52: ...case the user will be required to correct the interference at his own expense A 1 1 EN Statements Europe EN55022 Class A Statement A 1 2 ICES Statements Canada Class A Statement This Class A digital...

Page 53: ...2 13 14 7 8 9 10 11 15 16 17 18 MTS3610 ATTN PWR 1 2 3 4 B A 5 6 12 13 14 7 8 9 10 11 15 16 17 18 MTS3610 ATTN PWR B A MTS3610 ATTN PWR 1 2 3 4 B A 5 6 12 13 14 7 8 9 10 11 15 16 17 18 MTS3610 ATTN PW...

Page 54: ...17 11 12 13 14 8 7 6 5 4 3 2 1 9 10 16 15 18 17 11 12 13 14 8 7 6 5 4 3 2 1 9 10 16 15 18 17 11 12 13 14 8 7 6 5 4 3 2 1 9 10 16 15 18 17 11 12 13 14 8 7 6 5 4 3 2 1 9 10 16 15 18 17 11 12 13 14 8 7 6...

Page 55: ...6 Tx4p Transmitter Non Inverted Data Input 7 GND Ground 8 ModSelL Module Select 9 ResetL Module Reset 10 Vcc Rx 3 3 V Power supply receiver 11 SCL 2 wire serial interface clock 12 SDA 2 wire serial i...

Page 56: ...8 3 3 3 3 3 3 3 3 RX4p GND GND GND RX4n RX2p RX2n TX1n GND TX1p GND TX3n TX3p GND IntL ModPrsL VccTx Vcc1 LPMode 18 35 8 50 Top ResetL SDA SCL ModSelL RX3p TX2n GND VccRx 1 2 3 4 5 6 7 8 9 1 0 1 2 3...

Page 57: ...19U QSFP SDR DDR QDR InfiniBand Switch Platform User s Manual Rev 1 7 Mellanox Technologies 57 Appendix D Ethernet RJ 45 Connector Figure 35 Ethernet RJ45 Connector...

Page 58: ...07 00 0 addr reg 88 data reg 92 Chip revision is A0 dev mst mt25418_pci_cr0 PCI direct access bus dev fn 07 00 0 bar 0xe2000000 size 0x100000 Chip revision is A0 dev mst mt25418_pci_msix0 PCI direct...

Page 59: ...opology file is not specified Reports regarding cluster links will use direct routes Loading IBDM from usr lib64 ibdm1 2 I Using port 1 as the local port I Discovering 32 nodes 26 Switches 6 CA s disc...

Page 60: ...I I skip option set no report will be issued I I Bad Links Info I No bad link were found I I Stages Status Report STAGE Errors Warnings Bad GUIDs LIDs Check 0 0 Link State Active Check 0 0 Performanc...

Page 61: ...0xe2000000 size 0x100000 Chip revision is A0 dev mst mt25418_pci_msix0 PCI direct access bus dev fn 07 00 0 bar 0x00000000 size 0x0 dev mst mt25418_pci_uar0 PCI direct access bus dev fn 07 00 0 bar 0x...

Page 62: ...lid 0x0013 dev mst SW_MT48438_lid 0x0014 dev mst SW_MT48438_lid 0x0015 dev mst SW_MT48438_lid 0x0016 dev mst SW_MT48438_lid 0x0017 dev mst SW_MT48438_lid 0x0018 dev mst SW_MT48438_lid 0x0019 dev mst S...

Page 63: ...mswg release fw IS4 last_revision fw IS4 mlx I Querying device I Using auto detected configuration file mswg release fw IS4 last_revision MTS3611QC ini PSID MT_0C60000003 I Using auto detected hash fi...

Page 64: ...PU MTS3610U CPU management module with PPC MTS3610MDC Management module blank MTM003610 Rack installation kit MTR003610 Fan unit for leafs MTF001234 Fan unit for spines MTF001254 DB9 to RJ45 Harness H...

Page 65: ...19U QSFP SDR DDR QDR InfiniBand Switch Platform User s Manual Rev 1 7 Mellanox Technologies 65 Power cord Type B for Japan ACC000212 Power cord Type I for Australia ACC000213 Part Description OPN...

Page 66: ...Rev 1 7 Mellanox Technologies 66...

Page 67: ...moins 8 cm 3 pouces d espace libre autour des ouvertures de ventilation Le ch ssis ne doit pas tre empil sur un autre mat riel Si le ch ssis tombe il peut provoquer des blessures corporelles et des d...

Page 68: ...iment Ce mat riel ne doit tre install remplac ou entretenu que par du personnel form et qualifi L limination de ce mat riel doit s effectuer dans le respect de toutes les l gis lations et r glementati...

Page 69: ...z un cordon lec trique homologu UL et certifi CSA 3 conducteurs 18 AWG termin par une fiche moul e d une tension nom inale de 125 V 15 A avec une longueur minimale de 1 5 m 6 pieds et d une longueur m...

Page 70: ...ndfreien Luftstrom zu gew hrleis ten Das Chassis sollte nicht auf andere Ger te gestapelt werden Wenn das Chassis herunterf llt kann es zu Verletzungen und Besch digungen an Ger ten f hren Dieses Prod...

Page 71: ...elektrischen Bestimmungen installiert werden Geeigneter elekrischer mechanischer und Feuerschutz sind vom Hersteller des Endprodukts oder dem Endbenutzer bereitzustellen F r Nordamerika Stromanschluss...

Page 72: ...neueste Version des Landes National Electrical Code F r Nordamerika m ssen in bereinstimm ung mit den geltenden Vorschriften in der US amerikanischen National Elec trical Code und dem Canadian Electri...

Page 73: ...earthing conductor Unit shall be plugged into a wall socket outlet which is connected to protective earth Socket outlets which are not connected to earth shall not be used 2 Finland 3 Norway 4 Sweden...

Reviews: