T. 1300 222 445 | www.melec.com.au
For further information about our Warranties please go to:
melec.com.au/legal/warranties
INSTALLATION GUIDE
Zigbee to DALI+0/1-10V 2 in 1 Converter
Function introduction
Important:
Read All Instructions Prior to Installation
Product Data
•
DO NOT set the DIP switches with power applied to the device.
•
DO NOT install with power applied to device.
•
DO NOT expose the device to moisture.
Safety & Warnings
•
Zigbee to DALI+0/1-10V 2 in 1 converter based on zigbee 3.0
•
Zigbee signal input 110-240VAC power input, DALI signal output to DALI line or 0/1-10V signal output,
•
Max. 5A relay output and metering function
•
Compatible with universal Zigbee gateway or hub products
•
Can directly pair to a compatible ZigBee remote via Touchlink
•
Compatible with universal Zigbee remotes
•
Supports self-forming zigbee network without coordinator
•
Supports find and bind mode to bind a ZigBee remote
•
Supports zigbee green power and can bind max. 20 zigbee green power remotes
•
DALI signal or 0/1-10V signal output selectable by DIP switches
•
Built-in DALI bus power supply, no extra DALI bus PS required
•
With max. 50mA DALI bus power current output
•
Able to supply control current to up to 25 DALI control devices
•
DALI DT6 or DT8 device type selectable by DIP switch
under
DALI
mode
•
Color control according to DALI specifications of Device Type 8,
•
Color type: Tc, XY coordinates, RGBW selectable by DIP switches
•
DALI address control mode or group control mode selectable by DIP switch
•
DALI address (00-63) to be controlled by DIP switches
•
DALI group (0-15) to be controlled by DIP switches
•
Control 1 DALI Group of devices or 1 DALI Address on DALI line
•
Control all devices on DALI line via broadcast
•
Waterproof grade: IP20
110-240V AC
power input
DIM
DT8 Tc
1 2 3 4 5 6 7 8
DT8 XY Coordinates
DT8 RGBW
1 2 3 4 5 6 7 8
9 10
Address Mode
Group Mode
1 2 3 4 5 6 7 8 9
9 10
DALI
1 2 3 4 5 6 7 8
Operation
1) Select
DALI or 0/1-10V Output Using
DIP
Switch 10
0/1-10V
1 2 3 4 5 6 7 8 9 10
9 10
Switch up
Note:
once DALI output is selected, please then select the DALI device type you would like to control by
the
DIP
switches.
3) Select DALI Address or Group Control Mode Using D
IP
Switch 7
Note:
once DALI device type is selected, please then select address control mode or group control mode
by
DIP
switch.
0
1
2
3
4
5
6
4)
Note: here device type is selected as DIM as an example, please select your correct DALI device type.
Select the DALI Group to be Controlled Using D
IP
Switches 2-6
9
10
11
12
13
14
15
1 2 3 4 5 6 7
7
9 10
Controlled group
Controlled group
Note: 1)
once DALI device type and group control mode are selected, please then select the DALI group
(0-15 selectable) to be controlled on DALI line by
DIP
switches.
2)
The control gear that is assigned to the selected DALI group on DALI line will be controlled.
3)
The control gear shall be first grouped by a DALI master controller, please refer to the user manual of
corresponding master controller.
8
8
9 10
10
9 10
1 2 3 4 5 6 7 8 9 10
Switch
up
Switch down
1 2 3 4 5 6 7 8 9 10
Switch up
Switch down
1 2 3 4 5 6 7 8
1 2 3 4 5 6 7 8 9 10
Switch up
Switch down
1 2 3 4 5 6 7 8
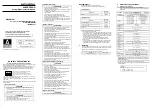
Input
Output, relay
110-240VAC
Max. 4mA
Max. 20mA
Current
Resistive
5A
LED
1.6 A
Power
Current
Operating
temperature
-20
℃
-+50
℃
Signal
Zigbee
2.4GHz
Output, DALI
Output,
0/1-10V
DALI PS
current
Max. 50mA
DALI current
consumption
Switching
voltage
110-240VAC
Relative
humidity
8% to 80%
Environment
Dimensions
80x36x20.5mm
Others
Broadcast
Relay output,
max. 5A
DALI (DA-, DA+)
or
0/1-10V output (+, -)
LED indicator
Program key, for network pairing, touchlink, and factory reset of the device
Dip switches to select DALI or 0/1-10V output, DALI DT6 or DT8 color type, DALI address
or group control mode, DALI address to be controlled, DALI group to be controlled
DALI Add.
1
5
3
7 9
2
6
4
8 10
L
L1
N
N
DA/-
DA/+
Prog.
DALI
0/1-10V
Input Voltage: 110-240V AC
Output Current: 1x5A max
ZigBee to DALI+0/1-10V
2 in 1 Converter with Relay
ta:-20
℃
-+50
℃
1 2 3 4 5 6 7 8 9 10
Switch down
Note:
please first select output signal by the
DIP
switch.
2) Select DALI Device Type (DT6/DT8 Color Type) to be Controlled Using DIP Switches 8-9
Zigbee to DALI+0/1-10V 2 in 1 Converter
Function introduction
Important:
Read All Instructions Prior to Installation
Product Data
•
DO NOT set the DIP switches with power applied to the device.
•
DO NOT install with power applied to device.
•
DO NOT expose the device to moisture.
Safety & Warnings
•
Zigbee to DALI+0/1-10V 2 in 1 converter based on zigbee 3.0
•
Zigbee signal input 110-240VAC power input, DALI signal output to DALI line or 0/1-10V signal output,
•
Max. 5A relay output and metering function
•
Compatible with universal Zigbee gateway or hub products
•
Can directly pair to a compatible ZigBee remote via Touchlink
•
Compatible with universal Zigbee remotes
•
Supports self-forming zigbee network without coordinator
•
Supports find and bind mode to bind a ZigBee remote
•
Supports zigbee green power and can bind max. 20 zigbee green power remotes
•
DALI signal or 0/1-10V signal output selectable by DIP switches
•
Built-in DALI bus power supply, no extra DALI bus PS required
•
With max. 50mA DALI bus power current output
•
Able to supply control current to up to 25 DALI control devices
•
DALI DT6 or DT8 device type selectable by DIP switch
under
DALI
mode
•
Color control according to DALI specifications of Device Type 8,
•
Color type: Tc, XY coordinates, RGBW selectable by DIP switches
•
DALI address control mode or group control mode selectable by DIP switch
•
DALI address (00-63) to be controlled by DIP switches
•
DALI group (0-15) to be controlled by DIP switches
•
Control 1 DALI Group of devices or 1 DALI Address on DALI line
•
Control all devices on DALI line via broadcast
•
Waterproof grade: IP20
110-240V AC
power input
DIM
DT8 Tc
1 2 3 4 5 6 7 8
DT8 XY Coordinates
DT8 RGBW
1 2 3 4 5 6 7 8
9 10
Address Mode
Group Mode
1 2 3 4 5 6 7 8 9
9 10
DALI
1 2 3 4 5 6 7 8
Operation
1) Select
DALI or 0/1-10V Output Using
DIP
Switch 10
0/1-10V
1 2 3 4 5 6 7 8 9 10
9 10
Switch up
Note:
once DALI output is selected, please then select the DALI device type you would like to control by
the
DIP
switches.
3) Select DALI Address or Group Control Mode Using D
IP
Switch 7
Note:
once DALI device type is selected, please then select address control mode or group control mode
by
DIP
switch.
0
1
2
3
4
5
6
4)
Note: here device type is selected as DIM as an example, please select your correct DALI device type.
Select the DALI Group to be Controlled Using D
IP
Switches 2-6
9
10
11
12
13
14
15
1 2 3 4 5 6 7
7
9 10
Controlled group
Controlled group
Note: 1)
once DALI device type and group control mode are selected, please then select the DALI group
(0-15 selectable) to be controlled on DALI line by
DIP
switches.
2)
The control gear that is assigned to the selected DALI group on DALI line will be controlled.
3)
The control gear shall be first grouped by a DALI master controller, please refer to the user manual of
corresponding master controller.
8
8
9 10
10
9 10
1 2 3 4 5 6 7 8 9 10
Switch
up
Switch down
1 2 3 4 5 6 7 8 9 10
Switch up
Switch down
1 2 3 4 5 6 7 8
1 2 3 4 5 6 7 8 9 10
Switch up
Switch down
1 2 3 4 5 6 7 8
Input
Output, relay
110-240VAC
Max. 4mA
Max. 20mA
Current
Resistive
5A
LED
1.6 A
Power
Current
Operating
temperature
-20
℃
-+50
℃
Signal
Zigbee
2.4GHz
Output, DALI
Output,
0/1-10V
DALI PS
current
Max. 50mA
DALI current
consumption
Switching
voltage
110-240VAC
Relative
humidity
8% to 80%
Environment
Dimensions
80x36x20.5mm
Others
Broadcast
Relay output,
max. 5A
DALI (DA-, DA+)
or
0/1-10V output (+, -)
LED indicator
Program key, for network pairing, touchlink, and factory reset of the device
Dip switches to select DALI or 0/1-10V output, DALI DT6 or DT8 color type, DALI address
or group control mode, DALI address to be controlled, DALI group to be controlled
DALI Add.
1
5
3
7 9
2
6
4
8 10
L
L1
N
N
DA/-
DA/+
Prog.
DALI
0/1-10V
Input Voltage: 110-240V AC
Output Current: 1x5A max
ZigBee to DALI+0/1-10V
2 in 1 Converter with Relay
ta:-20
℃
-+50
℃
1 2 3 4 5 6 7 8 9 10
Switch down
Note:
please first select output signal by the
DIP
switch.
2) Select DALI Device Type (DT6/DT8 Color Type) to be Controlled Using DIP Switches 8-9