19
Settings
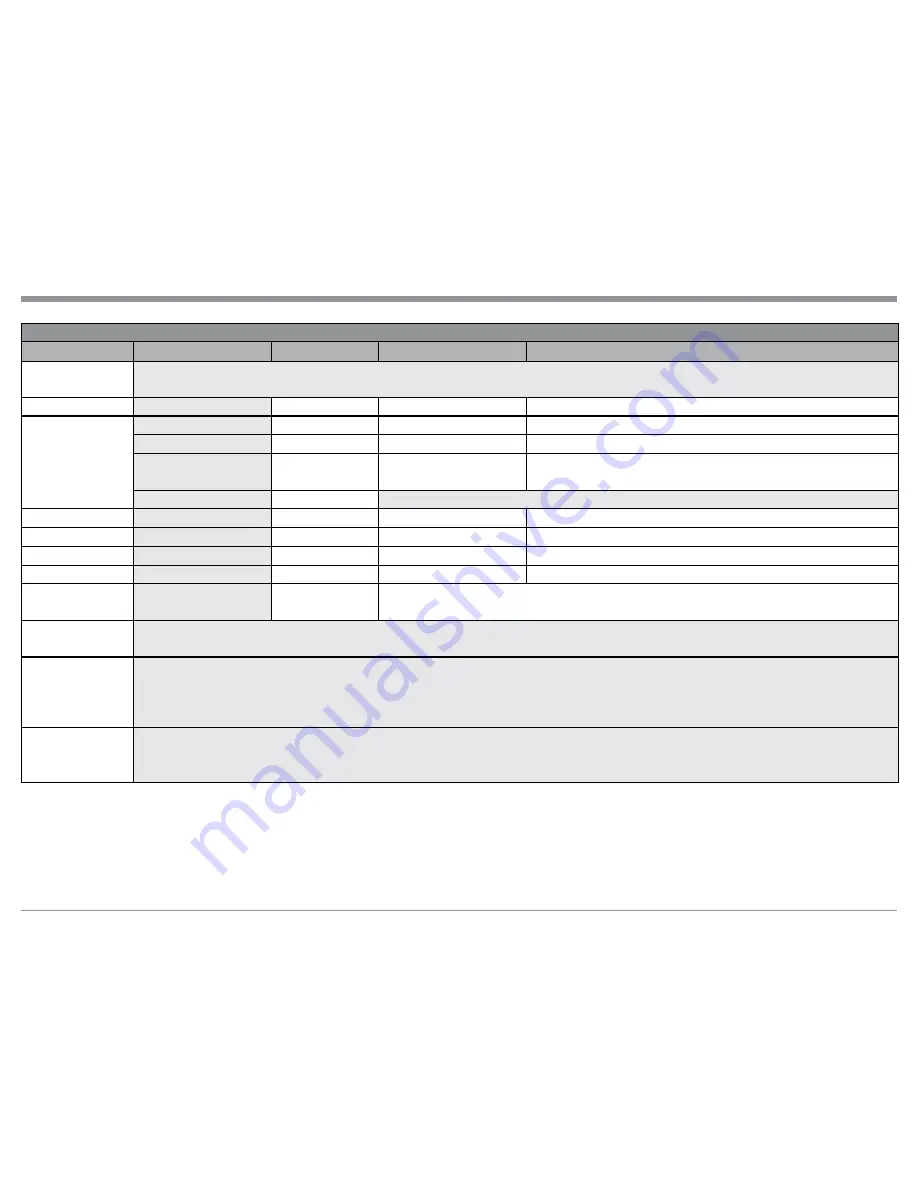
SOURCE SETUP MENU
MENU ITEM
SUB MENU
SELECTION
OPTION(S)
DESCRIPTION
Create a New Source
Refer to the MX160 Separate Sheet Menu 2, “Create new source”
Note: After a new Source Input and its settings have been entered, select the "Accept" icon push-button by pressing the SELECT push-button on the Remote Control
Source name
●Blank
Up to 27 characters long
Press SELECT to use the built-in keyboard, select "CLOSE" to exit
Volume offset
●0.0dB
-20dB to +20dB
Press SELECT, then use directional Left
t
or Right
u
, to enter value
Default (audio) postprocessing
●Dolby Upmixer
Choose one of 9 choices
Press SELECT, then use directional Up
p
or Down
q
, to enter value
Video input
●None
Choose one of 9 choices
Press SELECT, then use directional Up
p
or Down
q
, to enter value, HDMI Internal
will display On-Screen the McIntosh Logo when Audio Only Inputs are selected
IR command
●None
Note: Contact your Dealer for assistance in selecting the IR Command Settings
Lipsync offset
●0ms
0-223ms
Press SELECT, then use directional Up
p
or Down
q
, to enter value
Audio input
●None
Choose one of 19 choices
Press SELECT, then use directional Up
p
or Down
q
, to enter value
Data out
●None
Choose one of 4 Data Ports
Press SELECT, then use directional Up
p
or Down
q
, to enter value
Default voicing
●Neutral
Choose one of 9 choices
Press SELECT, then use directional Up
p
or Down
q
, to enter value
Trigger out
●None
Before a choice can be made, the System configuration "Trigger out setup" needs to be setup first, refer to page 27 and
MX160 Separate Sheet Menu 9. Press SELECT, then use directional Up
p
or Down
q
, to enter value
Edit Existing Sources
Refer to the MX160 Separate Sheet Menu 2, “Edit” source
Follow the above “Create a new Source” Selection, Option(s) and Description for altering the existing Source Inputs and their default settings
Arrange Sources
Refer to the MX160 Separate Sheet Menu 2, “Arrange” source
Follow the On-Screen instructions for changing the order of appearances for selection of the used MX160 Inputs without deleting the non-used Inputs to shorten the time it takes to
select the desired input using the INPUT Control and/or the REMOTE CONTROL INPUT
p
or
q
Push-button
Delete Sources
Refer to the MX160 Separate Sheet Menu 2, “Delete” source
Follow the On-Screen instructions for Deleting MX160 Inputs shorten the time it takes to select the desired input using the INPUT Control and/or the REMOTE CONTROL
INPUT
p
or
q
Push-button
Summary of Contents for MX160
Page 13: ...13 ...
Page 29: ...29 e XX Notes ...
Page 37: ...37 How to Operate Zone B Figure 68 ...
Page 39: ...39 Advanced Operation and Setup Figure 72 Figure 73 Figure 74 ...


