18
settings after major changes are made to the equip-
ment of your Home Theater System. Follow the steps
below on how to activate a “A Reset to Factory Default
Settings”.
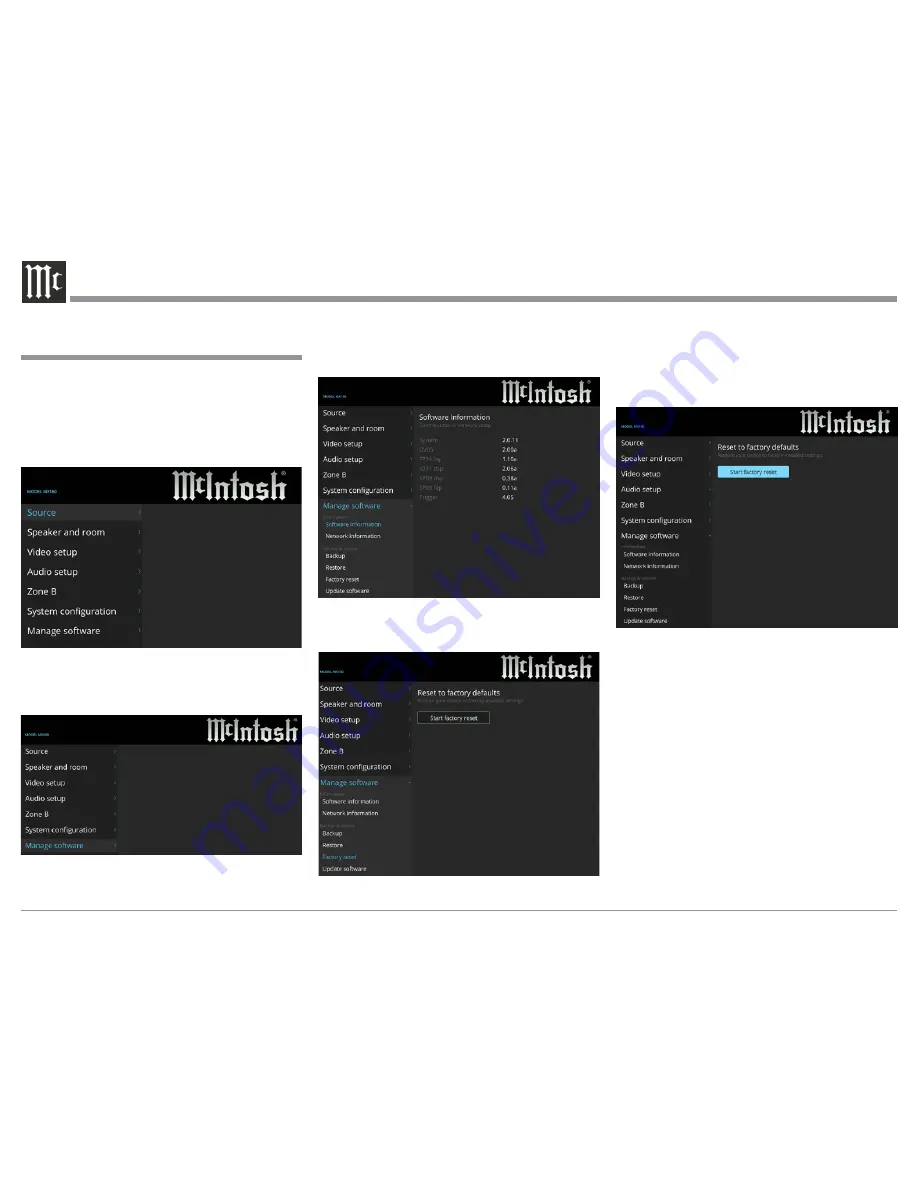
1. Press the SETUP Push-button on the Remote Con-
trol and the Main Setup Menu will appear on the
Monitor/TV screen. Refer to figure 7.
2. Select “Manage software” by using the Down
q
Directional Push-button on the Remote Control.
Refer to figure 8.
3. Press the Right
u
Directional Push-button on the
Remote Control and the “Manage software” sub-
Introduction to the MX160 Setup Mode,
con’t
Figure 7
Figure 10
Menus will appear. Refer to figure 9.
4. Select “Factory reset” by using the Down
q
Directional Push-button on the Remote Control.
Refer to figure 10.
Figure 9
Figure 8
5. Press the Right
u
Directional Push-button to
Highlight the “Start factory reset”. Refer to
figure 11.
6. To implement the return to Factory Default Set-
tings for the MX160, press the SELECT Push-
button. If you do not want to reset the MX160 at
this time, press the SETUP Push-Button to exit the
MX160 SETUP Mode.
For the vast majority of MX160 Owners, the Default
Settings and Suggested Component Connections are
all one needs for full enjoyment of movies and music.
The MX160 Setup Mode has a number of additional
options for your Home Theater System. Usually, your
McIntosh Dealer and/or Custom Installer uses these
additional capabilities. The navigation and selection
methods previously illustrated also apply to the re-
mainder of Setup Mode Settings on the next page.
If not, proceed to “How to Operate the MX160” start-
ing on page 30.
Figure 11
Summary of Contents for MX160
Page 13: ...13 ...
Page 29: ...29 e XX Notes ...
Page 37: ...37 How to Operate Zone B Figure 68 ...
Page 39: ...39 Advanced Operation and Setup Figure 72 Figure 73 Figure 74 ...


