background image


MaxPac Single/Dual/Triple-Screen 8230 Training and Maintenance Guide 


73


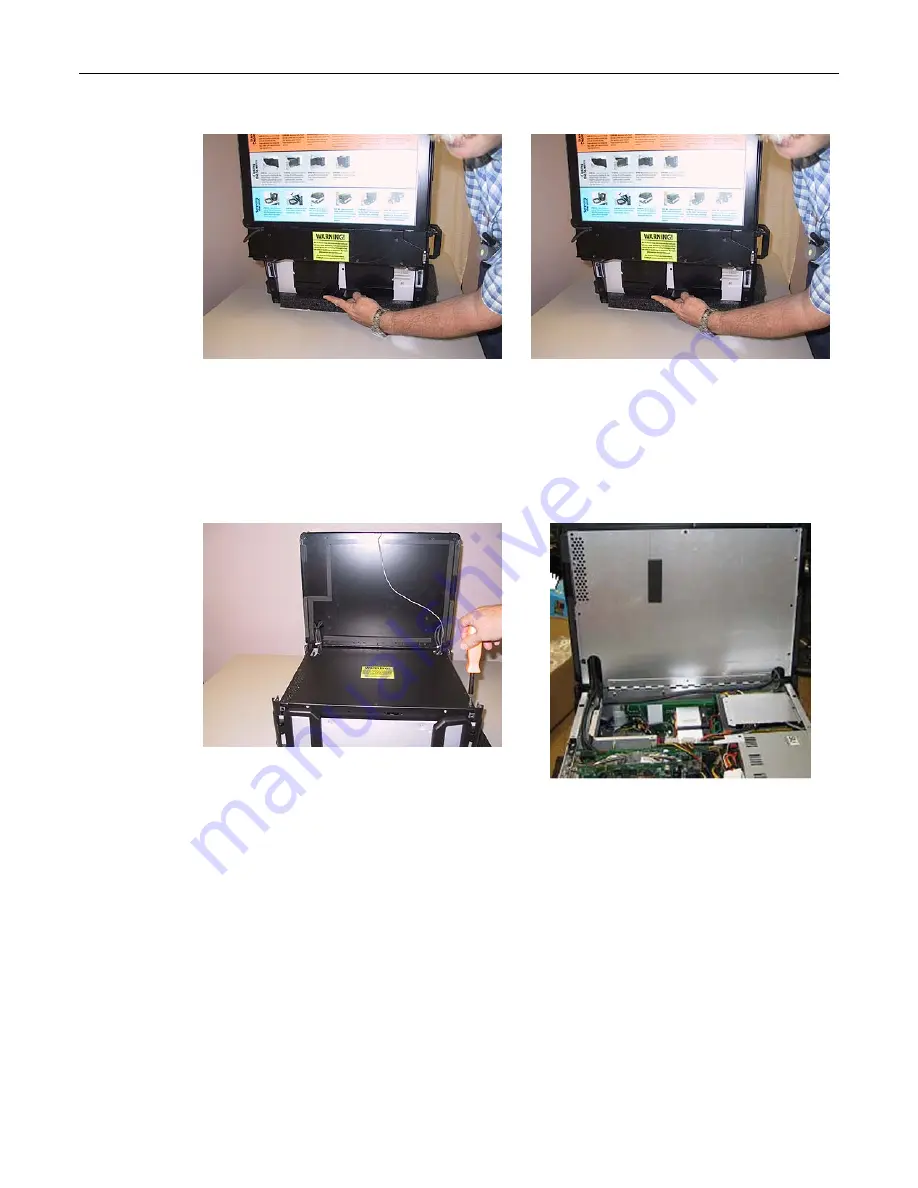
Figure 5-30 


Figure 5-31 


7)  Pull the support stands down to their maximum extended (service) position as illustrated in Figure 

5-31 (ensure that, when you release the supports, their spring mechanism expands them back 
into their locked position). 

8)  Return to facing the top of the system and use a Phillips #2 screwdriver to remove the five 6-32 

1/4" black countersunk screws – three on the top and one on each site – holding the inner 
chassis cover (Figure 5-32). 


Figure 5-32 


Figure 5-33 


9)  Observe that the inner chassis cover is hinged. Gently raise the inner chassis cover to its vertical 

position leaning back against the display assembly (Figure 5-33). 


Summary of Contents for Dual-Screen 8230

Page 1: ...ev A Training and Maintenance Guide Maintaining and Repairing Your MaxPac Single Dual Triple Screen 8230 XRA1 2 3 Rev A High Performance Transportable Workstation MaxVision Corporation 495 Production Avenue Madison AL 35758 USA Part Number 209 0054 0 ...

Page 2: ...w or remanufactured In the event that the Product returned is not defective you will be responsible for freight costs for return shipment to you The foregoing warranty shall not apply to Product that has been a damaged by accident Acts of God shipment improper installation abnormal physical or electrical stress misuse or misapplication as determined by MaxVision in its sole reasonable discretion o...

Page 3: ...s representative is authorized to make any modifications extensions or additions to this Agreement This Agreement is governed by the laws of the State of Alabama without application of the principles of conflicts or choice of laws The application of the United Nations Convention on Contracts for the International Sale of Goods to this Agreement is expressly excluded Copyright The materials in this...

Page 4: ...ews 33 Flat Panel Display Module 34 Opening the Display Assembly into its Service Position 40 Memory 43 PCI Cards General 44 PCI Express Card Primary 45 Power Distribution Assembly 47 Hard Drive Magazine also Individual Hard Drives 50 Optical Drive CD DVD 51 Optical Drive CD DVD Backplane 51 External Cooling Fan Assembly 53 CPU Cooling Fans 54 Main Power Supply Unit PSU 55 Motherboard 57 Chapter 5...

Page 5: ...o the MaxPac8230 107 Using the TeraPac 3 with a MaxPac 8230 107 Appendix A Creating and Using Backup Images Including Restoring Your OS 109 Introduction 109 Appendix B Regular System Maintenance 118 Cleaning Interior Dust 118 Replacing the Lithium Battery 118 Maintaining Cleaning the Baghdad Filters 118 Resetting the Motherboard BIOS 121 Appendix C Screws and Required Tools 123 Screws 123 Required...

Page 6: ......

Page 7: ...e to Green and back to Orange if the display is not receiving a signal The LED should stay green if receiving video signals Also note that each display must have its input set to DVI and NOT RGB To change the input source use the Input button on the display The RGB input can be used if one of the display s PIP VGA inputs is connected from an external source discussed later and you wish to display ...

Page 8: ...e middle nor right displays are not getting valid video the fault is probably with the primary PCI E graphics card For 8230XRA3 systems assuming you do not have a spare PCI E board you could temporarily remove the primary PCI E graphics board Now the secondary PCI E board for the left display should become the primary display for the BIOS and Windows 10 Assuming you now have video displaying on yo...

Page 9: ...MaxPac Single Dual Triple Screen 8230 Training and Maintenance Guide 3 Chapter 2 Motherboard Diagrams Figure 2 1 Top down view of the X7DAL E motherboard ...

Page 10: ...4 MaxPac Single Dual Triple Screen 8230 Training and Maintenance Guide Figure 2 2 Cable connections and LEDs on the X7DAL E motherboard ...

Page 11: ...c dual triple screen X Class system you will find that the graphics subsystem has been pre installed with the following recommended characteristics Color Quality Highest 32 bit Resolution 1 2 or 3 x 20 1 displays 1600 x 1200 Irrespective of the configuration the graphics on your system will have been custom pre configured to suite your particular requirements MaxPac systems are available with a va...

Page 12: ...ttons to vary the settings Some custom configurations allow the display to be driven from multiple sources In this case pressing the INPUT button selects between digital and analog inputs These custom configurations will come equipped with a special documentation addendum that details the actions of the INPUT button in the case of standard configurations the source should always be set to Digital ...

Page 13: ...on this control panel to access the Picture in Picture dialog Figure 3 5 Figure 3 5 Figure 3 6 3 Use this dialog to turn the Picture and Picture window On Off and to specify characteristics such as the size and position of the Picture and Picture window located in the lower right hand corner of the screen in Figures 3 5 and 3 6 Note The video source and the Picture in Picture window must be set to...

Page 14: ...m from the ground up Your MaxPac system can contain up to four SATA hot swappable hard disk drives presented in a 4 drive disk caddy This caddy is located on the lower left hand side of the main chassis under the Baghdad Filter assembly as shown in Figure 3 7 the numbering of the disks is as shown in Figure 3 8 In the case of a typical RAID 5 system the upper disk is the system disk while the lowe...

Page 15: ...ipt to place a 3DM 2 icon on your desktop Figure 3 9 Building a New 3ware RAID 5 Array from Scratch The discussions in this section assume that you have an existing system disk and for one reason or another have installed three new empty data disks 1 Start to power up the system When you see the BIOS message Alt 3 to access 3ware BIOS Manager Figure 2 10 press and hold the ALT alternate key and wh...

Page 16: ...3 13 4 Use the up down arrow keys to highlight the RAID Configuration item and then press the Enter key to access an associated pop up dialog Figure 3 14 5 Use the up down arrow keys to highlight the RAID 5 option and then press the Enter key to select this option Figure 3 14 Figure 3 15 6 Use the up down arrow keys to highlight the Stripe Size item and then press the Enter key to access an associ...

Page 17: ...8 and then press the Enter key to save your changes Figure 3 18 Figure 3 19 13 You will be presented with a warning dialog as shown in Figure 3 19 Press the Y yes to allow the write cache to be enabled note that this mode significantly improves performance but it can result in a loss of data in the event of a power failure so MaxVision STRONGLY recommends the use of an uninterruptible power supply...

Page 18: ...boot process you will see the BIOS report the existence of your new RAID array 17 Once the system has booted up into Windows right click on the My Computer icon and then select the Manage option In the ensuing Computer Management dialog click on the Disk Management item As you have just created a new RAID array this will automatically launch the Initialize and Convert Disk Wizard as shown in Figur...

Page 19: ...in Figure 3 24 20 Click the Next button to be presented with the Completing the Wizard screen as shown in Figure 3 25 and then click the Finish button to perform the operations and exit the wizard Figure 3 25 The Completing the Wizard dialog 21 Observe that the Disk Management area of the Computer Management dialog now shows Disk 1 as being a Dynamic disk that is as yet unallocated as shown in Fig...

Page 20: ...form the RAID array were each 400 GB in size Observe in Figure 3 26 that Disk 1 is shown as being approximately 800 GB in size where 800 GB equates to 2 3 of the 3 x 400 GB capacity of the data disks the remaining 400 GB is used to provide the RAID 5 redundancy 22 Now right click on the Disk 1 item in the lower right hand portion of the screen and then select the New Volume option from the ensuing...

Page 21: ...ac Single Dual Triple Screen 8230 Training and Maintenance Guide 15 Figure 3 27 Select the New Volume option 23 Observe the New Volume Wizard appear as shown in Figure 3 28 Figure 3 28 The New Volume Wizard ...

Page 22: ...sented by the system or enter a different letter if you require as shown in Figure 3 31 Figure 3 31 Figure 3 32 27 Click the Next button to be presented with the Format Volume screen Click the Format this volume with the following settings item as shown in Figure 3 32 Ensure that the settings are File system NTFS Allocation unit size Default and Volume Label user defined the default is New Volume ...

Page 23: ...MaxPac Single Dual Triple Screen 8230 Training and Maintenance Guide 17 Figure 3 33 The Completing the Wizard dialog Figure 3 34 Disk 1 is now shown as being Dynamic Online and Healthy ...

Page 24: ...tage one of the disks in the array may start to degrade or go completely off line For the purposes of these discussions we are going to power down the system physically remove Disk 01 from the array thereby simulating a catastrophic failure on this disk and power up the system back up again 1 Power down the system and remove the center data disk Disk 01 as shown in Figure 3 36 Figure 3 36 Figure 3...

Page 25: ...eviously part of a 3ware RAID array the system may report that the new disk is INOPERABLE as illustrated in Figure 3 39 Alternatively the system may report the new disk as being AVAILABLE as illustrated in Figure 3 40 Assuming that the new disk is reported as being INOPERABLE click the checkbox associated with that unit Unit 1 in this example and then click the Delete Unit button Observe that the ...

Page 26: ...20 MaxPac Single Dual Triple Screen 8230 Training and Maintenance Guide Figure 3 39 Figure 3 40 ...

Page 27: ...MaxPac Single Dual Triple Screen 8230 Training and Maintenance Guide 21 Figure 3 41 Figure 3 42 ...

Page 28: ...our MaxPac8230 may be configured for connection to the optional TeraPac3 8 drive SATA Expansion In this case the MaxPac8230 will include a 12 or 16 port SATA RAID 5 controller This chapter illustrates and assumes a 4 port SATA RAID 5 controller so the photos may be somewhat different Refer to Chapter 7 for a brief section on the MaxPac8230 connection to the TeraPac3 and to the TeraPac3 User Operat...

Page 29: ...tion once the hot spare disk has been deployed as discussed below the failed and replaced disk will assume the role of the new hot spare Figure 3 44 Establishing the Array and Reloading the System Image These discussions assume that you are reestablishing a system from the ground up and that you have four new disks in your disk caddy 1 Start to power up the system When you see the BIOS message Alt...

Page 30: ...highlight the RAID Configuration item and then press the Enter key to access an associated pop up dialog Figure 3 49 6 Now use the up down keys to highlight the RAID 5 option and then press the Enter key to select this option Figure 3 49 Figure 3 50 7 Next use the up down arrow keys to highlight the Stripe Size item and then press the Enter key to access an associated pop up dialog Figure 3 50 8 U...

Page 31: ... Y yes key to allow the write cache to be enabled note that this mode significantly improves performance but it can result in a loss of data in the event of a power failure so MaxVision STRONGLY recommends the use of an uninterruptible power supply UPS with your system 15 At this point you will be presented with a summary description of the RAID array you have defined Figure 3 55 16 Observe that t...

Page 32: ... ve created yourself as discussed in Appendix A and if that CD DVD or the first CD DVD in a set has the Acronis Bootable Rescue Media software on it then simply insert this disk in the drive and proceed to point 20 below Alternatively if your CD DVD does not have the Acronis Bootable Rescue Media software on it then first insert the bootable recovery DVD supplied by MaxVision in the drive and rebo...

Page 33: ... message saying that this is not the last created volume in the archive and requesting you to insert the last created volume In this case replace the current CD DVD with the last disk from the set click on the tib file on this disk and proceed to point 24 at some stage you will be prompted to return to the first disk 24 Click the Next button to be presented with the Restoration Type Selection page...

Page 34: ... Size page Figure 3 64 29 We have chosen to establish a 200 GB system partition in this example the remaining Free Space will automatically be allocated to the data portion of the RAID 5 array Click the Next button to be presented with the Next Selection window Figure 3 65 Figure 3 65 Figure 3 66 30 Select the No I Do Not option and then click the Next button to be presented with the Restore Opera...

Page 35: ...te Once you have re loaded the original MaxVision supplied image you will also have to re run the initialization procedures including re activating re registering your OS license as described earlier in this manual 34 After the system has booted up into Windows and you ve re run the initialization procedures as noted above right click on the My Computer icon and then select the Manage option In th...

Page 36: ...30 MaxPac Single Dual Triple Screen 8230 Training and Maintenance Guide Figure 3 69 Figure 3 70 Figure 3 71 ...

Page 37: ...array thereby simulating a catastrophic failure on this disk and power up the system back up again 1 Power down the system and remove the center data disk Disk 01 as shown in Figure 3 73 2 Power the system back up again The BIOS detects the fact that there is a problem with the RAID array and displays an appropriate message Figure 3 74 Press the Pause Break key to freeze the display from this and ...

Page 38: ... you ve just added to the system Use the up down arrow keys to highlight the uncommitted drive and press the Enter key to select it the fact this has been selected will be indicated with an asterisk character Note If this drive was ever part of a previous 3ware RAID array it will show up as a Failed Array comprising only a single drive In this case use the Tab key to select the Delete Unit option ...

Page 39: ...ck of things and to prevent misplacing any parts it is strongly recommended to have a plastic container divided into small compartments and to label these compartments as you work Required Tools and Techniques Most of the module replacement and upgrade procedures discussed in this chapter can be performed using only a pair of 1 small tip and 2 regular tip Phillips screwdrivers However some procedu...

Page 40: ...crewdriver to remove the four 4 40 3 16 black countersunk screws two on each side holding the monitor bezel to the main chassis Figures 4 1 and 4 2 Figure 4 1 Figure 4 2 3 Use a Phillips 2 screwdriver to remove the four silver screws two on the top and two on the bottom holding the main chassis to the monitor bezel Figures 4 3 and 4 4 Figure 4 3 Figure 4 4 4 Gently lift the monitor bezel away from...

Page 41: ...Guide 35 Figure 4 5 5 Disconnect the soft power cable as illustrated in Figures 4 6 and 4 7 Figure 4 6 Figure 4 7 6 Gently lift the inner chassis including the monitor assembly away from the outer chassis as illustrated in Figures 4 8 and 4 9 Figure 4 8 Figure 4 9 ...

Page 42: ... the side opposite the hinge Figure 4 13 until it is in its fully open position Figure 4 12 Figure 4 13 Note The display folds all of the way over until it s horizontal In fact it will open further until it touches the table but this may strain the hinge For this reason it is strongly recommended that you place some object under the monitor to support it this object should be covered by some soft ...

Page 43: ...ics board Figure 4 16 and gently pull the connector a little way from the system Figure 4 17 Figure 4 16 Figure 4 17 11 Use a Phillips 2 screwdriver to remove the two 6 32 screws attaching the access plate and the special linking bracket to the inner chassis Figure 4 18 Figure 4 18 Figure 4 19 12 Lift the linking bracket away from the system Figure 4 19 then lift the access plate away from the cha...

Page 44: ...14 Gently lift the monitor power and data cables out of the slot as illustrated in Figure 4 22 Figure 4 22 15 Place the monitor power and data cables inside the chassis out of the way while you close the display and remove the four screws two on each side holding the LCD panel to the main monitor display assembly Figures 4 23 and 4 24 Figure 4 23 Figure 4 24 ...

Page 45: ... main monitor assembly and snake the cables through the slot as illustrated in Figure 4 27 Figure 4 27 Figure 4 28 18 Gently lift the LCD away from the inner chassis and lay it face down on a protective surface Disconnect the power cable from the LCD Figure 4 28 Unscrew the jack screws attaching the data cable to the LCD Figure 4 29 and detach this cable Figure 4 30 Figure 4 29 Figure 4 30 19 Take...

Page 46: ...hat you lay the system on bubble wrap in order to protect the finish 2 Use a Phillips 1 screwdriver to remove the four 4 40 3 16 black countersunk screws two on each side holding the monitor bezel to the main chassis Figures 4 31 and 4 32 Figure 4 31 Figure 4 32 3 Use a Phillips 2 screwdriver to remove the four silver screws two on the top and two on the bottom holding the main chassis to the moni...

Page 47: ...r chassis from the outer chassis Some of these components include memory main power supply PCI and PCI Express boards While it is fairly easy to remove the inner chassis for the Single Display XRA1 it is more difficult for the Dual Triple Display XRA2 3 Some photos will include the outer chassis while others will not 6 Gently lift the inner chassis including the monitor assembly away from the oute...

Page 48: ...r black countersunk screws holding the screen assembly to the chassis two on the top Figure 4 40 and one on each side Figure 4 41 and Figure 4 42 Figure 4 40 Figure 4 41 8 Observe that the monitor assemble is hinged Gently lift the display on the side opposite the hinge Figure 4 13 until it is in its fully open position Figure 4 42 Figure 4 43 ...

Page 49: ... the MaxPac 8230 FB DIMMs REQUIRE that memory sticks be used in pairs with each pair having the same size capacity speed Population of the first pair of FBD occupies the first and second DIMM slots labeled DIMM1A and DIMM1B on the motherboard Population of the second pair of FBD occupies the third and fourth DIMM slots labeled DIMM2A and DIMM2B Note In the event that you begin to experience proble...

Page 50: ...e that the memory sticks are keyed such that they can only be inserted one way Take the new replacement memory stick sent to you by MaxVision support and gently press it down into the original slot on the motherboard 4 Return the system to its initial condition by reversing the order of the operations discussed at the beginning of this section PCI Cards General 1 Open the display assembly into its...

Page 51: ...hat flexible and the connectors can be broken free of the bond by simply pulling the SATA connector straight out do not pull on SATA cable itself Reapply adhesive provided by MaxVision support after reattaching the cables to the new card Note Ensure that the tongue on the new replacement card s faceplate lines up with the slot in the chassis you may have to bend the tongue slightly in the case of ...

Page 52: ...ng the card s retaining bracket and the special linking bracket to the inner chassis Figure 4 51 and lift the linking bracket away from the system Figure 4 52 Figure 4 51 Figure 4 52 4 Some PCI Express cards may have an auxiliary power connector If so disconnect it as shown in Figure 4 53 Figure 4 53 Figure 4 54 5 Gently remove the card from the system Figure 5 54 ...

Page 53: ...ther two is attached to the bottom DVII connector of the secondary PCI Express graphics board Note In this system there is no plastic latch holding the rear of the PCI Express card The foam attached to the hinged inner lid of the MaxPac will hold pressure to the back of the card when properly secured Power Distribution Assembly Note that the following procedure may be facilitated by first removing...

Page 54: ... of the inner chassis Figures 4 59 Figure 4 59 Figure 4 60 7 Gently remove the input power connector to the power distribution board note the latch on the back side of the connector as shown in Figure 4 60 8 Gently remove the display power cable from the power distribution board Figures 4 61 and 4 62 Cut all cable ties holding the cables to the aluminum cable guide bracket Figure 4 61 Figure 4 62 ...

Page 55: ...audio amplifier is also on the power distribution board Figure 4 65 11 Disconnect the left speaker cable from the power distribution board as illustrated in Figure 4 66 Figure 4 66 Figure 4 67 12 Gently lift the power distribution assembly up and away from the inner chassis Figure 4 67 13 Take the new power distribution assembly supplied by MaxVision support and incorporate it into the system by p...

Page 56: ...9 Figure 4 68 Figure 4 69 2 Gently pull on the magazine handle to extract the magazine from the inner chassis Figure 4 70 Figure 4 70 Figure 4 71 3 In order to replace an individual drive turn each of the four knurled screws attached to the upper binding bar until they pop out and then remove the upper binding bar Figure 4 71 Note that the upper binding bar has tabs that are inserted into slots of...

Page 57: ...lay assembly into its service position in order to perform this procedure 2 Undo the two knurled attaching the CD DVD drive to the outside of the system s main chassis Figure 4 73 Figure 4 73 Figure 4 74 3 Gently remove the CD DVD drive from the system Figure 4 74 4 Take the new CD DVD assembly as supplied by MaxVision support and incorporate it into the system by performing the steps described ab...

Page 58: ...ilips 1 screwdriver to remove the two screws attaching the CD DVD backplane to the main chassis as illustrated in Figure 5 78 7 Gently remove the CD DVD backplane as illustrated in Figure 4 79 8 Present the replacement CD DVD backplane supplied by MaxVision support to the inner chassis and perform the steps described above in reverse order Note If the replacement CD DVD backplane does not come equ...

Page 59: ... 4 80 Figure 4 81 3 All three fans must be treated as a single assembly so remove the twelve self tapping Plastite screws 4 per fan attaching the fans to the internal chassis Figure 4 82 and then gently lift the fan assembly away from the inner chassis Figure 4 83 4 Present the replacement fan assembly supplied by MaxVision support to the inner chassis and perform the steps described above in reve...

Page 60: ...ent of the CPU Cooling Fans but they can be replaced with the Power Distribution Assembly installed as well 1 Open the display assembly into its service position as discussed earlier in this chapter 2 There are two screws on either side of the cooling fan assembly Use a Phillips 2 screwdriver to loosen these captured screws Figures 4 84 and 4 85 Figure 4 84 Figure 4 85 3 Gently lift the cooling fa...

Page 61: ...n with equal pressure on all side and the fan power connector is replaced prior to powering up the system to avoid CPU damage Main Power Supply Unit PSU Depending on the problem you are experiencing and as directed by MaxVision support you may need to replace the entire power supply as discussed below 1 Open the display assembly into its service position as discussed earlier in this chapter 2 Remo...

Page 62: ... of the release catch facing the bottom of the chassis into the body of the connector Figures 4 92 and 4 93 Figure 4 92 Figure 4 93 5 Use a Phillips 2 screwdriver to remove the four screws attaching the power supply unit to the side of the inner chassis Figures 4 94 through 4 97 Note Observe the way in which the inner chassis is lifted in Figures 4 95 and 4 96 so as to facilitate access to two of ...

Page 63: ... reason you must either return the MaxPac system to MaxVision or be factory trained by MaxVision personnel see Appendix D for more details about contacting MaxVision support and returning your MaxPac to MaxVision 1 Open the display assembly into its service position as discussed earlier in this chapter 2 Remove any PCI and PCI Express cards as discussed earlier in this chapter 3 Remove the Power D...

Page 64: ... data cable from the slot leading to the exterior of the left side of the chassis as illustrated in Figure 4 102 6 Use a Phillips 1 screwdriver to remove the three 4 40 screws holding the wire harness protector plate Figure 4 103 then gently remove the protector plate to expose the right speaker cables Figure 4 104 Figure 4 103 Figure 4 104 ...

Page 65: ...ttached to the motherboard with a flexible adhesive such as Marine Goop Simply pull the connector not the wire until the adhesive gives Figure 4 105 8 There are two screws on either side of the cooling fan assembly Use a Phillips 2 screwdriver to loosen these captured screws Figures 4 106 and 4 107 Figure 4 106 Figure 4 107 9 Gently lift the cooling fan assembly away from the chassis as illustrate...

Page 66: ...11 Figures 4 110 and 4 111 illustrate the removal of the second CPU Fan Assembly Figure 4 110 Figure 4 111 12 Remove the screws from the sides and bottom of the shadow box as shown in Figure 4 112 through 4 115 Figure 4 112 Figure 4 113 Figure 4 114 Figure 4 115 13 Disconnect the external cooling fan assembly s power supply cable from the motherboard Simply pull it away using your fingers as shown...

Page 67: ...erboard Pull the connector up while using a flat blade screwdriver to push the top of the release catch facing the interior of the chassis into the body of the connector Figures 4 119 and 4 120 Figure 4 120 Figure 4 121 16 Disconnect the ATX 24 pin power connector from the motherboard Pull the connector up while using a flat blade screwdriver to push the top of the release catch facing the bottom ...

Page 68: ... 18 Remove the CD Audio In cable from the motherboard as illustrated in Figure 4 123 19 Remove the Internal USB cable connection from the motherboard as illustrated in Figure 4 124 These internal USB cables are normally used for USB Security Devices common with many applications Figure 4 124 Figure 4 125 20 Remove the DVD ATA cable connecting to the ATA port of the motherboard as shown in Figure 4...

Page 69: ...ard out and place it on a protected surface as shown in Figures 4 198 and 4 129 Figure 4 128 Figure 4 129 23 Under the direction of MaxVision support carefully remove the XEON series 5100 CPU from its socket as illustrated in Figures 4 130 through 4 131 Observe the keying of the CPU into its socket Figure 4 130 Figure 4 131 ...

Page 70: ...motherboard Note EXTREME CARE must be taken not to damage in any way the delicate pins used in the CPU sockets Once bent these pins cannot be straightened resulting in the total loss of the motherboard This type of damage is not covered under the MaxVision Warranty this motherboard is valued at almost 500 Always remove the protective CPU pin covers from the new motherboard and install them onto th...

Page 71: ...track of things and to prevent misplacing any parts it is strongly recommended to have a plastic container divided into small compartments and to label these compartments as you work Required Tools and Techniques Most of the module replacement and upgrade procedures discussed in this chapter can be performed using only a pair of 1 small tip and 2 regular tip Phillips screwdrivers However some proc...

Page 72: ... Figure 5 1 Figure 5 1 Figure 5 2 3 Gently lift the left hand screen s monitor cable access panel away from the system Figure 5 2 4 Unscrew the jack screws holding the DVI data cable connector Figure 5 3 and gently pull this connector away from the display Figure 5 4 Figure 5 3 Figure 5 4 5 Press down on the release catch holding the power cable and gently pull this connector away from this displa...

Page 73: ...ht Hand Screen 1 Lay the system flat on the table with the displays in the closed position and facing upwards it is recommended that you lay the system on bubble wrap in order to protect the finish If your MaxPac system has three screens unfold the left hand screen as shown in Figure 5 7 2 Use a Phillips 1 screwdriver to remove the six 4 40 3 16 black countersunk screws holding the right hand scre...

Page 74: ...32 1 4 black countersunk screws four on each site holding the screen to its hinge bar similar to the procedure for the left hand screen as shown in Figure 5 6 and then lift the screen away Figure 5 12 8 Perform the above steps in reverse order to replace the failed screen with the new unit as supplied by MaxVision support Flat Panel Display Module Center Screen 1 Lay the system flat on the table w...

Page 75: ... a vertical position standing against the cable side pair of wing brackets as illustrated in Figures 5 15 and 5 16 as these monitors are expensive items it is recommended that you keep hold of the screen when it is in this vertical position Figure 5 15 Figure 5 16 4 On the other side of the screen with regard to Figure 5 16 observe the monitor tilt stand components lying in on the main chassis as ...

Page 76: ...ack countersunk screws holding the center screen s monitor cable access panel Figure 5 18 6 Gently lift the center screen s monitor cable access panel away from the system Figure 5 19 Figure 5 19 Figure 5 20 7 Unscrew the jack screws holding the DVI data cable connector Figure 5 20 and gently pull this connector away from the display Figure 5 21 Figure 5 22 ...

Page 77: ...e cable access cover for the center screen observe that the cables exit the screen assembly through the larger upper cable guide as shown in Figure 5 23 When re installing the center screen once the cable access panel has been re attached any excess cable must be pushed down into the main chassis Figure 5 23 By comparison in the case of the left and right hand screens the cables exit as shown in F...

Page 78: ...re 5 26 Figure 5 27 2 Use a Phillips 2 screwdriver to remove the two 10 32 1 4 black countersunk screws one on each site on the top side of the system close to the handles holding the screen assembly to the chassis Figure 5 27 3 Use a Phillips 2 screwdriver to remove the two 10 32 silver truss head screws on the top of the system Figure 5 28 Figure 5 28 Figure 5 29 4 Press the feet down into their...

Page 79: ...g mechanism expands them back into their locked position 8 Return to facing the top of the system and use a Phillips 2 screwdriver to remove the five 6 32 1 4 black countersunk screws three on the top and one on each site holding the inner chassis cover Figure 5 32 Figure 5 32 Figure 5 33 9 Observe that the inner chassis cover is hinged Gently raise the inner chassis cover to its vertical position...

Page 80: ...d pair of FBD occupies the third and fourth DIMM slots labeled DIMM2A and DIMM2B Note In the event that you begin to experience problems with the memory that is already resident in your MaxPac you must first determine which stick has failed under the direction of MaxVision support Note The BIOS will always report the true amount of physical memory that is present in the system This may be as much ...

Page 81: ...eturn the system to its initial condition by reversing the order of the operations discussed at the beginning of this section PCI Cards General 1 Open the display assembly into its service position as discussed earlier in this chapter 2 If you are replacing an existing PCI card use a Phillips 2 screwdriver to remove the 6 32 screw attaching the card s retaining bracket to the inner chassis as show...

Page 82: ...nsure that the tongue on the new replacement card s faceplate lines up with the slot in the chassis you may have to bend the tongue slightly in the case of a new card PCI Express Card Secondary card for third screen and Projector Port In the case of a dual screen MaxPac system the graphics for both screens will be handled by a single PCI Express card discussed in the following section By compariso...

Page 83: ...erse order Note Ensure that the tongue on the new replacement card s faceplate lines up with the slot in the chassis you may have to bend the tongue slightly in the case of a new card In this system there is no plastic latch holding the rear of the PCI Express card The foam attached to the hinged inner lid of the MaxPac will hold pressure to the back of the card when properly secured PCI Express C...

Page 84: ...ector from the PCI Express graphics board Figures 5 43 and 5 44 Removing the bottom DVI connector will expose a screw securing the bottom of the DVI cable bracket Remove this screw with a 1 Phillips screwdriver Figure 5 43 Figure 5 44 Figure 5 45 Figure 5 46 3 Use a Phillips 2 screwdriver to remove the two 6 32 screws attaching the card s retaining bracket and the special linking bracket to the in...

Page 85: ...the case of a triple display system the left display connector which is a different shape to the other two is attached to the bottom DVII connector of the secondary PCI Express graphics board Note In this system there is no plastic latch holding the rear of the PCI Express card The foam attached to the hinged inner lid of the MaxPac will hold pressure to the back of the card when properly secured ...

Page 86: ...e side of the inner chassis Figures 5 53 7 Gently remove the input power connector to the power distribution board note the latch on the back side of the connector as shown in Figure 5 54 Figure 5 55 Figure 5 56 8 Gently remove the display power cables from the power distribution board There will be 1 2 or 3 of these power cables depending on the number of displays Figures 5 55 5 56 and 5 57 Note ...

Page 87: ... 10 Disconnect the audio input cable from the power distribution board as illustrated in Figures 5 60 This connector is black and has a latch Note that the audio amplifier is also on the power distribution board Figure 5 61 Figure 5 62 11 Disconnect the left speaker cable from the power distribution board as illustrated in Figures 5 61 12 Gently lift the power distribution assembly up and away fro...

Page 88: ...rew holding the middle binding bar Figure 5 63 and then remove the binding bar Figure 5 64 Figure 5 63 Figure 5 64 2 Gently pull on the magazine handle to extract the magazine from the inner chassis Figure 5 65 Figure 5 65 Figure 5 66 3 In order to replace an individual drive turn each of the four knurled screws attached to the upper binding bar until they pop out and then remove the upper binding...

Page 89: ...MaxVision serial numbers are affixed to the bottom edge the small white strips shown toward the bottom of the drives in Figure 5 67 Recording the positions and serial numbers of your disks for each MaxPac is advisable Optical Drive CD DVD 1 Note that it is not necessary to open the display assembly into its service position in order to perform this procedure 2 Undo the two knurled attaching the CD...

Page 90: ...ious topic 3 Remove the ATA cable observing where the red stripe is for future reference as illustrated in Figure 5 70 Figure 5 70 Figure 5 71 4 Remove the main power connector as illustrated in Figure 5 71 release the latch with your finger or thumb nail while pulling ion the cable Figure 5 72 Figure 5 73 5 Remove the CD Audio cable as illustrated in Figure 5 72 6 Use a Philips 1 screwdriver to r...

Page 91: ... motherboard Simply pull it away using your fingers as shown in Figures 5 75 and 5 76 Figure 5 75 Figure 5 76 3 All three fans must be treated as a single assembly so remove the twelve self tapping Plastite screws 4 per fan attaching the fans to the internal chassis Figure 5 77 and then gently lift the fan assembly away from the inner chassis Figure 5 78 4 Present the replacement fan assembly supp...

Page 92: ...PU Cooling Fans but they can be replaced with the Power Distribution Assembly installed as well 1 Open the display assembly into its service position as discussed earlier in this chapter 2 There are two screws on either side of the cooling fan assembly Use a Phillips 2 screwdriver to loosen these captured screws Figures 5 79 and 5 80 Figure 5 79 Figure 5 80 3 Gently lift the cooling fan assembly a...

Page 93: ... all side and the fan power connector is replaced prior to powering up the system to avoid CPU damage Main Power Supply Unit PSU Depending on the problem you are experiencing and as directed by MaxVision support you may need to replace the entire power supply as discussed below 1 Open the display assembly into its service position as discussed earlier in this chapter 2 Remove the video distributio...

Page 94: ...cing the bottom of the chassis into the body of the connector Figures 5 87 and 5 88 Figure 5 87 Figure 5 88 5 Use a Phillips 2 screwdriver to remove the four screws attaching the power supply unit to the side of the inner chassis Figures 5 89 through 5 92 Figure 5 89 Figure 5 90 Figure 5 91 Figure 5 92 Note Observe the way in which the inner chassis is lifted in Figures 5 90 and 5 91 so as to faci...

Page 95: ... your MaxPac to MaxVision Note Certain components can be replaced without removing the inner chassis from the outer chassis Some of these components include memory main power supply PCI and PCI Express boards While it is fairly easy to remove the inner chassis for the Single Display XRA1 it is more difficult for the Dual Triple Display XRA2 3 Some photos will include the outer chassis while others...

Page 96: ... Remove the 3 video data cables for the slot leading to the exterior of the left side of the chassis The triple screen MaxPac 8230 XRA3 is shown in figure 5 99 Figure 5 100 Figure 5 101 7 Use a Phillips 1 screwdriver to remove the three 4 40 screws holding the wire harness protector plate Figure 5 100 then gently remove the protector plate to expose the soft power and right speaker cables Figure 5...

Page 97: ...r and video cables must be removed from the inner chassis cover cable channel as show in Figure 5 103 10 The power and video cables for the right monitor and also and the soft power cable must be removed from the inner chassis cover cable channel as shown in Figure 5 104 Figure 5 105 Figure 5 106 11 You will need a second person to hold the monitor assembly while you lift the inner chassis out of ...

Page 98: ...assembly Use a Phillips 2 screwdriver to loosen these captured screws Figures 5 107 and 5 108 Figure 5 109 Figure 5 110 Figure 5 111 Figure 5 112 14 Gently lift the cooling fan assembly away from the chassis as illustrated in Figure 5 109 15 Each fan has its own power connector that is attached to the main motherboard Disconnect the power connector associated with the CPU fan Figure 5 110 16 Figur...

Page 99: ... 115 Figure 5 116 17 Remove the screws from the sides and bottom of the shadow box as shown in Figure 5 113 through 5 116 Figure 5 117 Figure 5 118 18 Disconnect the external cooling fan assembly s power supply cable from motherboard Simply pull it away using your fingers as shown in Figures 5 117 and 5 118 ...

Page 100: ...or of the chassis into the body of the connector Figures 5 120 and 5 121 Figure 5 121 Figure 5 122 21 Disconnect the ATX 24 pin power connector from the motherboard Pull the connector up while using a flat blade screwdriver to push the top of the release catch facing the bottom of the chassis into the body of the connector Figures 5 122 22 Remove the audio out cable that normally connects between ...

Page 101: ...ed in Figure 5 124 Figure 5 125 Figure 5 126 24 Remove the Internal USB cable connection from the motherboard as illustrated in Figure 5 125 These internal USB cables are normally used for USB Security Devices common with many applications 25 Remove the DVD ATA cable connecting to the ATA port of the motherboard as shown in Figure 5 126 Figure 5 127 Figure 5 128 ...

Page 102: ...28 Figure 5 129 Figure 5 130 27 Now slide the motherboard out and place on a protected surface as illustrated in Figures 5 130 and 5 129 Figure 5 131 Figure 5 132 28 Under the direction of MaxVision support carefully remove the XEON series 5100 CPU from its socket as illustrated in Figures 5 131 through 5 133 Observe the keying of the CPU into its socket Figure 5 133 Figure 5 134 ...

Page 103: ... Once bent these pins cannot be straightened resulting in the total loss of the motherboard This type of damage is not covered under the MaxVision Warranty this motherboard is valued at almost 500 Always remove the protective CPU pin covers from the new motherboard and install them onto the suspect or bad motherboard before any additional handling of the motherboard The installation of the pin pro...

Page 104: ...iple Screen 8230 XRA1 2 3 User Operation and Maintenance Guide 2 Use a Philips 1 screwdriver to remove the two screws attaching the wire harness protector plate to the disc array Observe the vertically mounted auxiliary power distribution board located in the back left hand corner of a Rev 0 system Figure 6 1 By comparison this board is not required in the case of a Rev A system Figure 6 2 Figure ...

Page 105: ...er will be disconnected for safety reasons Connect these two cables as illustrated in Figure 6 6 6 Gently insert the UPS into the chassis as illustrated in Figures 6 7 and 6 8 Figure 6 7 Figure 6 8 7 Use a Philips 1 screwdriver to secure the UPS using the four screws supplied as part of the UPS kit Figures 6 9 through 6 12 Do not use the two screws you removed from the system in step 2 because the...

Page 106: ... charge the UPS and to withdraw power form the UPS Due to the fact that this cable supplies high voltages it has a protective cap Remove this protective cap as illustrated in Figure 6 13 Figure 6 13 Figure 6 14 9 Connect the cables from the UPS and the system s main power supply as illustrated in Figure 6 14 10 Gently spread the wires exiting the UPS as illustrated in Figure 6 15 so as to make the...

Page 107: ... things can t be connected back to front However it is possible to misalign the connector by sliding it over by one pin so take care to ensure this does not occur Note Observe that this cable connector should be attached to the motherboard with a flexible adhesive such as Marine Goop care must be taken to apply this adhesive only to the outside of the connector and to keep it away from the connect...

Page 108: ...he CD doesn t start automatically use Windows Explorer to locate the setup exe file on the CD and then double click on this file to run it This will result in the MaxUPS Setup dialog shown in Figure 6 19 Figure 6 19 4 Read the agreement and assuming you accept the terms click the Accept button otherwise click the Don t Accept button of course if you don t accept these terms then we re all wasting ...

Page 109: ...nance Guide 103 Figure 6 20 6 Once all of the files have been copied you will be presented with the MaxUPS Setup Wizard as illustrated in Figure 6 21 Figure 6 22 7 Click the Next button and observe the Select Installation Folder dialog Figure 6 23 Figure 6 23 ...

Page 110: ...as illustrated in Figure 6 25 Figure 6 25 10 Click the Close button The UPS software has now been installed Using the UPS Software 1 Once the MaxUPS software has been installed as discussed in the previous topic a corresponding MaxUPS icon will appear in the system s task tray this is the black square containing the orange M and V characters for MaxVision as illustrated in Figure 6 26 Figure 6 26 ...

Page 111: ...t of these fields are diagnostic in nature The two important fields for users are the AC Power which should be Good and the Battery Charge which will be OK or LOW 4 Use your mouse to click on the Settings pull down menu and access the Settings dialog as illustrated in Figure 6 28 Figure 6 28 ...

Page 112: ...e to recharge the rate will increase to two times per second and the UPS controller will quickly force a shut down irrespective of any time left on the countdown timer this will be a forced shutdown not the graceful shutdown as described in the following points Note When the countdown is completed the UPS software will use system commands to automatically close any active applications and then shu...

Page 113: ...e cables will be color coded Figure 7 1 Figure 7 2 2 There are three 4 channel connectors on the 12 channel 3ware RAID controller card The bottom connector is used for the four internal drives The multi lane ML cable marked disk 0 3 connect to the middle connector the ML cable marked disk 4 7 connect to the top connector Figure 7 2 These two 4 channel ML cables connect to an external SATA bracket ...

Page 114: ...tated disks 4 7 3 Plug the other ends of these data control cables into the correspondingly labeled connectors on the TeraPac 3 unit as illustrated in Figure 7 5 the disks 0 3 connector is located on the right hand side of the back face of the unit this is the connector being pointed to in Figure 7 5 4 Refer to the TeraPac 3 User Operation and Maintenance Guide for more details on the RAID setup o...

Page 115: ...rgone some catastrophic failure such that under the direction of MaxVision support you are going to replace your primary hard drive s and or restore the original MaxVision supplied image In this case you will lose any applications and data that you have installed loaded or created on your main C drive partition Note If you do re load the original MaxVision supplied image you will also have to re r...

Page 116: ...tes your ability to return the system to a known good state should any problems arise such as a virus attack or a hard drive failure at some stage in the future For the purposes of this example we will assume that you are writing your image to CD media as opposed to DVD and that the image will occupy two CDs 1 Power down the system 2 In this case you will need to create your own Acronis Recovery b...

Page 117: ...wing the splash screen Figure A 6 under the Pick a Task heading select the Backup option the top item as illustrated in Figure A 7 Figure A 7 Figure A 8 6 Follow the actions depicted by the screenshots shown in Figures A 8 through A 22 Figure A 9 Figure A 10 Figure A 11 Figure A 12 ...

Page 118: ...112 MaxPac Single Dual Triple Screen 8230 Training and Maintenance Guide Figure A 13 Figure A 14 Figure A 15 Figure A 16 Figure A 17 Figure A 18 ...

Page 119: ...sed to clear out the license number and other settings following system test If you create your own image and if SYSPREP is not run and you subsequently load your image onto another MaxPac system then Microsoft will require activation before use no 30 day grace period At this time you will need to supply the correct OS license number for the MaxPac and activate prior to use this procedure may vary...

Page 120: ...e A 23 Use the mouse to select the Acronis item as shown in Figure A 23 Figure A 23 Figure A 24 4 Following the splash screen Figure A 24 under the Pick a Task heading select the Restore option the top item as illustrated in Figure A 25 5 Follow the actions depicted by the screenshots shown in Figures A 25 through A 43 Figure A 25 Figure A 26 Figure A 27 Figure A 28 ...

Page 121: ...MaxPac Single Dual Triple Screen 8230 Training and Maintenance Guide 115 Figure A 29 Figure A 30 Figure A 31 Figure A 32 Figure A 33 Figure A 34 ...

Page 122: ...116 MaxPac Single Dual Triple Screen 8230 Training and Maintenance Guide Figure A 35 Figure A 36 Figure A 37 Figure A 38 Figure A 39 Figure A 40 ...

Page 123: ...MaxPac Single Dual Triple Screen 8230 Training and Maintenance Guide 117 Figure A 41 Figure A 42 Figure A 43 Figure A 44 ...

Page 124: ... grills and heat sinks Close up the system Replacing the Lithium Battery A Lithium Ion battery is included with the system motherboard This battery is used for the Real Time Clock circuit The expected lifetime of the battery is approximately 5 years There is a danger of explosion if this battery is incorrectly replaced Replace only with the same or equivalent type recommended by the motherboard ma...

Page 125: ...humb is when the filters look physically dirty The following discussions are based on the left hand filter The same actions apply to the right hand filter It is more efficient to clean both filters at the same time 2 Starting with the filter on the left hand side of the chassis break the filter free of the Velcro on the side of the filter facing the front of the chassis Figure B 3 for single scree...

Page 126: ...002 0 comprises a pump spray cleaner and an aerosol spray containing replacement oil Figure B 8 Place the filter element on a working surface that is protected by some form of absorbent disposable material Figure B 9 Figure B 9 Figure B 10 7 It is recommended that you first tap the filter element on the work surface to dislodge any large embedded dirt particles and then gently brush it with a soft...

Page 127: ...color will eventually fade but the oil will remain and filter the air Figure B 11 Figure B 12 10 Let the filter stand for 20 minutes and then touch up any spots that do not visibly show the red dye contained in the oil 11 Bring together the elements forming the filter assembly and secure using the knurled screw as shown in Figures B 12 and B 13 ensure that the oil side of the main filter element f...

Page 128: ...n tasks have been completed Once the system does respond to this key you will be presented with the System Overview screen of the BIOS Setup utility as shown in Figure B 1 Figure B 1 Figure B 2 3 Use the left right arrow keys to select the Exit tab and then use the up down arrow keys to highlight the Load Optimal Defaults item Figure B 2 4 Press the Enter key to select this item You will be presen...

Page 129: ...Maintenance Guide 123 Appendix C Screws and Required Tools Screws The various screws used in a MaxPac 8230 Series X Class system are illustrated approximately full size as shown in Figure C 1 Figure C 1 Screws used in MaxPac 8220 Series X Class systems ...

Page 130: ...oking the blade with a permanent magnet Using a high quality universal screwdriver with replaceable Phillips 1 and 2 bits is a good idea to ensure that your bits are always in excellent condition Most of the module replacement and upgrade procedures discussed in this chapter can be performed using only a pair of 1 small tip and 2 regular tip Phillips screwdrivers For some procedures however needle...

Page 131: ...n com or the technical support and customer service hotline 800 533 5805 If MaxVision s technical support determines that the product is defective MaxVision will issue a Return Material Authorization RMA number to the customer The customer is required to ship the product referencing the RMA number on the outside of the original or equivalent packaging with a copy of MaxVision s RMA form if provide...

Reviews: