background image

17 


6.0


TROUBLE-SHOOTING 


GENERAL TROUBLESHOOTING GUIDE 


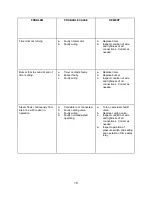
PROBLEM


PROBABLE CAUSE


REMEDY


Cooking indicator light fails to 
light with Timer set. 

a.  

Main power circuit breaker 
tripped. 

b.  

Door interlock switch 
contacts not closed. 

c.  

Door interlock switch faulty. 

d.  

Indicator light burned out. 

e.  

Faulty timer contacts. 

f.  

Faulty wiring. 

a.  

Locate external circuit 
breaker for incoming power 
and place in ON position. 

b.  

Shut cooker door to close 
switch contacts.  Check 
alignment of door with 
switch. 

c.  

Replace switch. 

d.  

Replace light. 

e.  

Replace timer. 

f.  

Inspect condition of wire 
and tightness of all 
connections.  Correct as 
needed. 

Steam fails to enter cooking 
compartment with cooking 
indicator light on. 

a.  

Faulty wiring. 

a.  

Inspect condition of wire 
and tightness of all 
connections.  Correct as 
needed. 


a.  

Standby thermostat not set 
correctly. 

b.  

Faulty thermostatic switch. 

c.  

HOLD set on timer. 

a.  

Adjust the thermostat 
lower. 

b.  

Replace thermostat. 

c.  

Rotate timer knob to ‘OFF’ 
position. 

Summary of Contents for MPS-3E

Page 1: ...MODEL MPS 3E INSTALLATION OPERATION MAINTEANCE TROUBLE SHOOTING PARTS WIRING Form Number S 6112 12 12 Printed in USA 35 Garvey Street Everett MA 02149 Telephone 617 387 4100 866 698 3188 Fax 617 387 4456 800 227 2659 custserv mfii com www mfii com ...

Page 2: ...RNING Improper installation operation adjustment alteration service or maintenance can cause property damage injury or death Read the installation operating and maintenance instructions thoroughly before installing operating or servicing this equipment This manual should be retained for future reference Intended for commercial use only Not for household use Adequate clearances must be maintained f...

Page 3: ...OWN 8 DRAINING THE BOILER 8 STEAM COOKING 9 PREPARATION 9 ACCEPTABLE PAN SIZES 9 4 0 SUGGESTED COOKING GUIDELINES 10 COOKING HINTS 10 PREPARATION 10 FROZEN FOOD ITEMS 10 Cooking Guide 11 5 0 PREVENTIVE MAINTENANCE 13 INTRODUCTION 13 CLEANING DAILY 13 CLEANING WEEKLY 14 DELIMING PROCEDURE 14 REMOVAL OF SCALE DEPOSITS 14 GENERATOR DELIMING INSTRUCTIONS15 STAINLESS STEEL 16 TO REMOVE HEAT TINT 16 6 0...

Page 4: ...unit water supply should be analyzed to make sure hardness is no greater than 2 0 grains and pH level is within the range of 7 0 8 5 Water which fails to meet these standards should be treated by installation of water conditioner EQUIPMENT FAILURE CAUSED BY INADEQUATE WATER QUALITY IS NOT COVERED UNDER WARRANTY D Drain 1 25mm IPS piped to open floor drain NO SOLID CONNECTION TO FLOOR DRAIN NO BEND...

Page 5: ...CATION Allow space for plumbing and electrical connections Minimum clearances are 0 on the sides and 6 152mm on the back for proper air circulation Allow adequate access for operating and servicing the steamer 36 915mm at the front of the steamer and 15 381mm above the steamer LEVELLING Using a spirit level or pan of water in the bottom of the steamer adjust the leveling feet or the feet on the ad...

Page 6: ...ary safety and plumbing codes The water supply inlets are provided with 3 8 10mm compression fittings for 3 8 O D copper tubing The water supply line pressure should be 25 50 PSI 170 345 kPa for each line The water supply to the generator tank is separate from the water supply to the cooling system where steam is condensed before entering the drain line Install line strainers not provided A manual...

Page 7: ...id valves have been adjusted to yield drain temperatures of 140o F This will vary depending on install location water supply temperature and pressure A qualified service person should adjust the cooling solenoid valves should the drain temperature be other than desired Refer to section 7 0 Adjustments on page 23 for adjustment instructions DRAIN CONNECTIONS FIGURE 2 The drain connection Fig 2 must...

Page 8: ...will bridge across the probe insulator from the metal extension which senses the water level in the boiler Once this scale becomes wet the water level control is unable to maintain the proper water level in the boiler This situation may cause an electric heating element to fail if the element is not adequately covered by water Strainers and filters will NOT remove minerals from the water Refer to ...

Page 9: ...door open observe that no steam is entering the compartment and that the COOKING light is OFF 4 Close compartment door The COOKING light should now be illuminated and steam should be heard entering the compartment after about 45 seconds 5 Check drain line to ensure that water from cold water condenser is flowing through the drain line 6 Open compartment door and observe that steam supply to chambe...

Page 10: ...LE TIMER The Half Cycle button is pre programmed to run for 1 1 2 minutes 90 seconds 4 4 FULL CYCLE TIMER The Full Cycle button is pre programmed to run for 2 1 2 minutes or 150 seconds 5 MAIN POWER SWITCH ON The steam generator will automatically fill and begin heating to the pre set READY temperature for standby Red light on switch will be illuminated OFF The steam generator will automatically d...

Page 11: ...OKING light will be lit At the end of the cooking cycle the buzzer will sound the COOKING light will go off and steam supply to the compartment will cease Turn the timer to the OFF position to silence the buzzer SHUTDOWN Turn main power switch OFF The boiler will automatically blow down Leave the compartment door open to allow the inside to dry out For an extended shutdown turn the main power swit...

Page 12: ...y thaw overnight in a refrigerator This will reduce their cooking time PREPARATION Prepare vegetables fruits meats seafood and poultry normally by cleaning separating cutting removing stems etc Cook root vegetables in a perforated pan unless juices are being saved Liquids may be collected in a solid 12 inch by 10 inch pan placed under a perforated pan Perforated pans are used for frankfurters wien...

Page 13: ...ces do not need to be preserved Solid pans are good for cooking puddings rice and hot breakfast cereals Vegetables and fruits are cooked in solid pans in their own juice Meats and poultry are cooked in solid pans to preserve their juice or return broth Canned foods can be heated in their opened cans cans placed in solid pans or the contents may be poured into solid pans DO NOT place unopened cans ...

Page 14: ...hetti Regular Vermicelli 12 15 Macaroni Shells Elbows 15 18 Lasagna Noodles 15 18 Frozen Casseroles Lasagna 35 Full Pan Meat Loaf 3 5 lb each 40 7 lb Beef Ground Chuck 20 25 5 lb Beans Baked Refried 9 5 lb Chicken Breasts Legs Thighs 20 7 lb Turkey Frozen Breasts 1 90 6 7 lb each Hot Dogs 3 40 50 SEAFOOD Clams Frozen 10 12 18 Fresh Cherrystone 5 6 18 King Crab Frozen Claws 4 1 lb Legs 4 6 2 lb Shr...

Page 15: ... Broccoli Spears Frozen 8 2 lb Spears Fresh 6 2 lb Florets Frozen 6 2 lb Carrots Baby Whole Frozen 8 3 lb Crinkle Cut Frozen 7 8 2 lb Sliced Fresh 11 4 lb Cauliflower Florets Frozen 6 2 lb Fresh 7 8 2 lb Corn Yellow Whole Kernel Frozen 5 2 lb Cobbettes Frozen 8 12 ears Corn on Cob Fresh 10 12 8 ears Peas Green 6 2 lb Potatoes Whole Russet 55 4 lb Zucchini Slices 8 5 lb Canned Vegetables 6 5 lb Fro...

Page 16: ...the warranty WARNING Disconnect the power supply to the appliance before cleaning or servicing CAUTION The steamer and its parts are hot Use care when operating cleaning and servicing the steamer The cooking compartment contains live steam Stay clear when opening door CLEANING DAILY At the end of each day or between cooking cycles if necessary 1 Turn main power switch OFF 2 Remove pans and racks f...

Page 17: ...nt cleaning otherwise the life of the equipment could be adversely affected It is NOT RECOMMENDED to use cleaning agents that are corrosive Use of cleaning agents that contain chloride acids or salts which are corrosive may cause pitting and corrosion when used over a period of time this will reduce the life of the appliance Should pitting or corrosion occur this is not covered by warranty Follow ...

Page 18: ...compartment GENERATOR DELIMING INSTRUCTIONS CAUTION Do not open or close compartment doors or operate unit when deliming caps are not in place 1 Turn the power switch OFF for three minutes allowing the generator to completely empty 2 Turn the power switch to the DELIME position 3 Remove cap located on top right of steamer Using a funnel and pouring slowly to avoid spilling pour one quart 1 liter o...

Page 19: ...g pads DO NOT USE ORDINARY STEEL WOOL as any particles left on the surface will rust and further spoil the appearance of the finish NEVER USE A WIRE BRUSH STEEL SCOURING PADS EXCEPT STAINLESS SCRAPER FILE OR OTHER STEEL TOOLS Surfaces which are marred collect dirt more rapidly and become more difficult to clean Marring also increases the possibility of corrosive attack Refinishing may then be requ...

Page 20: ...nd place in ON position b Shut cooker door to close switch contacts Check alignment of door with switch c Replace switch d Replace light e Replace timer f Inspect condition of wire and tightness of all connections Correct as needed Steam fails to enter cooking compartment with cooking indicator light on a Faulty wiring a Inspect condition of wire and tightness of all connections Correct as needed ...

Page 21: ...eplace timer b Replace buzzer c Inspect condition of wire and tightness of all connections Correct as needed Steam flows continuously from drain line with cooker in operation a Cold water not connected b Faulty cooling valve c Faulty wiring d Faulty or misadjusted operating a Turn on external shutoff valve b Replace cooling valve c Inspect condition of wire and tightness of all connections Correct...

Page 22: ...ry high resistance i e low mineral content or Reverse Osmosis Water c Scale build up on probe d Water fill solenoid valve a Replace b Replace level control with high sensitivity control c Clean all probes in steam generator d Plugged defective clean or replace Water accumulates in compartment a Plugged compartment drain a Remove screen and clean drain line Water flows into drain during shutdown a ...

Page 23: ...ain valve is open g Water supply off a Check incoming water valve is on b Call supply agency c Replace or clean d Check and correct e Replace f Check valve clean or replace g Check incoming water valve is on NOTE THESE PROBLEMS ARE AN INDICATION OF SEVERE WATER CONDITIONS WHICH SHOULD BE CORRECTED IMMEDIATELY TO AVOID DAMAGE TO THE COMPONENTS AND PERFORMANCE OF THE STEAMER CALL YOUR SERVICE AGENCY...

Page 24: ...otor c Wiring 5 Buzzer fails to sound at end of 60 MINUTE TIMER mode a 60 Minute timer contacts b Buzzer c Wiring 6 Steam flows continuously from boiler drain line a Cooling valve needs replacing b Wiring Timer Motor A defective timer motor will cause continuous operation in the TIME mode with the timer dial failing to return to the 0 Minute position To confirm timer motor condition proceed as fol...

Page 25: ...ight is verified by using an AC volt meter at the leads with input power on the selector switch in the correct position for that timer the timer set and the door latches closed If 240 volts is present the fault is in the indicator light and requires replacement If 240 volts is not present the fault is in the wiring or control components selector switch timer or door switch Buzzer If the buzzer doe...

Page 26: ...oor frame and remove the door panel assembly 3 Remove the six screws from the gasket plate in the door panel assembly 4 Remove the gasket plate and the door gasket from door panel 5 Install the new door gasket to the door panel Replace the gasket plate and six screws 6 Reassemble the door panel assembly in the door frame using the four screws 7 Gasket replacement is now complete Door may be diffic...

Page 27: ...24 8 0 PARTS FIGURE 3 Exploded View ...

Page 28: ...ont Spacer 1 97 7200 Split Lock Washer 1 2 1 97 5601 Hex Nut 1 2 20 UNF 1 12 97 6177 Drip Trough Strainer 1 13 97 6334 Compartment Strainer 1 14 08 7520 Adjustable Leg 4 15 97 7225 Door Assembly 1 15A 97 6295 Outer Door Shell 1 16 97 6432 Door Handle Assembly 1 97 6771 Decal Door Handle 1 97 7226 Door Handle 1 97 7227 Door Handle Plate 1 97 7228 Hex Socket Cap Screw 1 4 20 UNC x 1 3 4 Lg 2 97 7229...

Page 29: ...3 Steam Diverter Replacement Kit 2 28 97 7103 Hose Clamp 3 8 7 8 8 29 97 7234 Silicone Hose 1 2 I D x 6 1 2 Lg 2 30 97 7104 Hose Barb Brass 1 2 x 1 4 MPT 1 31 97 6738 Earth I D Tag 1 32 97 5052 Ground Lug 1 33 10 6963 Terminal Block Black 3 4 34 10 6962 Terminal Block White 208 240V 15 kW Terminal End Section Black 1 34 98 6186 Terminal End Section White 208 240V 15 kW 35 97 6279 Relay Single Pole...

Page 30: ...nector Brass 1 2 C x 3 4 MPT 1 48 98 6089 Elbow Brass 1 4 C x 1 8 MPT 1 49 97 6285 Cooling Solenoid Valve 1 8 NPT 240V 1 50 Tube 1 4 x 1 3 8 1 51 97 6344 Connector Brass 3 8 C x 1 8 MPT 1 52 97 6308 Fill Solenoid Valve 240V 1 53 98 6123 Connector Brass 1 4 C x 1 8 MPT 2 54 97 7238 Elbow 90 Brass 1 2 C x 1 4 FPT 1 55 97 7239 Left Rear Panel 1 97 6662 Nut Retainer 1 4 20 UNC 2 56 97 5619 Connector B...

Page 31: ... 70 97 6347 Pressure Switch Safety 5 psi 1 71 97 6346 Elbow 90 Brass 3 8 C x 3 8 MPT 1 72 91 7594 Delime Port 1 91 7765 Clean Port Plug 1 08 7511 O Ring 1 73 97 6587 Hose Barb Brass 5 8 x 1 2 MPT 1 74 97 6424 Hose 5 8 ID x 21 LG 1 75 97 6421 Hose Coupler Brass 5 8 x 3 8 MPT 1 76 97 7241 Top Cover 1 77 97 6188 Brass Elbow 3 8C x 1 8 MPT 2 78 97 7242 Silicone Hose 1 2 I D x Lg 1 79 97 7243 Hose Clam...

Page 32: ... Fuse Holder 380 415 480 600V 2 82 97 5616 Transformer 380 220V 50 60 Hz 100VA 1 97 5616 Transformer 415 240V 50 60 Hz 100VA 1 97 5613 Transformer 480 240V 60 Hz 100VA 1 98 6191 Transformer 600 240V 60 Hz 100VA 1 NOT SHOWN SELECT AS REQUIRED ...

Page 33: ...30 9 0 WIRING ...

Page 34: ...31 9 0 WIRING Continued ...

Page 35: ...32 9 0 WIRING Continued ...

Page 36: ...33 9 0 WIRING Continued ...

Page 37: ...34 9 0 WIRING Continued ...

Page 38: ...35 9 0 WIRING Continued ...

Reviews: