Maretron DSM800 User Manual Download Page 5


®

®

1  General 

1.1 

Introduction 

Congratulations on your purchase of the Maretron DSM800 Vessel Monitoring and Control Indoor 
Display. Maretron has designed and built your display to the highest standards for years of 
dependable and accurate service. 
 
The DSM800 is a dedicated touch screen that comes preloaded with Maretron’s N2KView

®

 vessel 

monitoring and control software (N2KView

®

 hardware license key sold separately). The N2KView

®


software allows you to configure as many favorite screens as you want with exactly the information 
you want to see. Although not suitable for outdoor applications, the DSM800 provides an extremely 
simple touch interface for monitoring and controlling critical systems from inside the vessel. 
 
The DSM800 is ruggedized for marine use and includes a solid state disk drive to withstand the 
pounding associated with waves. And since the DSM800 only dissipates 25 watts, there is no need 
for internal cooling fans that are noisy and wear out causing electronics to overheat and fail. 
 
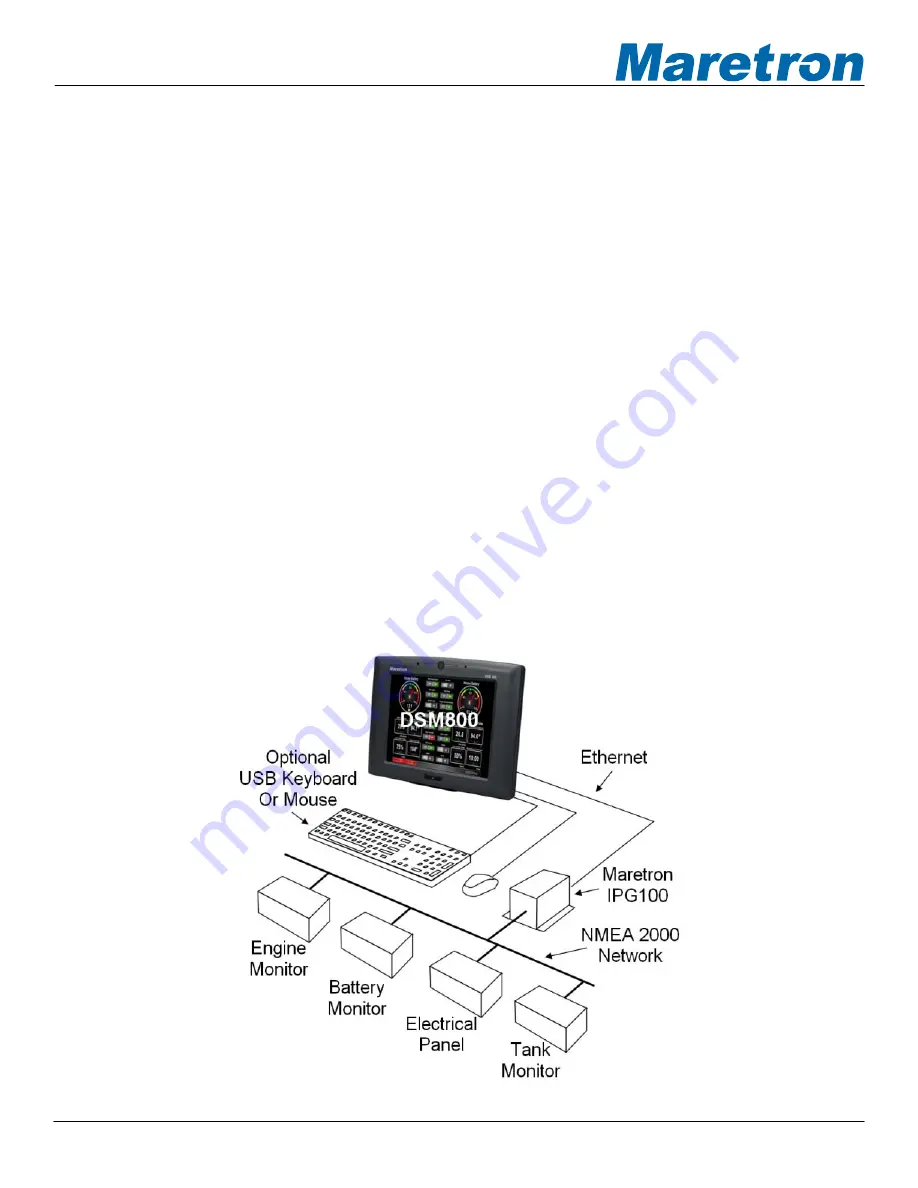
As an alternative to controlling the DSM800 through the touch screen, the DSM800 includes two USB 
ports for connecting keyboards, mice, or trackballs. The DSM800 also has an Ethernet port for 
communicating with an NMEA 2000

®

 network (see Figure 1) through Maretron’s Internet Protocol 

Gateway (IPG100). Alternatively, the DSM800 can network through Ethernet to a PC running 
N2KServer

®

. Although the DSM800 comes pre-installed with the N2KView

®

 software, a separately 

purchased N2KView

®

 hardware license key plugged into the IPG100 (or PC) is required (see IPG100 

User’s Manual for more details). The Ethernet port is also used for connecting Internet Protocol (IP) 
cameras for viewing within the N2KView

®

 software. 

Figure 1 – DSM800 Network Diagram


Revision 1.0 


Page 1 

Summary of Contents for DSM800

Page 1: ...Vessel Monitoring and Control Indoor Display User s Manual Revision 1 0 Copyright 2011 Maretron LLP All Rights Reserved Maretron LLP 9014 N 23rd Ave 10 Phoenix AZ 85021 7850 http www maretron com Mar...

Page 2: ...DSM800 User s Manual Page ii Revision 1 0 Revision History Rev Description 1 0 Original document...

Page 3: ...ting 7 2 4 Connecting the DSM800 8 2 4 1 LAN Connection 9 2 4 2 USB Device Connection 10 2 4 3 Power Connection 10 2 4 4 Power Sequencing 11 2 5 Configuring the DSM800 11 2 5 1 Manually Entering LAN C...

Page 4: ...ts in mm 6 Figure 6 Tighten the Panel Mounting Clamp Screws 7 Figure 7 DSM800 Arm Mounting Retention Screw Holes 8 Figure 8 DSM800 Interface Connector Panel 9 Figure 9 LAN Connection 9 Figure 10 USB D...

Page 5: ...olid state disk drive to withstand the pounding associated with waves And since the DSM800 only dissipates 25 watts there is no need for internal cooling fans that are noisy and wear out causing elect...

Page 6: ...ructions for installation configuration and usage of the Maretron DSM800 in order to ensure optimal performance This manual corresponds to the DSM800 The Maretron DSM800 has the followin 8 LED Backlit...

Page 7: ...le so the DSM800 should be mounted in an indoor location 2 3 Mounting the DSM800 The DSM800 has three mounting options which include wall mounting if access to the backside of the mounting surface is...

Page 8: ...four screw holes on the rear panel of the DSM800 and tighten until the screw shank is secured against the rear panel Figure 3 Step 7 Align the mounting screws on the monitor rear panel with the mount...

Page 9: ...he clamps found within the panel mounting kit support a maximum panel thickness of 3 8 or 0 375 Step 1 Select the position on the panel to mount the DSM800 Step 2 Cut out a section from the panel that...

Page 10: ...nel Step 4 Insert the panel mounting clamps into the pre formed holes along the edges of the chassis behind the aluminum frame 6 clamps come with the optional panel mount kit 4 clamps are used and two...

Page 11: ...low the steps below Step 1 Please correctly mount the arm onto the base surface To do this refer to the installation documentation that came with the mounting arm Step 2 Once the mounting arm has been...

Page 12: ...DSM800 are found on the bottom panel The I O interface panel located on the bottom of the DSM800 has the following I O interface connectors 1 x 12 V DC Power input connector 1 x Audio line out jack 1...

Page 13: ...ollow the instructions below Step 1 Locate the RJ 45 connector on the bottom panel of the DSM800 Series Step 2 Align the connector Align the RJ 45 connector on the LAN cable with the RJ 45 connector o...

Page 14: ...N BOATS 1 Directly with 10 14VDC power source using the 12VDC pigtail 90 connector supplied in the box a Connect the wire with writing along the entire length to the negative supply b Connect the wire...

Page 15: ...o the DSM800 it will turn on 2 5 Configuring the DSM800 In order to use the DSM800 you must already have N2KServer installed and running on either a Windows PC or on a Maretron IPG100 Internet Protoco...

Page 16: ...is necessary and the DSM800 should be able to successfully connect to the local area network 2 5 1 Manually Entering LAN Connection Information If your local area network does not use DHCP you must m...

Page 17: ...the netmask value used on your LAN in most cases this value will be 255 255 255 0 f In the Gateway field enter the IP address of the default gateway of your LAN g In the Name Server field enter the I...

Page 18: ...tion to enable the DSM800 to receive information from an instance of N2KServer or an IPG100 Server This is done through the following steps Figure 14 N2KView Window with Tabs Displayed a Click anywher...

Page 19: ...Password text box enter the same server password that you entered into the N2KServer Service Manager for N2KServer running on a PC or programmed into the IPG100 g If you have purchased the Platinum Ed...

Page 20: ...yzer 2 Make sure the Server Address matches the IP address of the computer or IPG100 running N2KServer 3 Make sure you have appropriate instruments on the NMEA 2000 network to provide the data you are...

Page 21: ...rom the external breaker or switch 3 2 Turning the DSM800 Off To turn the DSM800 off use the Shutdown administrative tab of the N2KView software Alternatively you can power down the unit by pressing t...

Page 22: ...ay remove paint or markings or may corrode the DSM800 enclosure or seals Do not use any cleaners containing acetone as they will deteriorate the plastic enclosure Do not spray cleaning liquids directl...

Page 23: ...the right hand side of the unit behind the LCD screen Other Issues Please refer to the Troubleshooting section of the N2KView User s Manual If these steps do not solve your problem please contact Mare...

Page 24: ...E For connection to Maretron IPG100 and or router Audio Connection One Speaker Output Approvals Parameter Comment FCC CE CB CCC Electrical Parameter Value Comment Operating Voltage 10 14 Volts DC Volt...

Page 25: ...pport for Maretron products you can reach us in any of the following ways Telephone 1 866 550 9100 Fax 1 602 861 1777 E mail support maretron com World Wide Web http www maretron com Mail Maretron LLP...

Page 26: ...WARRANTIES ARE EXPRESSLY IN LIEU OF AND EXCLUDES ALL OTHER EXPRESS OR IMPLIED WARRANTIES INCLUDING BUT NOT LIMITED TO THE IMPLIED WARRANTIES OF MERCHANTABILITY AND OF FITNESS FOR A PARTICULAR PURPOSE...

Page 27: ...shipping and insurance charges Maretron will return the replaced or repaired product with all shipping and handling prepaid except for requests requiring expedited shipping i e overnight shipments Fa...

Reviews: