background image

25

ENGLISH

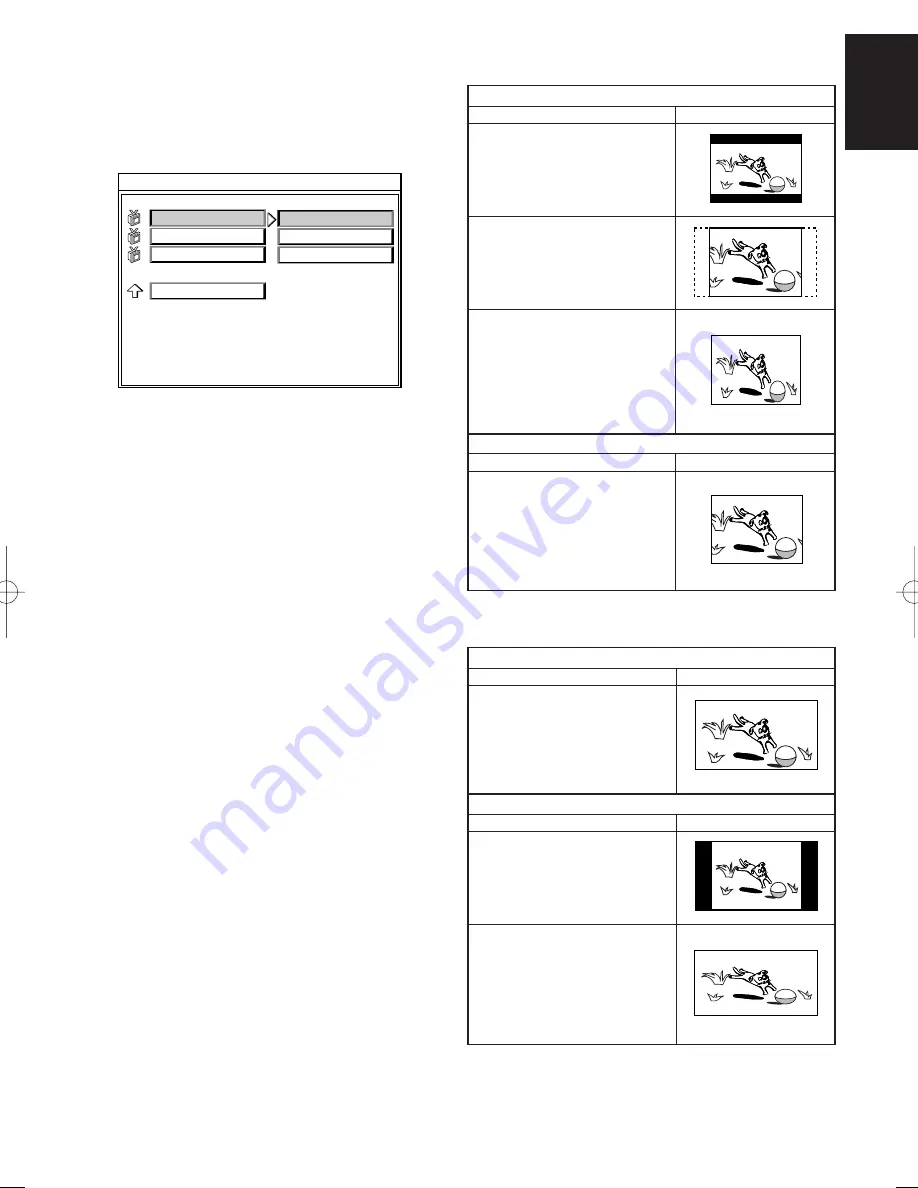
Picture in 16:9 aspect ratio

Player’s setting

How it looks

4:3 Letter Box

Black bars appear on top and
bottom of the screen. Picture is
displayed in right aspect ratio.

4:3 Pan & Scan

Both sides of picture are cropped
but picture is displayed in right
aspect ratio.

16:9 Wide

Picture is squeezed horizontally
and is not displayed in right
aspect ratio. Change the setting
to 4:3 Letter Box or 4:3 Pan &
Scan.

Picture in 4:3 aspect ratio

Player’s setting

How it looks

One of 4:3 Letter Box, 4:3 Pan
& Scan or 16:9 Wide

Picture is displayed in right
aspect ratio in any setting.

Picture in 16:9 aspect ratio

Player’s setting

How it looks

16:9 Wide

Picture is displayed in right
aspect ratio.

Picture in 4:3 aspect ratio

Player’s setting

How it looks

16:9 Wide

Black bars appear on both side
of picture but picture is displayed
in right aspect ratio.

16:9 Wide

If picture is displayed vertically
squeezed like shown at right,
check settings of your TV and set
it to normal. See the instruction
manual of your TV for details.

How it is displayed

• When your TV is 4:3 screen.

• When your TV is 16:9 screen.

VIDEO SETUP

Set picture aspect ratio.

This menu is to set picture aspect ratio to fit into your TV.

1. Press 

9

 button 

o

/

x

 to stop the player.

2. Press 

SETUP

 button 

!0

 to display the main menu.

3. With 

Cursor

 buttons 

!1

/

.

, select “VIDEO SETUP”.

4. Press 

ENTER

 button 

@4

/

,

. The below is displayed on TV.

16:9 WIDE

4:3 PAN_SCAN

VIDEO SETUP

MAIN PAGE

SCART VIDEO

TV ASPECT

4:3 LETTERBOX

-- VIDEO PAGE --

PIC MODE

5. With 

Cursor

(

3

 / 

4

) buttons 

!1

/

.

, select “TV ASPECT”.

6. Press 

Cursor

 (

2

) button 

!1

/

.

.

7. With 

Cursor

(

3

 / 

4

) buttons 

!1

/

.

, select the aspect ratio of

your TV.

• You can select from 4:3 PAN-SCAN, 4:3 LETTER BOX,

16:9 WIDE.

4:3 PAN-SCAN:

Displays wide picture on aspect 4:3
TV in Pan & Scan format.

4:3 LETTER BOX: Displays wide picture on aspect 4:3

TV in Letter Box format.

16:9 WIDE:

Set  here  when your TV has wide
screen.

Caution

When setting the aspect ratio, see the following section
“How it is displayed”.

8. Press 

ENTER

 button 

@4

/

,

 to confirm it.

9. Press 

SETUP

 button 

!0

 to quit the setup menu.

Summary of Contents for DV110

Page 1: ...vii Model DV110 User Guide DVD Tuner R CLASS 1 LASER PRODUCT KLASSE 1 LASER PRODUKT I H T IEC 825 ...

Page 2: ...e hacer uso del seguro o se ponga en contacto con Marantz IMPORTANTE Cuando solicite el servicio otorgado por la garantia el usuario tiene la responsabilidad de demonstrar cuándo efectuó la compra En este caso su recibo de compra será la prueba apropiada ITALIANO GARANZIA L apparecchio è coperto da una garanzia di buon funzionamento della durata di un anno o del periodo previsto dalla legge a part...

Page 3: ...ed EMC direktiveet og direktivet om lavspænding WARNINGS FOR LASER RADIATION CAUTION INVISIBLE LASER RADIATION WHEN OPEN DO NOT STARE INTO BEAM DANGER INVISIBLE LASER RADIATION WHEN OPEN AVOID DIRECT EXPOSURE TO BEAM VARO AVATTAESSA JA SUOJALUKITUS OHITETTAESSA OLET ALTTIINANAKYMÄTTÖMÄALLE LASERSÄTEILYLLE ÄLÄ KATSO SÄTEESEEN VARNING OSYNLIG LASERSTRÅLNING NÄR DENNA DEL ÄR ÖPPNAD OCH SPÄRREN ÄR URK...

Page 4: ...e sopra l unità Non posare nulla per circa un metro sopra il pannello superiore Lasciare 0 2 metro liberi tutto intorno l unità Português Para ventilar o aparelho não instalá lo dentro duma estante ou algo similar e observar as seguintes recomendações Não tocar a parte superior do aparelho durante a operação Não bloquear as aberturas do aparelho durante a operação Não insertar objectos debaixo do ...

Page 5: ...AR PROGRAM TUNER RC110DV REMOTE CONTROLLER SETUP ENTER RETURN ZOOM TIMER NEWS TA PTY MODE REPEAT A B RANDOM DISPLAY S TITLE ANGLE AUDIO MENU MENU TOP 0 9 6 3 8 2 5 7 4 1 AMS 1 2 4 5 3 6 7 8 9 10 11 12 13 14 15 A B C D E F G H I J K 1 18 20 21 22 24 25 26 28 29 2 4 6 7 8 9 11 12 13 14 15 3 5 10 16 17 19 23 27 ...

Page 6: ... VCD DISCS WITH PBC FUNCTION 13 PLAYING MP3 14 SWITCHING INFORMATION ON FL DISPLAY 14 VARIOUS PLAYING FUNCTIONS 15 SLOW PLAY 15 FRAME BY FRAME PLAY 15 REPEAT PLAY 15 A B REPEAT PLAY 16 RANDOM PLAY 16 AMS AUTO MUSIC SCAN PLAYING 17 PROGRAM PLAY 17 CHANGING ANGLES 18 ZOOM FUNCTION 18 CHANGING AUDIO TRACKS 18 SWITCHING AUDIO CHANNELS 18 CHANGING SUBTITLE LANGUAGES 18 TUNER OPERATION 19 TO LISTEN TO T...

Page 7: ...ith governmental regulations or environmental public instruction s rules that apply in your country or area EQUIPMENT MAINS WORKING SETTING Your Marantz product has been prepared to comply with the household power and safety requirements that exist in your area DV110 can be powered by 230 V AC only COPYRIGHT Recording and playback of any material may require consent For further information refer t...

Page 8: ...UT DISCS PLAYABLE DISCS DVD DVD R Finalized DVD disc recorded in the DVD video format Video CD VCD Audio CD CD DA CD R CD RW Finalized CD R and CD RW discs recorded in the CD DA format MP3 format p4 or Video CD format can be played with the unit Nevertheless some discs may not be able to be played depending on condition of the discs Finalize is the process to make a DVD R or CD R CD RW playable fo...

Page 9: ... COMPACT DISCS The glossy side shining like a rainbow is the front side of the disc and the side on which the label is printed is the back Unlike conventional turntables for playing analog discs the DV110 reads the information recorded on the disc from underneath without contacting it using a beam of laser light Therefore the performance of a compact disc will not degrade like conventional analog ...

Page 10: ... Press this button to select an item on the menu or title screen 2 ZOOM button Press this button to enlarge picture This function may be disabled depending on discs 3 Slow buttons Press this button for slow forward backward playback chapter 4 5 6 button Press this button for fast forward rewind playback of the currently playing chapter DVD or track Video CD CD When in TUNER mode this button is to ...

Page 11: ...rmat PAL NTSC Note Progressive function cannot be used 8 4 button Press this button to skip to next previous chapter DVD or track Video CD CD When in TUNER mode this button is to select the preset channel receiving mode or RDS 9 TIMER button Press to set the timer and clock These settings can be performed only when the unit is used on its own OPERATION OF REMOTE CONTROL UNIT 1 REMOTE CONTROL The d...

Page 12: ...urn into the DVD mode Cursor 3 4 1 2 buttons This button is to select an item on the menu etc 0 Display panel This panel displays the operating modes and statuses 1 6 MODE button Press this button to fast forward the disc while playing Also this button is to change the tuner mode Normal frequency display Preset mode RDS mode Receiving mode 2 5 MEMO button Press this button to fast rewind the disc ...

Page 13: ...operation mode Set to EXT position when DV110 is being used in combination with a AV amplifier PS110 CDR DR110 or MD MD110 If your component is not capable of system connection set this switch to INT position E S Video output jack Connect to the S video input terminals of an AV amplifier VCR F Digital out COAX jacks The DVD CD signals during playback are output digitally to these jacks Connect the...

Page 14: ...n how to make the correct connections CONNECTING THE MARANTZ EQUIPMENT PS110 DR110 MD110 MODEL NO PS110 R L TUNER TV VCR IN DVD IN CDR MD OUT REMOTE CONTROL SELECTOR SYSTEM INT SPEAKER SYSTEM 6 16 OHMS COAX OPT IN OUT PRE OUT DIGITAL IN FRONT R L SURROUND R L CENTER REMOTE CONTROL SUBWOOFER ANALOG IN OUT REMOTE CONTROL DIGITAL IN LEFT RIGHT IN OUT SELECTOR EXT INT OPT COAX MODEL NO MD110 ANALOG IN...

Page 15: ... Press and hold down the lever of the AM antenna terminal 2 Insert the bared wire into the antenna terminal 3 Release the lever 1 3 4 2 CONNECTING OTHER AUDIO EQUIPMENT Assembling the AM loop antenna 1 Release the vinyl tie and take out the connection line 2 Bend in the reverse direction 3 Inserting into the hole to attach the loop antenna to the antenna stand 4 With the antenna on top any stable ...

Page 16: ...pen the Front door 3 Press button 5 on the main unit to open the disc tray 4 Insert a disc in the tray label side up 5 Press button 5 on the main unit to close the tray 6 Press the 2 button 2 v to start the play DVD For DVD playback FL Display will be like below If DVD menu is displayed on the TV screen see DVD menu page p13 VCD For VCD playback without PBC function FL Display will be like below F...

Page 17: ... was stopped When 9 button o x is pressed FL Display will be like below When 2 button 2 v is pressed playback is resumed at the stopped position Deactivate Resume Function DVD VCD After stopping playback Resume status displayed press 9 button o x again to deactivate the resume function Press 2 button 2 v to start playback from the beginning CD For Audio CD discs FL Display is like below in stop mo...

Page 18: ...y time the button is pressed SEARCH PLAYING 1 While playing press 5 2 button or 6 1 button 4 for fast rewind or fast forward play Every time 5 2 button or 6 1 button 4 is pressed playing speed changes as shown below Note 5 button 4 2 is unavailable for MP3 Normal play 2X 4X 8X 16X 32X 64X Normal play 2X 4X 6X DVD Normal play 2X 4X 6X 8X MP3 VCD CD 2 Press 2 button 2 v to return to normal play DVD ...

Page 19: ...k while playing MP3 press 4 or button 8 on the remote Cautions on Discs in MP3 Format This player can handle with the multi session If there are many sessions it may take much time to start playing To record MP3 discs make the number of sessions as few as possible This player cannot play MP3 files recorded in 32kHz sampling frequency Record MP3 files in 44 1kHz sampling frequency 128kbps bit rate ...

Page 20: ...to step the frame backward Caution In frame by frame play there is no audio REPEAT PLAY Each time REPEAT button e is pressed repeat mode is changed in the following order 1 chapter track repeat Title all track repeat clear Caution For repeat play on VCD discs with PBC function disable PBC function first 1 Play the title or chapter track you want to repeat 2 Press REPEAT button e on the remote once...

Page 21: ...random play all tracks in the disc is played repeatedly in random sequence A B REPEAT PLAY DVD VCD CD You can play a specific part between A and B in a chapter track repeatedly Caution For repeat play on VCD discs with PBC function disable PBC function first This function cannot be used for MP3 discs 1 At the beginning of the desired passage press A B repeat button 7 on the remote control REPEAT i...

Page 22: ...ram up to 30 tracks to play tracks in any order you want Program play is not available for DVD VCD and MP3 discs 1 When the PROGRAM button 6 on the remote control is pressed in the stop mode the PROG indicator flashes and the program mode is established CD 2 Select the tracks to be programmed using the numeric buttons u on the remote control unit and then press ENTER button 4 To input a 2 digit tr...

Page 23: ... can be changed for DVD discs that contain multiple subtitle languages 1 If S TITLE button 0 on the remote is pressed once while playing the language of the currently displayed subtitle is displayed 2 Press S TITLE button 0 again to change subtitle language Each time S TITLE button 0 is pressed subtitle language changes If it is set to off no subtitle is displayed 3 Repeat step 2 for the next trac...

Page 24: ... stored in the presser channel memory TUNER OPERATION TO LISTEN TO THE RADIO This player can receive FM and AM radio broadcast 1 If TUNER button w n is pressed the player turns into tuner mode and the FL Display changes like below 2 Press TUNER button w n again to select receiving band you want Each time TUNER button w n is pressed the band switches from to FM and AM 3 Turn MULTI JOG dial 4 on the...

Page 25: ...ikewise you can select with 4 and buttons 8 on the remote MONO indicator flashes to show the current receiving mode 4 Push MULTI JOG dial 4 to confirm the receiving mode 5 Press TUNER button w n to return to tuner mode Blink Auto preset memory This allows a band to be scanned automatically a station with good reception to be found and to be stored in the preset memory 1 Press TUNER button w n to t...

Page 26: ...ht classical 5 CLASSIC Serious classical 6 NEWS News 7 AFFAIR Current Affairs 8 INFO Information 9 SPORT Sport 10 EDUCATE Education 11 DRAMA Drama 12 CULTURE Culture 13 SCIENCE Science 14 OTHERS Varied 15 OTHER Other Music 16 WEATHER Weather 17 FINANCE Finance 18 CHILDREN Children s programmes 19 SOCIAL Social Affairs 20 RELIGION Religion 21 PHONE IN Phone In 22 TRAVEL Travel 23 HOBBIES Hobbies 24...

Page 27: ...the display is changed to select a station that receives the TA NEWS information 5 Turn the MULTI JOG dial 4 to select a station which is the present station or another station to be received 6 Press the MULTI JOG dial 4 to a station When the present station is selected EON NEWS is displayed When another station is selected EON SEEK is displayed Blink Blink 7 1 To set EON SEEK on the present stati...

Page 28: ...ss 9 button o x to stop the player 2 Press SETUP button 0 to display the main menu 3 With Cursor buttons 1 select LANGUAGE SETUP 4 Press ENTER button 4 The below is displayed on TV PREFERRED AUDIO LANGUAGE MAIN PAGE OSD LANG DISC MENU SUBTITLE AUDIO OTHERS GERMAN ITALIAN SPANISH FRENCH ENGLISH LANGUAGE PAGE 5 With Cursor 3 4 buttons 1 select AUDIO 6 Press Cursor 2 button 1 7 With Cursor 3 4 button...

Page 29: ...ttons 1 select LANGUAGE SETUP 4 Press ENTER button 4 The below is displayed on TV SET OSD LANGUAGE MAIN PAGE OSD LANG DISC MENU SUBTITLE AUDIO SWEDISH GERMAN PORTUGUESE DANISH ITALIAN SPANISH FRENCH ENGLISH LANGUAGE PAGE 5 With Cursor 3 4 buttons 1 select OSD LANG 6 Press Cursor 2 button 1 7 With Cursor 3 4 buttons 1 select your preferred language You can select from English French Spanish Italian...

Page 30: ... right check settings of your TV and set it to normal See the instruction manual of your TV for details How it is displayed When your TV is 4 3 screen When your TV is 16 9 screen VIDEO SETUP Set picture aspect ratio This menu is to set picture aspect ratio to fit into your TV 1 Press 9 button o x to stop the player 2 Press SETUP button 0 to display the main menu 3 With Cursor buttons 1 select VIDE...

Page 31: ...e SCART terminal are S Video and Composite RGB signal is not supported Still picture display setup To set how still picture is displayed while pausing 1 Press 9 button o x to stop the player 2 Press SETUP button 0 to display the main menu 3 With Cursor buttons 1 select VIDEO SETUP 4 Press ENTER button 4 The below is displayed on TV SET PICTURE MODE TV ASPECT SCART VIDEO VIDEO PAGE N FLICKER HI RES...

Page 32: ...firm it 9 Press SETUP button 0 to quit the setup menu Dynamic range compression setup For discs recorded in Dolby Digital format audio dynamic range the range between the smallest and the biggest sound compression ratio can be changed depending on volume level If the compression is set On you can hear small sound much clearer Caution For discs not recorded in Dolby Digital format this function has...

Page 33: ...on 4 to confirm it 9 Press SETUP button 0 to quit the setup menu RATINGS SETUP Set password for parental lock You need to enter password to play discs under parental lock or to change parental lock level This is to set the password 1 Press 9 button o x to stop the player 2 Press SETUP button 0 to display the main menu 3 With Cursor buttons 1 select RATINGS SETUP 4 Press ENTER button 4 The below is...

Page 34: ... is displayed on TV PLAYBACK CONTROL MAIN PAGE PBC SCR SAVER OFF ON OTHERS PAGE DEFAULT 5 With Cursor 3 4 buttons 1 select PBC 6 Press Cursor 2 button 1 7 With Cursor 3 4 buttons 1 select either PBC function on or off You can select from ON or OFF OFF PBC function deactivated ON PBC function activated 8 Press ENTER button 4 to confirm it 9 Press SETUP button 0 to quit the setup menu Default setup ...

Page 35: ...hmiri ks Kurdish ku Kirghiz ky Latin la Lingala ln Laothian lo Lithuanian lt Latvian lv Malagasy mg Maori mi Macedonian mk Malayalam ml Mongolian mn Moldavian mo Marathi mr Malay ms Maltese mt Burmese my Nauru na Nepali ne Norwegian no Occitan oc Oromo om Oriya or Panjabi pa Polish pl Pashto Pushto ps Quechua qu 0721 0801 0809 0818 0821 0825 0901 0905 0911 0914 0919 0923 1009 1023 1101 1111 1112 1...

Page 36: ...k Blink Blink USING THE TIMER FUNCTIONS This unit enables a time to be set and for a disc to be played at this setting The clock must always be set for the timer functions to be valid Note These functions work only when the unit is used on its own The PS110 s timer functions are used when the unit is operating as part of a system with the PS110 SETTING TIME 1 Press the TIMER button 9 on the remote...

Page 37: ...the S TITLE button 0 next 7 Press the STANDBY button z to turn off the unit once into the stand by mode 8 Press the STANDBY button z again to turn on the unit The password and the parental lock level have been reset default status 4 Set the playback ON minute using the Cursor 1 2 buttons 1 on the remote control or the Cursor 1 2 buttons on the main unit 5 Press the ENTER button 4 to enter the sele...

Page 38: ...n not receive FM AM radio broadcast Connect the antenna correctly Change the antenna location For FM radio stereo receiving can cause a bit more noise than monaural receiving Change the receiving mode to monaural Noise on AM radio may be caused by another equipment Move the equipment far from the tuner Multi path distortion radio signal is received through multiple paths because of reflection by b...

Page 39: ...34 ENGLISH ...

Page 40: ... Audio output 2 0 V 1 dB Digital output 0 5 Vp p 0 05 Video section Frequency response 100IRE Multi burst 1MHz Ref 4 8MHz 6 0 dB Video S N White100 LPF 4 2MHz HPF 100kHz SC trap ON 60 dB Color S N Magenta100 LPF 500kHz HPF 100kHz 56 dB Video output 1 0 Vp p 0 8 dB Video output impedance 75 Ω Y output level 1 0 Vp p 0 1 C output level 0 286 Vp p 0 0286 Y C output impedance 75 Ω GENERAL Power supply...

Page 41: ...wait LATVIA Ace Ltd 61 LacPlesa Str Riga LV 1011 Latvia LEBANON AZ Electronics S A 1 P O Box 11 2833 Beirut Lebanon LITHUANIA Accapella Ltd Ausros Vartu G 5 Pasazo SKG 2001 Vilnius Lithuania MALAYSIA Wo Kee Hong Electronics Sdn Bhd 2ndFloorBangnanInfiniteCentre Lot1 Jalan13 6 46200PetalingJaya SelangorDatulEhsan Malaysia MALTA Doneo Co Ltd 78 The Strand Sliema SLM07 Malta MAURITIUS SKR Electronics...

Reviews: