3-31
D3 - DRY AIR FILTER CARTRIDGE
CHANGE
In case of use in a heavily dust laden atmosphere, there are pre-filtration car tridges, see:
3 - MAINTENANCE: FILTERS CARTRIDGES AND BELTS. Also, the checking and cleaning
periodicity of the car tridge must be reduced (up to 250 hours in a heavily laden dust
atmosphere and with pre-filtration).
Change the cartridge in a clean location, with the I.C. engine stopped. Never operate the lift truck with
the air filter removed or damaged.
- Open the I.C. engine bonnet.
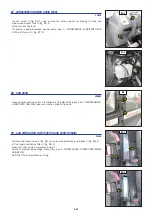
- Loosen the bolts and remove cover 1 (fig. D3).
- Gently remove the car tridge 2 (fig. D3), taking care to avoid spilling the dust.
- Leave the safety car tridge in place.
- The following par ts must be cleaned with a damp, clean lint-free cloth.
• The inside of the filter and cover.
• The inside of the filter inlet hose.
• The gasket sur faces in the filter and in the cover.
- Check pipes and connections between the air filter and the I.C. engine and the connection and state of the clogging indicator on
the filter.
- Before mounting check the state of the new car tridge (see: 3 - MAINTENANCE: FILTERS CARTRIDGES AND BELTS).
- Introduce the car tridge into the filter axis and push it in, pressing the edges and not the middle.
- Reassemble the cover, guiding the valve downwards.
D4 - FUEL PRE-FILTER
CHANGE
MLT 634 Turbo LSU Série F-E3
MLT 731 Turbo Série F-E3
MLT 735 Turbo LSU Série 6-E3
MLT 741 Turbo LSU Série 6-E3
MLT 1035 L Turbo LSU Série 6-E3
Make sure the electrical contact on the lift truck is cut, otherwise fuel will be released if the lift pump
is on.
- Open the I.C. engine bonnet.
- Carefully clean the outside of the filter and its holder, to prevent dust from getting into
the system.
- Place a container under the pre-filter and drain it using drain plug 1 (fig. D4).
- Remove bleeder screw 2 (fig. D4) in order to ensure that the oil is drained properly.
- Unscrew locking screw 3 (fig. D4).
- Remove housing 4 (fig. D4) and discard car tridge 5 (fig. D4) as well as the seals of the car tridge.
- Clean the inside of the pre-filter head and the housing, using a brush immersed in clean diesel oil.
- Refit the assembly with a new pre-filter and new seals (see: 3 - MAINTENANCE: FILTERS CARTRIDGES AND BELTS).
- If necessar y, bleed the fuel circuit (see: 3 - MAINTENANCE: G1 - FUEL SYSTEM).
D4 - FUEL PRE-FILTER
CHANGE
MLT 634 -120 LSU Série F-E3
MLT 634 -120 LSU POWERSHIFT Série F-E3
MLT 735 -120 LSU Série 6-E3
MLT 735 -120 LSU POWERSHIFT Série 6-E3
MLT 741 -120 LSU Série 6-E3
MLT 741 -120 LSU POWERSHIFT Série 6-E3
- Open the I.C. engine bonnet.
- Carefully clean the outside of the filter and its holder, to prevent dust from getting into
the system.
- Place a container under the pre-filter and drain it using drain plug 1 (fig. D4).
- Disconnect the harness 2 (fig. D4).
- Unscrew locking screw 3 (fig. D4).
- Remove housing 4 (fig. D4) and discard car tridge 5 (fig. D4) as well as the seals of the
car tridge.
- Clean the inside of the pre-filter head and the housing, using a brush immersed in clean diesel oil.
- Refit the assembly with a new pre-filter and new seals (see: 3 - MAINTENANCE: FILTERS CARTRIDGES AND BELTS).
- Connect the harness
- Pressurise the circuit by means of the hand pump 6 (fig. D4).
- If necessar y, bleed the fuel circuit (see: 3 - MAINTENANCE: G1 - FUEL SYSTEM).
D3
1
2
D4
5
1
4
2
3
D4
5
2
3
1
4
Summary of Contents for 6-E3 Series
Page 2: ......
Page 4: ......
Page 5: ...1 1 1 OPERATING AND SAFETY INSTRUCTIONS...
Page 6: ...1 2...
Page 32: ...1 28...
Page 33: ...2 1 2 DESCRIPTION...
Page 34: ...2 2...
Page 111: ...2 79...
Page 124: ...2 92...
Page 125: ...3 1 3 MAINTENANCE...
Page 126: ...3 2...
Page 133: ...3 9...
Page 143: ...3 19...
Page 149: ...3 25...
Page 172: ...3 48...
Page 173: ...4 1 4 OPTIONAL ATTACHMENTS FOR USE WITH THE RANGE...
Page 174: ...4 2...
Page 176: ...4 4...
Page 191: ...5 1 5 SPECIFIC AUSTRALIA See also the operator s manual supplement 647065 AU...
Page 192: ...5 2...


