3-27
C2/1
C2/3
4
3
4
4
C2/2
1
1
2
1
1
C3/1
1
1
2
1
1
C3/2
3
3
C2 - ALTERNATOR/CRANKSHAFT BELT TENSION
CHECK - ADJUST
MLT 634 -120 LSU Série F-E3
MLT 634 -120 LSU POWERSHIFT Série F-E3
MLT 735 -120 LSU Série 6-E3
MLT 735 -120 LSU POWERSHIFT Série 6-E3
MLT 741 -120 LSU Série 6-E3
MLT 741 -120 LSU POWERSHIFT Série 6-E3
MLT 1035 L Turbo LSU Série 6-E3
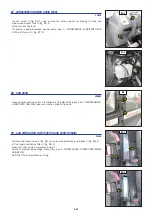
For this operation, we advise you to use the MANITOU tension meter (fig. C2/1) reference
167418.
- Open the I.C. engine bonnet.
- Unscrew the fastening screws 1 (fig. C2/2).
- Lay down the protective guard 2 (fig. C2/2).
- Check the belt for signs of wear and cracks and change if necessar y (see: 3 - MAINTENANCE:
FILTERS CARTRIDGES AND BELTS).
- Check the belt tension between the pulleys of the crankshaft and of the alternator.
NEW BELT:
- At a pressure of 15 N ± 0.4 on strap 3 (fig. C2/3), the displacement must be about 3,7 mm.
BELT AFTER 20 HOURS OF OPERATION:
- At a pressure of 13 N ± 0.4 on strap 3 (fig. C2/3), the displacement must be about 3,7 mm.
- Carr y out adjustments if necessar y.
- Untighten screws 4 (fig. C2/3) by two to three thread turns.
- Swivel the alternator assembly so as to obtain the belt tension required.
- Retighten screws 4 (fig. C2/3) (tightening torque 22 N.m).
- Put the protective guard back 2 (fig. C2/2).
If the alternator belt has to be changed, check the tension again after the first 20 hours of operation.
C3 - COMPRESSOR BELT TENSION (OPTION AIR CONDITIONING)
CHECK - ADJUST
- Open the I.C. engine bonnet.
- Unscrew the fastening screws 1 (fig. C3/1).
- Lay down the protective guard 2 (fig. C3/1).
- Check the belt for signs of wear and cracks and change if necessar y (see: 3 - MAINTENANCE:
FILTERS CARTRIDGES AND BELTS).
- Check the belt tension between the pulleys of the crankshaft and of the compressor.
- Under a normal pressure exer ted with the thumb (45 N), the belt should move approximately
10 mm.
- Carr y out adjustments if necessar y.
- Untighten screws 3 (fig. C3/2) with two to three thread turns.
- Swivel the compressor assembly so as to obtain the belt tension required.
- Retighten screws 3 (fig. C3/2).
- Put the protective guard back 2 (fig. C3/1).
If the compressor belt has to be changed, check the tension again after the first 20 hours of operation.
Summary of Contents for 6-E3 Series
Page 2: ......
Page 4: ......
Page 5: ...1 1 1 OPERATING AND SAFETY INSTRUCTIONS...
Page 6: ...1 2...
Page 32: ...1 28...
Page 33: ...2 1 2 DESCRIPTION...
Page 34: ...2 2...
Page 111: ...2 79...
Page 124: ...2 92...
Page 125: ...3 1 3 MAINTENANCE...
Page 126: ...3 2...
Page 133: ...3 9...
Page 143: ...3 19...
Page 149: ...3 25...
Page 172: ...3 48...
Page 173: ...4 1 4 OPTIONAL ATTACHMENTS FOR USE WITH THE RANGE...
Page 174: ...4 2...
Page 176: ...4 4...
Page 191: ...5 1 5 SPECIFIC AUSTRALIA See also the operator s manual supplement 647065 AU...
Page 192: ...5 2...


