


R
epair
[4] DISASSEMBLY/ASSEMBLY
[4]-6. Control cable
P
8
/2
6
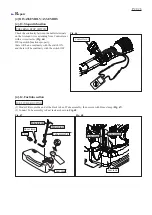
(1) Using cutting pliers, cut and remove Wire band that holds
Cable tube to Elbow. (
Fig. 19
)
(2) Remove Control cable and
ON/OFF
switch cords from the hook
of Volute case 2, then disconnect the bullet terminal of ON/OFF
switch cords. (
Fig. 20
)
(3) Remove Control cable and
the high voltage cable of
Ignition coil
from the wire holder of Volute case 2. (
Fig. 21
)
(4) Pull Control cable out of the space between Volute case and
Air cleaner cover complete. (
Fig. 22
)
(5) Remove Control cable from Carburetor. (
Fig. 23
)
DISASSEMBLING
ASSEMBLING
Note:
Be careful not to bend Control cable.
(1) Pass the inner cable of Control cable through Adjust screw and Adjust nut,
then route it in the groove of Swivel and then hook the cable end on Swivel. (
Fig. 23
)
(2) Put Control cable in the space between Volute case and Air cleaner cover complete. (
Fig. 22
)
(3) Fix Control cable and
the high voltage cable of
Ignition coil in the wire holder of Volute case 2.
Be sure to fix Control cable first, then the high voltage cable.
Make sure that Control cable is tight and vertically straight. (
Fig. 21
)
(4) Connect the bullet terminal of ON/OFF switch cords securely. (
Fig. 20
)
(5) Hold Cable tube to Elbow with a new Wire band that holds. (
Fig. 19
)
Fig. 19
Fig. 21
Fig. 22
Fig. 23
Carburetor
Wire band
Elbow
Cable tube containing
Control cable and
ON/OFF switch cords
20 to 60mm
raised portion of Elbow
Control cable
high voltage cable
Fig. 20
Control cable
hook
bullet terminal
ON/OFF
switch cord
of Switch complete
Adjust screw
Control cable
Swivel
cable end
Adjust nut
inner cable
Air cleaner case complete
Volute case
Control cable
wire holder


