background image

25 ENGLISH

3.

  Set the stand-by switch on the vacuum cleaner to 

"AUTO".

► 

Fig.61:


1.

 Stand-by switch

4.

  Push the wireless activation button on the tool 

briefly. The wireless activation lamp will blink in blue.

► 

Fig.62:


1.

 Wireless activation button 

2.

 Wireless 

activation lamp

5.

  Turn on the tool. Check if the vacuum cleaner runs 

while the tool is operating.
To stop the wireless activation of the vacuum cleaner, 

push the wireless activation button on the tool.

NOTE:

 The wireless activation lamp on the tool will 

stop blinking in blue when there is no operation for 

2 hours. In this case, set the stand-by switch on the 

vacuum cleaner to "AUTO" and push the wireless 

activation button on the tool again.

NOTE:

 The vacuum cleaner starts/stops with a delay. 

There is a time lag when the vacuum cleaner detects 

a switch operation of the tool.

NOTE:

 The transmission distance of the wireless unit 

may vary depending on the location and surrounding 

circumstances.

NOTE:

 When two or more tools are registered to 

one vacuum cleaner, the vacuum cleaner may start 

running even if you do not turn on your tool because 

another user is using the wireless activation function.

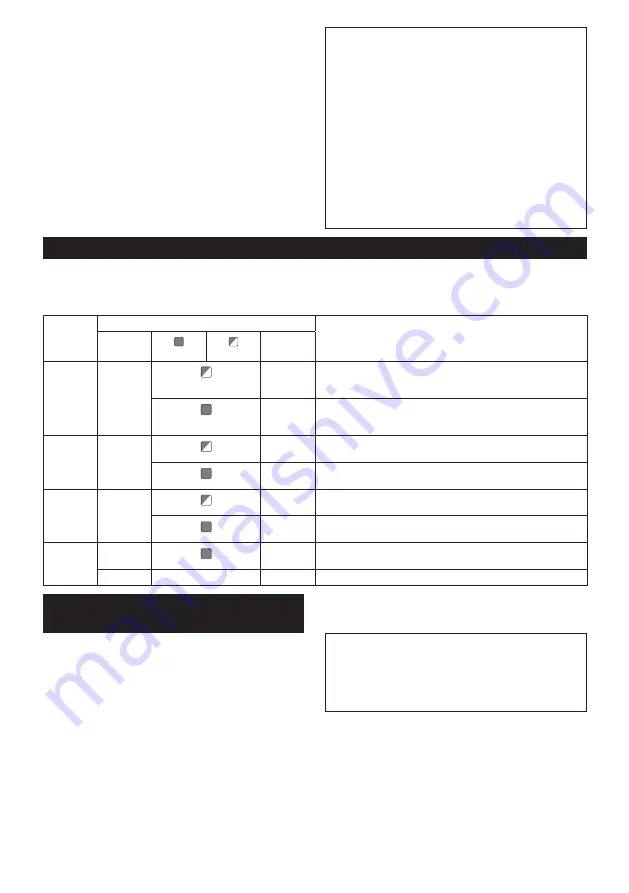
Description of the wireless activation lamp status

► 

Fig.63:


1.

 Wireless activation lamp

The wireless activation lamp shows the status of the wireless activation function. Refer to the table below for the 

meaning of the lamp status.

Status

Wireless activation lamp

Description

Color


On


Blinking

Duration

Standby

Blue

2 hours

The wireless activation of the vacuum cleaner is available. The 

lamp will automatically turn off when no operation is performed 

for 2 hours.

When 

the tool is 

running.

The wireless activation of the vacuum cleaner is available and the 

tool is running.

Tool 

registration

Green

20 seconds Ready for the tool registration. Waiting for the registration by the 

vacuum cleaner.

2 seconds

The tool registration has been finished. The wireless activation 

lamp will start blinking in blue.

Cancelling 

tool 

registration

Red

20 seconds Ready for the cancellation of the tool registration. Waiting for the 

cancellation by the vacuum cleaner.

2 seconds

The cancellation of the tool registration has been finished. The 

wireless activation lamp will start blinking in blue.

Others

Red

3 seconds The power is supplied to the wireless unit and the wireless activa-

tion function is starting up.

Off

-

-

The wireless activation of the vacuum cleaner is stopped.

Cancelling tool registration for the 

vacuum cleaner

Perform the following procedure when cancelling the 

tool registration for the vacuum cleaner.

1.

  Install the batteries to the vacuum cleaner and the 

tool.

2.

  Set the stand-by switch on the vacuum cleaner to 

"AUTO".

► 

Fig.64:


1.

 Stand-by switch

3.

  Press the wireless activation button on the vac-

uum cleaner for 6 seconds. The wireless activation 

lamp blinks in green and then become red. After that, 

press the wireless activation button on the tool in the 

same way.

► 

Fig.65:


1.

 Wireless activation button 

2.

 Wireless 

activation lamp

If the cancellation is performed successfully, the wire-

less activation lamps will light up in red for 2 seconds 

and start blinking in blue.

NOTE:

 The wireless activation lamps finish blinking in 

red after 20 seconds elapsed. Press the wireless acti-

vation button on the tool while the wireless activation 

lamp on the cleaner is blinking. If the wireless acti-

vation lamp does not blink in red, push the wireless 

activation button briefly and hold it down again.

Summary of Contents for HR009GT201

Page 1: ...mer BRUKSANVISNING 44 FI Akkukäyttöinen yhdistelmäpora KÄYTTÖOHJE 60 DA Akku kombinationshammer BRUGSANVISNING 76 LV Bezvadu kombinētais veseris LIETOŠANAS INSTRUKCIJA 92 LT Belaidis kombinacinis gręžtuvas NAUDOJIMO INSTRUKCIJA 109 ET Juhtmeta kombinatsioonihaamer KASUTUSJUHEND 125 RU Аккумуляторный трехрежимный перфоратор РУКОВОДСТВО ПО ЭКСПЛУАТАЦИИ 141 ...

Page 2: ...2 1 1 2 3 Fig 1 1 2 Fig 2 1 Fig 3 1 Fig 4 1 Fig 5 A B 1 1 Fig 6 1 2 3 Fig 7 1 4 2 3 Fig 8 ...

Page 3: ...3 1 2 Fig 9 1 Fig 10 1 Fig 11 1 Fig 12 1 2 3 5 4 Fig 13 1 2 3 Fig 14 Fig 15 ...

Page 4: ...4 1 2 3 Fig 16 1 2 3 4 5 Fig 17 1 2 Fig 18 1 2 Fig 19 1 2 Fig 20 1 2 Fig 21 1 Fig 22 ...

Page 5: ...5 1 2 3 4 Fig 23 1 Fig 24 1 3 2 4 5 Fig 25 1 2 3 4 5 Fig 26 1 2 3 4 Fig 27 1 Fig 28 ...

Page 6: ...6 1 2 Fig 29 1 Fig 30 1 2 Fig 31 1 2 3 5 4 Fig 32 Fig 33 1 Fig 34 1 3 2 4 5 6 Fig 35 ...

Page 7: ...7 1 2 3 Fig 36 1 2 3 4 Fig 37 4 3 1 2 Fig 38 1 2 Fig 39 1 Fig 40 1 2 Fig 41 Fig 42 ...

Page 8: ...8 1 Fig 43 1 2 Fig 44 1 2 Fig 45 1 2 3 4 Fig 46 1 2 Fig 47 Fig 48 Fig 49 1 2 Fig 50 ...

Page 9: ...9 2 1 Fig 51 Fig 52 Fig 53 Fig 54 1 Fig 55 1 2 3 4 Fig 56 1 2 3 Fig 57 ...

Page 10: ...10 1 Fig 58 1 2 1 2 Fig 59 Fig 60 1 Fig 61 1 2 Fig 62 1 Fig 63 ...

Page 11: ...11 1 Fig 64 1 2 1 2 Fig 65 ...

Page 12: ...ge without notice Specifications may differ from country to country The weight may differ depending on the attachment s including the battery cartridge The lightest and heavi est combination according to EPTA Procedure 01 2014 are shown in the table Applicable battery cartridge and charger Battery cartridge BL4020 BL4025 BL4040 BL4050F BL4080F Recommended battery Charger DC40RA DC40RB DC40RC Some ...

Page 13: ...nning idle in addition to the trigger time Vibration The following table shows the vibration total value tri axial vector sum determined according to applica ble standard Model HR008G Work mode Vibration emission Uncer tainty K Applicable standard Hammer drilling into concrete ah HD 9 1 m s2 1 5 m s 2 EN60745 2 6 Hammer drilling into concrete with DX10 ah HD 7 8 m s 2 1 5 m s 2 EN60745 2 6 Chisell...

Page 14: ...arefully before operation 4 In cold weather or when the tool has not been used for a long time let the tool warm up for a while by operating it under no load This will loosen up the lubrication Without proper warm up hammering operation is difficult 5 Always be sure you have a firm footing Be sure no one is below when using the tool in high locations 6 Hold the tool firmly with both hands 7 Keep h...

Page 15: ...l injury 17 Unless the tool supports the use near high voltage electrical power lines do not use the battery cartridge near a high voltage elec trical power lines It may result in a malfunction or breakdown of the tool or battery cartridge 18 Keep the battery away from children SAVE THESE INSTRUCTIONS CAUTION Only use genuine Makita batteries Use of non genuine Makita batteries or batteries that h...

Page 16: ...ost or damaged SAVE THESE INSTRUCTIONS FUNCTIONAL DESCRIPTION CAUTION Always be sure that the tool is switched off and the battery cartridge is removed before adjusting or checking function on the tool Installing or removing battery cartridge CAUTION Always switch off the tool before installing or removing of the battery cartridge CAUTION Hold the tool and the battery cartridge firmly when install...

Page 17: ... when released Fig 3 1 Switch trigger To start the tool simply pull the switch trigger Tool speed is increased by increasing pressure on the switch trigger Release the switch trigger to stop Speed change The revolutions and blows per minute can be changed by turning the adjusting dial to a given number setting from 1 to 5 Higher speed is obtained when the dial is turned in the direction of number ...

Page 18: ...ting the action mode NOTICE Do not rotate the action mode changing knob when the tool is running The tool will be damaged NOTICE To avoid rapid wear on the mode change mechanism be sure that the action mode changing knob is always positively located in one of the three action mode positions Rotation with hammering For drilling in concrete masonry etc rotate the action mode changing knob to the sym...

Page 19: ...e near moving parts or running machinery Failure to do so may result in a crush or entanglement hazard 10 Do not carry the tool by the attachment device or the lanyard 11 Only transfer the tool between your hands while you are properly balanced 12 Do not attach lanyards to the tool in a way that keeps switches or trigger lock if supplied from operating properly 13 Avoid getting tangled in the lany...

Page 20: ...chisel to the desired angle Fig 22 1 Action mode changing knob Rotate the action mode changing knob to the sym bol Then make sure that the chisel is securely held in place by turning it slightly Depth gauge The depth gauge is convenient for drilling holes of uniform depth Press and hold the lock button and then insert the depth gauge into the hex hole Make sure that the toothed side of the depth g...

Page 21: ...ot use the dust collection system for drilling in wet concrete or use this system in wet environment Failure to do so may cause malfunction Installation NOTICE Before installing the dust collection system clean the joint parts of the tool and the dust collection system Foreign matters on the joint parts may cause it difficult to install the dust collection system If any dust remains on the air duc...

Page 22: ... by hand to remove dust Do not tap the filter directly touch the filter with brush or similar or blow compressed air on the filter Doing so may damage the filter Replacing filter of dust case 1 Remove the dust case while pressing down the latch lever of the dust case Fig 43 1 Latch Lever 2 Lift the lock tab slightly outwards and open the filter cover of the dust case Fig 44 1 Filter cover 2 Lock t...

Page 23: ...rkpieces in a vise or similar hold down device NOTICE Never use rotation with hammering when the drill chuck is installed on the tool The drill chuck may be damaged Also the drill chuck will come off when reversing the tool NOTICE Pressing excessively on the tool will not speed up the drilling In fact this excessive pressure will only serve to damage the tip of your drill bit decrease the tool per...

Page 24: ...id when removing the wireless unit If the hooks do not catch the wireless unit close the lid completely and open it slowly again Tool registration for the vacuum cleaner NOTE A Makita vacuum cleaner supporting the wireless activation function is required for the tool registration NOTE Finish installing the wireless unit to the tool before starting the tool registration NOTE During the tool registr...

Page 25: ...e tool is running The wireless activation of the vacuum cleaner is available and the tool is running Tool registration Green 20 seconds Ready for the tool registration Waiting for the registration by the vacuum cleaner 2 seconds The tool registration has been finished The wireless activation lamp will start blinking in blue Cancelling tool registration Red 20 seconds Ready for the cancellation of ...

Page 26: ...lled into the tool Install the wireless unit correctly The terminal of the wireless unit and or the slot is dirty Gently wipe off dust and dirt on the terminal of the wireless unit and clean the slot The stand by switch on the vacuum cleaner is not set to AUTO Set the stand by switch on the vacuum cleaner to AUTO No power supply Supply the power to the tool and the vacuum cleaner Incorrect operati...

Page 27: ...iances such as Wi Fi devices and microwave ovens The vacuum cleaner runs while the tool is not operating Other users are using the wireless activation of the vacuum cleaner with their tools Turn off the wireless activation button of the other tools or cancel the tool registration of the other tools MAINTENANCE CAUTION Always be sure that the tool is switched off and the battery cartridge is remove...

Reviews: