


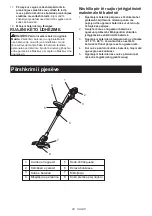

13 ENGLISH
Installing the guard
CAUTION:
•
While installing the guard, be careful not to
contact the nylon cord cutter provided on
the guard.
Contact with the cutter could result
in personal injury.
►
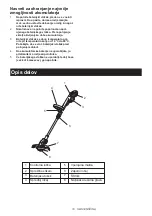
Fig.12:
1.
Guard
2.
Screws
3.
Cutter cover
Mount the guard by fitting it on to the motor housing
so that the Nylon cord is not pinched between the
guard and the motor housing, and then secure it with
two screws. Before starting the trimmer, take away the
cutter cover from the cord cutter.
Installing or removing the Nylon
cutting head
WARNING:
•
Before installing or removing the Nylon cut
-
ting head (both spool cover and spool, and
hereafter called this way), make sure that the
tool is switched off and the battery cartridge
is removed from the tool.
Failure to switch off
the tool and remove the battery cartridge may
cause a personal injury.
CAUTION:
•
While installing or removing the Nylon cut
-
ting head, be careful not to contact the nylon
cord cutter provided on the guard.
Contact
with the cutter could result in personal injury.
►
Fig.13
►
Fig.14
To remove the Nylon cutting head (spool and spool
cover) from the string trimmer, press in the latches
forcefully on both sides of the spool cover and raise it.
►
Fig.15:
1.
Nylon cord eyehole
2.
Notch of the nylon
cutting head installation port
3.
Spring
4.
Spool holder
NOTICE:
•
Make sure that the spring is installed inside the
spool holder.
To install a cord-newly-wound Nylon cutting head (spool
and spool cover) on the string trimmer, align the Nylon
cord eyehole with the notch of the Nylon cutting head
installation port on the trimmer and then press in it until
a click is heard.
Winding a new Nylon cord on the
spool
►
Fig.16
Remove the spool from the spool cover and take off the
remaining used Nylon cord from the spool.
►
Fig.17:
1.
Nylon cord
2.
Retainer for nylon cord end
Insert a Nylon cord to the retainer shown in the figure.
►
Fig.18
Wind it tightly flat around the spool in the direction of
arrow on the spool so that the wound Nylon cord sur-
face appears uniform over the winding area.
►
Fig.19
Temporarily fix a Nylon cord at the notch shown in the
figure.
►
Fig.20
Bring the Nylon cord through the Nylon cord eyehole in
the spool cover.
►
Fig.21:
1.
Spool
2.
Nylon cord
After installing the Nylon cutting head, make sure that
the Nylon cord comes out by pressing the spool and
pulling the Nylon cord.
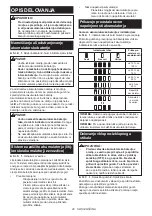
OPERATION
Attachment of shoulder strap
CAUTION:
When you use the tool in combi
-
nation of the backpack-type power supply such
as portable power pack, do not use the shoulder
strap included in the tool package, but use the
hanging band recommended by Makita.
If you put on the shoulder strap included in the tool
package and the shoulder strap of the backpack-type
power supply at the same time, removing the tool or
backpack-type power supply is difficult in case of an
emergency, and it may cause an accident or injury.
For the recommended hanging band, ask Makita
Authorized Service Centers.
►
Fig.22:
1.
Shoulder strap
2.
Hook
Hook the shoulder strap in a hole in the front grip.
OPERATION
CAUTION:
•
Do not cut high grass at a time.
Cutting high
grass at a time near the root may cause the
trimmer motor spindle to be entangled by grass
which leads to the motor under overload, result-
ing in damage to the trimmer.
►
Fig.23
►
Fig.24
CAUTION:
•
Use the trimmer without getting the spool
into a contact with the ground surface.
Using
the spool contacting the ground surface may
cause the motor under overload resulting in
damage to the trimmer.
►
Fig.25
CAUTION:
•
Do not force the trimmer in densely growing
grass.
►
Fig.26
CAUTION:
•
Do not use the trimmer as if you dig out the
ground with it.
Summary of Contents for DUR181
Page 2: ...1 2 3 1 1 2 1 2 1 Fig 1 Fig 2 Fig 3 Fig 4 Fig 5 Fig 6 Fig 7 Fig 8 2 ...
Page 3: ...1 2 1 1 2 3 1 2 3 1 2 3 4 Fig 9 Fig 10 Fig 11 Fig 12 Fig 13 Fig 14 Fig 15 Fig 16 3 ...
Page 4: ...1 2 1 2 1 2 Fig 22 Fig 17 Fig 18 Fig 19 Fig 20 Fig 21 Fig 23 Fig 24 4 ...
Page 5: ...1 2 Fig 30 1 Fig 25 Fig 26 Fig 27 Fig 28 Fig 29 Fig 31 5 ...
Page 106: ...106 ...
Page 107: ...107 ...


