background image

8

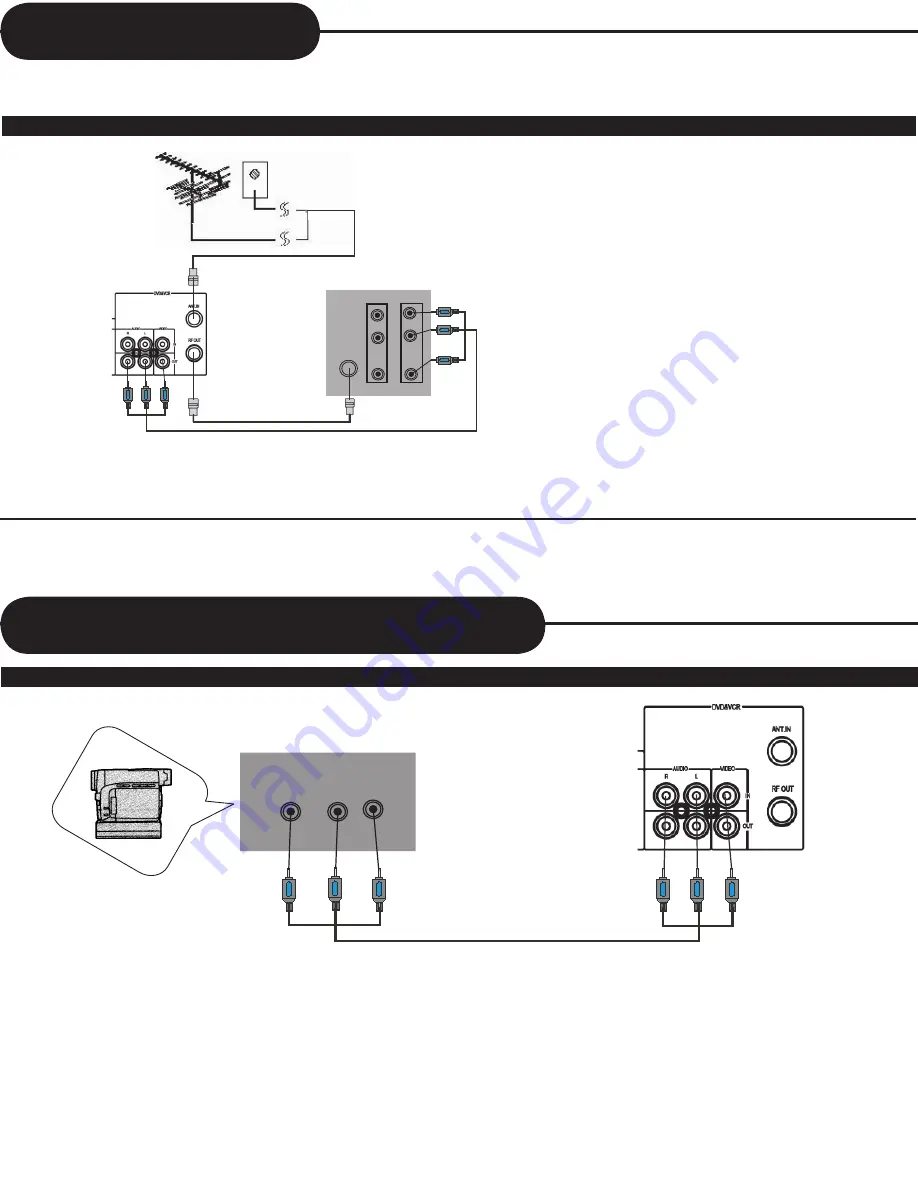
Connecting With TV

• In connecting RF cable to TV, set TV channel to CH3.

INPUT 1

INPUT 2

R

L

AUDIO

ANT IN

RF CABLE

AUDIO&VIDEO CABLE

OUT SIDE ANTENNA

OR WALL ANTENNA OUTLET

REAR PANEL OF TV

1 Connect antenna cable to the “ANT.IN” jack on rear panel of player.

2 Connect TV to the Combo Player by connecting the “RF OUT” jack with “ANT.IN” jack of the TV with RF cable(included).

3 Connect AV OUT jack on VCR&DVD PLAYER to AV IN jack of the TV with RCA(composite) cables(included).

• Connect with Audio/Video terminal, you can enjoy more clear video and audio.

REAR PANEL OF CAMCORDER 

VIDEO

L

R

AUDIO

OUT

Connecting With Optional Equipment

Connect AV OUT jack on camcorder (or playback video) to AV IN jack on rear panel (or front panel) of VCR&DVD PLAYER with 

RCA(composite) cables.

How to Connect with RF cable or AV cable

How to Connect 

Summary of Contents for DVD833-2

Page 1: ...anual carefully before using this Magnasonic product to ensure proper use After reading this manual please keep it in a safe place and refer to it when necessary For additional information on this product or for help with set up please call the Customer Help Line at 1 800 287 4871 Visit www magnasonic ca for more information about our great products ...

Page 2: ...the Radio Interference Regulations of Industry Canada These limits are designed to provide reasonable protection against harmful interference in a residential installation This equipment generates uses and can radiate radio frequency energy and if not installed and used in accordance with the instruction may cause harmful interference to radio communications However there is no guarantee that inte...

Page 3: ...paratus 11 Only use attachments accessories specified by the manufacturer 12 Use only with the cart stand tripod bracket or table specified by the manufacturer or sold with the apparatus When a cart is used use caution when moving the cart apparatus combination to avoid injury from tip over 13 Unplug this apparatus during lightning storms or when unused for long periods of time 14 Refer all servic...

Page 4: ...d The loaded disc may come off the proper position and cause damage to the player When you place this player near a TV or radio the playback picture may become poor and the sound may be distorted In this case place the player away from the TV or radio Notes on cleaning Use a soft dry cloth for cleaning For stubborn dirt soak the cloth in a weak detergent solution wring well and wipe Use a dry clot...

Page 5: ...places subject to moisture and dust Store discs vertically in a case Stacking or placing objects on discs outside of their case may cause warping PLAYABLE DISCS This Combo Player can playback the following discs Introduction Your new VCR DVD PLAYER is designed for you to enjoy all forms of disc media and VHS Tape Your player will allow you to enjoy full length motion pictures with at the movies pi...

Page 6: ...F Function 14 Playing Back a Disc 14 Locating a Specific Title Chapter or Track 16 Using the On screen Display 17 Playing Repeatedly 18 Playing in Random Order 18 Zooming a Picture On DVD 18 Selecting The Camera Angle Language Audio Settings 19 Selecting Subtitles 19 Playing in a Favorite order 20 MP3 Operation 20 WMA Operation 21 Playing Your JPEG Files 22 Memo On Output Sounds 22 Setting the Par...

Page 7: ...FAST REVERSE 16 PROGRAM 17 SEARCH THE INSTRUCTIONS BELOW DESCRIBE THE FUNCTIONS ON THE REMOTE CONTROL 8 6 3 28 33 32 19 27 15 21 34 POWER button on the remote control is for standby power When displayed on TV function is not operational on the disc Child Lock Press the POWER button of the remote control for about 8 seconds No buttons of front panel and remote control can be operated now and Lock i...

Page 8: ...over BATTERIES PREPARING THE REMOTE CONTROL To operate the Combo Player you must first place the batteries in the remote control INCORRECT USE OF BATTERIES MIGHT CAUSE THEM TO LEAK CORRODE OR EXPLODE Do not place the batteries in the wrong direction It is dangerous to charge heat open or short circuit the batteries Do not leave dead batteries or mix new with old batteries in the remote control Whe...

Page 9: ...RF OUT jack with ANT IN jack of the TV with RF cable included 3 Connect AV OUT jack on VCR DVD PLAYER to AV IN jack of the TV with RCA composite cables included Connect with Audio Video terminal you can enjoy more clear video and audio REAR PANEL OF CAMCORDER VIDEO L R AUDIO OUT Connecting With Optional Equipment Connect AV OUT jack on camcorder or playback video to AV IN jack on rear panel or fro...

Page 10: ...uality Connect the player to your HDTV ready television using the component video inputs outputs component video cables not supplied available at your local electronics store Do not substitute RCA cables for component cables eventough they look alike as this might damage the player Connect this Player with Y Pr and Pb if your TV has Progressive Scan and Component Video input Press I P button on re...

Page 11: ...tatus continues for five minutes the recording will be cancelled automatically 7 To stop recording press button If you want to playback DVD during recording with video insert a DVD disc Place the desired DVD disc on DVD tray press DVD button to switch into DVD mode and press button Then you can watch DVD Press DVD button to convert output into DVD mode 1 Insert the desired DVD disc you can t copy ...

Page 12: ...ion press down button to select desired Index Number 4 After the correct index number is highlighted on the screen press the ENTER button to move to the specific index number you have requested Press VCR button to change into VCR mode 1 Press the SETUP button on the remote control 2 Press the button to select the Search and press ENTER button 3 Press the button to select the Counter Search and pre...

Page 13: ...e next program entry form as the title at the top of the screen has changed to show PROGRAM 2 or higher If you want to exit the programming screen simply press the SETUP button Press NEXT and PREV button to scroll through the 8 event programming screens Press the POWER button to activate timer recording This function can only be accessed in STOP mode when there is no tape playing Press VCR button ...

Page 14: ... screen when you start or stop tape playback Press VCR button to change into VCR mode 1 Press the SETUP button on the remote control 2 Press the button to highlight and select the Option and press ENTER button 3 Press ENTER button until the appropriate system is selected On or Off 4 Press SETUP button to quit VCR Setting Auto Power Off Setting The OSD Display RF Out Tape Handling 1 Do not use any ...

Page 15: ...ich is connected to the Combo Player 1 Press the POWER button on the front panel Press DVD button of remote control to change into DVD mode 2 Press the OPEN CLOSE button This will open the disc tray Be sure the playback side is faced down 3 Place the disc on the disc tray 4 Press the button After closing the disc tray playback will start Moving the Combo Player during playback may cause damage to ...

Page 16: ...each movie a menu screen will appear Be aware that the on screen setup menu may damage your TV by permanently burning that image onto the screen if it is left on the screen for to long To avoid this press the STOP button at the completion of each movie You may also decide to setup the SCREEN SAVER function ADVANCED PLAYBACK The Combo Player allows you to playback discs at various speeds PLAYING AT...

Page 17: ...IVIDED INTO TRACKS YOU CAN CONVENIENTLY LOCATE ANY SPECIFIC TITLE CHAPTER OR TRACK WITH THIS COMBO PLAYER TITLE 1 DVD Video Disc TITLE 2 Audio CD LOCATING A TITLE USING THE TITLE MENU You can locate a specific title using the title menu function if a DVD video disc contains a title menu 1 Press the TITLE button On the TV screen the title menu will appear 2 Press the button to select the title you ...

Page 18: ...ATUS AND DISC INFORMATION ON YOUR TV SCREEN CHECKING THE OPERATIONAL STATUS With this function you can view on your TV the following Current title Track number Total playing time Press DISPLAY during playback Display Off Title Elapsed TT 01 12 CH 006 039 0 02 20 Chapter Elapsed TT 01 12 CH 006 039 0 03 50 Chapter Remain TT 01 12 CH 006 039 0 10 40 Current Title Total Title Current Chapter Total Ch...

Page 19: ... A B RPT button at the beginning of the segment in which you want to repeat playback point A 2 Press the A B RPT button again at the end of the segment point B The Combo Player will automatically return to point A and start to repeat playback of the selected segment A B 3 Press the A B RPT button to cancel the A B repeat function The Combo Player will resume to normal playback A AB Depending on th...

Page 20: ...RAL DIFFERENT ANGLES AND LANGUAGES HOW TO CHANGE THE CAMERA ANGLE Press the ANGLE button while playing back a scene recorded with multiple angles Each time you press the ANGLE button the angle will change NOTICE The angle function will not work on DVD video discs that do not contain recorded multiple angles The angle icon indicator will illuminate while playing back a title that contains at least ...

Page 21: ...mbo Player is turned off or if the disc is removed the program item will be removed Depending on the disc the programmed playback may not function The program function supports to play normal CD s it is not available while playing MP3 CD s and WMA To clear the numbers that you have programmed in just now press CLEAR button Program TT XX CH XX 01 TT CH 06 TT CH 02 TT CH 07 TT CH 03 TT CH 08 TT CH 0...

Page 22: ...d files to select which ones you want to play Insert a WMA CD the Combo Player will initialize the disc when the tray is closed and the directory folder will be shown in a WMA MENU on screen 2 Then press then the key to select and highlight a WMA file song Press ENTER to commence playback of a WMA file you have selected WMA Operation ...

Page 23: ... or image you want to view and then press ENTER button to confirm your selection Fifteen slideshow transition modes are provided Use PROGRAM key to select IMAGE ROTATION ZOOM mode 9 EXTEND FROM CENTER H mode 10 EXTEND FROM CENTER V mode 11 COMPRESS TO CENTER H mode 12 COMPRESS TO CENTER V mode 13 WINDOW H mode 14 WINDOW V mode 15 WIPE FROM EDGE TO CENTER RANDOM NONE by default mode 1 WIPE TOP mode...

Page 24: ...ttons to highlight the PREFERENCE PAGE menu and then press ENTER button to go to this page 1 Follow steps 1 to 3 in the previous section 2 Scroll through the menu by pressing the or buttons and highlight PASSWORD and press the ENTER button Press the ENTER button again to select CHANGE option 3 Enter old password 4 Enter new password 5 Re enter to confirm your new password 6 Press ENTER 7 Press SET...

Page 25: ...aker Setup Dolby Digital Setup Video Setup and Preferences The selected category will provide you the setting details on screen General Setup Page TV Display PS Angle Mark On OSD Lang ENG SPDIF Output RAW Captions Off Screen Saver On Speaker Setup Page Downmix Normal PS Normal LB Wide On Off English French Spanish SPDIF Off SPDIF RAW SPDIF PCM On Off On Off LT RT Stereo Dolby Digital Setup Dual Mo...

Page 26: ...re by pressing the TRACKING button Cannot view a tape but the audio is OK Head cleaning may be necessary No or poor playback picture Select channel 3 or 4 on your TV Fine tune your TV TV programs cannot be seen normally Check the ANT IN and RF OUT connections Press the VCR button on the remote control Video or color fades in and out when making a copy of a video tape You cannot copy a copyrighted ...

Page 27: ...balanced RCA JACK Audio input 8 8 dBm RCA JACK RF output 3 or 4 CH Video output 1 0 V p p 75 RCA JACK S video output Y 1 0 V p p 75 negative sync Mini DIN 4 pin x 1 C 0 286 V p p 75 Component video output Y 1 0V p p 75 Pb 0 7V p p 75 Pr 0 7V p p 75 Audio output DVD analog audio 1 8 0 2V p p rms 10k pin jack L R x 1 Audio output VCR analog audio 5 8 2 dBm RCA JACK Playable tape Very high dense tape...

Page 28: ...onnecting cables cassette tapes compact discs This warranty shall in addition not apply to damages due to handling transportation unpacking set up installation customer adjustments that are covered in the instruction book repair or replacement of parts supplied by other than the MAGNASONIC authorized service depot any malfunction or failure caused by or resulting from abnormal environmental condit...

Page 29: ...28 ...

Reviews: