010-200002-000
Page 28
HB IOM 1.1 2-13-2014
START-UP
Pre-Startup
Building Envelope—
All building windows and doors should
be installed and closed before starting unit. During summer
construction, avoid unit sweating by allowing for gradual pull
down: use elevated chilled water temperature, reduce chilled
water flow rate (gpm), use maximum available airflow.
Heating Fluid Temperature-
Maximum entering water tem-
perature is 180°F, unless nameplate indicates 200°F.
CAUTION
: If unit is marked for 200°F maximum entering
water temperature, customer must ensure that water vapori-
zation does not occur especially at higher elevations when
entering water temperatures are greater than 190°F.
Temperature Controls-
Check that unit or wall-mounted ther-
mostat or field-supplied controller s connected to the unit.
Outside Air and Freeze Protection
-
WARNING: Insure that the unit is protected against
freezing conditions Failure to provide freeze protection
may result in equipment or property damage.
Freeze pro-
tection measures are customer-provided and installed
and include but are not limited to low-limit thermostats,
automatic temperature controls, and use of glycol based
heat transfer fluids (see section FREEZE PROTECTION
OF WATER PIPING).
1. If “locking quadrant” manual damper operator provid-
ed, set to desired position.
2. If damper actuator provided, insure that actuator
opens the damper when the fan turns on, and closes
when fan stops. Test mixing box controls to make sure
OA damper closes on power failure or upon activation of
customer-supplied and installed low limit thermostat or
other freeze protection device.
Start-Up Check List —
Make a walkway inside unit com-
ponents to protect insulation. Remove all construction
debris from unit interior.
Remove walkway before starting
unit.
FILTERS — Install unit filters in all filter sections. Protect
open filters from drywall dust and construction debris.
FANS
1.
Check lubrication of fan, motor bearings, and linkag-
es.
a) Note that bearings are permanently lubricated
and do not require greasing before startup.
b) Hand-operate all damper linkages to check for free-
dom of movement.
2.
Check tightness of bearing setscrews or locking collars.
Also, check tightness of setscrews on fan wheels and
sheaves.
3.
Check tightness of fan shaft bearing mounting.
4.
Recheck sheave alignment and belt tension. (Refer to
Fig. 24 to 26)
5.
Hand turn fan to make certain it turns freely and fan
wheel does not rub in housing.
6.
Check fan speed with a strobe-type tachometer or use
the following formula: Obtain the motor rpm from the fan
motor nameplate and read sheave pitch diameters
marked on the fan and motor pulleys, or estimate the
pitch diameters by using the pulley outside diameters.
Then:
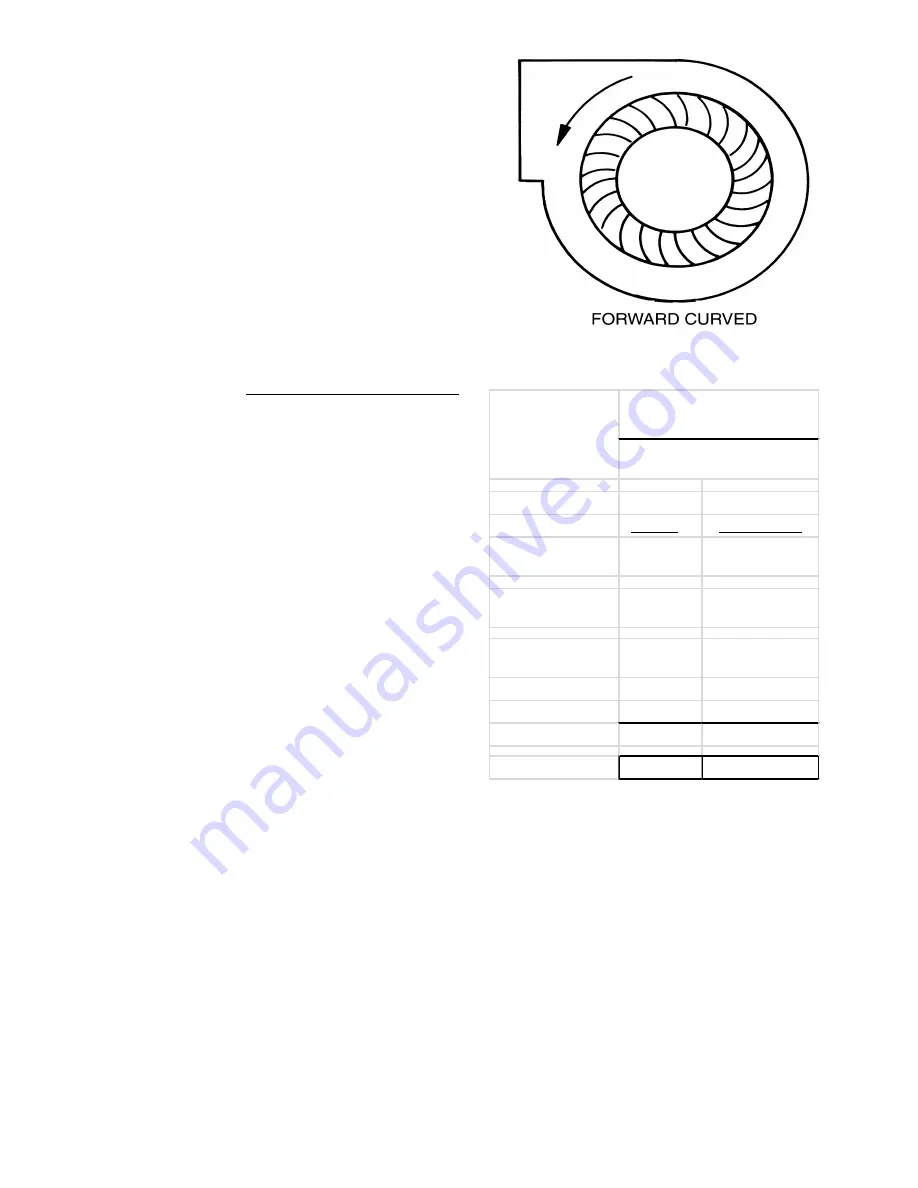
Fig. 34 — Fan Wheel Rotation
Refer to the product data catalog for maxi-
mum allowable fan speeds for standard
wheels.
Excessive fan speed may result in
condensate carryover from cooling coil or
fan
motor overload and wheel failure.
7. Check direction of rotation (see Fig. 34).
Arrow on drive side of fan housing indi-
cates correct direction of rotation.
8. Check vibration. If excessive vibration
occurs, check for the following:
a. Variable sheave (if air balance of system
has been accomplished: replace sheave
with fixed sheave for continuous applica-
tion).
Example:
Actual
Approximate
Nameplate Motor
RPM
1760
1760
Mtr Sheave Pitch
Diameter
8.9 in.
9.0 in. (OD)
Fan Sheave Pitch
Diameter
12.4 in.
12.5 in. (OD)
Fan Speed
=
1760 x 8.9
1760 x 9
12.4
12.5
Fan Speed
=
1263 RPM
1267 RPM
Motor RPM x Motor Sheave
Pitch Diameter (in.)
Fan Sheave Pitch Diameter
(in.)
Fan Speed (RPM)
=


