background image

Navigation Screens

14

Resetting Maximum Speed

1.

While viewing the 

Speedometer

 screen, press 

MENU

.

2.

Select 

Reset Speed

.

3.

The 

Speedometer

 screen is displayed with the maximum and average speeds reset to zero.

The Compass Screen

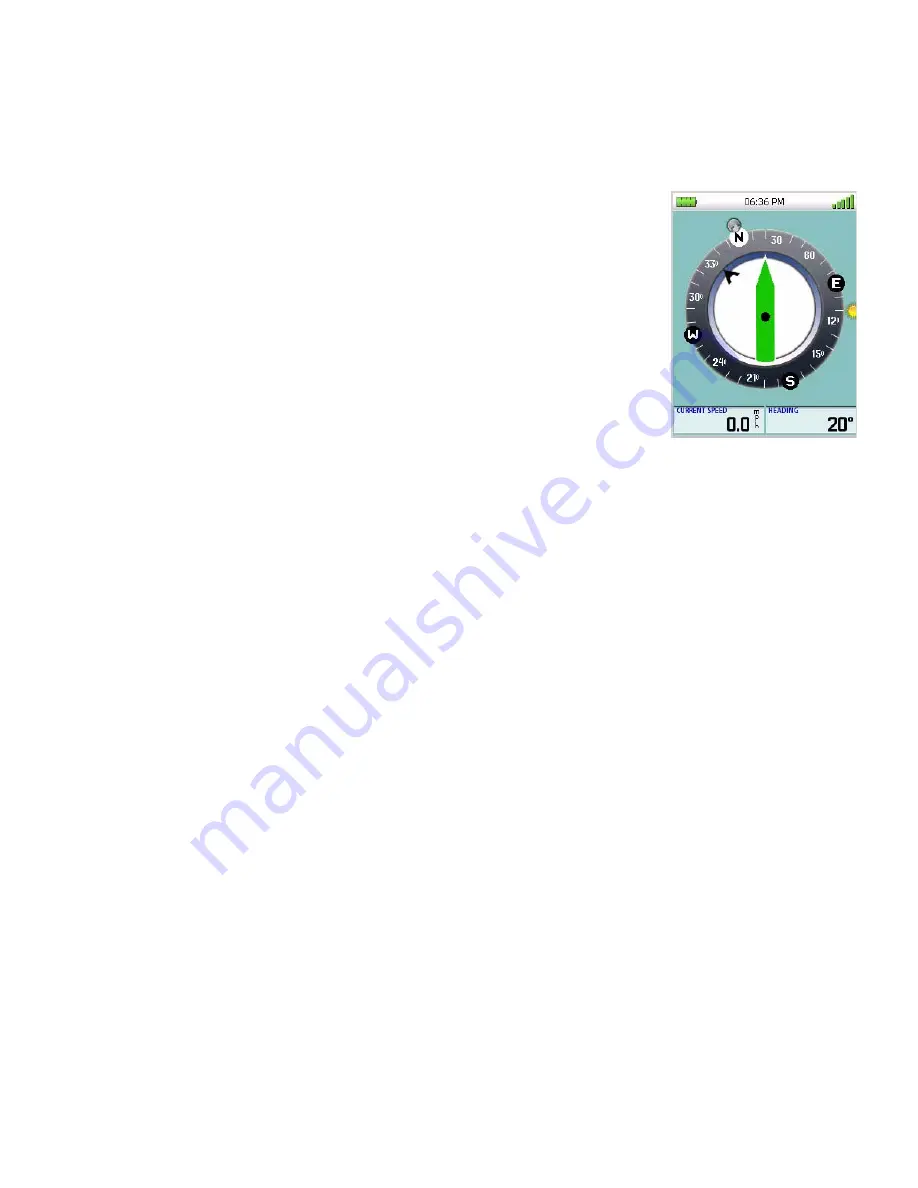
The Compass screen displays information about your heading (the 
direction you are travelling) and bearing (direction to your next waypoint 
destination if a route is active) in a familiar graphical format.

Outside the compass are icons indicating the position of the sun and the 
moon relative to your position and heading.

Inside the compass there are two arrows that can be displayed.  The large 
green arrow is your heading and is displayed only while moving.  The 
smaller, black arrow is the bearing to your next destination waypoint if 
you have a route activated.  When the two arrows are lined up together, 
you are moving directly towards your destination. (Note that the compass 
will rotate relative to North.)

The two data fields at the bottom of the display are customized by 
following the instructions provided.

Customizing the Data Fields for the Compass Screen

1.

Select the field you want to change by highlighting the field and pressing 

ENTER

.

2.

Select the data that you want to be displayed.  (Use the cursor control to highlight the data 

field in orange and press 

ENTER

.)

3.

The 

Compass

 screen will be displayed with the field changed to the type selected.

Calibrating the Compass  (Magellan Triton 500)

The compass should be calibrated everytime that the batteries are changed.

1.

While viewing the 

Compass

 screen, press 

MENU

.

2.

Select 

User Calibration

.

3.

Place the Magellan Triton on a flat, horizontal surface away from any metallic objects.

4.

Select 

Start

.

Summary of Contents for Triton Triton 400

Page 1: ...Magellan Navigation Inc 960 Overland Court San Dimas CA 91773 Magellan Triton User Manual Magellan Triton 400 Magellan Triton 500 ...

Page 2: ...by poor satellite geometry and obstructions like buildings and large trees USE PROPER ACCESSORIES Use only Magellan cables and antennas the use of non Magellan cables and antennas may severely degrade performance or damage the receiver and will void the warranty LICENSE AGREEMENT Magellan Navigation Inc grants you the purchaser the right to use the software supplied in and with Magellan Navigation...

Page 3: ...5 of the FCC Rules Operation is subject to the following two conditions 1 This device may not cause harmful interference and 2 this device must accept any interference received including interference that may cause undesired operation FCC Caution Any changes or modifications not expressly approved by the party responsible for compliance could void the user s authority to operate this equipment IMP...

Page 4: ...nformation Underwriters Laboratories Inc UL has not tested the performance or reliability of the Global Positioning System GPS hardware operating software or other aspects of this product UL has only tested for fire shock or casualties as outlined in UL s Standard s for Safety for Information Technology Equipment UL60950 1 UL Certification does not cover the performance or reliability of the GPS h...

Page 5: ...ting the Power Off Timer interval 6 Menus 6 Accessing the Main Menu 6 Navigation Screens 7 Accessing the Map Screen Options Menu 7 Accessing the Compass and Speedometer Options Menu 7 Data Fields 8 Customizing the Data Field 8 Selecting Maps 8 Battery Life 8 Navigation Screens 11 Selecting Navigation Screens 11 Map Screen 11 Changing the Map Scale 11 Accessing the Options Menu 11 Map Cursors 11 Ca...

Page 6: ...n of Data Field Types 17 Using the Keyboard 19 Date Entry 22 Text Size Limitations 22 Settings 23 Customizing Navigation Settings 23 Setting Volume and Brightness 23 View Memory Usage 24 Clearing Memory 24 Restoring Factory Settings 24 Setting Connectivity 24 Getting Software Version Information 25 Viewing Copyright Information 25 Personalizing Magellan Triton 25 Performing Diagnostic Checks 25 Pr...

Page 7: ...36 Editing a Saved Geocache Waypoint 36 Deleting a Saved Geocache Waypoint 37 Deleting a Saved Geocache Waypoint Alternate Method 37 Duplicating a Saved Geocache Waypoint 38 Routes 39 Go To Routes 39 Creating a Go To Route Using the Pan Cursor 39 Creating a Go To Route to a Saved User Created Waypoint 39 Creating a Go To Route to a Place Waypoint 40 Creating a Go To Route to a Geocache Waypoint 41...

Page 8: ...arching for a Place Waypoint base map 49 Searching for a Place Waypoint Detail Map 49 Turning On Off the Waypoint Proximity Alarm for a Place Waypoint 50 Viewing Best Fish and Hunt Times for a Place Waypoint 51 Viewing Sun and Moon Rise and Set Times for a Place Waypoint 51 Media 53 Browsing Photographs 53 ...

Page 9: ...your footsteps back to your point of origin 3 meter accuracy The SiRFstarIII GPS chipset and an integrated multidirectional antenna offer superior GPS accuracy The Magellan Triton is also WAAS and EGNOS capable taking advantage of the Wide Area Augmentation System for improved accuracy 3 axis electronic compass Triton 500 only Get accurate compass readings while standing still even without a GPS f...

Page 10: ...n C D F H G E A B I A Backlight Button B Power Button C Zoom Zoom out Button D Zoom Zoom in Button E ENTER Button Cursor Control F PAGE GO TO Button G Esc Escape Button H Menu Button I SD Card Slot under protective rubber cover ...

Page 11: ...nna Built in multidirectional patch Keypad Nine direct access keys Operating Range 14 to 140 F 10 to 60 C Receiver SiRF Star III 20 channels WAAS EGNOS Acquisition Time Hot 20 seconds Cold 60 seconds Initial 2 minutes Update Rate Once per second Accuracy 3 to 5 meters 10 16 feet WAAS EGNOS 7 meters 15 feet GPS only Languages English French German Dutch Danish Swedish Spanish Italian Portuguese Fin...

Page 12: ...klight intensity 1 Press the backlight button momentarily The backlight intensity will increase 20 until it reaches the maximum intensity Pressing the backlight button again will turn off the display backlight Please note that reducing the backlight setting will increase the battery life for the Triton Refer to the section in this chapter on Battery Life for other tips on extending the Triton s ba...

Page 13: ...guage field 7 From the drop down menu select the desired language 8 Press the PAGE GO TO button until the Info page is displayed 9 Select Activate Profile Sleep Mode Backlight Timer To conserve battery life the Triton will go into Sleep Mode at a preset interval when no keys have been pressed Waking up the Triton from Sleep Mode 1 Press any key and the Triton will wake up turning the backlight on ...

Page 14: ...o create a Go To route to a waypoint that has been saved to the Magellan Triton The Place option is used to select a destination waypoint that has been either preloaded into the Magellan Triton as part of the internal base map or a destination waypoint found on a detailed map that have been loaded on an optional SD card The Trail option displays trails that you have saved previously You can select...

Page 15: ...gs of the Magellan Triton for a particular activity hiking marine use or geocaching The Maps option displays a list of the base maps and available detail maps that can be used The Media option contains the functions for taking and viewing photographs and movie clips Other functions of the Media option are creating audio clips and playing MP3 music files Use Settings to access navigation settings a...

Page 16: ...aps Detailed maps including National Geographic maps can be purchased and downloaded from the Magellan Store and loaded to the SD card in your Magellan Triton Once loaded you will need to select the detailed map you want to use to activate it 1 From the Map screen press MENU 2 Select View 3 Select Maps 4 Select the detailed map from the list that you want to activate and press ENTER 5 The font for...

Page 17: ... 2 Select View 3 Select Profiles 4 Select a profile 5 Press PAGE GO TO to select the Display page 6 Select Backlight Level Disable the electronic compass if GPS fix is available Magellan Triton 500 1 Press MENU 2 Select View 3 Select Profiles 4 Select a profile 5 Press PAGE GO TO to select the Navigation page 6 Select Electronic Compass and set it to OFF Disable the barometer if barometric pressur...

Page 18: ...Select POWER ONLY from the options menu that is displayed Connect to Vehicle Power Adapter optional accessory 1 Connect the Magellan Triton to the optional vehicle power adapter 2 Select POWER ONLY from the options menu that is displayed For optimal performance use only brand name AA alkaline or lithium batteries Rechargeable AA batteries are not recommended ...

Page 19: ...d it is shown on the map as solid yellow lines The trail colors can be modified A pink line is also displayed that indicates the Position Destination Line The Position Destination Line is a straight line displaying LOS line of sight from your current location to the next destination waypoint At the top right of the map is a north indicator that rotates to indicate north from your present heading a...

Page 20: ...ion otherwise the information is for your current location 1 While viewing the Map screen press ENTER 2 Select Local Info 3 Select Fish and Hunt 4 Select the arrows at the top of the display to scroll through the dates Highlight the date text displayed at the top of the display and press ENTER to use the calendar to select a date 5 Press the green checkmark when done Viewing Sun and Moon Rise and ...

Page 21: ...highlighting the field and pressing ENTER 2 Select the data that you want to be displayed Use the cursor control to highlight the data field in orange and press ENTER 3 The Large Data screen will be displayed with the field changed to the type selected Speedometer Screen The Speedometer screen displays the current speed and the maximum speed in a large easy to read format It also displays an odome...

Page 22: ...estination waypoint if you have a route activated When the two arrows are lined up together you are moving directly towards your destination Note that the compass will rotate relative to North The two data fields at the bottom of the display are customized by following the instructions provided Customizing the Data Fields for the Compass Screen 1 Select the field you want to change by highlighting...

Page 23: ...that compass calibration is complete 8 Press ESC to return to the Calibrate Menu 9 Press ESC again to return to the Compass screen Calibrating True North Magellan Triton 500 1 While viewing the Compass screen press MENU 2 Select Set true north direction 3 Place the Magellan Triton on a flat surface Rotate the Triton until the green arrow points to the North N symbol on the compass 4 Select the gre...

Page 24: ...ellites Signal levels are also represented at the bottom of the screen as colored bars The numbers indicate the GPS satellite ID while W indicates WAAS Wide Area Augmentation System satellites There are also two customizable navigational screens displayed at the bottom of the display Customizing the Data Fields for the Satellite Status Screen 1 Select the field you want to change by highlighting t...

Page 25: ...oute is set this will appear blank or dashes Distance to End Distance to End is the measurement of distance from the user to the final destination point in a route If no Go To or Route is set this will appear blank or dashes Time to Next Time to Next measures how much time it will take the user to arrive at the next destination point in a route based on how fast the user is currently moving If the...

Page 26: ...ppear blank or dashes Accuracy Accuracy calculates the margin of error the user can expect based on their satellite reception The smaller the number is the better the accuracy Normally the accuracy is around 10 30 ft 3 10 m Things that interfere with satellite reception may decrease the accuracy increase the number such as heavy canopies from trees tunnels tall buildings canyons broadcast satellit...

Page 27: ...on Alphanumeric Light Blue Enters the alpha numeric or symbol character selected Cursor Position Medium Blue Moves the character cursor to the left or right Symbol Select Blue Changes the available characters to symbols Symbol Set Select Medium Blue Available only when symbol characters are displayed Steps through three different sets of symbols and navigation terms ...

Page 28: ... available characters to extended characters Numeric Select Blue Changes the available characters to numeric characters Alpha Select Blue Changes the available characters to alphabetic characters Delete Medium Blue Deletes the character to the left of the character cursor ...

Page 29: ...ers shown shifts between two character sets Not functional when numeric or symbol characters are displayed Return Medium Blue Adds a carriage return at the character cursor position Accept Green Saves the text entered and applies it to the appropriate field Cancel Red Cancels the text and returns to the last displayed screen with no text changes ...

Page 30: ...the day portion of the calendar is highlighted you will need to press the up arrow until one of the month selector arrows is highlighted Use the arrow cursor to move through the dates If one of the arrows in the month selector at the top of the display is highlighted press the down arrow to move the highlight to the day portion of the calendar Text Size Limitations Single line fields 50 characters...

Page 31: ...g Volume and Brightness 1 From the Map screen press MENU 2 Select View 3 Select Settings 4 Select Volume Brightness 5 Highlight the volume or brightness slider bars 6 Use the left and right arrows on the cursor control to adjust the volume or brightness 7 Select the green checkmark when done Units Kn M Kph Mi Ft Mph Mi Yd Mph Ntmi M Kts Ntmi Ft Kts Sets the units of measure NORTH REFERENCE Magneti...

Page 32: ...ll need to reset any profiles or settings you have previously set 1 From the Map screen press MENU 2 Select View 3 Select Settings 4 Select Memory 5 Select Restore Factory Settings 6 Select the green checkmark to confirm Setting Connectivity You can set the connectivity through the settings option but please note that every time the Triton is connected to a personal computer or an external power s...

Page 33: ...n 1 From the Map screen press MENU 2 Select View 3 Select Settings 4 Select About 5 Select Copyright Info 6 Press ESC to return to the About Menu Personalizing Magellan Triton 1 From the Map screen press MENU 2 Select View 3 Select Settings 4 Select About 5 Select Owner 6 Select the field to change Name Address Phone or EMail 7 Use the keyboard to enter the information 8 Select the green checkmark...

Page 34: ...ettings 26 3 Select Settings 4 Select Diagnostics 5 Select Audio Test Video Test Keypad Test or Touch Test 6 Follow the displayed instructions for each test 7 Press ESC to return to the Diagnostics Menu ...

Page 35: ...e options have been set use the PAGE GO TO button to display the Info page for the profile and activate the profile Display Page BACKLIGHT LEVEL Off Low Medium High Sets the default backlight level To conserve battery life set the backlight level to the lowest acceptable setting BACKLIGHT TIMER Off 15 sec 30 sec 60 sec Sets the time that the backlight will turn off without use of the keys POWER OF...

Page 36: ...r not the position destination line pink will be displayed on the Map screen PLACES SHOWN On Off Sets whether or not place POIs will be displayed on the Map screen ELECTRONIC COMPASS On Off Turns the electronic compass on or off BAROMETER On Off Turns the barometer on or off GPS FIX On Off When set to on will alert you when the Magellan Triton loses GPS signals and cannot compute a GPS fix ALARM T...

Page 37: ...ious Sets distance that the Magellan Triton will alert you to as you approach a waypoint GEOCACHE PROXIMITY Various Sets distance that the Magellan Triton will alert you to as you a geocache waypoint LOW BATTERY On Off Sets the alarm to alert you when you have a low battery condition ...

Page 38: ...ints can be found in the chapter on geocaching but they are used the same as user created and place waypoints in creating a route Waypoint Detail Screen Overview Whenever a waypoint is being created the Waypoint Detail screen is displayed This screen provides a way to enter data modify existing data add media or set alarm requirements for the waypoint The Magellan Triton automatically assigns a na...

Page 39: ... location 5 The Waypoint Details screen is displayed with the latitude longitude and elevation for your current location 6 Edit the waypoint information as needed 7 Select the Media page to add media or the Options page to turn the proximity alarm on or off 8 Select the green checkmark to save the waypoint Creating a Waypoint Using the Pan Cursor 1 While viewing the Map screen use the arrow keys t...

Page 40: ...press ENTER 2 Select Create Waypoint 3 The Waypoint Details screen is displayed with the latitude longitude and elevation for your current location or the position of the pan cursor 4 Select the latitude field LAT 5 Use the keyboard to enter the latitude for the waypoint Select the green checkmark when done 6 Select the longitude field LONG 7 Use the keyboard to enter the longitude for the waypoin...

Page 41: ...he proximity alarm on or off 13 Select the green checkmark to save the waypoint Viewing Waypoints Viewing a Saved Waypoint 1 From the Map screen press MENU 2 Select Go To 3 Select Waypoint 4 Change the order that the waypoints are displayed if needed or search for a waypoint Select the Search field under the Select Waypoint header Select the order you want the waypoints listed either by nearest da...

Page 42: ...to select the Media page to add or remove media files or the Options page to set the proximity alarm on or off 10 Press ESC to save the waypoint Pressing ENTER will create a Go To route to that waypoint Deleting a Saved Waypoint 1 From the Map screen press MENU 2 Select Go To 3 Select Waypoint 4 Change the order that the waypoints are displayed if needed or search for a waypoint Select the Search ...

Page 43: ...o To 3 Select Waypoint 4 Change the order that the waypoints are displayed if needed or search for a waypoint Select the Search field under the Select Waypoint header Select the order you want the waypoints listed either by nearest date added or by name To do a search select Search and using the keyboard enter the first few characters of the waypoint 5 Select the waypoint you want to duplicate fro...

Page 44: ...en press MENU 2 Select Create 3 Select Geocache 4 Select from current location Point on Map or Coordinates If you are marking a new cache location you would probably select current location If you are entering waypoint information manually you could select current location or Coordinates 5 The Geocache Waypoint Details Information page is displayed On this page you can edit the waypoint the same a...

Page 45: ...s MENU 2 Select Go To 3 Select Geocache 4 Change the order that the geocache waypoints are displayed if needed or search for a geocache waypoint Select the Search field under the Select Waypoint header Select the order you want the waypoints listed either by nearest date added or by name To do a search select Search and using the keyboard enter the first few characters of the waypoint 5 Select the...

Page 46: ...ant the waypoints listed either by nearest date added or by name To do a search select Search and using the keyboard enter the first few characters of the waypoint 5 Select the waypoint you want to duplicate from the list of waypoints 6 When the waypoint name is highlighted press ENTER Select the View icon to the left of the waypoint name and press ENTER 7 Use the PAGE GO TO button to display the ...

Page 47: ... three Go To routes Once the route is activated the Magellan Triton will begin providing navigation information to get you to the store After arriving at the store it will automatically begin providing information to get you to the bridge and then the scenic spot Another useful feature of multileg routes is that they can be saved into memory and used over and over Tip If you want to save a single ...

Page 48: ...isplayed on the Map screen 2 Select Go To 3 Select Place 4 Select the Map Only the background map is displayed if no detailed maps are installed 5 Select the Category and Subcategory Not all categories will have a subcategory 6 Select Nearest to view the waypoints in the category sorted by the distance from your current location or do a search on a waypoint Select the Search field under the Places...

Page 49: ...icon arrow highlighted press ENTER 9 The Map screen is displayed with a preview of the route shown The total distance for the route is displayed at the top of the screen 10 Press ENTER again to begin the route Creating a Multileg Route 1 From the Map screen press MENU 2 Select Create 3 Select Route 4 Select the method for determining the starting location for the route Current Location The Waypoin...

Page 50: ...reen is displayed with a graphical representation of the route 10 When the route is correct select Done in the action header bar 11 Select Save Route 12 The route has been assigned a default name To change the name select the button with the default name RouteXXX Use the keyboard to enter the desired name for the route Select the green checkmark when done 13 Select Save 14 The newly created route ...

Page 51: ...point Select the Search field under the Go to route header Select the order you want the waypoints listed by date added or name Select search to enter the first few characters for a route you want to search for 5 Select the route 6 Press the right arrow 7 Press the PAGE GO TO button twice 8 Select Duplicate Route 9 Confirm the route duplication 10 Enter a new name for the route 11 Select the green...

Page 52: ...lect the order you want the waypoints listed by date added or name Select search to enter the first few characters for a route you want to search for 5 Select the route 6 Press the right arrow 7 Select Vertical Profile 8 Select the green checkmark when done viewing the vertical profile Cancelling a Route 1 From the Map screen press ENTER 2 Select Cancel Route 3 Confirm the cancellation by selectin...

Page 53: ...u might want to use backtrack route with clear the track memory described in this chapter before beginning the hike Trails are displayed on the Map screen as dotted lines Creating a Trail Once you begin traveling with the Magellan Triton it will begin to store track information If you want to save this track to be used again you need to follow the steps provided here 1 From the Map screen press ME...

Page 54: ...er that the trails are displayed if needed or do a search on a trail Select the Search field under the Select Trail header Select the order you want the trail listed by name or date added Select search to enter the first few characters for a trail you want to search for 5 Select the trail you want to delete from the list of trails 6 When the trail name is highlighted press ENTER and select the Tra...

Page 55: ... the trail name 7 Press the PAGE GO TO button to display the Options page 8 Select Duplicate Trail 9 Enter a name for the trail 10 Select the green checkmark Reversing a Trail 1 From the Map screen press MENU 2 Select Go To 3 Select Trail 4 Change the order that the trails are displayed if needed or search for a trail Select the Search field under the Select Trail header Select the order you want ...

Page 56: ...e Trail or Show Trail Activating a Backtrack Route Many might consider a Backtrack route as the most important function in a handheld GPS receiver Being able to quickly create a route back to your starting point is not only handy for normal outdoor adventures but also gives the traveller the security in knowing that directions back to camp are only a button press away 1 From the Map screen press E...

Page 57: ...iled maps loaded Background Maps will be the only option 5 Select the category Roads World_Map Waterways Cities 6 Select Nearest to view the waypoints in the category sorted by the distance from your current location or do a search on a waypoint Select the Search field under the Places header Select if you want the waypoints listed by nearest or if you want to do a search Selecting search brings u...

Page 58: ... Place Waypoint 1 From the Map screen press MENU 2 Select Go To 3 Select Place 4 From the Select Map display select the background map or the detailed map for the waypoint If you do not have any detailed maps loaded Background Maps will be the only option 5 Select the category or All Categories 6 Select the subcategory or All Subcategories if available 7 Select Nearest to view the waypoints in the...

Page 59: ...s ENTER Select the View icon to the left The Waypoint Detail screen is displayed 9 Use the PAGE GO TO button to switch to the Options Page 10 Select Local Info 11 Select Fish and Hunt 12 Select the arrows at the top of the display to scroll through the dates Select the date displayed at the top of the display to use the calendar to select a date 13 Press the green checkmark when done Viewing Sun a...

Page 60: ...press ENTER Select the View icon to the left The Waypoint Detail screen is displayed 9 Use the PAGE GO TO button to switch to the Options Page 10 Select Local Info 11 Select Sun and Moon 12 Select the arrows at the top of the display to scroll through the dates Select the date displayed at the top of the display to use the calendar to select a date 13 Press the green checkmark when done ...

Page 61: ...ce or name Note The Sort button is not active unless there are images available on the SD card 5 Select an image to display the image in full screen Pressing the up and down arrows while viewing a photograph will rotate the image between portrait and landscape modes 6 Use the Left and Right Arrow keypad to step through the saved photos 7 Press ESC to return to the Browse Photos list 8 Press ZOOM t...

Reviews: