background image

SIP-H680 Series IP Phone User Manual

7.Click confirm button to save the operation.

6.1.3 Multicast use


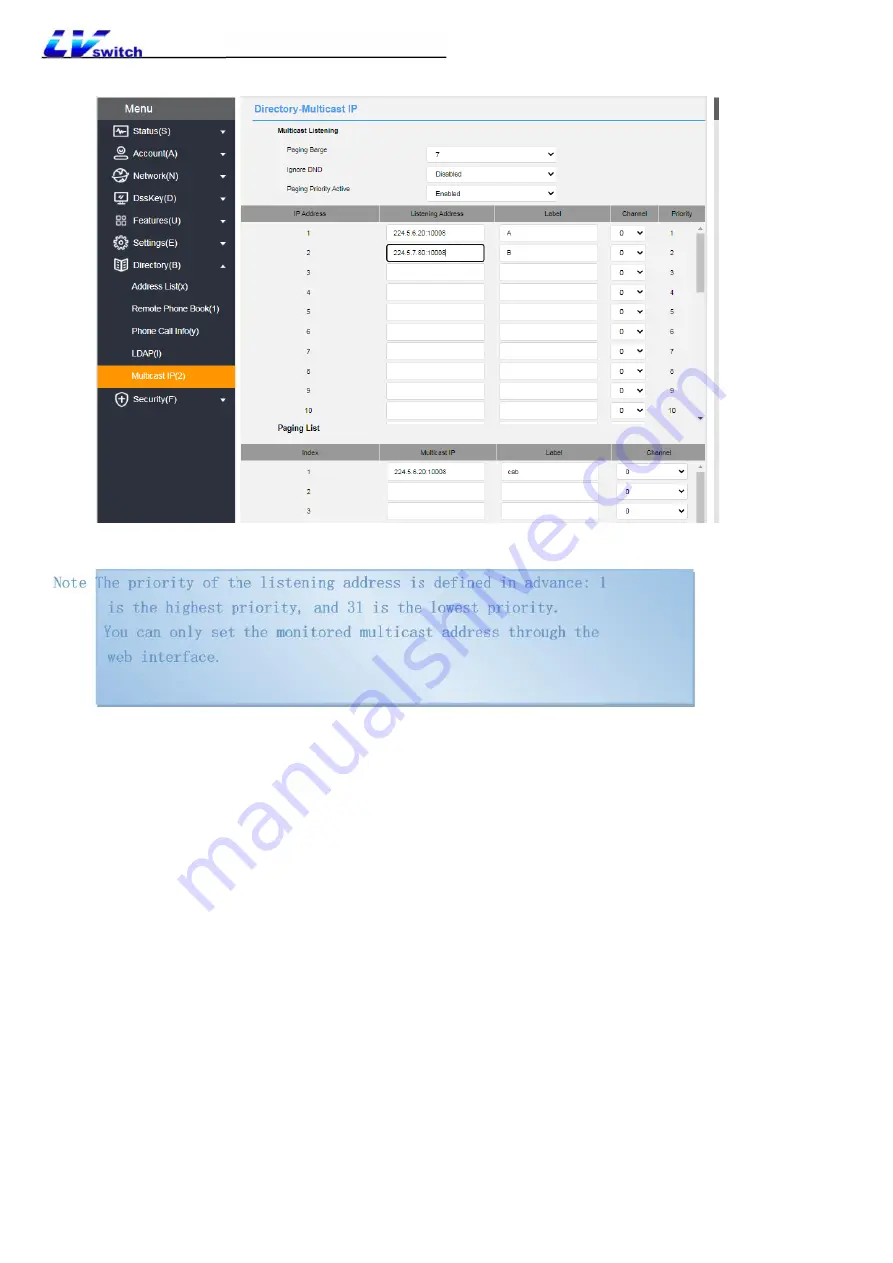
Phone A has set up account 1 as multicast, account 2 as the multicast list, phone B, C, D, etc., set the 

listening address;

1. 

Multicast key sending

: When phone A is in standby mode, press the 

account 1 multicast key, and the pre-configured monitor phone will receive the multicast RTP stream; if 

phone A presses the hold key, the receiver will automatically hang up the multicast RTP session. Press

the restore button to restore the held multicast. Press Hang up to end the multicast RTP session.

2. 

Multicast list sending

: Press Multicast List in the standby state, select the 

option that needs multicast and press Multicast, or press Menu->Function->Multicast List in the standby 

state.

Summary of Contents for SIP-H680 Series

Page 1: ...Ezdirect distributore Lvswitch Via Nerino Garbuio 54038 Montignoso www ezdirect it ...

Page 2: ...e 14 3 Getting started with the phone 16 3 1 Packing list 16 3 3 Phone initialization 17 Guarantee 3 3 5 Check phone status 18 3 6 Set up phone network 19 3 7 Register an account 23 3 8 Phone input method and input method 23 4 Phone customization 26 4 1 Basic setting 26 Copyright 3 4 1 2 Time Date 28 4 1 3 Call out button 32 4 1 4 Keypad lock 33 4 2 Voice setting 36 4 2 1 Volume setting 36 4 2 2 R...

Page 3: ...ing 87 5 9 Auto redial 88 5 10 Auto Answer 89 5 11 Anonymous Call 91 5 12 Hotline 91 5 13 QR Code 92 5 14 Conference 93 5 15 Upgrade 95 6 Advanced function 97 6 1 Multicast 97 6 1 1 Multicast list configuration 98 6 1 2 Accept multicast RTP stream 100 6 1 3 Multicast use 102 6 2 Message 102 6 2 1 SMS 102 6 3 Configuration management 107 6 4 Auto Provision 108 6 4 1 Preparing steps 108 6 4 2 Automa...

Page 4: ...ill not be notified if the content is updated Unless there is a special agreement this manual is only used as a guide try to provide the most accurate statements information and suggestions and does not guarantee any express or implied structure The user shall bear full responsibility for the application of the product LVswitch Guangdong Information Technology Co Ltd does not make any guarantees f...

Page 5: ... and would love to receive your feedback If you have any suggestions or questions about the content of the document please send your feedback to the following mailbox service lvswitches com Since electronic products contain certain hazardous substances in order to properly dispose of these electronic and electrical wastes and at the same time recover precious resources when users intend to discard...

Page 6: ...ons are the same and the difference lies in the hardware The following table describes the differences between these hardware Product model Description SIP H680W Carry WiFi module version SIP H680L 4G LTE version This guide contains all the functions of the phone and instructions for use so that users can be familiar with the functions of the T790 IP phone Before installing the phone please read t...

Page 7: ...nfiguration interface description Ø 1 4 Use documentation 1 1 Hardware composition Item Name Description 1 Volume up key Increase volume 2 Volumue down key Volume declined when in standby mode or ringing interface during a call 3 Up down left and right buttons Options for switching the display 4 Hands free key Press for hands free mode 5 Off hook key dial Used for calling and entering into the dia...

Page 8: ......

Page 9: ... of the display screen 17 LCD screen Display the information of the phone Register account information Display name display number Time and date battery level wifi signal or LTE signal Reminder icon For details please refer to the display icon description Messages Incoming call missed call email message Operation prompt 18 LED indicator Charging indicator 19 Earphone Audio output when using the ha...

Page 10: ...1 3 Configuration interface description The H680 phone supports the following ways to configure the phone l Phone LCD configuration l Web interface configuration l QR code configuration ...

Page 11: ...k etc enter the advanced settings need to enter the administrator password the initial administrator password of H680 is admin At the same time there are some basic functions in the menu Please refer to the function configuration chapter for specific function settings 1 3 2 Web interface configuration To view the IP address IPv4 or IPv6 of the phone It can be viewed in any of the following ways 1 ...

Page 12: ...ature settings please refer to the function configuration chapter For more help please contact your network administrator The configurable functions of the three configuration ways are compared as follows Phone configuration Phone config uration Web code co nfiguration QR code con figuration Status IPv4 IPv6 MAC address Version Account status Account User information Display name User name Registe...

Page 13: ...mous Call Hotline QR code DND Conference Call waiting Auto redial Advanced features Intercom Paging list Message Configuration management Auto Provision Customization Time date Multi language Sound Button voice Ring tone Signal tone call out button Dial plan DSS keys Keypad Lock Directory Local directory Blacklist Remote PhoneBook LDAP 1 4 Us age Do ...

Page 14: ...as follows Name Description Obtain Language H680 quick user manual Includes easy installation and phone customization With IP phone Chinese English Lvswitch company website download H680 User Guide for IP Phone Detailed function introduction and use Lvswitch company website download Chinese English ...

Page 15: ...cidents At the same time the warranty service of your product will also be invalid If you need technical support please contact the agent or your network administrator l Keep the temperature and humidity of the product in line with the working requirements of the product Make sure that the product is placed flat on the workbench and check that the non slip glue on the product base does not fall of...

Page 16: ...ng list Ø 3 2 Phone installation Ø 3 3 Phone initialization Ø 3 4 Phone standby interface Ø 3 5 Check phone status Ø 3 6 Set up phone network Ø 3 7 Register an account Ø 3 8 Phone input method 3 1 Packing list H680 IP phone contains the following accessories 3 2 Phone Installtion Charge the phone Plug the power adapter into a power source socket to start using the charging base ...

Page 17: ...to network the phone s initial network is automatically obtained by DHCP After the phone is successfully turned on the phone will automatically obtain the assigned IP address subnet mask default gateway DNS server and other network configuration If the network cable is connected after the phone is turned on the LCD screen will display the prompt of network acquisition 3 4 Phone standby interface T...

Page 18: ...interface please refer to the display icon composition 3 5 Check phone status The phone status contains the following information l Network information IP mode IPv4 IPv6 address subnet mask default gateway DNS server l Account status SIP account registration information l Device information Firmware version product name hardware version MAC address Product ID You can check the phone status in the ...

Page 19: ...r the IP address of the phone IPv4 IPv6 192 168 17 39 3 Enter the phone login page enter the account and password to log in the initial account and password is admin admin 3 6 Set up phone network H680 can set three network modes IPv4 IPv6 IPv4 IPv6 Set the network mode through the phone interface ...

Page 20: ...4 IPv6 mode you can configure the mode priority Press or to enter selecting mode priority to switch If you want to set up a DHCP network fill in other corresponding SSID information and save it Set network mode through web interface 1 Log in to the phone page by IP address 2 Click Network N WIFI SSID1 Fill in the corresponding ssid information and enable it select it in the WAN interface drop down...

Page 21: ...lect the SSID to connect press Option configuration to select the desired mode in the IP mode IPv4 IPv6 IPv4 IPv6 3 Select static IP in IPv4 mode 4 Fill in the relevant detailsŽ IPv4 needs to fill in the IP address subnet mask default gateway primary DNS and secondary DNS IPv6 needs to fill in the IP address IPv6 IP prefix default gateway primary DNS and secondary DNS 5 After filling in press the ...

Page 22: ...sid information and enable 3 Check the static IP address according to the selected WAN interface mode IPv4 needs to fill in the IP address subnet mask default gateway preferred DNS and alternative DNS For IPv6 you need to fill in the IP address IPv6 prefix default gateway preferred DNS and alternative DNS 4 Click the confirm button to save ...

Page 23: ...account you need to configure the account manually For details please refer to the Account management chapter 3 8 Phone input method and input method The phone supports keyboard input and you can use the numeric keyboard to enter data on the screen to configure the phone s functions H680 supports 4 input methods 123 2aB abc and ABC When you need to input data you can use the key to switch between ...

Page 24: ... Input method introduction Ž ...

Page 25: ......

Page 26: ...ings of H680 include the following l Language l Time Date l Call out button l Keypad lock 4 1 1 Language H680 supports multiple languages the default language of phone initialization is English phone interface and web interface are integrated after the phone changes language the web page will be refreshed and the language will be updated synchronously with the phone when the web interface changes ...

Page 27: ... Set the language through the phone interface 1 Enter the phone IP address to enter into the web interface 2 At the top right of the web interface select the language from the drop down box ...

Page 28: ...e time and date Obtain the time and date automatically through the phone interface 1 Press Menu Settings Basic Settings Time Date Automatic Timing 2 Press the OK soft key to save Set the time and date manually through the phone interface 1 Press Menu Settings Basic Settings Time Date Manual Timing 2 Press to select 3 Input the time and date you want to set through the numeric keyboard ...

Page 29: ...ult 4 Primary server and secondary server fill in the SNTP server address 5 Set the synchronization period unit seconds 6 Click the Confirm button to save after setting Set the time manually via a web browser 1 Log in to the phone page by IP address Press settings E date and time t 3 Manual setting is enabled 4 Set the time and date as needed 5 Click the Confirm button to save after setting ...

Page 30: ... address 2 Press settings E date and time t 4 There are two types of manually setting the daylight saving time method by date or by week Fill in the start time and end time 5 Click the Confirm button to save after setting u Automatic set Daylight saving time u Set daylight saving time in date modeŽ ...

Page 31: ... web browser 1 Log in to the phone page through the IP address 2 Press Settings E Date and Time t 3 Select the corresponding format in the time format support 12 hour system and 24 hour system 4 The phone supports 7 date formats and different date formats will display the corresponding date on the phone LCD screen ...

Page 32: ...M DD 12 Aug 2020 MM DD WW Wed 12 Aug 4 1 3 Call out button H680 can set and numbers as the outgoing button you can also use the button send soft key etc to make outgoing calls Set according to your personal habits Set the outgoing key on the phone interface 1 Press Menu Features Key as send 2 Use the switch soft key to switch the outgoing key disable 3 After switching press the Save soft key to sa...

Page 33: ...e can only dial preset emergency numbers You can answer the call by pressing the off hook key hands free key and the answer soft key You can reject the incoming call through the reject soft key Set the keypad lock through the phone interface 1 Press Menu Settings Basic Settings Keypad Lock 2 Enter the keyboard lock password in the unlock PIN the factory default password is admin and press the OK s...

Page 34: ...ne page by IP address 2 Press Features U Keypad Lock 3 Enable keypad lock 4 Select the keypad lock type 5 If you need to change the unlock password set the unlock password 6 Enter the automatic lock time 0 3600 seconds in the keyboard lock time input box a If the time is set to 0 seconds the keyboard lock will not be automatically locked after saving you need to long press to enable the keyboard l...

Page 35: ... function key and all keys 2 Enter unlock password in the Unlock PIN field Default admin 3 Press ok softkey The Unlock soft key on the standby interface disappears that is it is successfully unlocked Long press or wait for the unlocking time to lock the keyboard again Note If you forget the unlock password you can reset it via web user interface ...

Page 36: ...e can set the ring volume and the volume during the call The volume setting range is 1 15 and the volume becomes larger as the value increases Set the ring volume of incoming calls in standby ringing state 1 Press the side volume key to adjust the ring volume as shown in the figure Set the volume of the handset speaker headset and other devices when a call comes in 1 Press the side volume key to a...

Page 37: ...stinguish incoming calls from different contacts The system provides a total of 10 default ringtones to choose from Set the incoming call ringtone on the phone interface 1 Press Menu Settings Basic settings Sounds Ringtone to select the ringtone 3 Press save softkey to save the opearation Set the contact ringtone in the web browser 1 Log in to the phone page through the IP address ...

Page 38: ... Add button if you want to modify a contact click the Edit button 4 2 3 Button sound The phone will emit a key tone when pressing the keyboard key to indicate that the key has been triggered The key tone can be enabled or disabled by setting Set button sound via phone interface 1 Press Menu Settings Basic settings Sounds button tone 2 Press the switch soft key to enable and disable the key tone 3 ...

Page 39: ...ngs E tones q 3 Please select the country according to the national standard If you want to customize the signal tone select custom in the country option 4 To select custom you need to fill in the value yourself to change the signal 5 Click save button to save settings Signal tone type introduction and standard Signal ton e frequency Transmission freque ncy dBm0 Description Dial 450 25 ž10 3dBm0 U...

Page 40: ...e message Message 450 25 ž10 3dBm0 Tones for receiving messages Auto Answ er 450 25 ž10 3dBm0 Prompt tone in automatic answering state Stutter Dial 450 25 ž10 3dBm0 Prompt tone for voice mail callback 4 3 Contact management Contact management of the H680 IP phone mainly includes l Local contacts l Blacklist l LDAP 4 3 1 Local contacts Local contacts can save the contact s name internal extension n...

Page 41: ...ft key Dir AddGrp 2 Fill in the group name 3 Press the Save soft key to save the group Add group via web browser 1 Log in to the phone page by IP address 2 Click Directories B Address list x 3 Enter the group name in the group name box 4 Click the Add button to add a group 4 3 1 2 Edit group ...

Page 42: ... group name in the group name edit box only English can be input on the phone interface 5 Press save softkey to save the group Edit group via web browser default group cannot be edited 1 Log in to the phone page through the IP address 2 Click Directory B Address list x 3 Select the group 4 After the selection the selected group becomes an input mode and it is modified to the name to be changed 5 C...

Page 43: ... Menu Directory Local directory to select the group needs to be deleted 3 Press option softkey to select delete option 5 Press ok softkey to delete If you want to delete all groups press Option Delete All Delete the group through the web browser the default group cannot be deleted 1 Log in to the phone page through the IP address ...

Page 44: ...ule 4 3 1 4 Add contact There are three ways of adding contact l Manually add l Batch import l Add from call record Add contacts via phone user interface 1 Press the history soft key in the standby state to select the number needs to add to contact 3 Press softkey Option Add to contact to complete contact information name group 5 Press save to save the contact ...

Page 45: ...e Option Add key to enter the add interface to fill in the contact information Name mobile number office number other number ring account group etc Can switch to another group 5 Press save softkey to save the contact Add contacts via web browser 1 Log in to the phone page by IP address 2 Click Directories B Address list x 3 Fill in the contact information in the local contact module ...

Page 46: ...lick Directories B Address list x 3 Batch operation module click on CSV format to export contact templates 4 Add edit contact information in the table 5 Batch operation module Click Browse to find the CSV file you want to import click CSV format import to add contacts Currently only supports importing xls csv xlsx file types After clicking Import the following prompt will appear ...

Page 47: ...er into the edit page of the contact 4 Press to edit the contact information 5 Press the save button to save the operation Edit contacts via web browser Log in to the phone page by IP address 2 Click Directories B Address list x 3 Click the contact you want to edit in the contact list below and the information will be filled in the local contact module 4 Modify the contact information in the local...

Page 48: ...ory All Contacts in standby mode to select the name of the contact you want to delete 3 Press Option Delete Delete all 4 Press the OK soft key to confirm the action Delete contacts via web browser 1 Log in to the phone page by IP address 2 Click Directories B Address list x 3 Tap the contact you want to delete in the contact list below ...

Page 49: ...l contact through the phone interface 1 Press Menu Directory Local Directory All Contacts in standby mode 2 to select the name of the contact you want to call 3 Press send softkey to enter the contact number list 4 Press to select the number you want to call to make a call mobile number or office number 5 Press the Send soft key to make a call ...

Page 50: ...omatically rejected by the phone 4 3 2 1 Add to blacklist Add a blacklist through the phone CDR interface 1 Press the History soft key in standby mode or to select the number added to the blacklist 3 Press soft key Option Add to blacklist 4 Complete blacklist member information 5 Press OK to save the blacklist ...

Page 51: ...contact module and select the group as a Blacklist BlackList 4 Click the Add button to save the blacklisted contacts 4 3 2 2 Delete blacklist Delete the blacklist through the phone interface 1 In standby mode press the soft key Menu Directory Local Directory Blacklist 2 Press to select the blacklist members to be deleted 3 Press Option Delete Delete all 4 Press the OK soft key to delete ...

Page 52: ...wser 1 Log in to the phone page by IP address 2 Click Directories B Address list x 3 Select the blacklist from the drop down box of the contact list below BlackList 4 Check the blacklist to be deleted 5 Click the Delete Delete All button under the list to delete the blacklist ...

Page 53: ...r l Open LDAP Directory Server l Microsoft Active Directory Application Mode ADAM The biggest advantage of LDAP is that users can quickly find contacts from the LDAP server without the need to maintain a local phone book The contact information returned by the LDAP server is read only Users can call LDAP contacts but cannot add edit or delete LDAP contacts The administrator can configure LDAP quer...

Page 54: ...hether to enable the LDAP function or not Enable LDAP LABEL Fill in the telephone directory name Telephone Directory LDAP name filtering Set whether the phone can search for contact information by nickname or last name Represents any letter Represents the input string and is used as the prefix of the filter condition CallerIDName LDAP number filteri ng Set whether the phone can search for contact ...

Page 55: ...ver will search for contacts from this phone book dc pbx dc com User name Fill in the user name of LDAP server The user name provided by the LDAP server Password Fill in the password of the LDAP server The password provided by the LDAP server Max hit 1 1000 Set the maximum entry of LDAP server search results 50 LDAP Name Attribut es Set the name attribute to be obtained Multiple name attributes ca...

Page 56: ...e search results in alphabetical or numerical order Enable 4 3 3 4 Search LDAP contacts through the address book Enable LDAP address book 1 Log in the phone web interface click Directories B LDAP 2 Enable LDAP address book 3 Click Confirm s Search LDAP contacts 1 Click Menu Directory LDAP 2 Input the name or number of the contact the contact information that meets the search criteria will be displ...

Page 57: ...the dialog list For contact operations please refer to the chapter on contact management View the call history through the phone interface 1 Press the History soft key the number list displayed on the LCD screen is the recent call record to select the call record 3 Press the soft key Option Detail You can view the details of the record View CDRs via web browser 1 Log in to the phone page through t...

Page 58: ...SIP H680 Series IP Phone User Manual Make a call from the CDRS 1 Press the History soft key when the phone is in standby to select the number going to call 3 Press option detail to send out ...

Page 59: ...headset installation please refer to the phone installation chapter Activate headset mode 1 Plug the headset into the phone The icon in the upper left corner of the LCD screen is changed to a headset icon When the phone receives an incoming call press the Answer soft key to answer the call and the phone automatically enters the headset call mode Dial the number and press the send button the phone ...

Page 60: ...witch the account to use by pressing the account key 4 6 1 1 Account Register Register an account through the phone interface 1 Press Menu Accounts 2 Press to select the account to be configured and press the Enter soft key to enter the configuration interface 3 to fill in label display name user name user name password and sip server sip server port etc 5 Press to change the transport method UDP ...

Page 61: ... protocol 4 7 Dial Plan Set the dial plan the phone can dial conveniently according to the grammar set by the dial plan 4 7 1 Dial plan syntax Before using the dial plan you need to understand the dialing grammar If you are already familiar with the grammar you can skip this step and check the contents of the dialing plan function Symbol description of dialing rules Symbol Description Example Repr...

Page 62: ...eplacement rule means that if you enter a string of characters the phone will automatically replace it with a custom string for you In practical applications for example to set a replacement rule enter 1 replace with 10086 when you dial 1 on the phone press the send soft key or the phone will automatically be replaced with 10086 for dialing Using replacement rules IP point to point calls can also ...

Page 63: ...Settings E Dial Plan k Replace Rules 3 In the rule list select the check box to the right of the rule to be modified 4 Modify the values in the prefix area and replacement area or account 5 Click edit button to save the modification Delete one or more replacement rules through the web interface 1 Log in to the phone interface through the IP address 2 Click Settings E Dial Plan k Replace Rules 3 In...

Page 64: ...the calling account to all any account when you dial any five digit number of 10086 the phone will immediately call 10086 when the outgoing rule is met Add call out rules via web interface 1 Log in to the phone interface through the IP address 2 Click Setting E Dial rule k dial now 3 Enter the rule character to be set in the rule input area such as xxxxx 4 For the account select the account that a...

Page 65: ... Log in to the phone page through the IP address 2 Click Settings E Dial plan k Dial now 3 Click the rule to be modified in the rule list 4 Modify the rule in the rule input area such as original xxxxx change 1xxxx 5 In the account area select the account that applies the matching rules for example account 1 2 all and the default value is all means all accounts 6 Click the Edit button to save the ...

Page 66: ...tgoing calls The default time is 1 seconds and the setting range is 0 14 unit second When the number entered during dialing meets an immediate outgoing call rule the phone will automatically after the delay time to call out this number and you don t need to press the send button of the phone Set the delay time for immediate outgoing call through the web interface 1 Log in to the phone interface by...

Page 67: ...ically add an area code prefix to your outgoing number Example Set the area code Length 1 15 bits 0757 When you make call Length 1 15bits 12345 The number actually called is changed to 075712345 Set the area code through the web interface 1 Log in to the phone interface through the IP address 2 Click settings E Dial plan k Area code 3 Fill in the area code in the area code length range 1 15 digits...

Page 68: ... number you call matches the rule the phone LCD will display the words Forbidden Number Add call restrct number through web interface 1 Log in to the phone interface through the IP address 2 Click settings E Dial rule k block out 3 The blocked number field fills in the number to be restricted from calling 4 Enter the registered account that restricts calls Account 1 2 all 5 Click the Add button to...

Page 69: ...put area such as original 1234 changed 123456 5 Fill in the account number matching the rules in the account area for example account 1 2 all the default value is all representing all accounts 6 Click the edit button to save the modified rule Delete the restricted outgoing call rule through the web interface 1 Log in to the phone page through the IP address 2 Click Settings E Dial plan k Block out...

Page 70: ...SIP H680 Series IP Phone User Manual ...

Page 71: ...waiting Ø 5 9 Auto Redial Ø 5 10 Auto Answer Ø 5 11 Anonymous Call Ø 5 12 Hotline Ø 5 13 QR code Ø 5 14 Conference Ø 5 15 Upgrade 5 1 Make a call The way to make a call can be Manual dialing Call bills local contact selection number dialing For the dialing method of CDRs and local contacts please refer to Contact Management and CDR Management H680 can use three tools to talk l Handset l Headset l ...

Page 72: ... Use the headset to make a call You can use any of the following methods Use the speaker to make a call You can use any of the following methods 5 2 Answer a call ...

Page 73: ...s the Reject soft key to reject the incoming call If DND is set you can automatically reject incoming calls For details please see the DND section 5 3 End a call If you want to hang up during a call you can use the following methods Use the handset or headset to make a call press the Hang Up soft key ž 5 4 Redial The phone can quickly redial the last call or any call the specific operations are as...

Page 74: ...ty of the busy tone and display the message of missed calls on the phone As shown below l There are two modes of Do Not Disturb to choose from l l Phone DND factory default mode Enabling this mode will enable DND for all accounts l Custom Do Not Disturb You can choose a designated account to set up Do Not Disturb Set DND mode via web interface 1 Login web interface 2 Click Features U Forward DND 4...

Page 75: ...ess Menu Features Do Not Disturb when the phone is in standby 2 Press the switch soft key to switchž 3 Finally press the Save soft key to save the operation After enabling the DND mode there will be a label on the right corner of the ip phone In custom mode enable DND on the phone interface ...

Page 76: ...d the IP phone will automatically transfer to the other landline or mobile phone that is set for external calls There are two types of call transfer When the phone rings an incoming call press the FWD soft key to dial the number transfer active transfer when the phone has an incoming call it will automatically transfer to the preset number auto transfer 5 6 1 Active transfer Transfer operation pro...

Page 77: ...nsfer when no one answers the call during the ringing it will transfer to the preset number after timeout Set the call forwarding authentication number through the web page interface 1 Click Features U Forward DND 4 2 Enable call forwarding emergency numbers in the call forwarding area 3 Enter the corresponding number in the call forwarding authentication number area and separate multiple numbers ...

Page 78: ...elect Enable 4 Fill in the destination number to be transferred 5 Set the feature on and off code Optional 6 Click the confirm button to save Note If the call forwarding feature code is configured the phone will send the corresponding feature code to the server For example set the feature code for unconditional transfer on to 72 the feature code for off unconditional transfer to be 73 and the tran...

Page 79: ...d 2 Select the transfer method to be set according to your needs Always forward 1ŽPress or to select enter into Always forward 2Ž or to select enable 3ŽFill in the number for unconditional transfer 4ŽEnter the on Feature code and off Feature code in the feature code area Optional 5ŽPress save softkey to save the operation ...

Page 80: ...area Optional 5 Press save softkey to save the operation No answer forward 1ŽPress to enter No answer forward 2 to select enable disable 3ŽFill in the number for call transfer on no answer 4ŽPress or to select no answer time before transfer fill in the waiting time before transfer the default value is 6s 5 Enter the on Feature code and off Feature code in the feature code area Optional 6ŽPress sav...

Page 81: ... phone is in standby 5 7 Call transfer The call transfer can be divided into the following types l Blind transfer There is no need to negotiate with the transferee and directly transfer to the other party l Inquiry transfer After negotiating with the transferee and agreeing to transfer the call will be transferred to the other party ...

Page 82: ...ing the number the BTra soft key appears on the LCD screen of phone B 2ŽPress the BTra soft key on phone B 3ŽThe call between phone B and phone A will be interrupted and the call will be transferred to phone C Phone A Phone B Phone C A and B are talking AB inputs the number C press the BTRa softkey to transfer the call to party C BThe call between A and B is disconnected and A and C are talking B ...

Page 83: ...Press Trans soft key to blind transfer 5ŽThe call between phone B and phone A will be interrupted and the call will be transferred to phone C Cancel the blind transfer operation process When phone A and phone B are in a conversation after phone B presses the Trans soft key phone B and phone A enter the call hold state and the caller will hear the call hold ringtone If you want to exit the transfer...

Page 84: ...SIP H680 Series IP Phone User Manual operation press the resume soft key to resume the call between phone B and phone A 5 7 2 Inquiry transfer ...

Page 85: ...onversation with phone A and informs that phone A cannot answer 4ŽThe transfer is ended BIf C does not agree to answer B and C end the call DB press the resume soft key to resume the call between A and B indicating the reason why the transfer cannot be made and AB ends the call BIf C agrees to answer DB press the Trans soft key to transfer the call to C Inquiry transfer flow chart Phone A Phone B ...

Page 86: ...ll The beep tone will sound and there will be no such reminder for new incoming calls Set up the call waiting via web interface 1 Click Meun Features U General Information 5 2 Enable call waiting set the feature code on off different PBX feature codes are different 3 Press confirm button to save the operation or cancel button to cancel If the call waiting on off feature code has been set when enab...

Page 87: ...s Menu Features Auto redial 2 Select to enable automatic redial set the automatic redial interval unit second default 10 range 1 300 set the numbers of redials default 10 range 1 300 3 Press save key to save the opeartion or back key to cancel the operation Set the auto redial via the web interface 1 Press Features UŽžGeneral information 5 2 Select to enable auto redial set the autoredial interval...

Page 88: ...e registered account of the phone When the account with auto answer turned on receives an incoming call the phone will automatically answer the call after the set auto answer waiting time Set auto answer via phone interface 1 Press Menu Features Auto Answer 2 or key to select the auto answer account 3 or keyto switch the enabled or disabled state 4 Press the Save soft key to save the operation ...

Page 89: ...ject the call If the server supports the anonymous rejection function you can also turn on off the anonymous rejection function of the account by dialing the service code of the server Set the anonymous call and anonymous rejection function through the phone interface Set the anonymous rejection function through the phone interface 1 Press Menu Features Anonymous Call 2 Select the corresponding ac...

Page 90: ...lly dial the set hotline number If the delay time is set to 0 the hotline number will be automatically dialed out immediately when dialing Set the hotline function through the phone interface 1 Press Menu Features Hotline 2 Fill in the hotline number 3 Fill in the hotline delay time fill in the number of seconds after picking up the phone to automatically call the hotline Default is 0 4 Press the ...

Page 91: ...t phone to enter the web interface so as to configure the phone information on the phone Before scanning the QR code the phone must be connected to the local area network to which the phone belongs and in the same network segment as the phone such as connected to the WIFI of the router ...

Page 92: ...e If you want to know the configuration method of each function please check the function introduction of each chapter If you have any questions about the use of the QR code please contact your network administrator 5 14 Conference H680 can initiate a three party call locally and use the conference softkey during a two party call to invite a third ...

Page 93: ...ay call Add calls from two accounts to a three way call 1 Phone A s account 1 is talking with phone B and phone A s account 1 is talking with phone C but it is on hold 2 If account 1 is calling and account 2 is on hold press to switch the call Using account 1 that is currently in a call press the Conf to select the held call and press the Send soft key to start a three way call Operations that can...

Page 94: ...other two parties can still talk 5 Hang up soft key End the meeting 5 15 Upgrade The H680 phone can be upgraded to the latest version via the Web the latest version can be downloaded from the official website or contact your seller to obtain Upgrade firmware version via web 1 Through the web interface click Settings Upgrade Upgrade Firmware select the version that needs to be upgraded and click Up...

Page 95: ...SIP H680 Series IP Phone User Manual 6 Advanced function ...

Page 96: ... simply and quickly Send the RTP stream to the pre configured multicast address through the multicast key or multicast list set on the phone By setting the monitoring multicast address on other phones the phone can monitor and play the RTP stream sent by the multicast address The multicast process does not involve SIP signaling The phone can be set to monitor up to 31 multicast addresses 6 1 1 Mul...

Page 97: ...soft key to save the operation 8 Repeat steps 2 7 to add more groups Configure paging list via web interface 1 Click Directory Multicast IP Paging list 2 Fill in the multicast address IP address port number in the multicast address input box for example 224 5 6 20 10008 3 Enter the group name in the Label area 4 Select the corresponding channel number in the channel drop down box 5 Click Confirm t...

Page 98: ... groups press the Delete All key You can also set the way the phone receives RTP streams through the Web which can be divided into paging intervention DND penetration and paging priority Configure the path Directory Multicast address 2 1 Paging intervention If there is multicast during the call if the current multicast priority is lower than the call priority the phone will automatically ignore th...

Page 99: ...ity the phone will automatically ignore the multicast disable it to ignore all multicasts the range is 1 31 For example if the priority is set to 1 the multicast with priority 2 31 is ignored 2 Penetrate DND If the phone is enabled to penetrate DND priority is 3 when the phone is enabled in the DND mode multicasts with a priority greater than or equal to three can be answered normally 3 Paging pri...

Page 100: ... account 1 multicast key and the pre configured monitor phone will receive the multicast RTP stream if phone A presses the hold key the receiver will automatically hang up the multicast RTP session Press the restore button to restore the held multicast Press Hang up to end the multicast RTP session 2 Multicast list sending Press Multicast List in the standby state select the option that needs mult...

Page 101: ...phone will emit a di beep prompt the power indicator will flash red slowly and the LCD interface will prompt n new text messages n represents the number of unread text messages for example 1 New text messages and display the icon of unread text messages Text messages can be stored in Inbox Sentbox outbox and draft box each of which can store 100 text messages If the number of SMS exceeds 100 the p...

Page 102: ...ges New Message 2 Write new message press the key to switch the input method 3 Optional Press the Switch soft key and select the sender account in the sender area 4 Enter the recipient number in the send to field 5 Press the Send soft key to send the message or the Back soft key to cancel ...

Page 103: ...Send number 4 Type the Send Content 5 Press Confirm button to send the message To reply text messages 1 Press Menu Messages Text messages Inbox 2 Select the message you want to reply and press the Reply soft key 3 Write message press abc to switch input methods 4 After editing press Send softkey 5 Check the Sender and Send to area 6 Press the Send soft key ...

Page 104: ...d press the Option soft key 3 Select Delete and then press the OK soft key The LCD interface displays Delete the selected message 4 Press the OK soft key to delete and press the Cancel soft key to cancel To delete all short messages press the Option soft key and select Delete all For more information please refer to the steps above 6 3 Configuration management ...

Page 105: ...o export configuration directly 4 Click the import button CFG configuration 1 Log in the web interface via Ip address 2 Click settings E Configuration CFG configuration 3 Export CFG configuration files network configuration SIP configuration 4 After selecting press Export button 5 Import CFG configuration file Import the modified configuration file 6 Press Import key 6 4 Auto Provision Automatic p...

Page 106: ... it will first try to download the common boot boot file and guide the phone based on the boot file to reference the specified CFG configuration file The specific sequence is as follows Configuration file description Before configuring the phone you need to obtain the CFG configuration file common cfg is the common configuration file and mac cfg is the mac based configuration file you can also cre...

Page 107: ...et to Chinese create a LanguageAndUp cfg file add the configuration and place it in the server root directory languate language_setting languages 0 upgrade static firmware url ftp 192 168 17 xx V2 0 0 3_T790_rootfs sqhfs 6 4 2 Automatic update operation steps There are two methods of server l HTTPS l FTP TFTP 6 4 2 1 HTTP S method update To configure the server just run HFS exe directly after runn...

Page 108: ... directory file map Setting steps 1 Login Web interface 2 Click Settings E Auto provision 3 3 server URL Fill in the https address such as http s 192 168 17 xx enable power on and start Automatic configuration information update after restart ...

Page 109: ...ver run IPOP exe directly to enable FTP TFTP in the service or you can use 3CDaemon TFTPD32 etc as the server after running put the configuration file directly in the environment root directory the configuration file includes xx boot and xx cfg etc File The configuration steps as following ...

Page 110: ...tup automatic configuration information update after restart 6 5 SIP configuration 6 5 1 SIP Session Timer SIP session timers T1 T2 and T4 are SIP transaction layer timers defined in RFC 3261 Configure SIP session timer through web page Only through web page configuration 1 Login Web interface 2 Click Settings E The SIP configuration 3 Check SIP Session Timer T1 T2 T4 4 Press Confirm button to sav...

Page 111: ...transmission multiplication of timer T1 0 5 will continue until the retransmission time reaches timer T2 4 The total registration request retry time will be less than 64 times of T1 64 0 5 32 The retransmission interval is 0 5s 1s 2s 4s 4s 4s 4s 4s 4s 4s 4s 4s 4s 4s 4s 4s 4s 4s 4s 4s SIP session timer T4 Indicates the time for the network to clear messages between the SIP client and server 6 5 2 L...

Page 112: ...s and each action corresponds to a URL that can be customized by the user When a certain action occurs such as an incoming call the phone and the corresponding URL HTTP HTTPS GET is sent to the computer so as to achieve the purpose of reporting its own action URL format http s server address help xml mac mac 6 6 1 The action that can realize reporting to the server The action that can realize repo...

Page 113: ...the handle When the handle is off hook Same as above Incoming call When ip phone has incoming call mac ip model firmware active_url active_user active_host local remote display_local display_remote call_id callerID calledNumber Call related Dial a call When ip phone dial a call Same as above Establish a session When the session is establishing Same as above End a session When the session is finish...

Page 114: ...call forwarding on no answers Enable call forwarding on no answers Same as above Disable call fowarding on no answers Disable call fowarding on no answers Same as above Call forward When a call transfer occurs mac ip model firmware active_url active_user active_host local remote display_local display_remote call_id callerID calledNumber Blind transfer When the blind transfer occurs Same as above I...

Page 115: ... state from the call state Same as above Reject incoming calls When you reject the incoming calls Same as above Answer new incoming calls When you answer a new incoming call Same as above Forward failure When the call forward failure Same as above Forward complete When the call forward is complete Same as above Forward call When forwarding a incoming call Same as above Update automatically When th...

Page 116: ... current active account only valid for incoming outgoing and calling active_user Reissue the user account of the sip_uri of the current active account only valid for incoming outgoing and calling active_host The server part of the sip_uri of the current active account only valid for incoming outgoing and calling local Native sip_uri remote The peer sip_uri display_local Native display name display...

Page 117: ... specific CA certificate to your phone Configure trusted certificates via web interface 1 Login Web interface 2 Click security F Trusted Certificates 3 Select the approriate value from Only trusted certificates are allowed User name confirmation CA certificate 4 Click Confirm to confirm the operation A dialog box pops up prompting to take effect after restart ...

Page 118: ...hone Upload trusted certificate via web page 1 Login Web interface 2 Click security F Trusted Certificates 3 In the Load Trusted Certificate File area click Browse to select the local certificate file pem crt cer or derŽ 4 Click import to import the certificate 1 1 ...

Reviews: