2
Installation Instructions
Warning
•
Installation of this product requires connection of electrical wires and
should only be performed by trained personnel.
•
Verify electrical voltage has been removed from all wires involved in the
installation of this product prior to installation.
•
Remove negative terminal from all batteries of vehicle during installation of
this product.
•
Installation of this product may require the use of various power tools,
ensure all safety precautions are followed in accordance with the specific
power tool manufacturers safety recommendations
•
Ensure ANSI approved Z87+ or better eye protection is worn at all times
during the installation of this product.
•
Before performing the following installation steps, read and understand this
manual in its entirety.
1. Mounting
It is acceptable to mount this product in any vertical or horizontal
orientation as shown in Figure 1.3. The unit is supplied from the factory
with stainless steel fasteners installed on the light and the end cap
mounting stud. Corrosion resistant Grade 5 hardware is included to
secure the mounting brackets down to any mounting surface of choice.
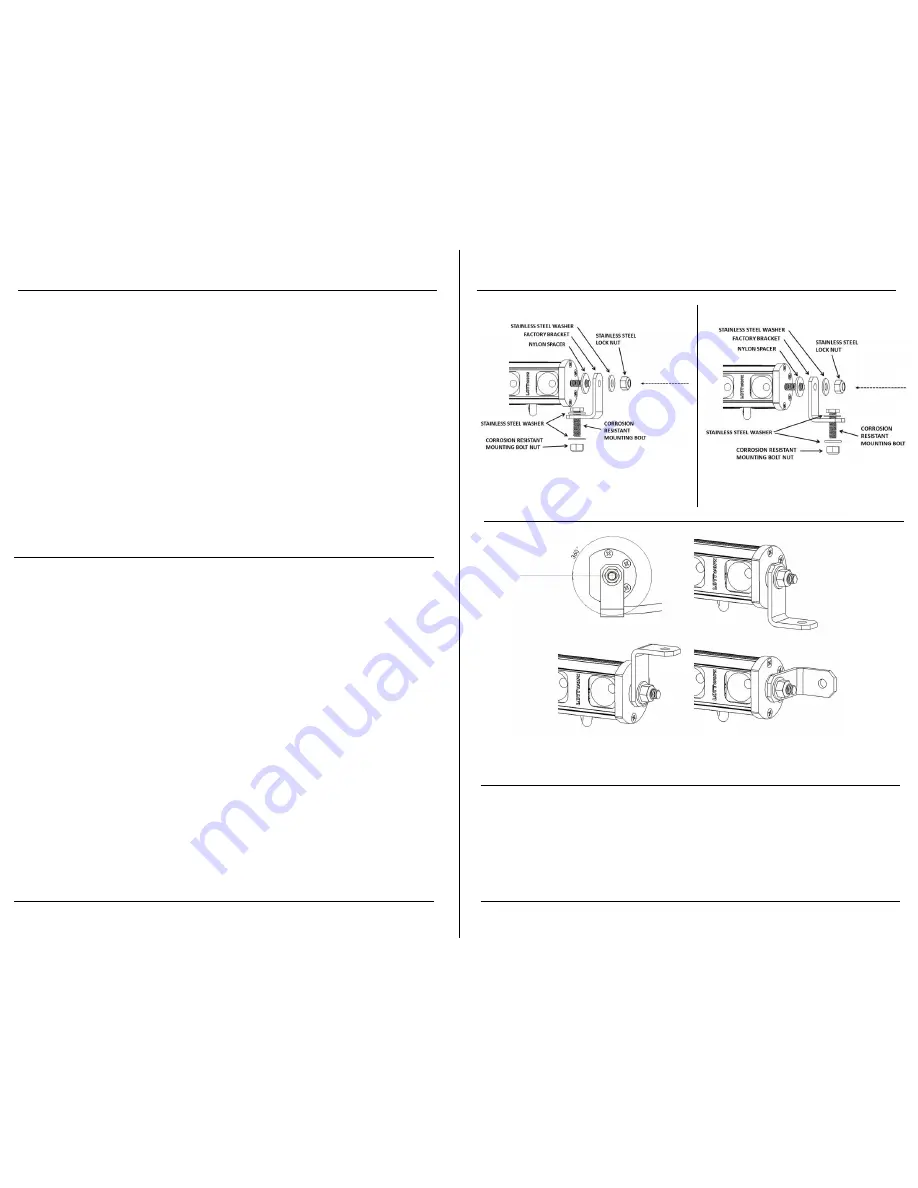
The factory brackets can be installed so that the mounting leg of the
bracket faces either inward or outward, the difference is shown in
Figures 1.1 and 1.2 on the following page. It is very important to install
the hardware as shown in the diagrams. It is acceptable to use mounting
brackets other than the factory brackets, however it is very important
that the Nylon Spacer is installed between any mounting bracket and the
housing end cap.
•
Verify nylon spacer is installed between
housing end cap and mounting bracket.
Mounting Continued
Figure 1.1: Inward facing
bracket hardware stack-up.
Figure 1.2: Outward facing
bracket hardware stack-up.
Figure 1.3: Examples of acceptable
bracket mounting positions.
3
•
If brackets will be utilized in the inward position, (as shown in Figure 1.1)
the bottom mounting bolt and washer must be installed onto mounting
bracket prior to bracket installation onto housing end cap stud.
•
After mounting brackets are installed onto housing end cap studs, snug
down the stainless steel end cap stud lock nut and maneuver light onto
final mounting surface.
Copyright 2015 LOTTworx
Copyright 2015 LOTTworx


