MOTION DETECTION
The Multiplexer has a built-in pixel based Motion Detection feature, offering an alternative method of motion
detection to connecting external PIR motion sensors.
To enter the Motion Detection configuration, follow these instructions:
1) Go to the Main Menu by pressing the ENTER and ESC buttons simultaneously;
2) Enter the Channel Setup Menu from the Main Menu by pressing the button.
3) Press the ENTER button while on the Channel (1-16) in which you wish to program Motion Detection,
4) Then press the MOTION button to access the Motion Detection setup screen for that channel.
You will see the current camera picture overlaid with the motion targets. The targets on each motion setup
can be turned to ON or OFF individually by row. To set up targets, navigate between each target using the
▲▼
◄ ►
arrow keys, and use the following keys:
MOTION
– turns the target area ON / OFF [ = ON / = OFF ]
Camera (1-15)
– toggles the corresponding target on the cursor line ON or OFF. Since there are only 15
targets in a row, only buttons 1-15 are usable.
LINE
– turns all targets in the current row ON or OFF. Refer to image below for an example.
ALL
– turns all targets on the screen ON or OFF.
To adjust the Sensitivity, press the and buttons.
The Sensitivity value is related to motion and brightness change.
Low value (as 001) means higher sensitivity on motion and brightness change.
High value (as 255) means lower sensitivity on motion and brightness change.
You can choose the suitable sensitivity value in different locations. The default value is set at 32.
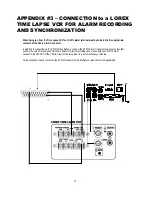
Motion Detection will trigger your Time Lapse VCR / DVR to record, provided that you have the connections
configured according to the diagram shown in Appendix #3.
12
Example of changing a LINE of motion targets


