background image


22


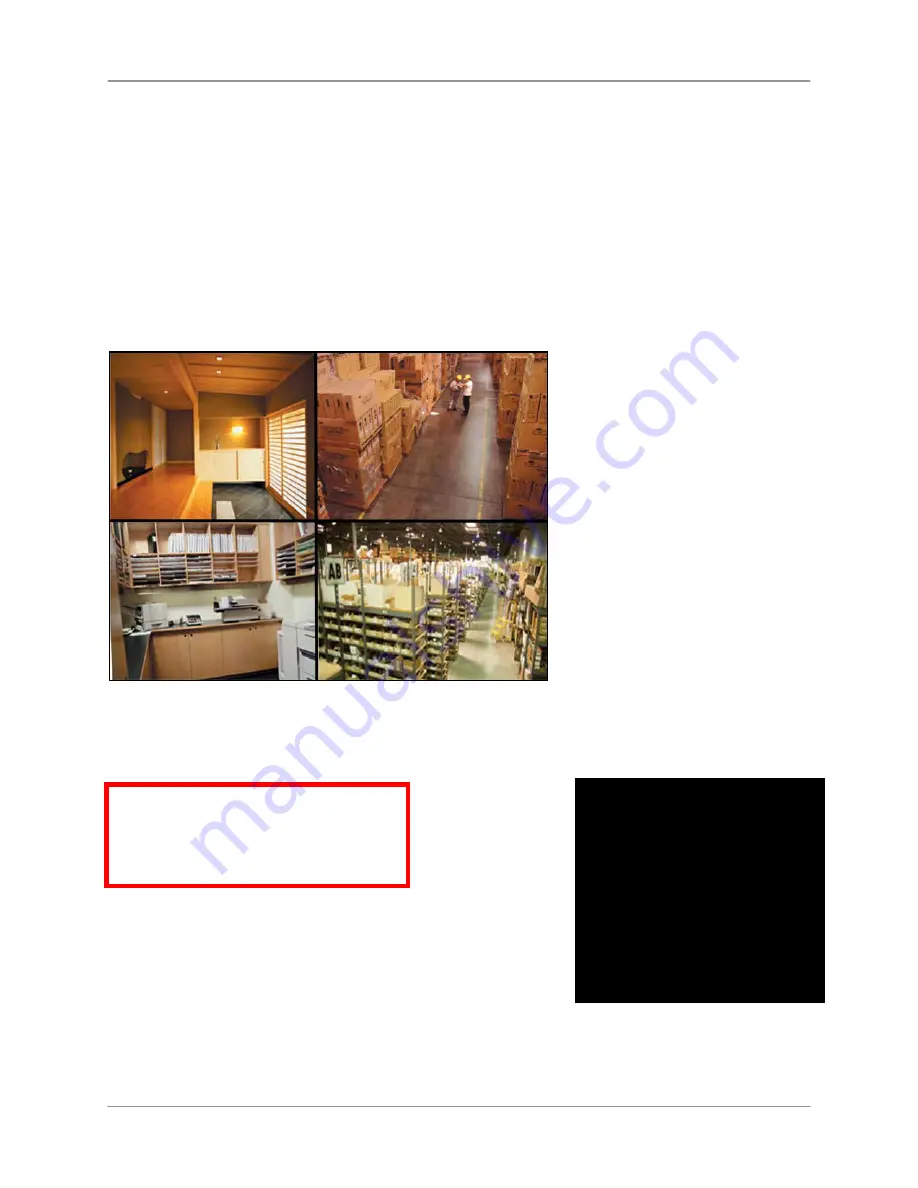
Quad Mode 

Use Quad mode to view up to four cameras simultaneously. 

To enable/disable Quad mode: 


Press the 

QUAD button

. The Schedule Recording warning appears briefly on-screen (see 

figure 5.2), then the Quad display mode begins.


NOTE

: The signal indicator or SD card icon are not shown while the receiver is in Quad mode. 

NOTE

: You cannot access the Main Menu while the system is in Quad Mode. 


Quad mode is also available while in Zoom mode. For details on using Zoom, see “Zoom” on 
page 52. 


Recording Tip! 

Using Quad Mode with Motion Recording is a highly 
recommended recording solution. For more details, see 
“Motion Recording” on page 30. 


Figure 5.1 Quad Mode 

C

C

a

a

m

m

1

1


C

C

a

a

m

m

2

2


C

C

a

a

m

m

3

3


C

C

a

a

m

m

4

4


ATTENTION

: While in Quad Mode, 

you cannot turn on Schedule 
Recording. 

Schedule 

Recording Cannot 

begin because you 

are in Quad Mode 

Figure 5.2 Quad Mode warning

Summary of Contents for LW2702 series

Page 1: ...hnology Inc DIGITAL WIRELESS QUAD LCD SURVEILLANCE SYSTEM Instruction Manual www lorexcctv com MODELS LW2702 Series English Version 1 0 WITH BUILT IN VIDEO RECORDER INTERCOM AND INDOOR OUTDOOR MOTION...

Page 2: ...G TO QUALIFIED SERVICE PERSONNEL The lightning flash with arrowhead symbol within an equilateral triangle is intended to alert the user to the presence of uninsulated dangerous voltage within the prod...

Page 3: ...roduct Consumer Guides and Video Tutorials are available on our web site at www lorexcctv com support If you require further installation assistance please visit www lorexcctv com installation or cont...

Page 4: ...nsert Need Help pour ob tenir de l information sur le service la cli ent le et le support technique Veuillez constater qu une fois que les com posantes de ce produit ont t retir es de l emballage vous...

Page 5: ...t for technical installation issues support lorexcorp com By Email Customer Care for warranty and accessory sales customerservice lorexcorp com Customer Feedback info lorexcorp com Product Support is...

Page 6: ...entes d accessoires appuyez sur l option 1 pour l anglais et ensuite sur les options 2 5 nous serions heureux de recevoir vos commentaires info lorexcorp com pour commander des accessoires visitez www...

Page 7: ...roduct o A polarized plug has two blades with one wider than the other o A grounding type plug has two blades and a third grounding prong o The wide blade or the third prong is provided for your safet...

Page 8: ...ock or other hazards 16 Safety Check Upon completion of any service or repairs to this video product ask the service technician to perform safety checks recommended by the manufacturer to determine th...

Page 9: ...e following two conditions 1 this device may not cause harmful interference and 2 this device must accept any interference received including interference that may cause undesired operation The manufa...

Page 10: ...on to maximize recording time Viewing Options Quad Mode Shows up to 4 Camera Views on Same Screen Auto Sequence Mode displays all cameras in Full Screen Single Channel Full Screen viewing Screen Saver...

Page 11: ...er with Motion Recording 24 Setting the Time 25 Recording 26 Recording Mode Summary 26 Manual Recording 27 Schedule Recording 28 Stopping Schedule Recording 29 Motion Recording 30 Viewing Recorded Vid...

Page 12: ...echnology 56 Appendix C Adding Cameras 57 Appendix D Strengthening the Range of the Wireless Signal 58 Extending Your Wireless Signal 58 Appendix E Deleting Video Files on the System 60 Appendix F Est...

Page 13: ...OMPONENTS SHOWN ABOVE 1 x 7 LCD MONITOR WIRELESS RECEIVER 3 x POWER ADAPTERS FOR RECEIVER CAMERAS 2 x MOUNTING KITS 1 X UNDER THE COUNTER MOUNTING KIT 2 x COLOR TWO WAY AUDIO OUTDOOR CAMERAS 2 x CAMER...

Page 14: ...ns 5 TALK Press to talk using the Intercom release to listen 6 Microphone Microphone for two way audio 7 DC 5V Connect the included power adapter 8 Wall Hanger Use hole to hang the LCD Receiver like a...

Page 15: ...y 3 Lens Camera lens 4 Night Vision IR Night vision IR LEDs used for viewing in complete darkness 5 Speaker Speaker for two way audio 6 Pair Pairing button For more details see Appendix C Adding Camer...

Page 16: ...audio from the receiver increase decrease volume during playback 7 Quad Press to change the display view to quad 4 way split screen 8 2 Move menu cursor RIGHT increase playback speed jump to camera 2...

Page 17: ...as an ambient temperature between 14 F 122 F 10 C 50 C To install the camera 1 Use the included mounting screws to mount the stand to the mounting surface Mark the position of the screw holes on the w...

Page 18: ...hear one click Continue turning counter clockwise to position the LCD receiver as desired 2 Insert the included SD card into the SD Card slot on the LCD receiver until you hear a click The card will...

Page 19: ...n the system for viewing on a TV VCR or Monitor NOTE When using AV Out the LCD screen will be blacked out the image will only appear on the TV VCR or Monitor 6 Slide the power switch on the rear panel...

Page 20: ...points 3 Adjust the antenna on the LCD receiver to allow for proper clearance with your mounting surface 4 Attach the LCD receiver to the mounting stand Adjust the position of the LCD receiver and tig...

Page 21: ...t or surge protector 7 Slide the power switch on the rear panel to the ON position POWER ADAPTER Figure 3 7 Power on the LCD receiver Figure 3 6 Connect the 5V AC adapter Figure 3 8 LCD receiver mount...

Page 22: ...D card The blue lights indicate the following NEW A new video file has been recorded to the SD card FULL The SD card is full NOTE The Full light will only appear if Overwrite is disabled For details s...

Page 23: ...ecording Indicator REC appears during manual motion and schedule recording 3 File Name Name of the file actively being recorded 4 Camera indicator Displays the camera you are presently viewing positio...

Page 24: ...6 Power Failure icon Flashing icon indicates a power failure has occurred on the system You may need to manually restore settings or modes on the system after a power failure For details see Appendix...

Page 25: ...and switch automatically between channels press Channel M button to disable Auto Sequence OR Press the Channel M button repeatedly to switch between channels 1 4 NOTE By default Auto Sequence Viewing...

Page 26: ...annot access the Main Menu while the system is in Quad Mode Quad mode is also available while in Zoom mode For details on using Zoom see Zoom on page 52 Recording Tip Using Quad Mode with Motion Recor...

Page 27: ...Menu 2 From the Main Menu select Setting and press the Enter button 3 From the Settings menu select Screen Saver and press the Enter button 4 From the Screen Saver menu select Blank screen or Picture...

Page 28: ...nable Screen Saver with Motion Recording 1 From live viewing press the Motion button AUTO REC appears on the LCD receiver 2 Press the Scan Del button to enable the Screen Saver SCAN appears on the LCD...

Page 29: ...s the Enter button 2 From the Setting menu select Date Time and press the Enter button 3 Press RIGHT LEFT to move the cursor press UP DOWN to change the year month day hour minutes and seconds NOTE Th...

Page 30: ...wing Mode SCHEDULE RECORDING Continuous recording from one camera or from Auto Sequence Viewing Mode system will record from one camera at a time ATTENTION Turn off Manual Recording and Motion Recordi...

Page 31: ...Sequence Viewing Mode during Manual Recording To enable Manual Recording 1 Select a channel 1 4 on the wireless receiver or from the remote control 2 Press the Record button 3 To stop Manual Recordin...

Page 32: ...le Recording However the system will record video of the sequence itself Therefore you cannot playback video of individual cameras To set a recording schedule 1 Press the MENU button to open the Main...

Page 33: ...Schedule Recording When the Stop Time arrives the system stops recording However if necessary you can also stop Schedule Recording manually To stop Schedule Recording Press the Record button on the r...

Page 34: ...L A button When motion is detected the system will display the triggered camera on screen When motion recording is over Auto Sequence Viewing Mode will continue as normal Change channels manually Pres...

Page 35: ...nce Mode Motion Recording when power is restored For more details see Appendix G Power Failure on page 62 Recording Tip If you are using more than one camera it is highly recommended to use Quad Mode...

Page 36: ...onitor or directly from the SD card simply connect the SD card to your computer Viewing Video Using the System To playback recorded video on the system 1 Stop all recording on the system 2 Press the E...

Page 37: ...n to go up a level 5 Select a file from the list and press the Enter button The selected file loads and playback begins 080512 080513 080514 091252_1 3MB 092003_2 5MB 092532_4 2MB 100341_3 449KB 09410...

Page 38: ...start video from the beginning Fast forward playback 2X 4X 8X 16X 32X and 64X During fast forward press to pause and then press again to play Stop playback Rewind playback 1X 2X 4X or 8X During rewind...

Page 39: ...yer Mac To playback recorded video on a Mac 1 Remove the SD card from the wireless receiver by gently pushing on the SD card The SD card will pop out from the slot 2 Insert the SD card into an SD card...

Page 40: ...ly 12 in 30 cm 3 Release the TALK button to hear a response from the camera s Two Way Audio Volume The two way audio volume is different from the alarm buzzer volume found in the Main Menu Main Menu S...

Page 41: ...is in single channel full screen view prior to opening the Main Menu 1 Camera On Off Enable disable connected cameras 2 Record Configure recording parameters set a recording schedule and enable disabl...

Page 42: ...dix G Power Failure on page 62 Make sure cameras are properly connected and paired to the receiver before disabling To enable disable cameras 1 From the Main Menu select Camera On Off and press the En...

Page 43: ...e overwrite The Record menu contains the following sub menus Quality Set the image resolution to 320x240 QVGA or 640x480 VGA Trigger Record Set the recording time when motion is detected by a camera S...

Page 44: ...ess the Enter button 2 From the record menu select Quality and press the Enter button 3 Press LEFT RIGHT to select 320x480 QVGA or 640x480 VGA 4 Press the Enter button to save your settings 5 Press th...

Page 45: ...d by a camera To change the motion recording time 1 From the Main Menu select Record and press the Enter button 2 From the Record menu select Trigger Record and press the Enter button 3 Select 5 secon...

Page 46: ...Schedule Record and press the Enter button 3 Press RIGHT LEFT to move the cursor yellow press UP DOWN to change the hour and the minutes NOTE You need to press RIGHT to move the cursor from Start Time...

Page 47: ...and press the Enter button 4 Press the Menu button until all menu windows are closed NOTE If you do not enable Overwrite the system will prompt you when the SD card is full by two ways the SD Card ic...

Page 48: ...th one another once they are powered on What is Pairing Pairing is an electronic handshake between wireless devices Wireless devices and components need to be paired in order to communicate with each...

Page 49: ...screen prompt press the Pair button on the rear panel of the camera You have 30 seconds to press the PAIR button on the camera Once paired the camera will be immediately displayed on screen NOTE If yo...

Page 50: ...e Time Set the date and time on the system Brightness Adjust screen brightness level AV out Select the TV system for audio video output Screen saver Select an image for Screen Saver mode Alarm Volume...

Page 51: ...he Main Menu select Setting and press the Enter button 2 From the Setting menu select Date Time and press the Enter button 3 Press RIGHT LEFT to move the cursor press UP DOWN to change the year month...

Page 52: ...s 1 From the Main Menu select Setting and press the Enter button 2 From the Settings menu select Brightness and press the Enter button 3 Press LEFT RIGHT to increase and decrease the brightness 4 Pres...

Page 53: ...select the TV system 1 From the Main Menu select Setting and press the Enter button 2 From the Settings menu select AV out and press the Enter button 3 Select NTSC North America or PAL UK Europe and p...

Page 54: ...ess the Enter button 4 Press the MENU button until all menu windows are closed To enable Screen Saver mode 1 Press the Scan Del button The selected image appears on the LCD screen 2 Press the Scan Del...

Page 55: ...ing AV out changing the system alarm volume will also affect the level of audio output To increase decrease alarm volume 1 From the Main Menu select Setting and press the Enter button 2 From the Setti...

Page 56: ...the Enter button 4 Select X 1 or X 2 and press the Enter button 5 Press MENU until all menu windows are closed The selected camera will be shown on the main display in 2X zoom While zoomed in you can...

Page 57: ...u hear a click Please insert the card according to the diagram on the panel 2 From the Main Menu select Setting and press the Enter button 3 From the Settings menu select Format and press the Enter bu...

Page 58: ...etting and press the Enter button 2 From the Settings menu select Default and press the Enter button 3 Select Yes and press the Enter button 4 Press the MENU button until all menu windows are closed A...

Page 59: ...Total Picture Pixels 640 x 480pxl NTSC Minimum Illumination 0Lux IR on Night Vision Distance TBD View Angle Diagonal 64 Power Consumption Max Max 350mA Power Supply 9V DC Dimensions 70 mm x 188 mm x...

Page 60: ...is much higher then the analog transmission signal allowed by authorities around the Globe When an image is captured by the camera it is instantly converted from an analog to digital signal and packa...

Page 61: ...3 From the Main Menu select Pairing and press the Enter button 4 Select Camera 3 or Camera 4 and press the Enter button NOTE By default the cameras included with your system are paired as Camera 1 ch...

Page 62: ...a clear line of sight between the camera and the receiver Obstacles There should be little to no obstacles obstructing the line of sight between the camera and the receiver Solid objects such as conc...

Page 63: ...tension cable is included help with proper position of the antenna 2 4 GHZ Omni Directional Wireless Antenna Use the 2 4GHz Omni Directional Wireless Antenna model ACCANTO9 to extend the range and boo...

Page 64: ...Select a file and press the Scan Del button 5 At the prompt select YES and press the Enter button The file is deleted and the File List returns as normal 6 Repeat steps 3 5 for other files on the SD c...

Page 65: ...D cards Times shown are in hours minutes and seconds NOTE The system is compatible with SD High Capacity SDHC cards minimum Class 2 SD Card Capacity Standing Recording Time QVGA 320x240 VGA 640x480 51...

Page 66: ...power failure occurred you will need to re apply the previous display view and recording mode A flashing Power Failure icon will appear on screen the Power Failure icon indicates that a power failure...

Page 67: ...V Monitor especially high definition televisions the picture might be grainy as the camera limits video resolution to VGA 640x480 pixels This is not a product defect For best performance use with TV M...

Page 68: ...ce from picking up the signal this also means that you cannot pair one camera to multiple receivers Q Can I use 900 MHz and 2 4 GHz systems at the same time A Yes 900 MHz devices and 2 4 GHz devices w...

Page 69: ...limitation on how long an implied warranty lasts so this limitation may not apply to you Some states do not allow the exclusion or limitation of incidental or consequential damages so the above warra...

Page 70: ...original des droits sp cifiques et il se peut que d autres droits variant d un tat ou d une province l autre puissent lui tre conf r s Obtention du service Si l acheteur a besoin de service pour son...

Page 71: ......

Page 72: ...2 LOREX 1 888 425 6739 See Hear PROTECT PROTECT EVERYTHING THAT MATTERS Warehouse CVC6998HR Office CVC6993R Day Care LW2602 Convenience Store CNC1020 VQ1536HR Restaurant Home Office LW2002B Add wired...

Reviews: