Lorex LH150 Instruction Manual Download Page 118

102

Lorex Player 11: Playing Backed up Video on PC

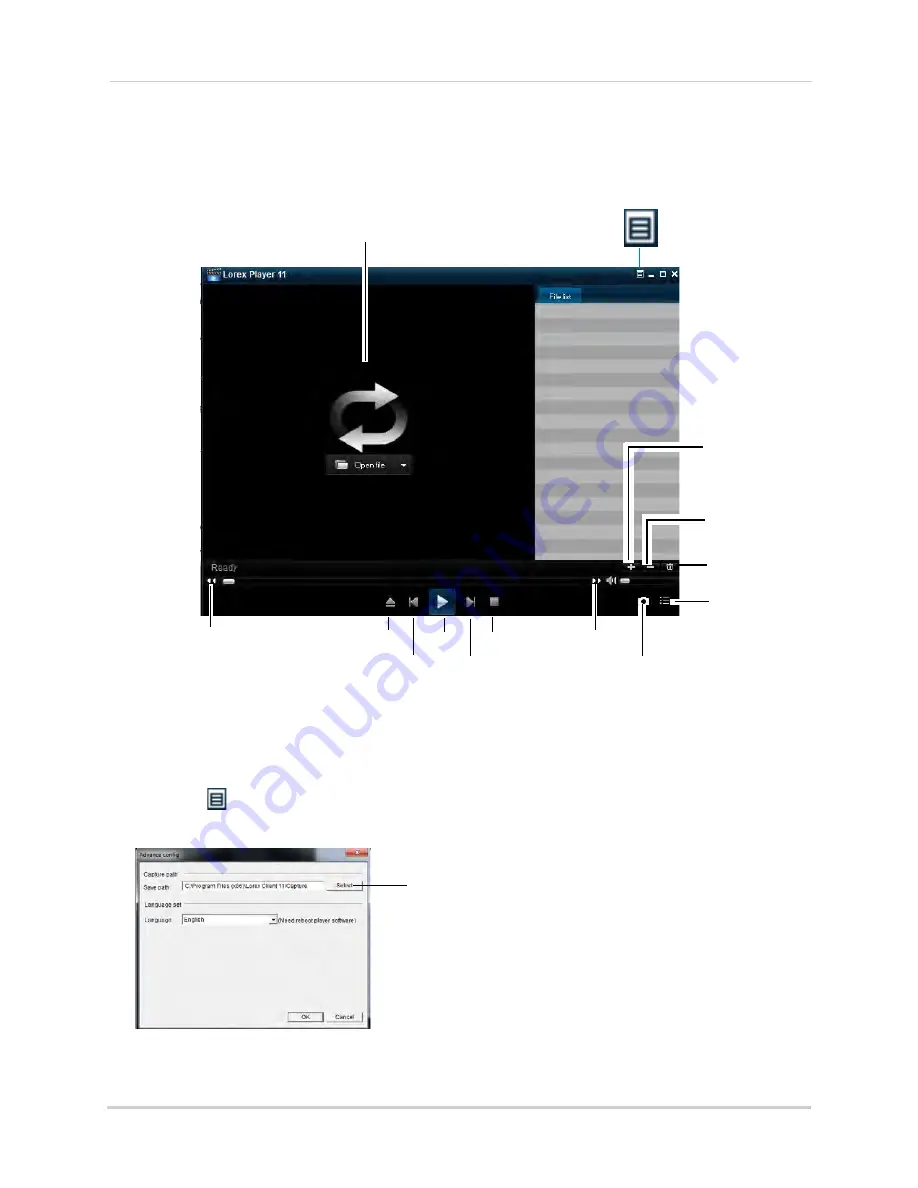
Lorex Player 11 Interface Overview

About the Advanced Config Menu

The Advanced Config menu allows you to select where the screen captures are stored.

To open the Advanced Config menu:

1

Click the 

 button.

2

Click

 Select

 to change the snapshot save folder. Then select the folder and click 

OK

.

3

Click 

OK

 to save changes.

Click here to open the 
Advanced Config menu

Play

Snapshot button

Add file

Remove file

Delete file

Video Window

Hide/reveal 
playlist

Next

File

Stop

Previous

File

Open File

Rewind

Fast Forward

Select

Summary of Contents for LH150

Page 1: ...RVEILLANCE RECORDER LH150 ECO4 SERIES Copyright 2013 Lorex Technology Inc Instruction Manual English Version 1 0 THE ECONOMICAL SOLUTION TO PROTECT YOUR HOME OR BUSINESS RETAIL INDUSTRY BUSINESS BUSIN...

Page 2: ...G TO QUALIFIED SERVICE PERSONNEL The lightning flash with arrowhead symbol within an equilateral triangle is intended to alert the user to the presence of uninsulated dangerous voltage within the prod...

Page 3: ...vice for warranty matters 1 888 425 6739 1 888 42 LOREX Tech Support for technical installation issues 1 877 755 6739 1 877 75 LOREX Mexico 001 800 681 9263 001 800 514 6739 International 800 425 6739...

Page 4: ...rend les renseignements sur les produits guides d utilisation guides de d part rapide et FAQ www lorextechnology com support En ligne Hay 2 maneras f ciles de comunicarse con nosotros Norte Am rica At...

Page 5: ...logy com support If you require further installation assistance please visit www lorextechnology com installation or contact a professional installer Please note that once the components of this produ...

Page 6: ...de ce produit vous ne pouvez pas retourner celui ci directement au magasin sans son emballage original Favor de leer la gu a de instalaci n r pida y la gu a del usuario antes de instalar este product...

Page 7: ...f the obsolete outlet 5 Power Sources This product should be operated only from the type of power source indicated on the marking label If you are not sure of the type of power supplied toyourlocation...

Page 8: ...moving covers may expose you to dangerous voltage or other hazards Refer all servicing to qualified service personnel 2 ConditionsRequiringService Unplugthisproduct from the wall outlet and refer serv...

Page 9: ...ment does cause harmful interference to radio or television reception which can be determined by turning the equipment on and off the user is encouraged to try to correct the interference by one or mo...

Page 10: ...ones Tablets3 PC and Mac compatible Instant email alerts with snap shot attachment 1 Recording time may vary based on recording resolution quality lighting conditions and movement in the scene 2 Requi...

Page 11: ...Set the Time 9 Default System Password Port Numbers 10 Lorex Stratus Connectivity 10 Quick Access to System Information 10 Connecting Cameras 11 Installation Tips 11 Installing Cameras 11 Connecting B...

Page 12: ...r Settings 37 Enabling Covert Recording 37 Configuring the Time and Recording Time Display 38 Configuring Sequence Time 38 Changing the Video out Resolution 38 Restoring the System s Resolution if you...

Page 13: ...System Firmware Using a USB Thumb Drive 53 Restoring to Factory Default Settings 54 Restarting or Shutting Down the DVR 55 Configuring System Warnings 55 Saving Your System Configuration to a USB Fla...

Page 14: ...Firmware Upgrades 80 Manually Upgrading System Firmware 81 Restoring Default Settings 82 Configuring Event Settings 82 Configuring Auto Reboot 83 Mobile Apps Accessing your DVR Using a Mobile Device 8...

Page 15: ...e Hard Drive 112 8 Channel 112 16 Channel 113 Installing the Hard Drive 115 8 Channel 115 16 Channel 116 Formatting the Hard Drive 118 Appendix F DDNS Setup Advanced 119 Accessing your DVR within a lo...

Page 16: ...xiv...

Page 17: ...D USB MOUSE ETHERNET CABLE REMOTE CONTROL may not be exactly as shown DVR DIGITAL VIDEO RECORDER HDMI CABLE HARD DRIVE SIZE NUMBER OF CHANNELS AND CAMERA CONFIGURATION MAY VARY BY MODEL PLEASE REFER T...

Page 18: ...hold for 15 seconds to reset the DVR to the default resolution DVR will reboot Press to stop resume recording When the channel displays a red box with the letter C the channel is recording Menu Esc O...

Page 19: ...ayback time In Playback Mode press to fast forward Press repeatedly to increase fast forward speed In Playback Mode press to stop video playback In Live Viewing Mode press to stop DVR recording Passwo...

Page 20: ...cursor right 5 PTZ Within system menus press to confirm a selection In Live Viewing Mode press to open the System Information window In Live Viewing Mode press and hold for 6 seconds to open the PTZ...

Page 21: ...or not included to view the system interface 5 PTZ Alarm Block Connect compatible PTZ cameras not included or alarm devices not included 6 IR EXT Service only not supported 7 On Off Switch Turns the D...

Page 22: ...ot included to view the system interface 5 PTZ Alarm Block Connect compatible PTZ cameras not included or alarm devices not included 6 IR EXT Service only not supported 7 On Off Switch Turns the DVR o...

Page 23: ...one of the USB ports Step 3 Connect the Ethernet Cable Connect an ethernet cable included to the LAN port on the rear panel of the DVR Connect the other end of the ethernet cable to a router on your n...

Page 24: ...Adapter and Power on the DVR Connect the included power adapter to the DC 12V port Connect the end of the power adapter to a wall socket or a surge protector Turn the power switch to I to turn on the...

Page 25: ...firmware update to complete The system will restart once the firmware has been upgraded Step 7 Verify Camera Image Power on the cameras and then verify the camera video quality before mounting the cam...

Page 26: ...ia a secure handshake with Lorex s Stratus servers This means you can easily connect to your system without requiring any network configuration For details on setting up your system to connect to the...

Page 27: ...meras 1 Mount the camera s to the desired mounting surface according to the instructions that came with the camera s Choose a firm mounting surface NOTE If you wish to mount cameras to drywall it is r...

Page 28: ...camera power adapter to a power outlet Connecting and Removing BNC Cables BNC Bayonet Nut Connector is a special connector that locks on to the system port and cannot be accidently removed To connect...

Page 29: ...g Left Button Click to select a menu option During live viewing in Split screen View double click on a channel to view the selected channel in full screen double click the channel again to return to S...

Page 30: ...e audio during Live Viewing and Playback Mode 5 Playback Controls In Playback Mode press to fast forward increase fast forward speed In Playback Mode press to rewind increase rewind speed In Live View...

Page 31: ...ESC Press to open the system menu In menus press to go back exit menu MUTE In Live Viewing and Playback Modes press to mute un mute audio PIP In Live Viewing Mode press once to open Picture in Pictur...

Page 32: ...ion recording A alarm recording 3 Channel number Channel title Displays channel number or channel title To rename the channel number to a title see Configuring Custom Channel Names on page 37 C M C C...

Page 33: ...uise function Zoom Opens digital zoom Must be in Full screen Live Viewing Mode Record Search Opens the DVR Search Menu This allows you to search for video recorded on the DVR Start Stop Recording Star...

Page 34: ...on an option or field such as the User ID and Password fields if passwords are enabled The Virtual Keyboard opens Click Shift to switch between upper and lowercase letters Click to move the cursor be...

Page 35: ...ct the Zoom button A Zoom icon appears on the screen 3 Click and drag on the area of the screen you would like to enlarge The image zooms in on the selected area The box in the lower right hand corner...

Page 36: ...l PIP1X2 shows 1 channel in full screen and 2 other channels Picture in Picture Mode opens To change the full screen channel click anywhere in the main viewing area To change the smaller channels clic...

Page 37: ...wn menu to select 12HOURS or 24HOURS Optional DST Click the Setup button next to DST to configure automatic Daylight Savings Time adjustments Optional NTP Click the Setup button next to NTP to synchro...

Page 38: ...button 2 Configure the following Daylight Saving Time Select Enable Time Offset Select the number of hours the system should move forward or backward when DST occurs Daylight Saving Time Mode Select...

Page 39: ...e To enable NTP 1 Right click to open the Menu Bar and click the Main Menu button 2 Click System Beside NTP click Setup 3 Configure the following Enable Select Enable Server Address Select ntp lorexdd...

Page 40: ...d data For more details see Configuring Hard Drive settings on page 51 Event Recording The system also includes motion recording Recording Motion The system records when motion is detected by the came...

Page 41: ...d password default 000000 and click Apply The Record Search tab opens 3 Configure the following CH Select the channel you wish to search Select All to search all channels Search Date Enter the month d...

Page 42: ...on Your search results appear in the calendar In the top portion of the calendar results are shown for each day in the month In the bottom portion results are shown for each hour in the selected day 4...

Page 43: ...Events in the Playback Bar The advanced playback controls show the time and type of video footage available Continuous recordings are shown in green and motion or alarm recordings are in red NOTE Mot...

Page 44: ...ge click The button will become colored Move your mouse to the time you where you would like the range to start and click Then move your mouse to the time you where you would like the range to end and...

Page 45: ...cted for Playback To create a backup video clip 1 Connect a USB flash drive not included to one of the USB ports on the DVR 2 Open Playback mode with only one channel selected For details see Playing...

Page 46: ...Connect a USB flash drive to one of the USB ports on the rear panel of the DVR 2 Right click to open the Menu Bar and click the Record Search button 3 Enter the system user name default admin and pas...

Page 47: ...for Mac Viewing Backed up Video on Mac on page 103 Converting Backed Up Video to AVI Files The DVR saves its backup files as proprietary video files To share these files you must convert them into AVI...

Page 48: ...sired file format 264 h 264 All File that you wish to search for Click Open 4 Click Start to convert and save the file in the default save folder Or click Save As to select a desired save folder then...

Page 49: ...can change the system password of the ADMIN and USER accounts from the Users menu To change the admin password 1 Right click to open the Menu Bar and click the Main Menu button Enter the system user n...

Page 50: ...e system When adding different users you can assign what menus they have access to For example you may want your friend to monitor your system while you are away while not giving full access to your s...

Page 51: ...d Enter your desired password Confirm Re enter the password 7 Click Apply to save your settings Now you can log in to the system locally or remotely using the user name and password you created When l...

Page 52: ...2 Search Search for recorded video and log files on the system 3 Alarm Configure motion detection and alarm settings 4 System Configure system time and user accounts 5 Record Configure recording setti...

Page 53: ...t hand corner D L Lower left hand corner U R Upper right hand corner D R Lower right hand corner OFF Do not display the channel name 4 Optional Use the drop downs next to Copy to copy settings to anot...

Page 54: ...k repeatedly to exit all menus The DVR prompts you to restart Click OK 5 The DVR restarts and asks you to confirm the new resolution Click Yes to confirm or No to revert to the old resolution If you d...

Page 55: ...tput mode between BNC mode and VGA HDMI mode When BNC mode is selected the mouse cursor appears on the BNC monitor To adjust the video margin 1 Click the Output tab 2 Click the Margin button 3 Drag th...

Page 56: ...ace to the Video Out monitor by pressing 0 three times on the remote control Complete the steps and then press 0 three times on the remote control again to return the mouse and system interface to the...

Page 57: ...e Channel drop down menu select the desired channel you wish to configure 3 In the PreRecord drop down menu select Enable to enable pre recording or Disable to disable pre recording 4 Click Apply to s...

Page 58: ...the box is gray 4 Optional Use the top Copy and Copy To drop down to copy the recording schedule to a specific day or all days Click Copy to copy the schedule 5 Optional Use the bottom Copy and Copy...

Page 59: ...bleoptions are 480x240 960x240 or 960x480 5 Under the FPS drop down menu select the number of frames per second you want the DVR to record on each channel 6 Optional Use the Copy and Copy To drop down...

Page 60: ...he video you want to play back 7 Select the channel or channels you want to play back 8 Click Play to begin playback Video Playback Controls Move the mouse slightly to display the on screen playback c...

Page 61: ...t only have alarm attributes NOTE Videos are not marked as Alarm unless continuous recording is turned off and motion or alarm settings are enabled To perform an Event Search 1 Click the Event Search...

Page 62: ...ng Network Type DHCP Static IP The system has the ability to operate in DHCP mode and Static IP mode To configure DHCP and Static IP settings 1 Select the Network tab 2 In the Type drop down menu sele...

Page 63: ...to save your settings 5 Right click to exit all menus You will be prompted to restart Adjusting Remote Connectivity Streaming Rates You can adjust the data streaming rate also called the SubStream wh...

Page 64: ...s when it detects motion alarm triggers 5 Click Apply to save your settings If you select Enable and want to use your own email server 1 Configure the following SSL Select ON OFF to enable disable Sec...

Page 65: ...ing to connect Alarm The Alarm tab allows you to configure Motion Detection and Alarm settings Configuring Motion Detection Configure motion settings to determine the area you wish to monitor for moti...

Page 66: ...Alarm Settings The Alarm settings menu allows you to configure how the system behaves when an external alarm device not included is triggered To configure the Alarm tab 1 From the Alarm menu click th...

Page 67: ...ing 1 Select the HDD tab 2 Select the checkbox beside the hard drive you wish to configure 3 In the Overwrite drop down menu select Auto recommended or select the desired duration the hard drive shoul...

Page 68: ...select your desired system language 2 Click Apply to save your settings 3 Right click until you exit the menu Follow the on screen instructions to restart your system Changing Video Output NTSC PAL T...

Page 69: ...your system You must have the latest DVR firmware and client software or mobile apps to connect to the DVR over the Internet You can enable or disable firmware upgrade prompts from appearing The syst...

Page 70: ...the firmware update Wait for the system to reboot Restoring to Factory Default Settings Restoring to factory default settings reverts any setting changes you have made to their original settings This...

Page 71: ...end out a notification or alarmtrigger ChoosefromDiskNoSpace low hard drive space Disk Error hard drive error or Video Loss Enable Select Enable or Disable to activate or deactivate the system from se...

Page 72: ...nced and select the Maintain tab 4 Click Save Settings Wait for the system to save your settings Loading a System Configuration from a USB Flash Drive 1 Insert a USB flash drive not included that cont...

Page 73: ...sing Lorex Stratus Client make sure your system meets or exceeds the following system requirements NOTE If a user connects to the system remotely there may be slow performance when accessing the syste...

Page 74: ...your router 3 Turn the power switch to I to power the DVR back on Step 2 of 3 Obtain the DVR s Device ID The Device ID is a unique code that allows your system to handshake with the Lorex servers for...

Page 75: ...atus Client 1 icon from the desktop The DVR login screen appears 3 Under Login Type select Device ID 4 Under Device ID enter the DVR s Device ID Press PTZ on the front panel to find the Device ID 5 Un...

Page 76: ...nd the Device ID 7 Under User Name enter the DVR s user name default admin 8 Under Password enter the DVR s password default 000000 9 Under Client Port enter the DVR s Client Port default 9000 10 Clic...

Page 77: ...back View saved video footage Remote Setting Configure system and networking options Local setting Configure where local files are stored on your hard drive Logout Exits remote viewing 2 Active Channe...

Page 78: ...n Status Shows the type of connection used P2P peer to peer indicatesthat thevideoisstreamingdirectlyfromtheDVRto the computer running the Client Software RLY relay indicates that the video is streami...

Page 79: ...e window Click Preview to view the image or Folder to show the image in the save folder Recording Video You can record video footage directly onto your local hard drive Once the video is in your hard...

Page 80: ...the cameras that display in the main viewing window To show or hide video in the main video window 1 Click beside the channel number to show a channel Click again to hide the channel Viewing the Bit...

Page 81: ...ed Video PC Only You can change the format of recorded video saved using Remote Surveillance This allows you to directly backup footage from your DVR as an avi file This does not affect the format of...

Page 82: ...onnected to 2 Use the PTZ control panel to control the pan tilt zoom focus and iris control of the camera Direction keys Click to pan and tilt the camera Speed Slider Increase or decrease the pan and...

Page 83: ...esired month year and date 3 Under the Type drop down menu select the desired recording type you wish to search for Continuous Alarm or All 4 Select the channels you wish to search Check Synchronous p...

Page 84: ...ard button to advance the video by 1 frame Video Slider Drag the slider to control the playback speed Download Content Allows you to download recorded videos to your computer hard drive To download vi...

Page 85: ...ow or hide the record time on the remote display 3 Click Save to apply your settings Configuring Privacy Zone Settings You can blank out a certain portion of the channel with a black box To configure...

Page 86: ...e if you select 15 minutes then every file will contain 15 minutes of footage Pre record Select whether to enable or disable pre recording 3 Click Save to apply your settings Configuring the Recording...

Page 87: ...Configuring System Recording Quality 1 Click the Remote Setting tab and click Record MainStream 2 Under Resolution Mode select D1 or 960H If you change the Resolution Mode setting the system will res...

Page 88: ...s Subnet Mask Gateway and DNS settings AutoPortForwarding Select EnableorDisabletoenableordisabletheAutoPortForwarding feature 3 Click Save to apply your settings Configuring the System Substream You...

Page 89: ...down menu select Default to use the default Lorex email server recommended or select Custom to use your own custom SMTP email server If you want to use Lorex s email server recommended 1 In the Sende...

Page 90: ...ails The primary connectivity option uses the Lorex Stratus service to connect to your system over the Internet without requiring port forwarding or DDNS registration For details See Connecting to You...

Page 91: ...ct to enable system recording when motion is detected Post Recording Select the post recording time after a motion event occurs Record Channel Select the channels that should record during a motion ev...

Page 92: ...Click the Remote Setting tab and click Alarm Alarm 2 Configure the following Alarm In Select the channel that you wish to configure Alarm Type Select the alarm type N O normally open N C normally clo...

Page 93: ...drive is full You can also select a desired amount of days or hours the system should retain data For example if you select 30 days the hard drive will begin to overwrite itself after 30 days Note tha...

Page 94: ...camera Parity Select the parity settings of the PTZ camera Cruise Select Enable or Disable Address Select the address of the PTZ camera Consult the PTZ camera s instruction manual for protocol and con...

Page 95: ...eout drop down menu select the duration the menu stays on screen before disappearing 3 Click Save to apply your changes Configuring System User Accounts You can add user accounts on the system To conf...

Page 96: ...ick the Remote Setting tab and click System Info Configuring Firmware Upgrades Firmware upgrades can provide improved functionality to your DVR When firmware upgrades become available you will automat...

Page 97: ...or updates The system will check for firmware upgrades every hour NOTE Click Detect to check for firmware updates manually 4 Click Save to save changes Manually Upgrading System Firmware To manually u...

Page 98: ...menus that you wish to restore to factory defaults 3 Click Save to restore system defaults for the selected items Configuring Event Settings The Event Settings tab allows you to configure how the sys...

Page 99: ...alarm out panel Latch Time Configure the system latch time after an event occurs 3 Click Save to save changes Configuring Auto Reboot Auto reboot allows the system to restart automatically at a set t...

Page 100: ...d up for the iPad screen Prerequisites iOS version 5 0 and above An iTunes account requires valid credit card number Your credit card will not be billed when downloading the Lorex Mobile Eco App Conne...

Page 101: ...ice ID printed on the label 7 Under Client Port enter the DVR s Client Port default 9000 8 Under User Name enter the DVR s User Name default admin 9 Under Password enter the DVR s Password default 000...

Page 102: ...ting you will be prompted to change the DVR password Tap OK 15 Enter the new password and tap Done This password will be used to connect to your system from now on 16 Tap in one of the display areas a...

Page 103: ...To view screenshots see Viewing Manual Recordings on page 90 Taking Manual Recordings 1 Tap during live view or playback If taking manual recordings from live view tap the grid area you would like to...

Page 104: ...page 106 To use PTZ Controls 1 Tap the channel with your PTZ camera 2 Tap to open PTZ controls 3 Double tap the channel to select it in full screen Use the PTZ controls Using Remote Playback Mode on...

Page 105: ...layback controls Viewing Screenshots You can view screenshots or email them using the app NOTE To email screenshots you must have an email account configured in the Email app Lorex does not support th...

Page 106: ...back 2 Tap the DVR you would like to view manual recordings from 3 Tap the recording file you would like to view 4 Use the on screen controls Tap the screenshot you would like to view Swipe left or ri...

Page 107: ...your DVR s To delete a DVR 1 From the Main Menu tap Device Manager 2 Swipe to the right on the DVR you would like to delete and tap Delete 3 Tap Delete to confirm To modify a DVR 1 From the Main Menu...

Page 108: ...e version You must have the latest DVR firmware and mobile apps to connect to the DVR over the Internet NOTE For the latest device compatibility list visit www lorextechnology com Connecting to Your S...

Page 109: ...name default admin 9 Under Password enter the system password By default the password is 000000 10 Tap Press to get channel number 11 Tap Save Then tap Back 12 Tap Live Monitor 13 Tap inside one of th...

Page 110: ...Tap Confirm 15 Enter the new password and tap Save This password will be used to connect to your system from now on 16 Tap inside one of the display areas and then tap Select Repeat for any additional...

Page 111: ...ect the grid area you would like to take a screenshot from or tap to take a screenshot from all connected cameras 2 To view screenshots see Viewing Screenshots on page 89 Tapachanneltoselect Double ta...

Page 112: ...89 Using PTZ Controls If you have a PTZ camera not included connected you may control it using the app NOTE You must configure the system to communicate with the PTZ camera locally before you can cont...

Page 113: ...mote Playback 2 Tap Select Channel Select the channel you would like to playback from NOTE If you receive the message No video found close the app and restart it 3 The calendar shows any days that hav...

Page 114: ...re the apps used for sharing Lorex does not support 3rd party applications To view screenshots 1 From the Main Menu tap Image Manager 2 Select the DVR with screenshots you would like to view 3 Tap the...

Page 115: ...file Viewing Manual Recordings You can view manual recordings using the app To view manual recordings 1 From the Main Menu tap Record Playback 2 Tap the DVR you would like to view manual recordings fr...

Page 116: ...te or modify your DVR s To delete a DVR 1 From the Main Menu tap Device Manager 2 Press and hold on the DVR you would like to delete and then tap Delete To modify a DVR 1 From the Main Menu tap Device...

Page 117: ...our local hard drive Installing Lorex Player 11 1 Insert the software CD that comes included with the system OR download Video Player for PC from www lorextechnology com under the page for your DVR mo...

Page 118: ...ptures are stored To open the Advanced Config menu 1 Click the button 2 Click Select to change the snapshot save folder Then select the folder and click OK 3 Click OK to save changes Click here to ope...

Page 119: ...ate to the product page for your DVR model and download Video Player for MAC 3 Extract the file and double click the Lorex Mac Player installer pkg file Follow the on screen instructions to install th...

Page 120: ...ur Home folder dvr 3 Double click the video file in the playlist to begin playback Loading Multiple Video Files You can load an entire folder of video files To load multiple video files saved onto you...

Page 121: ...A System Specifications As our products are subject to continuous improvement Lorex Technology Inc and its subsidiaries reserve the right to modify product design specifications and prices without not...

Page 122: ...ide of the RS485 port on the rear panel 3 Connect the video cable to a BNC port Configuring PTZ Settings Before you can use the PTZ controls you must enter your camera s PTZ protocol details into the...

Page 123: ...opy the PTZ settings to multiple channels 4 Click Apply to save your settings Using the PTZ Menu Local DVR To control the PTZ camera locally on your DVR 1 Select the channel that the PTZ camera is con...

Page 124: ...ets as needed Press Save when you are finished to save all created presets Selecting PTZ Presets 1 In the No field select the number of the preset you would like to select 2 Click Go to to go to the p...

Page 125: ...he Video Output port Customizing the Channel Arrangement on the External Monitor You can use the steps below to create a custom split screen display on a secondary monitor connected to the Video Out p...

Page 126: ...w Mode select the desired viewing mode Single Quad Nine or Sixteen 7 Click Vout Setup A menu appears that allows you to select the arrangement of channels 8 Click the drop down menus to select which c...

Page 127: ...els or any Video Input port 8 channel For example connect the camera to Video INPUT port 1 2 Connect the RCA audio cable from the camera to the corresponding Audio INPUT Following the example in step...

Page 128: ...hard drives which are designed to be reliable over long periods of time while recording 24 7 Security certified hard drives are available at www lorextechnology com Removing the Hard Drive The steps...

Page 129: ...eep holding the hard drive and turn the DVR back over Remove the hard drive from the DVR 5 Replace the side and cover panel screws 16 Channel 1 Remove the screws from each side panel x2 and rear panel...

Page 130: ...the bracket Replace the hard drive bracket and hard drive bracket screws If your system has a 2 5 hard drive turn the DVR over carefully Hold the hard drive in place and remove the 4 screws securing...

Page 131: ...power and data connectors facing left if looking at the DVR from the front and slide the hard drive into place Tighten the hard drive screws to secure the hard drive in place If installing a 2 5 hard...

Page 132: ...If installing a 3 5 hard drive remove the 4 screws holding the hard drive bracket and remove the bracket from the DVR Place the hard drive in the bracket and insert 4 screws to secure the hard drive t...

Page 133: ...and carefully turn the DVR over Insert 4 hard drive screws to secure the hard drive Turn the DVR back over 4 Connect the power and data cables 5 Replace the DVR cover Remove the hard drive screws Make...

Page 134: ...under Select to choose the drive you wish to reformat 4 Click Format HDD 5 When the warning window appears click OK Wait for the system to format the hard drive NOTE You will notice that the size of t...

Page 135: ...plorer through the local area network LAN It is recommended to confirm connectivity over a local network before setting up your DVR for DDNS connectivity NOTE To complete the steps below your computer...

Page 136: ...numbers appear as three digits For example 005 is the same as 5 Step 3 of 3 Connect to the DVR s Local IP Address Follow the steps below to confirm connectivity over a local network on a PC or Mac To...

Page 137: ...s Client Port default 9000 8 Click Login Ifthisisthefirsttimeconnectingtoyoursystem youwillbepromptedtochangethepassword Enter the new password and click OK To connect using the DVR s local IP address...

Page 138: ...and click Login to connect to the DVR DDNS Setup Access your DVR Remotely over the Internet Setting up DDNS connectivity allows you to view your DVR from any computer or compatible mobile device with...

Page 139: ...orward the required ports on your router to your DVR s IP address by following your router manufacturer s instructions For more information on port forwarding see the reference guides on www lorextech...

Page 140: ...te a new account fill in the required fields on the right and click Create Account 3 Click Warranties to register your product for warranty NOTE Warranty registration is required to register for DDNS...

Page 141: ...d click Create Address 6 Fill in the warranty registration form with your product and purchase details Check the sticker underneath your DVR for the Product Model Number and Serial Number Click Save W...

Page 142: ...ice This is used to identify this device in your list of activated DDNS accounts that appears anytime you visit the DDNS page MAC Address Enter the MAC address of your Lorex product Press the PTZ butt...

Page 143: ...DVR 1 Right click to open the Menu Bar and click the Main Menu button Enter the system password if prompted 2 Click Network and select the DDNS tab 3 In the DDNS drop down menu select Enable 4 Beside...

Page 144: ...esktop The DVR login screen appears 3 Under Login Type select IP Login 4 Under IP Address enter the DVR s DDNS Address e g tomsmith lorexddns net 5 Under User Name enter the DVR s user name default ad...

Page 145: ...lowed by lorexddns net e g tomsmith lorexddns net 6 Under User Name enter the DVR s user name default admin 7 Under Password enter the DVR s password default 000000 8 Under Client Port enter the DVR s...

Page 146: ...r bar or surge protector try bypassing the bar and connecting the power directly to the wall outlet Confirm that there is power at the outlet Connect the power cable to another outlet Test the outlet...

Page 147: ...panel There is no picture on selected channels camera picture is not being displayed Camera cables are loose or have become disconnected Check the camera video cable and connections Disconnect and re...

Page 148: ...R16 EXPAND AND CUSTOMIZE YOUR SYSTEM WITH A FULL RANGE OF CAMERAS ACCESSORIES Accessories www lorextechnology com Specialty Cameras Wireless Cameras Dome Cameras Digital Video Recorders Simulated Came...

Reviews: