18
Bioscience Solutions
– 4D-Nucleofector™ Manual
2.10 4D-Nucleofector™ Y Unit
2.10.1
Defining a New Experiment
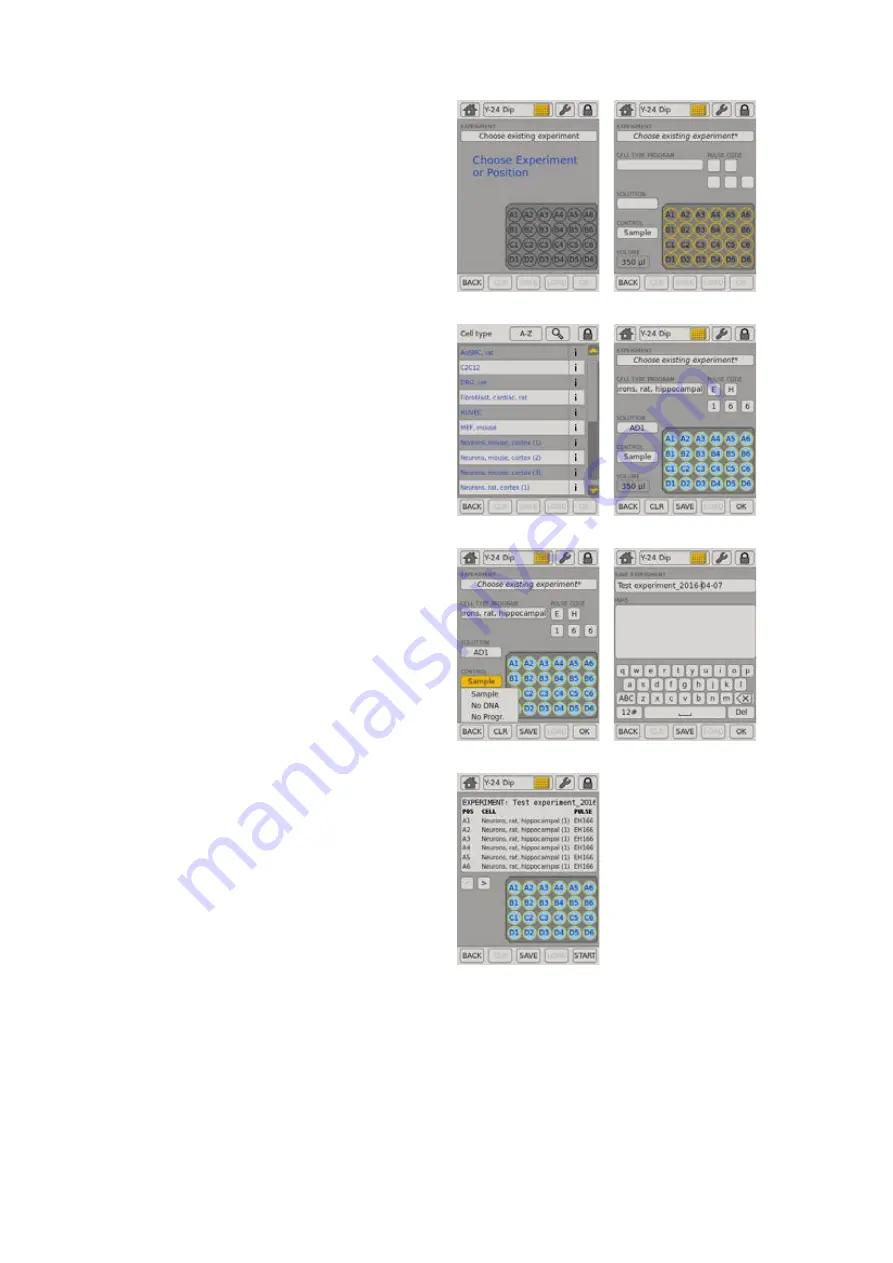
1. After unit selection (see chapter 2.8.2) a screen appears that allows
you to define a new experiment or select a previously saved experiment
by pressing “Choose existing experiment” (figure 2.16, A).
2. When defining a new experiment, by tapping on a position you can
select one or multiple samples/wells (e.g. A1 and A2) that should
be defined with the same parameters. The selected positions are
highlighted with an orange frame (figure 2.16, B).
NOTE:
You can select a whole column by double clicking on the top or
bottom well. Wells can be de-selected by tapping on the position
again. The orange frame will disappear.
3. Upon well selection the fields “CELL TYPE PROGRAM”, “CUSTOM
PROGRAM”, “PULSE CODE”, “SOLUTION” and “CONTROL” will be activated
(2). For further explanation about parameters, please refer to chapter
2.8.3.
4. Press the field “CELL TYPE PROGRAM” to choose predefined
Nucleofection conditions from a cell type list (figure 2.16, C). Use the
search (magnifying glass symbol) or the sort list functions (A-Z) to
find conditions more quickly.
a. Select the desired cell type code by tapping on the appropriate
line of the cell list. The cell type selected will be highlighted. For
additional information about the cell type selected press “i”.
b. To confirm your selection press “OK”.
c. If required, modify pulse code by pressing the letter or number
code fields. A keyboard will appear, enabling you to change
settings. The solution code can be modified via a selection list.
NOTE:
Instead of defining solution and program code via the CELL TYPE
PROGRAM, both parameters can also be selected manually, e.g.
in case no predefined cell type program is available. For adding
new cell type programs, please refer to chapter 2.12.3.
5. Define control options for the selected well by choosing
(figure 2.16, E)
6. Optional: At this stage (or at step 8) you can save your defined
experiment for future use by pressing the “SAVE” button. A keyboard
will appear allowing you to define a name (max. length: 26 characters).
You may enter further information about your experiment by touching
the “Info” field and typing in your text (figure 2.16, F).
7. Confirm and save the experiment parameters by pressing “OK” (saves
the experiment and opens the drawer) or “SAVE” (saves the experiment
for later use).
8. A summary of the defined settings will be displayed (figure 2.16, G).
Please check for correctness before loading samples (see chapter
2.10.2) and starting the experiments by pressing “START” (see chapter
2.10.3).
A
B
C
D
E
F
G
Figure 2.16:
Experiment definition (Y Unit)


