background image

Loftek CXS 2200 User Manual

9

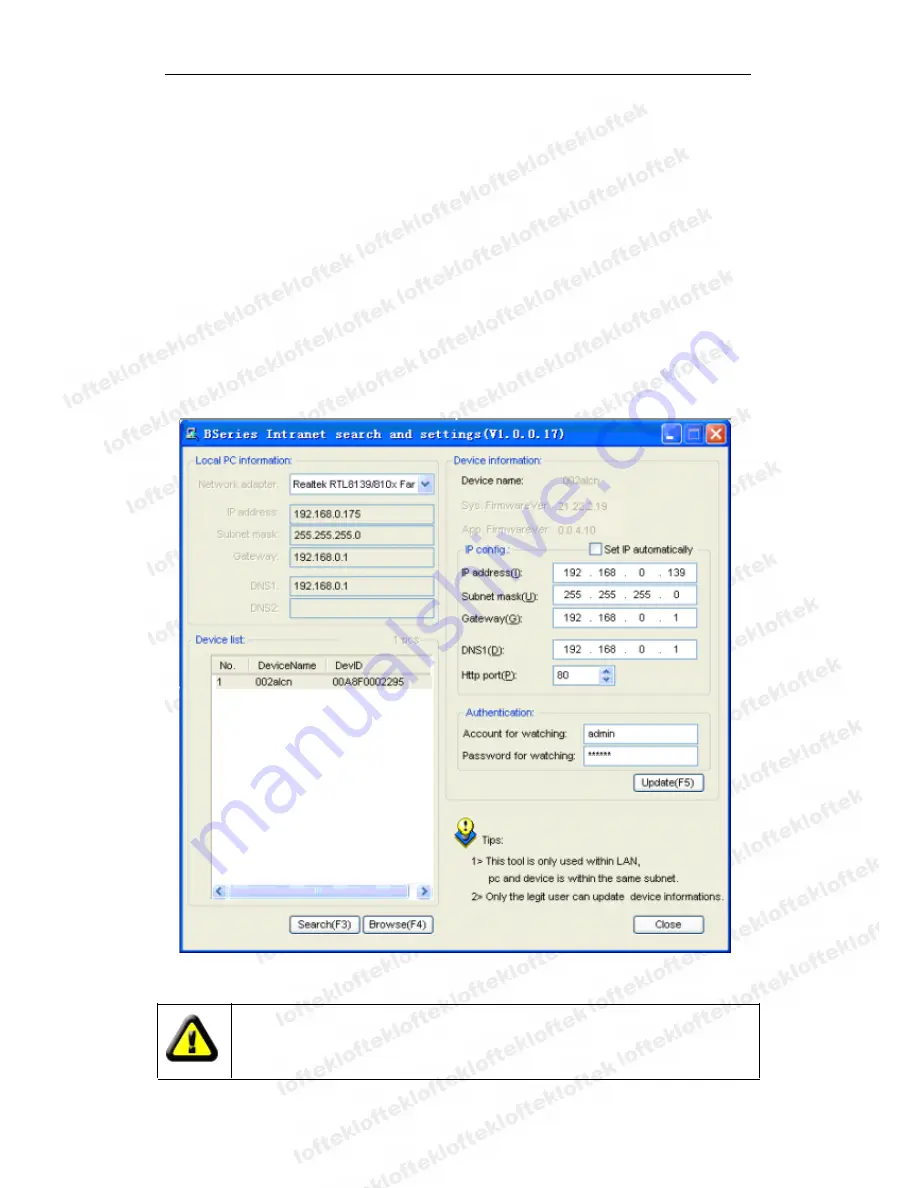
2) Change the content of “IP config” on the right to make sure the content is the same

as “Local PC information”. Only the last section of the IP address needs manual

setting. Usually it is set at 139 as in Figure 6.

3)

3)

3)

3) If

If

If

If you

you

you

you don

don

don

don’’’’tttt know

know

know

know how

how

how

how to

to

to

to fill

fill

fill

fill out

out

out

out the

the

the

the content

content

content

content of

of

of

of “

““

“IP

IP

IP

IP config

config

config

config”

””

”,,,, you

you

you

you can

can

can

can also

also

also

also select

select

select

select

““

“Set

Set

Set

Set IP

IP

IP

IP automatically

automatically

automatically

automatically”

””

” to

to

to

to obtain

obtain

obtain

obtain the

the

the

the IP

IP

IP

IP address

address

address

address from

from

from

from the

the

the

the router

router

router

router automatically.

automatically.

automatically.

automatically.

4) Input the user name and password into “Authentication” (

By

By

By

By default,

default,

default,

default, the

the

the

the user

user

user

user name

name

name

name

is:

is:

is:

is: admin,

admin,

admin,

admin, password:

password:

password:

password: 123456

123456

123456

123456

). Click “Update”. The settings will take effect. Select

the device in the list box and click the “Browse” button. It will open the browser

automatically and a pop up a window for entering the user name and password. After

logging in, click “English” on the right-top corner, as shown in Figure 7.

Figure 6

If you have a firewall installed on your computer, when HSearch_en.exe is run,

a pop up window may open asking whether to block this program or not. You

should choose not to block to allow for proper operation of the program.

Summary of Contents for CXS 2200

Page 1: ...Series Series Series IP IP IP IP IP IP IP IP Camera Camera Camera Camera Camera Camera Camera Camera CXS CXS CXS CXS CXS CXS CXS CXS 2200 2200 2200 2200 2200 2200 2200 2200 2011 2 2011 2 2011 2 2011...

Page 2: ...AMERA CAMERA CAMERA THROUGH THROUGH THROUGH THROUGH A A A A LAN LAN LAN LAN 8 8 8 8 5 1 IP ADDRESS SETUP 8 5 2 ACCESSING THE CAMERA 10 6 6 6 6 VIEWING VIEWING VIEWING VIEWING THE THE THE THE CAMERA CA...

Page 3: ...ion 22 7 4 2 Time Settings 22 7 4 3 Firmware upgrade 22 7 4 4 Restore Factory Default 23 7 4 5 User Browsing Log 23 8 8 8 8 CENTRALIZED CENTRALIZED CENTRALIZED CENTRALIZED CONTROL CONTROL CONTROL CONT...

Page 4: ...rnet Cable 2 2 2 2 Features Features Features Features and and and and Functions Functions Functions Functions Three video resolutions VGA QVGA QQVGA User can change parameters according to their dema...

Page 5: ...ttom of the unit for ease of installation and configuration All required software included 3 3 3 3 Appearance Appearance Appearance Appearance and and and and interface interface interface interface 3...

Page 6: ...me username is is is is admin admin admin admin password password password password is is is is 123456 123456 123456 123456 3 3 3 3 WIFI WIFI WIFI WIFI Antenna Antenna Antenna Antenna socket socket so...

Page 7: ...n Button Button The reset button is on the bottom of the device To operate press and hold the reset button for 10 seconds The camera will restart and be restored to the factory default settings 4 4 4...

Page 8: ...tch the segment of PC 1 2 The The The The PC PC PC PC and and and and IP IP IP IP Camera Camera Camera Camera are are are are in in in in different different different different LANs LANs LANs LANs bu...

Page 9: ...dress address address address from from from from the the the the router router router router automatically automatically automatically automatically 4 Input the user name and password into Authentica...

Page 10: ...sing Accessing the the the the Camera Camera Camera Camera We suggest using the IE kernel browser to view the video as it allows for full use of the functions The user should install the player before...

Page 11: ...switch between full screen and original size Right double click in the video display area to display Pan tilt controls 3 3 3 3 Status Status Status Status Display Display Display Display Area Area Ar...

Page 12: ...1 can access IP Camera 1 In Figure 5 before the computers in WAN PC 2 PC 3 can access the IP Camera 1 the camera must be configured through a WAN Enabling port forwarding on Router 1 will allow IP Ca...

Page 13: ...amic IP address If the device can t be accessed by IP address this domain name is also unavailable 6 2 1 6 2 1 6 2 1 6 2 1 Manufacturer Manufacturer Manufacturer Manufacturer s s s s DDNS DDNS DDNS DD...

Page 14: ...work Network Network Settings Settings Settings Settings 7 1 1 7 1 1 7 1 1 7 1 1 Basic Basic Basic Basic Network Network Network Network Settings Settings Settings Settings The user can enter the basi...

Page 15: ...d to the Internet without the need for port forwarding Figure 15 7 1 4 7 1 4 7 1 4 7 1 4 UPnP UPnP UPnP UPnP Settings Settings Settings Settings UPNP stands for universal plug and play With UPNP enabl...

Page 16: ...ttings Settings Settings Settings 1 1 1 1 Alarm Alarm Alarm Alarm Detection Detection Detection Detection Motion detection can monitor a certain area if any movement occurs in the selected area the al...

Page 17: ...ng Setting Setting The device will send a notification email to the specified email address Figure 19 is a mail setting page for your reference After the initial configuration click save and test to s...

Page 18: ...3 FTP FTP FTP FTP Service Service Service Service Setting Setting Setting Setting Figure 20 When the alarm is activated the camera will capture still shots and send the images to an FTP server Figure...

Page 19: ...h as SMS MMS alarm and mobile phone paging etc 7 3 7 3 7 3 7 3 Advanced Advanced Advanced Advanced 7 3 1 7 3 1 7 3 1 7 3 1 User User User User Settings Settings Settings Settings The three levels of a...

Page 20: ...Loftek CXS 2200 User Manual 20 Figure 23 Figure 24...

Page 21: ...vice info into the popup setting dialogue box as shown in figure 26 and click save Click submit to finalize the settings Figure 26 7 3 3 7 3 3 7 3 3 7 3 3 Other Other Other Other Settings Settings Set...

Page 22: ...Time Time Time Time Settings Settings Settings Settings If the device is connected to the Internet users can enable the NTP server to correct the time and select the time zone The camera can also be s...

Page 23: ...x will open to confirm the selection After confirmation the system will be restored to the original factory defaults and rebooted 7 4 5 7 4 5 7 4 5 7 4 5 User User User User Browsing Browsing Browsing...

Page 24: ...Fixed Iris Pan Tilt Pan Coverage 270 Tilt Coverage 120 IR Illumination Lighting Control 10pcs 850nm Infrared LEDs 5m range Lighting Auto control Video and Audio Resolution 640 480 VGA 320 240 QVGA 16...

Page 25: ...he typical bandwidth use is listed below 640x480 10fps 4 0 Megabits 5 0 Megabits 320x240 30fps 1 2 Megabits 1 6 Megabits 3 3 3 3 Dark Dark Dark Dark colors colors colors colors appear appear appear ap...

Page 26: ...amera camera camera camera via via via via a a a a public public public public IP IP IP IP address address address address but but but but can can can can t t t t connect connect connect connect via v...

Reviews: