background image

Loftek CXS 2200 User Manual

12

Start video, stop, monitor, talk, record and snapshot controls.

Click the button to activate the desired function.

5

5

5

5

PTZ

PTZ

PTZ

PTZ and

and

and

and video

video

video

video control

control

control

control

In the Pan/Tilt control area, the user can control the movement according to the arrow

indicators: up, down, left, right, center, horizontal cruise, vertical cruise, and stop.

Open / Close IO output

The user can adjust the device resolution, brightness, contrast and other parameters.

6

6

6

6 Viewing

Viewing

Viewing

Viewing the

the

the

the Camera

Camera

Camera

Camera Through

Through

Through

Through a

a

a

a WAN

WAN

WAN

WAN

6.1

6.1

6.1

6.1 Port

Port

Port

Port forwarding

forwarding

forwarding

forwarding

First, set up the camera as described in section 5 and ensure that PC-1 can access IP

Camera-1. In Figure 5, before the computers in WAN (PC-2, PC-3) can access the IP

Camera-1, the camera must be configured through a WAN. Enabling port forwarding on

Router-1 will allow IP Camera-1 to be accessed through a WAN.

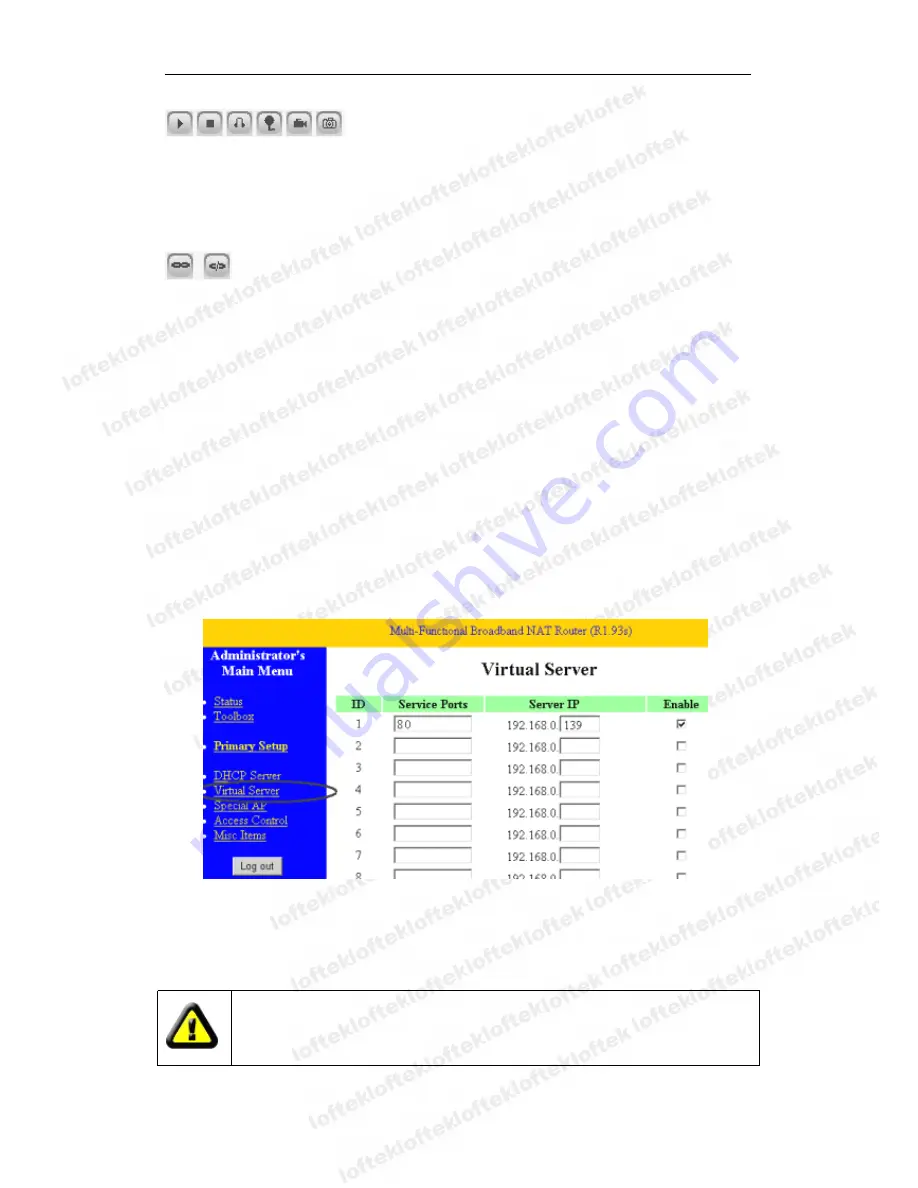
Open the Router Setting interface on PC-1. Note that the interfaces and port forwarding

settings for different routers may vary; please refer your router’s manual. For most

routers, the “Virtual server” option can be found in the setting interface. Fill the IP

address and port of IP Camera-1 into the corresponding space. Figure 10 is an example.

Figure 10

Select the “status” option and note the WAN IP address. Enter the IP address in the

browser of PC-1. If IP Camera-1 can be accessed via PC-1, the port forwarding was

successful. Note that PC-2 and PC-3 can now also access IP Camera-1.

The WAN IP address is allocated by your ISP; please make sure to enter the

exact WAN IP address. If PC-2 and PC-3 aren’t in the same WAN area,

accessing IP Camera-1 will be forbidden.

Summary of Contents for CXS 2200

Page 1: ...Series Series Series IP IP IP IP IP IP IP IP Camera Camera Camera Camera Camera Camera Camera Camera CXS CXS CXS CXS CXS CXS CXS CXS 2200 2200 2200 2200 2200 2200 2200 2200 2011 2 2011 2 2011 2 2011...

Page 2: ...AMERA CAMERA CAMERA THROUGH THROUGH THROUGH THROUGH A A A A LAN LAN LAN LAN 8 8 8 8 5 1 IP ADDRESS SETUP 8 5 2 ACCESSING THE CAMERA 10 6 6 6 6 VIEWING VIEWING VIEWING VIEWING THE THE THE THE CAMERA CA...

Page 3: ...ion 22 7 4 2 Time Settings 22 7 4 3 Firmware upgrade 22 7 4 4 Restore Factory Default 23 7 4 5 User Browsing Log 23 8 8 8 8 CENTRALIZED CENTRALIZED CENTRALIZED CENTRALIZED CONTROL CONTROL CONTROL CONT...

Page 4: ...rnet Cable 2 2 2 2 Features Features Features Features and and and and Functions Functions Functions Functions Three video resolutions VGA QVGA QQVGA User can change parameters according to their dema...

Page 5: ...ttom of the unit for ease of installation and configuration All required software included 3 3 3 3 Appearance Appearance Appearance Appearance and and and and interface interface interface interface 3...

Page 6: ...me username is is is is admin admin admin admin password password password password is is is is 123456 123456 123456 123456 3 3 3 3 WIFI WIFI WIFI WIFI Antenna Antenna Antenna Antenna socket socket so...

Page 7: ...n Button Button The reset button is on the bottom of the device To operate press and hold the reset button for 10 seconds The camera will restart and be restored to the factory default settings 4 4 4...

Page 8: ...tch the segment of PC 1 2 The The The The PC PC PC PC and and and and IP IP IP IP Camera Camera Camera Camera are are are are in in in in different different different different LANs LANs LANs LANs bu...

Page 9: ...dress address address address from from from from the the the the router router router router automatically automatically automatically automatically 4 Input the user name and password into Authentica...

Page 10: ...sing Accessing the the the the Camera Camera Camera Camera We suggest using the IE kernel browser to view the video as it allows for full use of the functions The user should install the player before...

Page 11: ...switch between full screen and original size Right double click in the video display area to display Pan tilt controls 3 3 3 3 Status Status Status Status Display Display Display Display Area Area Ar...

Page 12: ...1 can access IP Camera 1 In Figure 5 before the computers in WAN PC 2 PC 3 can access the IP Camera 1 the camera must be configured through a WAN Enabling port forwarding on Router 1 will allow IP Ca...

Page 13: ...amic IP address If the device can t be accessed by IP address this domain name is also unavailable 6 2 1 6 2 1 6 2 1 6 2 1 Manufacturer Manufacturer Manufacturer Manufacturer s s s s DDNS DDNS DDNS DD...

Page 14: ...work Network Network Settings Settings Settings Settings 7 1 1 7 1 1 7 1 1 7 1 1 Basic Basic Basic Basic Network Network Network Network Settings Settings Settings Settings The user can enter the basi...

Page 15: ...d to the Internet without the need for port forwarding Figure 15 7 1 4 7 1 4 7 1 4 7 1 4 UPnP UPnP UPnP UPnP Settings Settings Settings Settings UPNP stands for universal plug and play With UPNP enabl...

Page 16: ...ttings Settings Settings Settings 1 1 1 1 Alarm Alarm Alarm Alarm Detection Detection Detection Detection Motion detection can monitor a certain area if any movement occurs in the selected area the al...

Page 17: ...ng Setting Setting The device will send a notification email to the specified email address Figure 19 is a mail setting page for your reference After the initial configuration click save and test to s...

Page 18: ...3 FTP FTP FTP FTP Service Service Service Service Setting Setting Setting Setting Figure 20 When the alarm is activated the camera will capture still shots and send the images to an FTP server Figure...

Page 19: ...h as SMS MMS alarm and mobile phone paging etc 7 3 7 3 7 3 7 3 Advanced Advanced Advanced Advanced 7 3 1 7 3 1 7 3 1 7 3 1 User User User User Settings Settings Settings Settings The three levels of a...

Page 20: ...Loftek CXS 2200 User Manual 20 Figure 23 Figure 24...

Page 21: ...vice info into the popup setting dialogue box as shown in figure 26 and click save Click submit to finalize the settings Figure 26 7 3 3 7 3 3 7 3 3 7 3 3 Other Other Other Other Settings Settings Set...

Page 22: ...Time Time Time Time Settings Settings Settings Settings If the device is connected to the Internet users can enable the NTP server to correct the time and select the time zone The camera can also be s...

Page 23: ...x will open to confirm the selection After confirmation the system will be restored to the original factory defaults and rebooted 7 4 5 7 4 5 7 4 5 7 4 5 User User User User Browsing Browsing Browsing...

Page 24: ...Fixed Iris Pan Tilt Pan Coverage 270 Tilt Coverage 120 IR Illumination Lighting Control 10pcs 850nm Infrared LEDs 5m range Lighting Auto control Video and Audio Resolution 640 480 VGA 320 240 QVGA 16...

Page 25: ...he typical bandwidth use is listed below 640x480 10fps 4 0 Megabits 5 0 Megabits 320x240 30fps 1 2 Megabits 1 6 Megabits 3 3 3 3 Dark Dark Dark Dark colors colors colors colors appear appear appear ap...

Page 26: ...amera camera camera camera via via via via a a a a public public public public IP IP IP IP address address address address but but but but can can can can t t t t connect connect connect connect via v...

Reviews: