background image

4

Maintenance and service

Liquiflo FTS Transfer Pump User Manual
Series No. FTS400

47

1.

Ensure that all springs, wiper blades, and wear plates are properly installed on each rotating assembly before 
installation.

2.

Grease the narrow ends of the shafts with Mobilgrease

XHP™ 222.  This is to ensure the shaft seals in the center 

plate do not hang up on the corners of each step on the shafts.

3.

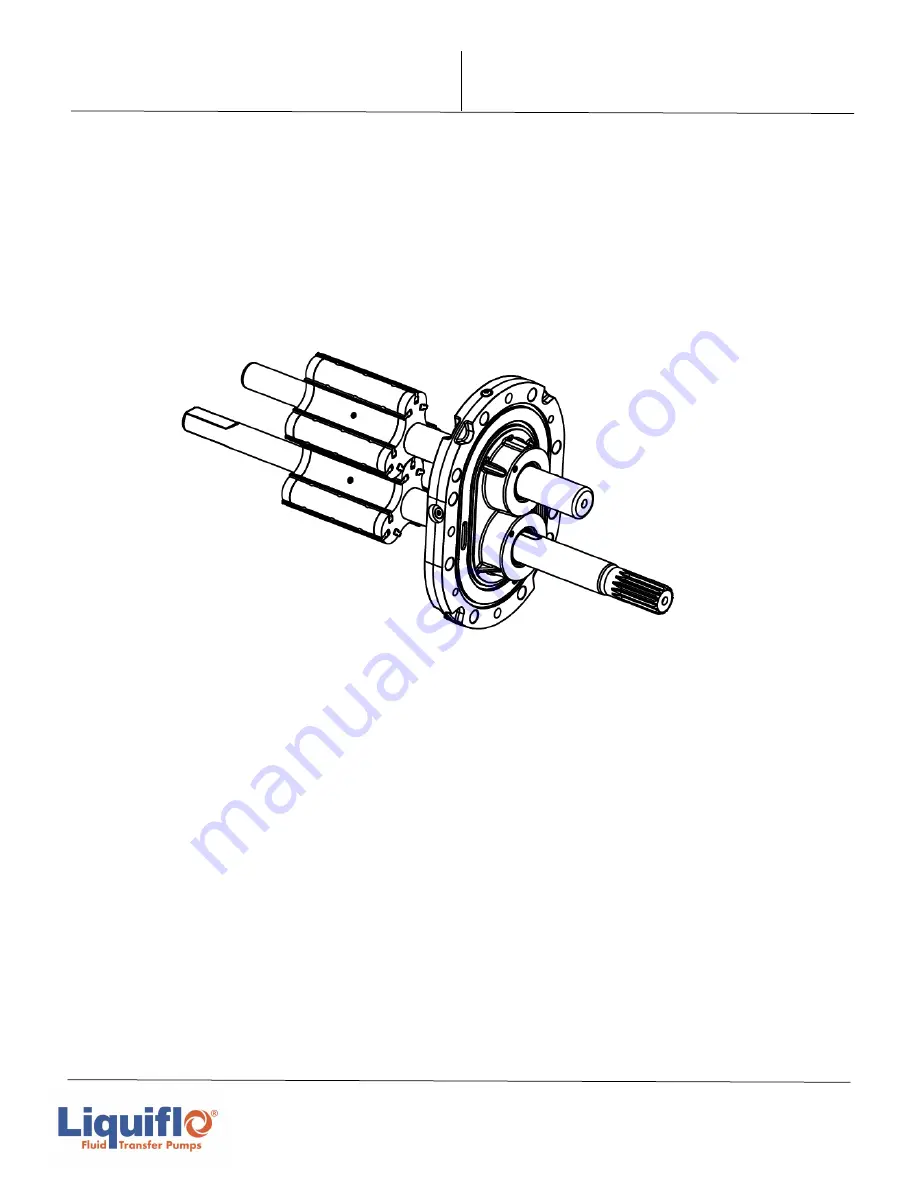
Align the bearing holes of the center plate with the drive shafts and carefully lower the center plate over the shafts 
until it contacts the pump lobe wear plates, 1. When pushing the center plate over the drive shafts, apply even and 
steady pressure to ensure you do not damage the shaft seals during installation.

Installing the rotating assemblies

Figure 1

Summary of Contents for FTS400 Series

Page 1: ...Liquiflo FTS Transfer Pump Series No FTS400 Safety Installation Operation and Maintenance Instructions Manual FT00504 Series No FTS400 Rev No 3...

Page 2: ...lades 25 Removing pump housing from volute housing 26 Removing inlet cover and impeller 27 Transfer pump reassembly 28 Center plate disassembly seal replacement and reassembly 28 Replacing center plat...

Page 3: ...ndards and follow the information concerning the product in the current product catalog and in any other materials provided from Liquiflo or its subsidiaries or authorized distributors To the extent t...

Page 4: ...Liquiflo FTS Transfer Pump User Manual Series No FTS400 4 1 Safety Instructions...

Page 5: ...er Pump weighs approximately 230 pounds It can be lifted from its packaging using the lifting points depicted in Figure 1 Once the pump has been lowered to its intended location remove the protective...

Page 6: ...ection 1 is considered the forward direction in which the Transfer Pump has the highest performance whereas the secondary flow Direction 2 is considered the reverse direction It is important to mount...

Page 7: ...sfer Pump Do not draw piping into alignment with the flanges with excessive force this will put unsafe strain on the Transfer Pump Do not allow flanges to support the weight of the piping ensure that...

Page 8: ...rsonnel is responsible for calculating the appropriate pipe diameter for the required pipe length system height pumping fluid and flow requirements See Pump Data Package for information on the Transfe...

Page 9: ...s No FTS400 9 Suction piping considerations To facilitate pump removal for service in rigid piped systems a 12 inch spool piece is recommended at the pump suction connection Removal of the spool piece...

Page 10: ...ions If it is desired to be able to run the pump in both directions the circuit design should include this option If using a hydraulic motor pump rotation should be initiated and then pump speed rampe...

Page 11: ...tandards This helps prevent dangerous electrical hazards Are all covers in place This includes the junction box covers and any other safety guards required for your application This helps prevent dang...

Page 12: ...n be run dry so there is no danger of damaging it if the pump is used to clear the lines 2 Safely isolate the fluid media source once the suction and discharge lines are purged 3 DO NOT CLOSE ANY DISC...

Page 13: ...4 Maintenance and service Liquiflo FTS Transfer Pump User Manual Series No FTS400 13 Parts description Mechanical seal configuration...

Page 14: ...4 Maintenance and service Liquiflo FTS Transfer Pump User Manual Series No FTS400 14 Parts description...

Page 15: ...ng Chamber Check Valve Ball 9 4 Needle Bearing ID 1 375 41 1 Cooling Chamber Check Valve Spring 10 6 Shaft Seal Center Plate 42 2 Grease fitting 11 1 Center Plate O ring Inner 43 4 Sealing screw 12 3...

Page 16: ...Thrust Washer Mounting Screw 39 1 Pump Chamber Elbow O Ring 40 1 Cooling Chamber Check Valve Ball 41 1 Cooling Chamber Check Valve Spring 42 2 Grease fitting 43 4 Sealing screw 44 1 Accessory flange...

Page 17: ...identification of the appropriate Threadlocker in each step Because many of the fasteners will have thread locker on them once they are removed be sure to clean the threads of any fastener before app...

Page 18: ...ps from the factory with lifetime oil so there are no scheduled oil changes needed However drainage of the gear oil is required for disassembly for service It is recommended that the gear oil be repla...

Page 19: ...ket head cap screw fasteners that attach the gear chamber and center plate to the pump housing Figure 1 2 Carefully pull the gear chamber sub assembly to remove it from the pump chamber Figure 2 3 If...

Page 20: ...nd center plate Figure 1 2 Carefully pull the center plate vertically along the two drive shafts to remove it from the gear chamber Figure 2 If the center plate sticks to the gear chamber find the pry...

Page 21: ...rs to identify proper orientation for reassembly later 2 Rotate the shafts while they are installed until the timing marks come into alignment Figure 2 3 Carefully pull the timing gears vertically off...

Page 22: ...emblies 1 After removing the timing gears and keys carefully pull the center plate vertically along the two drive shafts to remove it from the lobe gears Figure 1 2 If the center plate sticks to the l...

Page 23: ...g wiper blades 1 Locate the wiper blades nine per lobe gear of each rotating assembly Figure 1 2 Slide the wiper blades from the lobes slowly to release the retaining springs and wiper blades from the...

Page 24: ...easure the width of the wiper blade corresponding to each lobe gear slot in at least 3 locations down the length of the blade Figure 2 with the dimension labeled Blade Width 4 Subtract the result of t...

Page 25: ...per blade slot compressing the spring to ease it and the wiper blade half the way into the wiper blade slot Figure 2 3 Position the second spring in the wiper blade cutout compress it Figure 3 4 Slide...

Page 26: ...the pump housing to the volute housing Figure 1 NOTE The O ring inside the suction elbow will resist separation of the pump chamber and volute housing 2 To break the seal between the pump chamber and...

Page 27: ...oles depicted in the Figure 2 3 Simultaneously tighten the two screws to push the inlet cover out from volute chamber Figure 3 4 Remove the inlet seal and O ring Figure 4 5 Remove the impeller Figure...

Page 28: ...s 2 screwdriver remove two retaining screws each on both thrust washers and remove the thrust washers Figure 1 2 Using a seal removal tool remove the center plate outer shaft seals hooking it under th...

Page 29: ...ap screws from the face plate Figure 1 2 Lift the face plate off the center plate Figure 2 Use pry points if necessary 3 Remove the center plate inner shaft seals using a seal removal tool hooking it...

Page 30: ...aft seal number 1375 2000 Figure 5 Position the shaft seals with the cup facing up and push firmly into place 6 Replace the face plate onto the center plate Be sure that the alignment pins are properl...

Page 31: ...late faceplate Figure 1 Remove the face plate Figure 2 and use a seal puller to remove the lip seals 2 Stand the rotating assemblies up so that the keyway ends face up Continue on next page Figure 2 C...

Page 32: ...plate onto the shafts so that the trapping relief grooves face the lobes Figure 1 2 Ensure that the seal pressure grooves are oriented as shown Figure 3 Ensure that the shaft keyways are aligned prope...

Page 33: ...s No FTS400 33 Installing Teflon lip seals 4 Place a Teflon seal on the installation tool assembly Figure 1 Ensure that the cup is open away from the flange Figure 2 Remove the tapered cylinder from t...

Page 34: ...f the drive shaft flange up and slide the tool to the faceplate Figure 1 6 Use a small flat head screwdriver between the seal and tool flange to hold the shaft seal in place while sliding the installa...

Page 35: ...centerplate assembly down the shafts press firmly until the seals are seated fully in their chambers and the faceplate is contacting the centerplate Figure 1 Ensure that the alignment pins are engaged...

Page 36: ...head cap screws from the face plate Figure 1 2 Lift the face plate off the center plate Figure 2 3 Remove the volute chamber inner shaft seals using a seal removal tool hooking it under the lip of ea...

Page 37: ...press firmly into volute housing 5 Be sure you are using shaft seal number 1125 1875 Figure 5 Position the shaft seals with the cup facing up and push firmly into place 6 Replace the face plate onto t...

Page 38: ...ol hooking it under the lip of the seal and gently prying upward Figure 2 5 Be sure you are using shaft seal number 1125 1875 Position the shaft seal over the bearing with the cup facing up 6 Using sn...

Page 39: ...d replacement Mechanical seal configuration 1 Using a flathead screwdriver remove two retaining screws each on both thrust washers and remove the thrust washers Figure 1 continue to next page The gear...

Page 40: ...and press firmly into gear chamber 4 Place the spacer rings on top of the installed bearings so that they will be under the thrust washers 5 Using a flathead screwdriver and two retaining screws each...

Page 41: ...bellows assembly 6x set screws 1 Ensure the new Bellows assembly is free of debris Clean the sealing face with an alcohol wipe if needed 2 Lubricate the internal O Ring with Molykote 111 lubricant 3...

Page 42: ...s 1 Locate the gear chamber O rings and extract them from their retaining grooves Figure 1 2 Gently press the inner replacement O ring size 2 259 into place filling the groove Figure 2 3 Gently press...

Page 43: ...ring should seat firmly Be sure that the orientation of the wear ring is correct 3 Carefully loop the new inlet cover housing O ring size 2 265 around the inlet cover and ensure the entire O ring is...

Page 44: ...the inlet cover so the six screw holes on the inlet flange align with the screw holes in the volute housing Figure 2 3 Using a 10 mm hex bit install the six screws and tighten to 468 in lb 70 0 Nm Se...

Page 45: ...O ring size 2 265 into the retaining channel Figure 1 2 Identify the inlet elbow O ring lift it from its retaining channel and discard Position and press the new O ring size 2 241 into the retaining c...

Page 46: ...pump housing and volute is properly engaged Figure 1 3 Using a 10 mm hex key install the eight hex socket screws Figure 2 and tighten to 468 in lb 70 0 Nm See Figure 3 for the double pass tightening...

Page 47: ...2 This is to ensure the shaft seals in the center plate do not hang up on the corners of each step on the shafts 3 Align the bearing holes of the center plate with the drive shafts and carefully lower...

Page 48: ...either the factory timing marks or your scribe marks are aligned before installation onto the shafts Figure 2 4 Slide the timing gears onto the shafts as a pair Figure 3 If needed slightly rotate the...

Page 49: ...the shafts and carefully install the shafts into the gear chamber until the gear chamber contacts the center plate Figure 2 Be sure that the alignment pins of the center plate and gear chamber are pro...

Page 50: ...the gear chamber Be sure that the alignment pin of the pump housing and center plate is properly engaged Figure 1 2 Using a 10 mm hex key install the eight hex socket screws and tighten to 468 in lb 7...

Page 51: ...chamber with 1 quart 900 950 mL of Mobil 1 5W 30 synthetic motor oil or an equivalent SAE 5W 30 product Liquiflo FTS recommends Mobil 1 5W 30 synthetic for the Transfer Pump for longest life and highe...

Page 52: ...valve per bearing set This grease fitting type is also known as a Zerk fitting Figure 2 Each bearing set also has a grease exit port sealing screw to allow for old grease to flow out during lubricati...

Page 53: ...terface NOTE Pump head weighs approximately 230 pounds 2 Align the shaft of the pump with the shaft hole in the motor and carefully push the two components together ensuring the pump hub O ring does n...

Page 54: ...n line too restrictive Check to make sure the suction piping is not too small in diameter is not too long does not include valves which are too small does not include too many fittings such as elbows...

Page 55: ...6 Notes Liquiflo FTS Transfer Pump User Manual Series No FTS400 55...

Page 56: ...2020 Liquiflo Equipment Company Liquiflo Equipment Company Liquiflo FTS Fluid Transfer Pumps 443 North Avenue Garwood NJ 07027 USA phone 1 908 518 0777 fax 1 908 518 1847 www Liquiflo com FTS SKG 8 20...

Reviews: