


15
English
S
etup M
enus
2. Press
‘enter’
to return to the SETUP MENU - MAIN
PAGE.
3. Use the
key to highlight the EXIT SETUP option.
Press
‘enter’
.
Some changes made in the setup menus will be
implemented immediately, others will be implemented after
exiting setup.
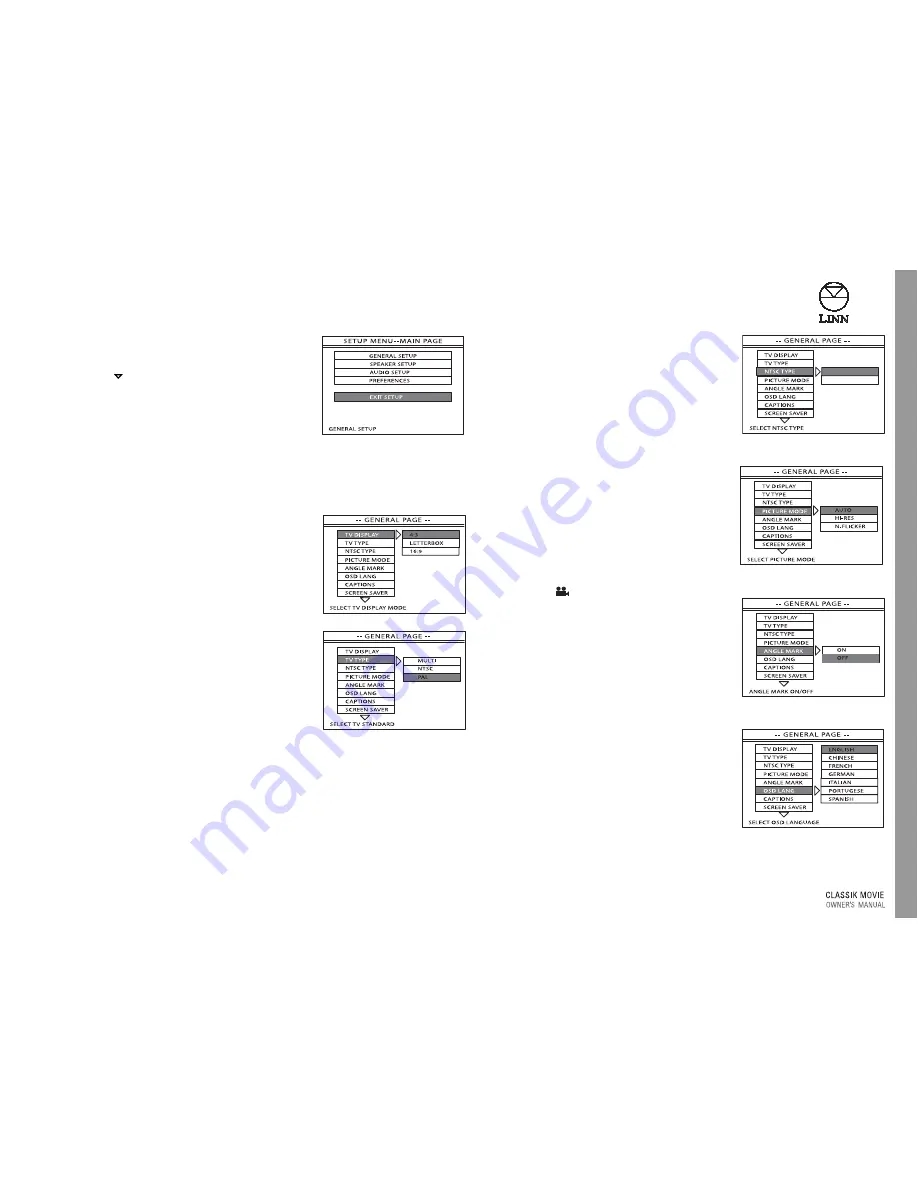
GENERAL SETUP
TV DISPLAY
Choose the option that matches your TV’s display;
either 4:3, LETTERBOX or 16:9.
TV TYPE
(If you have already selected the video signal format for your
TV using the FORMAT button (see Video Output
section), skip this item.)
Choose the option that matches the video signal
format accepted by your TV. Set to MULTI if your TV
accepts both NTSC and PAL formats.
Choose the option that matches the video signal
format accepted by your TV. Set to MULTI if your TV
accepts NTSC and PAL formats.
NOTES:
If TV TYPE is set to MULTI you may notice the screen
flicker when a DVD begins to play. This happens when
the CLASSIK Movie System Di switches from one video
signal format to the other.
If your TV only accepts one type of format, you may
not be able to view DVDs played on the CLASSIK
Movie System Di that have been recorded in the other
format.
This item is the same as the FORMAT key on the
front panel.
NTSC TYPE
For countries that use the NTSC TV signal format.
If in the U.S.A. - set to U.S.
If not in the U.S.A. – set to WORLD
NOTE:
The correct setting may be dependantethe make of your TV. Consult your TV’s
instruction manual for further information.
PICTURE MODE
If when viewing a DVD, moving screen images appear
jagged, choose a different option; either AUTO
(suitable for most DVDs), WEAVE or BOB. (Weave
and Bob are two methods of eliminating such
jagged images.)
ANGLE MARK
If set to ON, the
symbol appears on the screen
to inform you when a multi-angle portion of a DVD
is being played. Next to the symbol the number of
available camera angles is also displayed.
OSD LANG (on-screen display language)
Choose the language you want on-screen information and
menus displayed in.
YUV
RGB
U.S.
WORLD
S
etup M
enus
English
15
2. Press
‘enter’
to return to the SETUP MENU - MAIN
PAGE.
3. Use the
key to highlight the EXIT SETUP option.
Press
‘enter’
.
Some changes made in the setup menus will be
implemented immediately, others will be
implemented after exiting setup.
General Setup
TV DISPLAY
Choose the option that matches your TV’s display;
either 4:3, LETTERBOX or 16:9.
TV TYPE
(If you have already selected the video signal type
for your TV using the FORMAT button (see
Video
Output
section), skip this item.)
Choose the option that matches the video signal
format accepted by your TV. Set to MULTI if your TV
accepts both NTSC and PAL formats.
NOTES:
If TV TYPE is set to MULTI you may notice the screen flicker when a DVD begins to play.
This happens when the CLASSIK Movie switches from one video signal format to the
other.
If your TV only accepts one type of format, you may not be able to view DVDs played on
the CLASSIK Movie that have been recorded in the other format.
NTSC TYPE
For countries that use the NTSC TV signal format.
If in the U.S.A. - set to U.S.
If not in the U.S.A. – set to WORLD
NOTE:
The correct setting may be dependent on the make of
your TV. Consult your TV’s instruction manual for
further information.
PICTURE MODE
If when viewing a DVD, moving screen images appear
jagged, choose a different option; either AUTO
(suitable for most DVDs), HI-RES (high resolution) or N-
FLICKER (non-flicker).
ANGLE MARK
If set to ON, the
symbol appears on the screen to
inform you when a multi-angle portion of a DVD is
being played. Next to the symbol the number of
available camera angles is also displayed.
OSD LANG (on-screen display language)
Choose the language you want on-screen information
and menus displayed in.
U.S.
WORLD
Summary of Contents for Classik movie system
Page 1: ...English...
Page 2: ......


