English Manual
LINDY KVM Extender C5 Pro Installation and Use
page 26
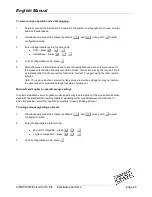
To manually adjust the video compensation
1
Change REMOTE switch 4 to the ON position.
2
Simultaneously, press the hotkeys (by default,
b
and
j
)
along with
f
to enter configuration mode.
The three keyboard indicators (‘Num Lock’, ‘Caps Lock’ and ‘Scroll
Lock’) will now begin to flash in sequence. The speed of the
sequence indicates the level of compensation currently
applied: the slower the rate, the less compensation is being applied.
3
While watching the displayed high contrast screen image, now adjust the video compensation setting
using the following keys:
•
Optionally press
F 2 f
to make the circuitry calculate and apply an automatic
compensation level – you can use this as a starting point for your fine tuning.
•
Press
w
to increase compensation by one fine step,
•
Press
{
to increase compensation by one coarse step,
•
Press
g
to select the neutral setting (no compensation),
•
Press
}
to decrease compensation by one coarse step,
•
Press
y
to decrease compensation by one fine step.
Note: If the monitor goes blank and switches off (due to extreme over compensation)
press the
g
key to restore it.
4
When no shadows are visible and the displayed images have crisp edges, press
f
to exit
configuration mode.
The new compensation setting will be stored, even when power is removed or if a complete
reset is initiated. The setting should not require further changes, unless the cabling
arrangement is altered.
Note: If REMOTE switch 4 is returned to it’s OFF position, the video compensation level will
be recalculated and set at the next power on.


