background image

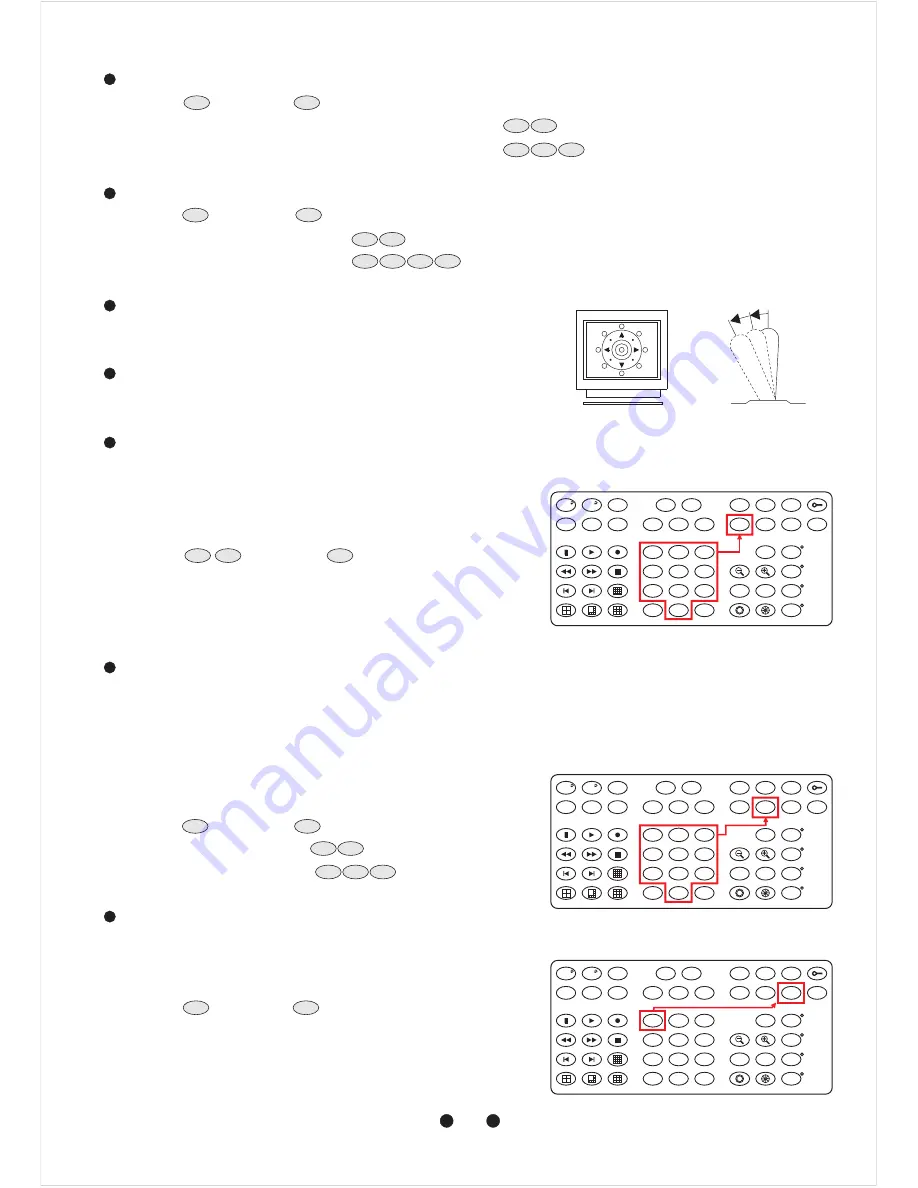
Push key

followed by

key, confirming that first channel is selected.

Ex. To select 1st channel (Channel 1 of the first Camera)

To select 64th channel (Channel 4 of the 16th Camera)

Push key

followed by

key, confirming that first preset position selected.

Ex. To select 1st preset position

To select 128th preset position

Move the joystick to bring the camera to the desired view position.

When set up preset point, adjust ZOOM IN and ZOOM OUT keys.

The speed the panorama camera travels to that preset position can be adjusted between 1 to 255 per second

(the factory default is 40 /sec).

To set speed as 10 /sec:

Push key

followed by

key, two beeps will be

heard confirming that speed is set.

Note: Push key again to confirm speed entered.

The dwell time means the time user wants to view on certain preset position under Auto Pan. The Preset Dwell

Time can be set between 0~255 seconds. (The factory default is 0 second.)

If the dwell is set to 0 second then that position will be omitted from the Auto Scan Tour.

To set dwell to 5 second:

Push key

followed by

key.

Ex. To set dwell to 5 second:

keys

To set dwell to 10 second:

keys

Once the above steps have been completed, the information must be stored or it will not be memorized by the

system.

Push key

followed by

key, two beeps will be heard

confirming that data is stored.

Note: For the first 16 presets on each panorama camera, the

above steps must be repeated. For presets 17~128 there

is a default speed and dwell setting so steps

and

are not required.

Select Panorama Camera

Selecting Preset Position

Joystick Control

Adjusting Lens

Setting Preset Speed

Setting Preset Dwell Time

Storing Preset Data

°

°

°

°

CAM

6

4

1

CAM

1

:

keys

:

keys

1

CAM

1

PRESET

1

PRESET

8

PRESET

2

1

:

keys

:

keys

2

3

4

1

2

4

3

5

5

5

5

1

0

F1

1

2

3

4

5

6

7

8

9

0

CLR

ENT

FOCUS

FAR

ALARM

RESET

F1

F2

F3

F4

ESC

SET

DVR

MATRIX

MON

PRESET

SEARCH

CTRL2

180

SEQ

FOCUS

NEAR

AUTO

PAN

SHIFT

AUTO

FOCUS

AUTO

IRIS

CTRL1

C.SET

SPRAY

ICR

LIGHT

C.ESC

CAM

WIPER

LENS

5

5

F2

5

F2

0

F2

1

6

1

2

3

4

5

6

7

8

9

0

CLR

ENT

FOCUS

FAR

ALARM

RESET

F1

F2

F3

F4

ESC

SET

DVR

MATRIX

MON

PRESET

SEARCH

CTRL2

180

SEQ

FOCUS

NEAR

AUTO

PAN

SHIFT

AUTO

FOCUS

AUTO

IRIS

CTRL1

C.SET

SPRAY

ICR

LIGHT

C.ESC

CAM

WIPER

LENS

7

1

F3

16

6

5

1

2

3

4

5

6

7

8

9

0

CLR

ENT

FOCUS

FAR

ALARM

RESET

F1

F2

F3

F4

ESC

SET

DVR

MATRIX

MON

PRESET

SEARCH

CTRL2

180

SEQ

FOCUS

NEAR

AUTO

PAN

SHIFT

AUTO

FOCUS

AUTO

IRIS

CTRL1

C.SET

SPRAY

ICR

LIGHT

C.ESC

CAM

WIPER

LENS

Summary of Contents for CMD2422S

Page 1: ...360 4CH PANORAMA CAMERA CMD2422S SC INSTRUCTION MANUAL...

Page 2: ...t within an equilateral triangle is intended to alert the user to the presence of important operating and maintenance servicing instructions in the literature shock to persons accompanying the unit CA...

Page 3: ...ch to night mode at low illumination showing clearly visible image with extra infrared illuminator The best choice among monitoring equipment PREFACE Build in 360 optical fisheye lens with focal lengt...

Page 4: ...2 3 4 5 6 7 8 ON 1 2 3 4 5 6 7 8 ON 4 port Video Out BNC Jacks 4CH BNC Model RJ 45 Jack CAT5 Model RS 485 In Out Terminal Power In DC Jack DC12V Camera Case 2M Pixels 360 Panorama Camera Camera Syste...

Page 5: ...Baud Rate 9600 bps BAUD RATE SELECTION DIP SWITCH 2400 bps 4800 bps 9600 bps 2 ON ON OFF 1 ON ON OFF 3 ON OFF PROTOCOL SELECTION DIP SWITCH MLP2 MERIT LILIN PROTOCOL 2 VERSION PELCO D PROTOCOL 5 ON O...

Page 6: ...1 1 1 1 1 1 1 1 1 1 1 1 1 1 1 2 2 2 2 2 2 2 2 2 2 2 2 2 2 2 2 2 2 2 2 2 2 2 2 2 2 2 2 2 2 2 2 2 2 2 2 2 2 2 2 2 2 2 2 2 2 2 2 2 2 2 2 2 2 2 2 2 2 2 2 2 2 2 2 3 3 3 3 3 3 3 3 3 3 3 3 3 3 3 3 3 3 3 3 3...

Page 7: ...Embedded Mounting Attached Mounting Only applicable in CAT5 model option 5 INSTALLATION...

Page 8: ...ting RS 485 Protocol Switch 1 2 3 4 5 6 7 8 ON 1 2 3 4 5 6 7 8 ON Camera System ID Switch Separate rubber sheet from the camera main body Set Panorama Camera ID RS 485 Protocol and Camera system Step...

Page 9: ...ody and Ring Attach the camera body to the fixed ring Camera body screw hole should be align to fixed ring s latch position Notice Tighten the two screws to fix the camera body 7 Attached Mounting Fix...

Page 10: ...Panorama Camera ID RS 485 Protocol and Camera system Note Refer to section P2 4 Step 6 Install Decorative Ring Rotate the decorative ring counter clockwise until its position column touch the camera b...

Page 11: ...era and Keyboard 4 channel Video signal from the panoramic camera is sent to multiplexer or quad and into monitor RS 485 Connection 7th pin TXDI of Connector Box connects to TXDI of RS 485 jack on pan...

Page 12: ...Connection RJ 45 Connection 7th pin TXDI of Connector Box connects to TXDI of RS 485 jack on panoramic camera 8th pin TXDI of Connector Box connects to TXDI of RS 485 jack on panoramic camera Should p...

Page 13: ...XDO of 1st panoramic camera connects to TXDI of 2nd panoramic camera and TXDO of 1st panoramic camera to TXDI of 2nd panoramic camera 7th pin TXDI of Connector Box connects to TXDO on RS 485 OUT jack...

Page 14: ...EO OUT RS 485 RS 485 NEXT DOME VIDEO IN VIDEO IN 4CH VIDEO OUT RS 232 RS 485 RS 232 RS 485 PC Interface TXDI TXDI TXDO TXDO GND TXDI TXDI TXDO TXDO GND CAMERA 1 1 4CH ADAPTOR AC CAMERA 2 5 8CH ADAPTOR...

Page 15: ...06 02 15 12 00 00 PTZ MODE ID 000 4CH VIDEO OUT A C 1 0 0 2 4 0 V V I DEO OU T 1 2 3 4 5 6 7 8 9 1 0 1 1 1 2 1 3 1 4 1 5 1 6 A L A RM r s 4 8 5 CA M ERA I N A u d i o i n S V I DEO A u d i o o u t 1...

Page 16: ...se the joystick on the keyboard to pan the panorama camera screen left push the joystick to the left to tilt down pull the joystick down towards you To move the panorama camera screen faster push the...

Page 17: ...arrower and target will become enlarge on the screen Zooming will stop when the key is released Push key The viewing angle becomes wider and target will become smaller on the screen Zooming will stop...

Page 18: ...ond keys Once the above steps have been completed the information must be stored or it will not be memorized by the system Push key followed by key two beeps will be heard confirming that data is stor...

Page 19: ...sh want to save the preset number keys keys two beeps will be heard confirming that new preset position is saved Single Preset Position Saving 1 2 3 4 5 6 7 8 9 0 CLR ENT FOCUS FAR ALARM RESET F1 F2 F...

Page 20: ...ESC SET DVR MATRIX MON PRESET SEARCH CTRL2 180 SEQ FOCUS NEAR AUTO PAN SHIFT AUTO FOCUS AUTO IRIS CTRL1 C SET SPRAY ICR LIGHT C ESC CAM WIPER LENS Sometimes it is necessary to delete the stored data A...

Page 21: ...ANUAL MANUAL CONTRAST SHARPNESS WHITE BALANCE SATURATION MIRROR FLIP ENGLISH ENGLISH 1 Press key on the keyboard to recall Setup Menu Press key to exit setup menu Setup Menu Display SET ESC LANGUAGE D...

Page 22: ...will be set SET ON OFF OFF DATE TIME PAN TILT ANGLE AREA TITLE 11 12 21 12 01 29 YY MM DD DATE TIME DATE FORMAT 1 Date Adjustment Push joystick down to select DATE and then press key to setup date Pus...

Page 23: ...rea Title on the monitor screen 1 Display the Camera Setting Menu Press key to enter Setup Menu Push joystick down to select DOME SETTINGS and then press key to enter dome setting menu Press key to go...

Page 24: ...2500 9500K color temperature Select MANUAL and press key into Manual White Balance mode adjustment image Push joystick down to select R and then push joystick left or right to adjust the low color te...

Page 25: ...s key to go back ESC 06 00 DOWN 06 00 18 00 SET ESC SET 4 Pan Tilt Setting Menu After getting in dome setting menu push joystick down to select PAN TILT and then push joystick left or right to select...

Page 26: ...Setting Push joystick down to select SELF RETURN MODE or AUTO MODE and then push joystick left or right to select AUTO then press key into auto scan mode setting Note OFF AUTO SEQ TOUR AUTO PAN SET HO...

Page 27: ...left or right to select TOUR then press key into tour setting menu 2 sec 40 deg sec ESC Cancel Tour Push joystick down to select CLEAR and then press key to cancel tour Dwell Time Setting Push joystic...

Page 28: ...N01 The first channel video screen to expand into 360 panorama mode PAN02 The first and second channel video screen are integrated to show single 360 panorama image 6 Restore Factory Defaults After ge...

Page 29: ...e schedule start during STOP mode duration if SELF RETURN is set and SELF RETURN TIME arrives panorama camera will start SELF RETURN mode first until next scheduled auto mode duration arrive then it w...

Page 30: ...0 1 3 Progressive scan CMOS Sensor 4 3 4 73mm H x 3 52mm V x 5 60mm D 1600 H x 1200 V 1 310 720 pixel Input 1600 H x1200 V Output 4xD1 N P 2 1 Interlace Schedule Day Color Night B W Color 1Lux F2 0 B...

Page 31: ...e Select Return Mode Select Auto Mode Reboot System Single Preset Position Delete Numeric Key CAM ZOOM IN ZOOM OUT FOCUS FAR FOCUS NEAR AUTO FOCUS IRIS O IRIS C AUTO IRIS 180 REV Numeric Key PRESET Nu...

Page 32: ...66 CMD2422CSE MERIT LILIN ENT CO LTD http www meritlilin com...

Reviews: