background image

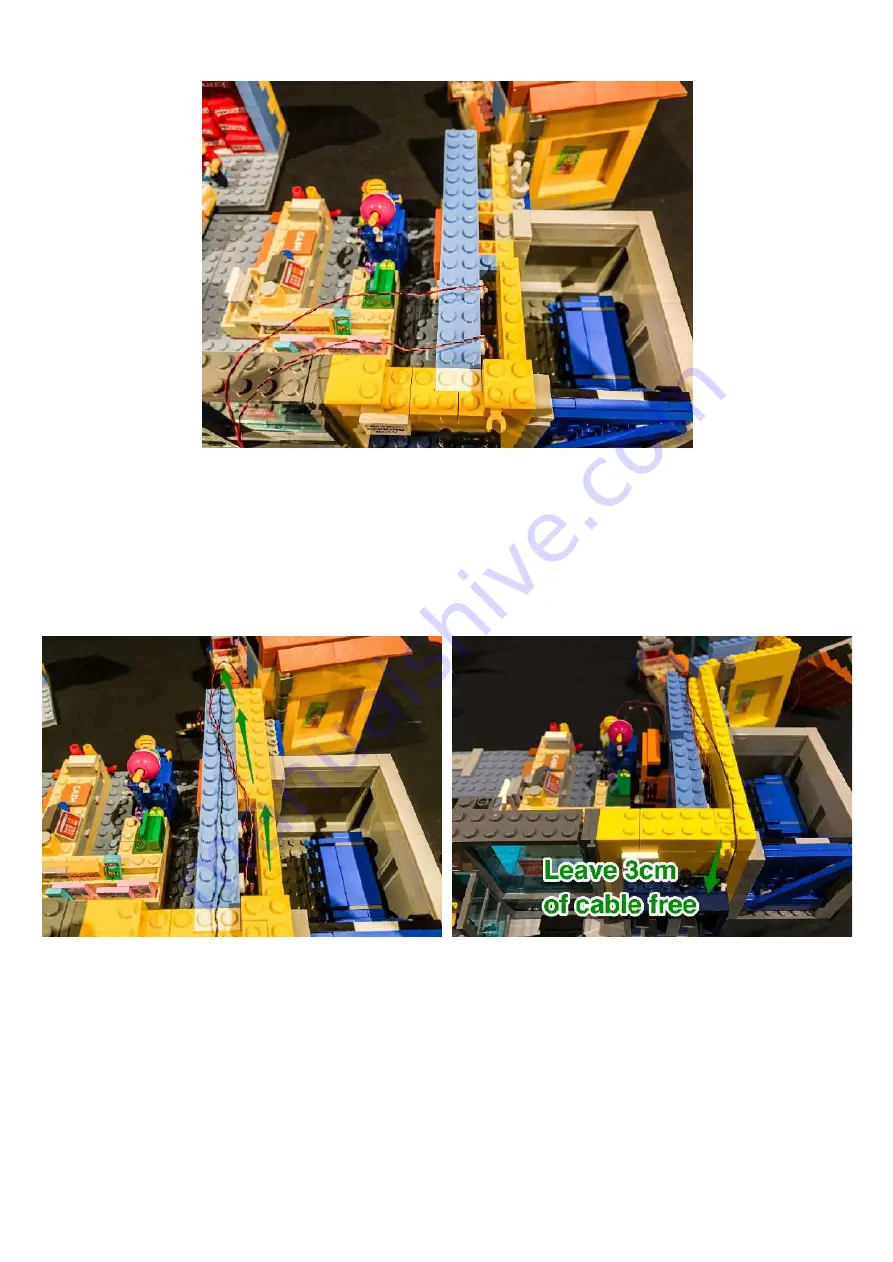
28.) Take the 2 cables from the  ashgame#1 and 2 and pull them up
towards the other end of the store. Take another 30cm cable and lay the
cable along side the other 2 cables. Leave about 3cm of free cable
sticking out the front. This will be used to connect to striplight#3 later.

Secure all 3 cables down by reconnecting all the blue and yellow Lego
pieces we removed earlier. Ensure that the cables are laid neatly in
between Lego studs.

Summary of Contents for 71016

Page 1: ...it Here is the instruction document for the Lego Kwik E Mart LED lighting kit Please read and follow the steps carefully to ensure this lighting kit is installed properly If you run into any issues please refer to the online troubleshooting guide This user guide is also available to download in PDF format here Package contents 7x LED Strip Lights ...

Page 2: ...es 10x Adhesive squares Connecting Cables 4x 15cm cables 4x 30cm cables Extra LEGO Pieces for mounting Strip Lights CCTV and Billboard Lights 4x Lego Plate 1x6 2x Lego Transparent Red 1x1 round plate 2x Lego Black Tile Modi ed 1 x 1 with Clip 2x Lego Technic Pin with Friction Ridges Lengthwise WITH Center Slots 2x Lego Weapon Spear Gun with Squared Trigger and Thick Spear Base 2x Lego Technic Blac...

Page 3: ...N Forcing LEGO to connect over a cable can result in damaging the cable and light Connecting cable connectors to Strip Lights Take extra care when inserting connectors to ports on the Strip Lights Connectors can be inserted only one way With the Strip Light facing up ensure the side of the connector with the wires exposed is facing down If a plug won t t easily into a port connector don t force it...

Page 4: ...he wires exposed should be facing toward the soldered symbol as you insert into the port If a plug won t t easily into a port connector do not force it WARNING Incorrectly inserting the connector can result in bent pins inside the port or possible overheating of the expansion board when connected Installing Bit Lights under LEGO bricks and plates When installing Bit Lights under LEGO pieces ensure...

Page 5: ...s or in between OK Let s Begin Instructions for installing this kit Lighting the Police Car 1 Start by removing the following Lego pieces which make up the roof and windscreen followed by the black Lego plates and tiles from the front bonnet ...

Page 6: ... using the connector end of the cable of the LED thread this through the hole of the front of the black brick Pull the cable from the back of the black brick all the way until the LED component is at up against the other side of the brick Ensure that the LED component part is facing the correct way up then secure this down by reconnecting the transparent yellow Lego plate over the top ...

Page 7: ...Repeat this step for the other head light of the car using another White 15cm Bit Light 3 Reconnect the 2 head lights back to the front of the car ensuring the cables for the lights are facing up ...

Page 8: ...4 Next step is to remove the following Lego pieces from the car so that we can lay the cables from the headlights underneath and all the way to the back ...

Page 9: ...ng back Lego plates and tiles over the top Before doing so ensure that the cables are laid in between studs exactly the same way as the below images 7 Reconnect the white bricks as per below ensuring that the cables are laid in between the black and white studs underneath Ensure the cables are laid on the side of each of the brown Lego studs ...

Page 10: ...pieces which make up the front of the dash board side mirrors and front windscreen 8 In order to hide the rest of the contents from this lighting kit in the back section of the car we will be removing and discarding the following pieces ...

Page 11: ...First turn the car around to the back and remove the back bumper with tail lights attached followed by the boot cover ...

Page 12: ...9 Continue to remove the following pieces from the back of the car 10 Turn the car over and remove the following pieces ...

Page 13: ...plates attached below then separate these pieces and hang on to the 2 grey plates 12 Remove the following pieces from the rear wheels and then connect to the axle the 2 grey pieces we kept in the previous step in the following position ...

Page 14: ...ransparent red plates Take another White 15cm Bit Light and place it in between the 2 grey studs Secure this LED in place by reconnecting a transparent red plate over the top Repeat this step for the 2nd tail light using another White 15cm Bit Light then reconnect the bumper to the back section of the car ...

Page 15: ...hem in between studs underneath the black plate on each side 15 Take the 2 cables and then pull them together and twist them around so they both come together Wind the cables around the axle of the rear wheels a few times until you have about 2 3 cm of excess cable left on each side ...

Page 16: ...Connect these 2 lights to rst available ports on the 8 port expansion board 16 Reconnect the rear wheels along with the back section of the car to the rest of the car using the 2 grey Lego pieces ...

Page 17: ...ch we removed earlier This will then allow the back section of the car to be secured to the car 17 Take the 2 cables from the front lights and twist them around so they come together Thread them down the space in between the axle and the grey Lego piece 4 grey studs ...

Page 18: ...rneath all the way and then then thread them down again over the axle Repeat this process a few times threading the cable around the axle until there is only approx 3 cm left of the cable Plug the 2 cables into the next available ports on the expansion board ...

Page 19: ...Lego tile and then take one of the Flashing White 15cm Bit Lights and place it in between the 2 grey studs then secure the LED in place by reconnecting the transparent red tile over the top Repeat this process using another Flashing White 15cm Bit Light for the blue light Then reconnect the long white tiles on each side ensuring the cables are pulled down in between ...

Page 20: ...ound so they form a neat loop of cables with a diameter of around 1 5cm Use a bit of tape to hold them together preventing them from untangling 20 Place the roof with lights installed on top of the car and then connect the 2 ashing bit light cables into the next available ports on the expansion board ...

Page 21: ...ttery pack and insert 2x CR2032 batteries then connect the battery pack cable to the spare port on the expansion board Place the battery pack in the following position ensuring that the on o switch is facing the outside ...

Page 22: ...t of the car to secure the battery pack 25 Reconnect the the side windows and back windscreen before reconnecting back the roof of the car While doing so ensure that the cables from the ashing lights are neatly kept in the back section underneath ...

Page 23: ...e required as it will be used to remove the roof of the Kwik E Mart as well as other Lego pieces 1 We will install lights starting from the right sections store room of the Kwik E Mart We will need to rst remove the roof of the right section by using the Lego tool to remove the roof at the following sections ...

Page 24: ...2 We will be installing the battery pack to the store room Remove the following Lego bricks to allow enough space for the battery pack to go ...

Page 25: ...ck and insert 3x AA batteries then place it down the spacing in between the walls Ensure the battery pack is inserted in the exact position per below as the on o switch will need to be accessible by opening the back door ...

Page 26: ...econnect the pieces we removed earlier 3 Take one 30cm connecting cable and connect it to the left port of an LED strip light striplight 1 Connect the battery cable to the right port of this strip light ...

Page 27: ...ight in the following position Ensure that you loop the 30cm cable above and then underneath the strip light so that it is not visible from the inside of the store 4 We will now install a light to the fridge of this section Remove the following pieces to allow us to get to it ...

Page 28: ... below We will identify this light as fridge 1 Reconnect this brick with the cable facing upward 6 Secure the cable by pulling it over the blue 2 x 6 brick and then forming a loop then pushing it back up and securing it underneath the yellow 1 x 3 brick and the blue 2 x 6 brick While doing this ensure that the connector part is on the other side of the wall underneath the yellow 1 x 3 brick ...

Page 29: ...lls and out the same side as the cable from fridge 1 8 Use the Lego removal tool to remove the main roof section at the following sections Carefully use the tool to lift the roof away from the yellow walls a little bit at a time to ensure the entire roof disconnects easily in one piece ...

Page 30: ... lights to the next lot of fridges Start by removing the following pieces 10 Take another White 30cm Bit Light fridge 2 and attach it using another adhesive square in the following position Reconnect this brick with cable facing up ...

Page 31: ...ge 3 using the same method as above and following these images 12 Before we install the 4th fridge light we need to remove one of the red piece items o the top shelf to prevent the light from being blocked out Remove the following pieces to get to it ...

Page 32: ...emove the red Lego piece on the far left and then reconnect the shelf Reconnect the blue Lego pieces we removed while taking anotherWhite 30cm Bit Light and install it in the following position fridge 4 ...

Page 33: ...1 across and secure them down by connecting back the yellow 2x3 brick over the top ensuring the cables are laid in between studs 14 We will now install a ashing light to the Video camera Remove the video camera from its connector and place it down ...

Page 34: ...f the camera Pull it through from the bottom of the camera all the way until the LED component part is sitting at against the top of the hole Ensure that the LED component is facing the correct way up Secure the LED in place by connecting one of the provided transparent red round Lego pieces We will identify this as video 1 ...

Page 35: ... the video camera cable in place by connecting the blue1 x 2 Lego piece over the top 15 Take the cables from video 1 fridge 2 3 and 4 and connect them all to one of the 12 port expansion boards Ensure cables are laid in between studs before connecting bricks over them ...

Page 36: ...Group the 4 cables together and twist them around each other so that they all form one large cable Wind the cables around the board until you have about 8 10 cm of slack ...

Page 37: ...n board 17 Wind the rest of the cables around each the expansion board as much as possile and then squeeze the expansion board on top of the fridges in between the blue and yellow bricks Ensure that the available ports are facing toward video 1 Then reconnect all the bricks surrounding the fridge ...

Page 38: ...k This is a good idea as you want to ensure all is working before you connect back bricks into original positions Let s turn it on to see how it looks so far 20 We will now move onto lighting the front of the building s roof section Take the main section of the roof and turn it over Take 1 LED strip light striplight 2 and stick it to the following section on the left ...

Page 39: ...30cm cable and connect it to the right port Take another strip light striplight 3 and stick it to the following position on the right side of the roof using the strip light s adhesive backing Then connect to the other end of the 30cm cable from striplight 2 into the left port Hide the 30cm cable underneath the grey Lego tiles in the spacing underneath the roof ...

Page 40: ...21 We will now install the 2 billboard lights which point to the Kwik E Mart sign Locate the following Lego pieces which have been included in this set ...

Page 41: ... scissors snip o the pointed end at the following position YES we will need to cut this piece in order for it to clip in securely to the roof 23 Take 2x White 30cm Bit Lights and stick the LED to self adhesive squares then stick the other ends of the LEDs to the 1x1 plates with clips ...

Page 42: ...ins into the 1x1 bricks with holes then thread the other end of the one of the bit lights through the pin and out the other side of the 1x1 brick Repeat this for the other technic pin and brick so that you have two billboard lights ...

Page 43: ...25 Take the 2 billboard lights and connect them to the following positions under the roof ...

Page 44: ... ensuring they are laid in between studs This now completes the roof lighting We won t connect these to 12 port expansion board as yet as this will happen when we connect the roof back after the next section of lights are installed 26 Let s move on to the next section of the building Remove the following Lego bricks and then disconnect the long blue section which connects across the length of the ...

Page 45: ...x Flashing Red 30cm Bit Light and stick it to the following positions using the provided self adhesive squares It does not matter which one is on the left or right We will identify these as ashgame 1 and ashgame 2 Reconnect the long blue section back to its original position ensuring that the cables are facing the same way as pictured ...

Page 46: ...m cable and lay the cable along side the other 2 cables Leave about 3cm of free cable sticking out the front This will be used to connect to striplight 3 later Secure all 3 cables down by reconnecting all the blue and yellow Lego pieces we removed earlier Ensure that the cables are laid neatly in between Lego studs ...

Page 47: ...the building and connecting the 15cm cable cable from 12 port expansion board to the left port on lightstrip 2 Then connect the 2 cables from the billboard lights into the expansion board Connect the 30cm cable from the right side of the building which we left 3cm free to the right port on striplight 3 ...

Page 48: ...lding ensuring that all cables are pushed behind their lights and over the front wall This part is a little tricky and may take a few goes to ensure all cables are hidden behind and the roof is fully connected to the top of the walls Be patient you will get there ...

Page 49: ...nging down from the other side We will hide these by rst removing the grey Lego walls of the roof laying the cables in between the black Lego studs below and then reconnecting the grey walls over the top Do this as much as required to ensure cables are neatly secured and out of the way ...

Page 50: ...Now let s turn on the battery pack to test the lights we have just installed ...

Page 51: ...section and install another Flashing Red 30cm Bit Light video 2 the same we did for video 1 Secure this LED using another provided transparent red Lego piece Then reconnect the video camera back to its original position We will connect the other end of the cable later 34 We will now install lighting for the donut stand and hotdog display First remove this whole section from the base of the shop ...

Page 52: ...n install a White 30cm Bit Light underneath the orange donut sign in the following position Stick this LED using one of the provided adhesive squares Secure the cable by pulling it toward the right underneath the donut sign and in between the studs of the glass piece ...

Page 53: ...play at the cream Lego plates from the counter and remove the grey 1 x 4 Lego piece from the top back Using another adhesive square stick another White 30cm Bit Light to the bottom of this Lego piece in the following position ...

Page 54: ...the studs of the glass window piece underneath 37 Turn the counter over and remove the 2 orange Lego plates from the back of the counter 38 Reconnect the hotdog display and donut stand to the counter pull the cables from the lights down in between studs and then reconnect the orange Lego plates over them to secure them down ...

Page 55: ...Reconnect this whole section back to the base of the shop ...

Page 56: ... We will be laying the cables from the hotdog and donut lights down and then underneath the 2 fridges behind Start by removing the following pieces to then allow us to remove the fridge doors and shelves ...

Page 57: ... shelves over the top ensuring that the cable is pulled up from behind it and then to the right Secure the shelves by reconnecting the cream and yellow Lego piece Be careful and ensure that the cable still remains in between studs 41 Do the same for the donut light cable ensuring that the cable is laid in between grey Lego studs ...

Page 58: ...ce Take the left 2 x 6 piece and turn it on its side 42 Take another White 30cm Bit Light fridge 5 and stick it using an adhesive square in the following position before reconnecting this piece back Ensure that the cable is pointing toward the right as pictured below ...

Page 59: ... another blue Lego brick ensuring the cables are laid underneath 43 Install another White 30cm Bit Light to the bottom the last blue 2 x 6 Lego brick in the following position before reconnecting the piece back ...

Page 60: ...en secure them down by reconnecting the blue Lego 2x3 brick over the top Ensure that you pull this section all the way out so that you have enough cables when you open and close the section 45 Connect the 3 cables we just pulled over into another 12 port expansion board Ensure all cables are pulled to the right underneath the blue Lego bricks ...

Page 61: ...e cables from the hotdog stand and donut light and then connect them into the next available ports 47 Take the cables from video 2 and fridge 5 and 6 and then twist them together so that they form one large cable ...

Page 62: ...s into the next available ports on the expansion board them wind them around the expansion board to eliminate excess cable 48 Take the nal 30cm connecting cable and then connect this into a spare port on the expansion board ...

Page 63: ... between the fridges and wall ensure the 30cm cable is left out 50 Pull the 30cm cable back up to the other side and then secure this down by disconnecting the blue 2x3 brick and then reconnecting it over the top of all 4 cables Ensure they are all neatly laid in between studs ...

Page 64: ...e centre roof piece and place it on its side so that we can access underneath of it Take 4x Strip Lights and use the adhesive backing to stick them onto the provided LEGO 1x6 Plates Install the 4 strip lights to the following positions and connect a 15cm cable between all of the strip lights total of 3x 15cm cables required ...

Page 65: ...will have to glue the strip lights over the cables with super glue 53 Finally connect the centre roof section lights to the rest of the lighting circuit by taking the hanging 30cm cable and connecting it to the left port of the striplight in the top corner Place the centre piece back to the top of the roof in its original position ...

Page 66: ...This nally completes the LED lighting circuit for your Lego Kwik E Mart Now turn on your kit turn o the lights in your room and Enjoy ...

Page 67: ......

Reviews: