background image

23

SMART DIAGNOSIS

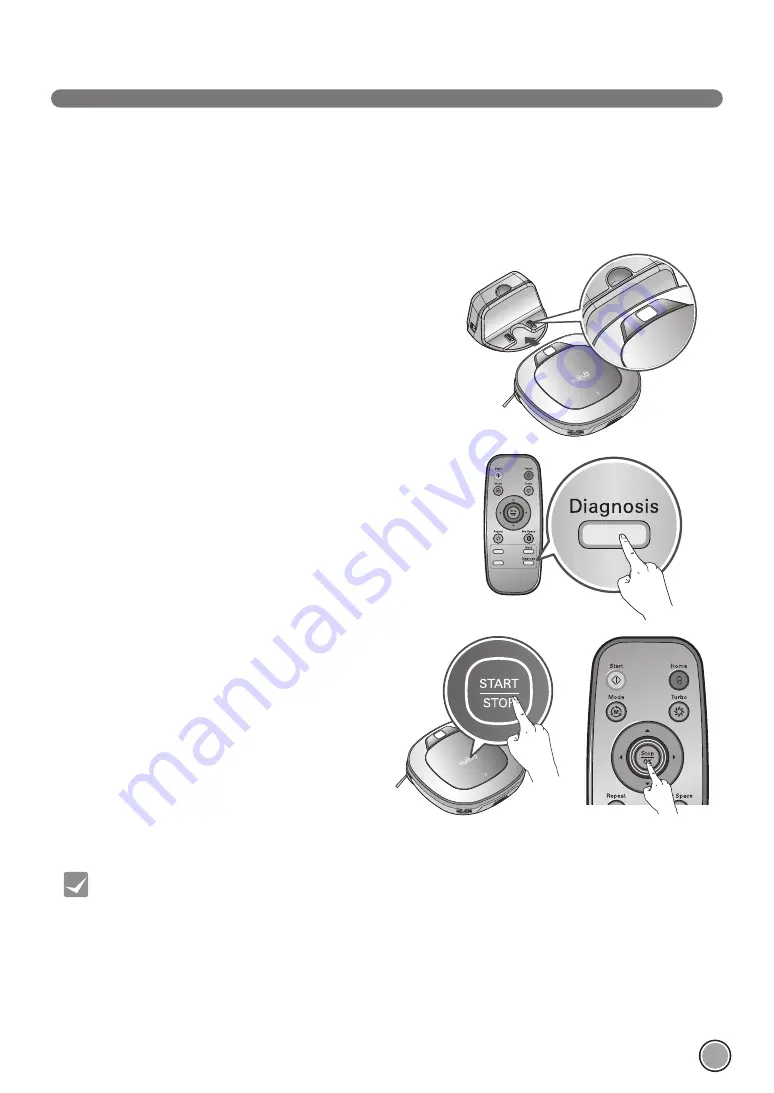
1.  Smart Diagnosis will operate when the main power switch of the Robot 

cleaner and the Home station are turned on, and the unit docked on 
the Home station.

  Smart Diagnosis is only possible when the Robot Cleaner  

is attached to the Home Station.

2.  Press 'Diagnosis' button on the Remote Controller, then the process 

will start with a voice message which says "Robot cleaner smart 
diagnosis will be started. Please step away and clear around 1 meter 
around the home station."

  If the Mop Plate(Selected models only (VR*.LVM))  

is attached, the process will not be activated.

3.  When the Smart Diagnosis has successfully finished, Robot 

Cleaner will return back to the Home Station and inform the 
result through a voice message. After the voice message, 
pressing the 'Home' button on the Remote Controller or 
main unit will allow the voice message to be repeated. To 
terminate the diagnosing process, press the 'Stop/OK' 
button on the Remote Controller or main unit.

  After the Smart Diagnosis voice message, the Robot 

Cleaner will start recharging after 1minute.

  If an error is detected with any of the Sensors whilst 

in Smart Diagnosis, a voice message will announce, 
and the unit will not return to the home station. 

Robot Cleaner uses this Smart Diagnosis feature to run a self-diagnosis.
If any irregularity is found from the diagnosis, please contact the local LG Electronics service center.

  During Smart Diagnosis, the Robot Cleaner will move about within a 50 

cm

 radius. So, make sure no objects are in the 

way within a 1 

m

 radius around the Home Station, before starting Smart Diagnosis.

•  Be careful not to touch the Robot Cleaner or disturb its operation before Smart Diagnosis is complete. 

If it is accidently interrupted, turn the main power switch OFF then ON again to resume the diagnosis.

•  Smart Diagnosis will not be activated in each of the following cases.  

In each case, check the problem and try again. 

- Robot Cleaner is detached from Home Station
- Battery level is insufficient
- No Dust Bin Filter is fitted.
- Mop Plate(Selected models only (VR*.LVM)) is attached

Tip

Summary of Contents for VR6347LV

Page 1: ...reater speed giving cleaner results Drawer Mop Plate Selected models only VR LVM The Drawer mop plate makes it much easier for users to fit and remove the mop without having to turn over the device over My Space Mode By commanding it to clean a particular area the Robot Cleaner quickly cleans that desired area Repeat Cleaning The Robot Cleaner will continuously clean until the battery runs out Loc...

Page 2: ... How to charge the battery Cleaning modes Auxiliary cleaning modes Mop cleaning Selected models only VR LVM Location search function Smart diagnosis Cleaning the dust bin Cleaning the dust bin filter Cleaning the brush Cleaning the sensors charging terminals Cleaning the side brush Cleaning the ultra microfiber mop Selected models only VR LVM 4 ADDITIONAL INFORMATION 5 REFERENCE 2 5 6 7 8 9 10 11 ...

Page 3: ... by a person responsible for their safety 2 Children should be supervised to ensure that they do not play with the appliance 3 If the supply cord is damaged it must be replaced by LG Electronics Service Agent in order to avoid a hazard 4 This appliance can be used by children aged from 8 years and above and persons with reduced physical sensory or mental capabilities or lack of experience and know...

Page 4: ...er plug do not to touch the prongs with your fingers Doing so can cause an electric shock Do not spray or use inflammable materials surfactants or drinking water in the vicinity of the Robot Cleaner Doing so can cause fire or product failure Inflammable materials gasoline thinner etc Surfactant detergent articles for bath etc Do not insert any part of the body such as a hand or foot below the brus...

Page 5: ... cause product failure or the cord of an appliance can be disconnected Make sure the Robot Cleaner is not put on a table or desk with the power ON It may result in an injury or damage to the product CAUTION In rare cases the Robot Cleaner s brush can damage carpet If this happens immediately stop the cleaning operation When a carpet has long tassels the tassels can be damaged Do not let the main u...

Page 6: ...rpets that are thicker than 20 mm as they may cause it to malfunction Please close any balcony doors as the wheels may get stuck while cleaning If the floor is wet or has wet spots wipe them up before using the Robot Cleaner Do not use the Robot Cleaner on a wet surface Doing so can cause product failure When attaching the mop ensure that it is fitted correctly so that it does not block the lower ...

Page 7: ...Cleaning Tool Cleaning brush It s on the dust bin cover Mop plate Selected models only VR LVM for cleaning sensors for cleaning the filter Ultra microfiber mop 2 pieces Selected models only VR LVM Batteries for remote controller 2 units of AAA size Home station Robot Cleaner Remote controller DVD Manual ...

Page 8: ...uttons Dust bin compartment release button Ultrasonic sensors Obstacle detecting sensor window Detecting sensors of home station Receiving sensors of remote controller Main Power switch Ventilation port Cliff detection sensors Side brush Charging terminals Brush Wheel Battery housing Lower camera sensor Optional Front view Rear view Bottom view ...

Page 9: ... different from actual objects Home station Dust bin Remote controller holder Charging terminals Sponge filter Dust bin handle Cleaning brush Dust bin lid Suction port flap EPA filter Filter cover Dust bin lid opening button Power cord fixing hook Power switch ...

Page 10: ...hange the language for the voice message You cannot use this function with the button on the remote controller Pressing the TURBO and START STOP button for 3 seconds will activate or deactivate the Lock function If Lock is ON a voice announcement Key lock has already been set will be heard each time a button is pressed Used to turn the power on from Standby start or stop cleaning If the button is ...

Page 11: ...to recharge the Robot Cleaner by making it return to the Home Station p17 Turbo Used to activate or deactivate Turbo mode p20 Stop OK Pressing the button will stop the Robot Cleaner My Space Used to put the Robot Cleaner in My Space clean mode p19 Mute Used to activate or deactivate Mute mode p11 Diagnosis Used to run Smart Diagnosis Available only when Robot Cleaner is recharging p23 Mode Change ...

Page 12: ... for Turbo Mode Operational Status icon This indicates the operational status of Robot Cleaner Homing icon This indicates the conditions of Homing and Charging Repeat Mode icon This indicates the settings for Repeat Mode Mute icon This indicates the settings for Voice Alert ...

Page 13: ...If you are not planning to use the mop for cleaning remove the mop before using Robot Cleaner Before starting the device it s better to remove carpets that are thicker than 20 mm as they may cause it to malfunction Please close any balcony as the wheels may get stuck while cleaning 1 Open the battery cover by lifting the rear hook of the remote controller 2 Insert two AAA batteries checking for no...

Page 14: ... while the Robot Cleaner is turned on You will hear an announcement of the cleaning mode and cleaning will begin once the Robot Cleaner has reversed and turned around 5 6 Automatic charge p17 Use the cleaning mode and auxiliary functions p18 21 The Robot Cleaner will self diagnose and automatically return to the home station to recharge before the complete discharge of the battery It takes approxi...

Page 15: ...the wall so that it does not move Then turn on the power switch 4 When the remote controller is not used store it in the remote controller holder on the home station 1 5 1 5 2 1 5 1 5 2 Fixing hook of power cord Always keep the home station plugged in when in use If the home station is not plugged in the Robot Cleaner will not return to the station to charge automatically How to Install the Home S...

Page 16: ...ard In about 10 seconds the power will be on and a melody will sound If 10 minutes elapse without the Robot Cleaner having being given an active command after being turned on the power will automatically return to Standby again Press and hold the START STOP button for two seconds while the Robot Cleaner is turned on A melody will sound when the power is turned off If the power cannot be turned on ...

Page 17: ... used During cleaning collisions can happen when the sensor cannot detect objects because of their shape Thin chairs and table legs furniture corner When this happens the internal impact detecting sensor will react by using a backward motion If the Robot Cleaner is set to start cleaning at a location away from the home station put the Robot Cleaner on a flat floor in order to prevent a malfunction...

Page 18: ...home station A melody sound will be generated along with an audio message to start charging If a voice message Main power switch on the back of the Robot cleaner is turned off Please turn the switch on is announced repeatedly then turn on the Main Power Switch Method 2 When the Home button of the remote control or the Robot Cleaner is pressed charging will be prompted by automatically generating a...

Page 19: ...e and press Start button Factory release default setting is Zigzag Zigzag Cleaning By pressing a direction key on the Remote Controller you can move Robot Cleaner in a Manual mode Robot Cleaner will clean the area moving forward backward left right according to the input of the direction key While in Manual mode the robot cleaner will run into obstacles placed behind it if the backward key on the ...

Page 20: ...he Robot Cleaner clean the manually outlined area by itself Upon failure to correctly outline a zone a voice will announce which says Area does not meet the specified conditions Please continue to make specified area for cleaning process Use the Remote Controller to assign a zone again When My Space cleaning is completed the mode is switched to Auto Clean ZigZag While recharging you cannot activat...

Page 21: ...battery runs out without returning to the home station The Robot Cleaner is capable of memorising the cleaning environment through its Learning mode for an intelligent cleaning operation Learning Mode is available only when the machine starts cleaning from the Home Station Turbo Mode Repeat Mode Learning Mode Precautions with Smart Operation This Learning mode enables memorizing locations with obs...

Page 22: ...is attached the Robot Cleaner will not climb on to carpets or over thresholds in order to prevent transferring dirt from the mop To avoid odors wash any foreign material or dust off the mop after cleaning is completed To avoid staining floors do not use the ultra microfiber mop to clean when dirt is contaminated with liquids such as coffee or ink To avoid damage to carpets from the Velcro or dirt ...

Page 23: ...n start the location search function along with an audio guide When the location search is successfully completed it will continue cleaning from where it was moved If the location search fails it will start again from the beginning The Robot Cleaner remembers its location while cleaning If the user moves the Robot Cleaner while it is operating it will search for the location it was moved from by u...

Page 24: ...e Remote Controller or main unit After the Smart Diagnosis voice message the Robot Cleaner will start recharging after 1minute If an error is detected with any of the Sensors whilst in Smart Diagnosis a voice message will announce and the unit will not return to the home station Robot Cleaner uses this Smart Diagnosis feature to run a self diagnosis If any irregularity is found from the diagnosis ...

Page 25: ...ntact an LG Electronics service center Please check for dirt on the left wheel Check for foreign materials on the left wheel Please check for dirt on the right wheel Check for foreign materials on the right wheel A problem has been found on the left wheel sensor Run Smart Diagnosis again and if the same message is announced contact an LG Electronics service center A problem has been found on the r...

Page 26: ... the cleaned Dust Bin close the lid and put in the Sponge and EPA Filter Refer to p 26 for detailed assembly guides 8 Put the dust bin into the Robot Cleaner and close the dust bin compartment cover If the dust bin is full suction power can be reduced Clean the dust bin before or after each cleaning session Clean the dust bin using the following sequence Operating the unit without Filters fitted t...

Page 27: ...orrectly assemble EPA and Sponge Filter onto the Filter housing 2 Thoroughly clean out the fine dust particles on the EPA Filter with a vacuum cleaner or cleaning brush Do NOT wash the EPA Filter with water Its suction power will be reduced To preserve the performance of the Robot Cleaner clean the EPA Filter at least once a week with a brush or vacuum cleaner The EPA and sponge filters must be fi...

Page 28: ...p to separate it from the main unit Carefully clean the Brush with a vacuum cleaner or scissors Turn the Main Power Switch OFF before starting the clean Put the Robot Cleaner upside down on a soft cloth After checking for foreign materials press down the Fixing Hook and pull it up to separate the brush Cover By using the cleaning tool clear hairs and other debris and foreign materials on the Brush...

Page 29: ...clean the sensors and charging terminals as follows 1 Turn off the power switch on the rear side of the Robot Cleaner Injury can be caused by the activation of the Robot Cleaner if the main power is not turned off 2 Lay a smooth cloth on the floor turn over the Robot Cleaner and put it on the cloth Please make sure to remove the dust bin before rotating the main body Otherwise the dust in the dust...

Page 30: ...r at the end of a table to make cleaning the side brush easier Make sure that the Robot Cleaner is not in danger of falling 4 Soak the side brush in warm to hot water 5 Press down on the side brush for about ten seconds so that it is completely submerged in the water 6 Slowly wipe the side brush by sliding it through your hand 7 Rotate the side brush and repeat steps 4 6 for each section of the br...

Page 31: ...e it will cause the Robot Cleaner to malfunction To avoid odors dirt and dust should be washed off the mop after it is used for cleaning Follow these directions to wash the ultra microfiber mop To avoid product malfunction only use the ultra microfiber mop provided with the Robot Cleaner Additional microfiber mops can be purchased by visiting a nearby LG Electronics service center Some models may ...

Page 32: ...erial after observing the wheel Please make sure to remove the dust bin before turning over the main body Otherwise the dust in the dust bin may fall out A warning message will be given if Robot Cleaner cannot go on cleaning due to any unfavourable condition Is the Robot Cleaner stuck s After removing it from the obstacle place the Robot Cleaner on flat floor Upon a voice message The wheels are no...

Page 33: ...bled onto the Dust Bin When the remaining amount of battery power is almost nil the voice Battery is low is generated Initiate battery charging of the Robot Cleaner by moving it to the home station s When the Robot Cleaner is attached to the docking station successfully it will start the recharging with the recharging start melody Upon a voice message Please check if the dust bin is installed with...

Page 34: ... remove the Dust Bin Otherwise it will cause dust to fall from Dust Bin The brush is making a loud abnormal sound s Confirm the correct assembly of the brush by checking the separation groove of the brush s Remove the lower rotating brush from the Robot Cleaner and remove any foreign material from the brush The lower rotating brush or side brush is stuck s Remove any foreign materials such as cabl...

Page 35: ... 25 Ƭ Ƭ Clean the dust bin filter Page 26 Noise becomes louder Ƭ Ƭ Confirm that the dust bin has been mounted properly Ƭ Ƭ Confirm that the dust bin filter has been mounted properly Page 26 Ƭ Ƭ Check whether foreign material is caught in the brush Page 27 The Robot Cleaner will not activate Ƭ Ƭ Confirm that the power switch is turned on Page 15 Ƭ Ƭ Confirm that the battery has been charged Page 17...

Page 36: ...ressing the connector hook Remove the screws by using a Phillips head screwdriver Remove the battery from the device 2 WARNING Please be careful of fire explosion electric shock or breakdown Do not charge this Battery Pack Pack hereafter with any other type of charger other than the one originally provided with the Robot Cleaner Do not damage the Pack in such ways as drop crush puncture cut or sho...

Reviews: