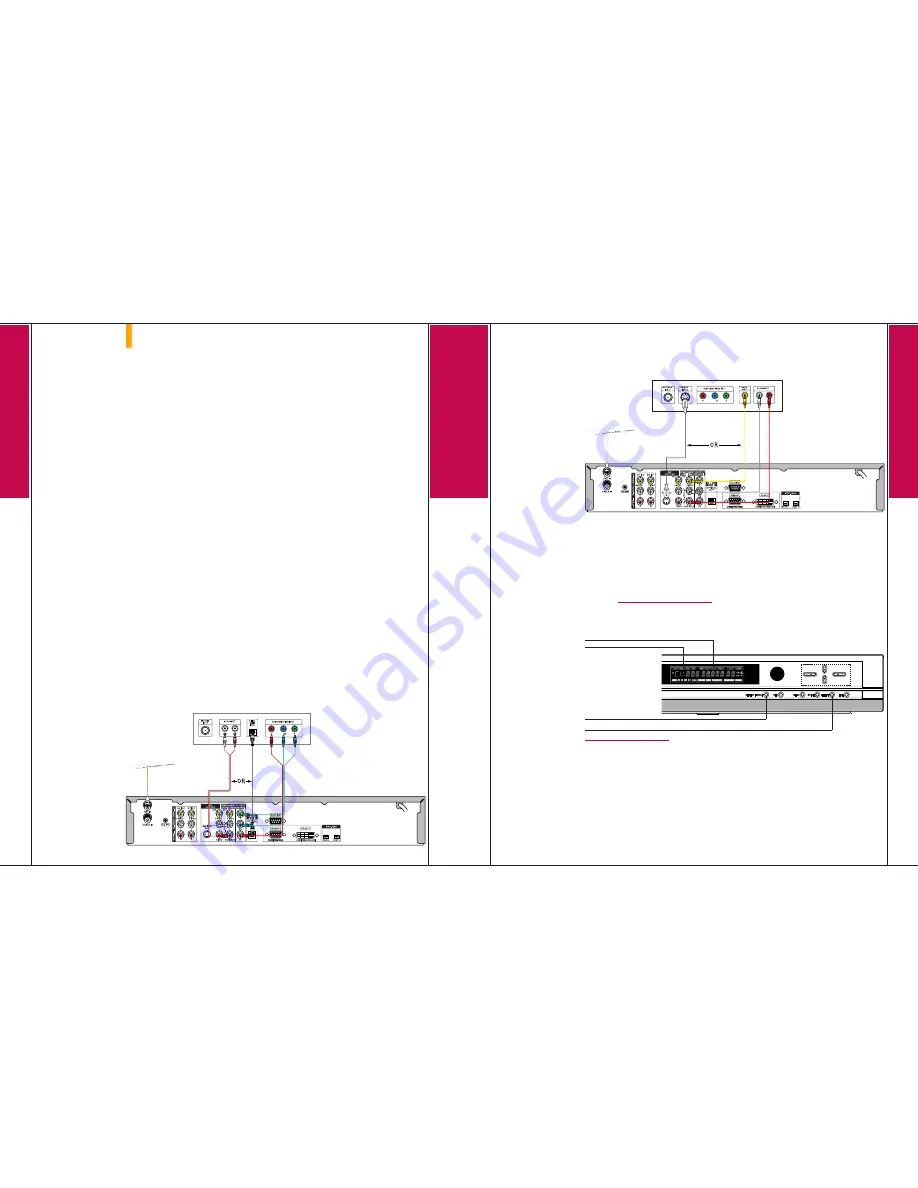
2-2. If your TV does not have “COMPONENT (YPbPr) IN” jacks: (Fig. 2)
Connect the “A/V OUT” jacks from the HD DVR to the “VIDEO IN” and “AUDIO IN” jacks on
your TV using RCA-type cables. If your TV is equipped with an S-Video jack, you can use the
“S-VIDEO OUT” jack. Connect with an S-VIDEO cable (not included).
3. Connect “Antenna” to the HD DVR
Connect the “Antenna” to the “ANT IN” jack on the HD DVR using a coaxial RF cable.
Note:
You can skip this step if you don’t want to watch terrestrial broadcasting.
4. Plug in power cord
Turn on your TV and the HD DVR (press POWER on the remote control for the HD DVR).
5. Tune TV(if necessary) to see Auto Demo
If you do not see Auto Demo, change input source of your TV or resolution/output of the HD
DVR(see
“
Changing Resolution/Output
”
).
Note:
While you are watching Auto Demo, you can see HD television if the HD DVR is con-
nected to an HDTV.
6. Turn off the HD DVR.
7. Unplug the power cord and wait 5 seconds.
8. Remove "Demo Pin".
9. Plug in the power cord and turn on th the HDDVR.
HD D
VR Quick Setup Guide _ 3
1. Unpack the HD DVR and Accessories
Make sure you have received all the accessories listed below with the HD DVR. (see page 10 of the owner’s manual.)
- HD DVR
- RF Cable
- Audio Cable
- Video (Composite) Cable
- Component (YPbPr) Cable
- G-LINK
®
Cable
- Demo Pin (Located in the G-LINK port of the HD DVR)
- DVI Cable
- Remote Control
- Batteries (size AA)
2. Connect the HD DVR to your TV
2-1. If your TV has “COMPONENT (YPbPr) IN” jacks: (Fig. 1)
Connect the “COMPONENT OUT” jacks from the HD DVR to the “COMPONENT IN” jacks on
your TV using component video cables.
Connect the L/R “AUDIO OUT” jacks on the HD DVR to the L/R “AUDIO IN” jacks on your TV
using RCA-type cables. If your TV is equipped with a “Digital Audio Input (Optical)” jack, you
can use “DIGITAL AUDIO (OPTICAL OUT)” jack. Connect with an optical audio cable (not
included).
HD D
VR Quick Setup Guide _ 2
STEP 1
Unpack and Connect
Fig. 2
TV Connection Panel
HD DVR Connection Panel
HD DVR Front Control Panel
Changing Resolution/Output
Press
DISPLAY FORMAT
on the front panel repeatedly to change output (DVI, RGB, YPbPr, or Video) afterward press
SELECT
. And
then press
DISPLAY FORMAT
repeatedly again to change resolution (1080i, 720p, 480p, 480i, NATIVE, VARIABLE 1, VARIABLE 2,
VARIABLE 3, or AUTO DVI) afterward press
SELECT
.
Output Indicator
DISPLAY FORMAT:
Changes blinking indicator
SELECT: Chooses currently blinking resolution or output
Resolution Indicator
Antenna
Antenna
Fig. 1
HD Monitor Connection Panel
HD DVR Connection Panel
Summary of Contents for LST-3410A
Page 66: ...Notes 66 ...
Page 67: ...Notes REFERENCE 67 ...


