background image

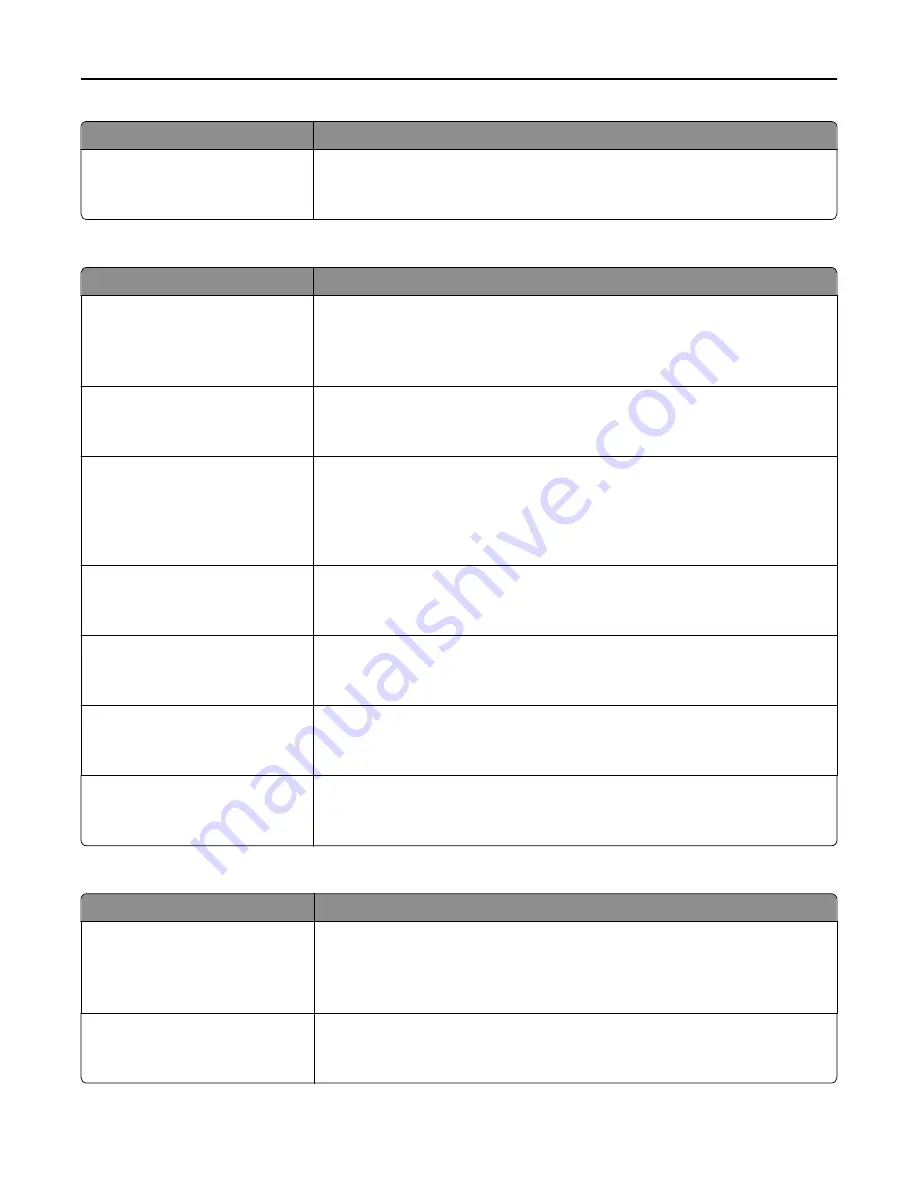
Use

To

Enable Color Fax Receive

On
Off

Enable the printer to receive fax in color and print it in grayscale.

Note: 

On is the factory default setting.

Fax Log Settings

Use

To

Transmission Log

Print log
Do not print log
Print only for error

Enable printing of a transmission log after each fax job.

Note: 

Print log is the factory default setting.

Receive Error Log

Print Never
Print on Error

Enable printing of a receive error log.

Note: 

Print Never is the factory default setting.

Auto Print Logs

On
Off

Enable automatic printing of fax logs.

Notes:

On is the factory default setting.

Logs print after every 200 fax jobs.

Log Paper Source

Tray [x]
Multipurpose Feeder

Specify the source of the paper used for printing logs.

Note: 

Tray 1 is the factory default setting.

Logs Display

Remote Station Name
Dialed Number

Specify whether printed logs display the dialed number or the station name or fax
name returned.

Note: 

Remote Station Name is the factory default setting.

Enable Job Log

On
Off

Enable access to the Fax Job log.

Note: 

On is the factory default setting.

Enable Call Log

On
Off

Enable access to the Fax Call log.

Note: 

On is the factory default setting.

Speaker Settings

Use

To

Speaker Mode

Always Off
On until Connected
Always On

Specify the mode of the speaker.

Note: 

On until Connected is the factory default setting. A sound is issued until the

fax connection is made.

Speaker Volume

High
Low

Set the speaker volume to high or low.

Note: 

High is the factory default setting.

Understanding the printer menus

162

Summary of Contents for XC2130

Page 1: ...XC2130 User s Guide September 2014 www lexmark com Machine type s 7527 Model s 496 ...

Page 2: ...een buttons 16 Setting up and using the home screen applications 18 Finding the IP address of the computer 18 Finding the IP address of the printer 18 Accessing the Embedded Web Server 18 Customizing the home screen 19 Understanding the different applications 19 Activating the home screen applications 20 Setting up Remote Operator Panel 23 Exporting and importing a configuration 24 Additional prin...

Page 3: ...m a flash drive or mobile device 63 Printing confidential and other held jobs 65 Printing information pages 67 Canceling a print job 68 Copying 69 Making copies 69 Copying photos 70 Copying on specialty media 70 Creating a copy shortcut using the printer control panel 71 Customizing copy settings 71 Placing information on copies 76 Canceling a copy job 77 Understanding the copy options 78 E mailin...

Page 4: ... options 116 Understanding the printer menus 119 Menus list 119 Supplies menu 120 Paper menu 120 Reports menu 130 Network Ports 131 Security menu 139 Settings menu 143 Saving money and the environment 193 Saving paper and toner 193 Saving energy 194 Recycling 197 Securing the printer 199 Using the security lock feature 199 Statement of Volatility 199 Erasing volatile memory 200 Erasing non volatil...

Page 5: ...ettings 231 Copying printer settings to other printers 231 Restoring factory default settings 231 Clearing jams 233 Avoiding jams 233 Understanding jam messages and locations 234 x page jam clear standard bin 203 xx 236 x page jam open front door to clear fuser 202 xx 239 x page jam open front door 20y xx 242 x page jam open front door to clear duplex 23y xx 243 x page jam open tray x 24y xx 244 x...

Page 6: ... scanner problems 307 Solving home screen application problems 311 Embedded Web Server does not open 312 Contacting customer support 314 Notices 315 Product information 315 Edition notice 315 Power consumption 319 Index 333 Contents 6 ...

Page 7: ...TION POTENTIAL INJURY The printer weight is greater than 18 kg 40 lb and requires two or more trained personnel to lift it safely CAUTION POTENTIAL INJURY Before moving the printer follow these guidelines to avoid personal injury or printer damage Turn the printer off using the power switch and then unplug the power cord from the electrical outlet Disconnect all cords and cables from the printer b...

Page 8: ... from the electrical outlet and disconnect all cables from the printer before proceeding CAUTION SHOCK HAZARD Do not use the fax feature during a lightning storm Do not set up this product or make any electrical or cabling connections such as the fax feature power cord or telephone during a lightning storm CAUTION TIPPING HAZARD Floor mounted configurations require additional furniture for stabili...

Page 9: ... a network Caring for and maintaining the printer Troubleshooting and solving problems User s Guide and Quick Reference Guide The guides are available on the Documentation CD Note These guides are also available in other languages Information on setting up and configuring the accessibility features of your printer Lexmark Accessibility Guide This guide is available at http support lexmark com Help...

Page 10: ...ries and regions See the printed warranty that came with this printer Selecting a location for the printer CAUTION POTENTIAL INJURY The printer weight is greater than 18 kg 40 lb and requires two or more trained personnel to lift it safely When selecting a location for the printer leave enough room to open trays covers and doors If you plan to install any options then leave enough room for them al...

Page 11: ...loor mounted configurations require additional furniture for stability You must use either a printer stand or printer base if you are using multiple input options If you purchased a multifunction printer MFP that scans copies and faxes then you may need additional furniture For more information see www lexmark com multifunctionprinters Learning about the printer 11 ...

Page 12: ...ray 2 9 Optional 550 sheet tray Tray 3 Understanding the basic functions of the scanner Make quick copies or set the printer to perform specific copy jobs Send a fax using the printer control panel Send a fax to multiple fax destinations at the same time Scan documents and send them to your computer an e mail address or an FTP destination Scan documents and send them to another printer PDF through...

Page 13: ...heets of plain paper into the ADF tray Scan sizes from 105 x 148 mm 4 1 x 5 8 inches wide to 216 x 355 mm 8 5 x 14 inches long Scan media weights from 52 to 120 g m2 14 to 32 lb Do not load postcards photos small items transparencies photo paper or thin media such as magazine clippings into the ADF tray Place these items on the scanner glass Using the scanner glass When using the scanner glass Pla...

Page 14: ...activity 8 Start button Start a job depending on which mode is selected 9 Indicator light Check the status of the printer 10 USB port Connect a flash drive to the printer Note Only the front USB port supports flash drives Understanding the home screen When the printer is turned on the display shows a basic screen referred to as the home screen Use the home screen buttons and icons to initiate an a...

Page 15: ...or Cartridge Low Show intervention messages and the instructions on how to clear them 7 Status Supplies Show a printer warning or error message whenever the printer requires intervention to continue processing View more information on the printer warning or message and on how to clear it This may also appear on the home screen Touch To Search Held Jobs Search current held jobs Jobs by user Access ...

Page 16: ...ition Indicator light Printer status Off The printer is off or in Hibernate mode Blinking green The printer is warming up processing data or printing Solid green The printer is on but idle Blinking red The printer requires user intervention Sleep button light Printer status Off The printer is off idle or in Ready state Solid amber The printer is in Sleep mode Blinking amber The printer is entering...

Page 17: ...Increase Select a higher value 6 Decrease Select a lower value 7 Tips Open a context sensitive Help dialog Other touch screen buttons Touch To Accept Save a setting Cancel Cancel an action or a selection Exit a screen and return to the previous screen without saving changes Reset Reset values on the screen Understanding the printer control panel 17 ...

Page 18: ...inter is connected to a network or to a print server You can find the printer IP address From the top left corner of the printer home screen From the TCP IP section in the Network Ports menu By printing a network setup page or menu settings page and then finding the TCP IP section Note An IP address appears as four sets of numbers separated by periods such as 123 123 123 123 Accessing the Embedded...

Page 19: ...gle page For more information see Setting up Card Copy on page 21 Fax Scan a document and then send it to a fax number For more information see Faxing on page 89 Forms and Favorites Quickly find and print frequently used online forms directly from the printer home screen For more information see Setting up Forms and Favorites on page 20 Multi Send Scan a document and then send it to multiple desti...

Page 20: ...from the printer home screen Note The printer must have permission to access the network folder FTP site or Web site where the bookmark is stored From the computer where the bookmark is stored use sharing security and firewall settings to allow the printer at least a read access For help see the documentation that came with your operating system 1 Open a Web browser and then type the printer IP ad...

Page 21: ...etting Specify a setting to increase or decrease the level of contrast when a copy of the scanned card is printed Select Best for Content if you want the printer to adjust the contrast automatically Default scale setting Set the size of the scanned card when printed The default setting is 100 full size Color Output Select the check box to print the scanned card in color or clear it to scan in blac...

Page 22: ...by periods such as 123 123 123 123 2 Click Settings Apps Apps Management Multi Send 3 From the Profiles section click Add and then customize the settings Notes See the mouse over help beside each field for a description of the setting If you select FTP or Share Folder as a destination then make sure the location settings of the destination are correct Type the correct IP address of the host comput...

Page 23: ...ation are correct type the correct IP address of the host computer where the specified destination is located For more information on obtaining the IP address of the host computer see Finding the IP address of the computer on page 18 Make sure the printer has access rights to the folder where the specified destination is located 4 Click Apply To use the application touch Scan to Network on the pri...

Page 24: ...ion file for one or multiple applications For one application a Navigate to Settings Apps Apps Management select an application Configure b Export or import the configuration file Notes If a JVM Out of Memory error occurs then repeat the export process until the configuration file is saved If a timeout occurs and a blank screen appears then refresh the Web browser and then click Apply For multiple...

Page 25: ...e printer then turn them off as well and unplug any cables going into the printer Warning Potential Damage Controller board electronic components are easily damaged by static electricity Touch something metal on the printer before touching any controller board electronic components or connectors Available internal options Memory card DDR3 DIMM Flash memory Fonts Firmware Forms and Barcode Prescrib...

Page 26: ...bles going into the printer 1 Access the controller board at the back of the printer Note This task requires a flat head screwdriver 2 Turn the screws counterclockwise to remove them 3 Slightly open the controller board access cover and then shift to the right to remove it 2 1 4 Locate the appropriate connector on the controller board Warning Potential Damage Controller board electronic components...

Page 27: ...1 2 1 Memory card connector 2 Option card connector 5 Reattach the cover 1 2 Additional printer setup 27 ...

Page 28: ...nplug the power cord from the electrical outlet before continuing If you have any other devices attached to the printer then turn them off as well and unplug any cables going into the printer 1 Access the controller board For more information see Accessing the controller board on page 26 2 Unpack the memory card Warning Potential Damage Do not touch the connection points along the edge of the card...

Page 29: ...th the ridge 2 on the connector 2 1 4 Push the memory card straight into the connector and then push the card toward the controller board wall until it clicks into place 1 2 5 Close the controller board access cover Additional printer setup 29 ...

Page 30: ...to the printer Warning Potential Damage Controller board electronic components are easily damaged by static electricity Touch a metal surface on the printer before touching any controller board electronic components or connectors 1 Access the controller board For more information see Accessing the controller board on page 26 2 Unpack the optional card Warning Potential Damage Avoid touching the co...

Page 31: ...ontroller board access door Note When the printer software and any hardware options are installed it may be necessary to manually add the options in the printer driver to make them available for print jobs For more information see Adding available options in the print driver on page 35 Installing hardware options Order of installation CAUTION POTENTIAL INJURY The printer weight is greater than 18 ...

Page 32: ...inter weight is greater than 18 kg 40 lb and requires two or more trained personnel to lift it safely CAUTION SHOCK HAZARD If you are accessing the controller board or installing optional hardware or memory devices sometime after setting up the printer then turn the printer off and unplug the power cord from the electrical outlet before continuing If you have any other devices attached to the prin...

Page 33: ...4 Align the printer with the 650 sheet duo tray and then lower the printer into place 5 Install the dust covers Additional printer setup 33 ...

Page 34: ...o match the following The USB symbol on the cable with the USB symbol on the printer The appropriate Ethernet cable to the Ethernet port Warning Potential Damage Do not touch the USB cable any network adapter or the printer in the area shown while actively printing Loss of data or a malfunction can occur 6 7 1 2 4 3 5 Use the To 1 Rear USB port Attach an optional wireless network adapter or an opt...

Page 35: ...the printer IP address from the TCP IP section in the Network Ports menu Adding available options in the print driver For Windows users 1 Open the printers folder In Windows 8 From the Search charm type run and then navigate to Run type control printers OK In Windows 7 or earlier a Click or click Start and then click Run b Type control printers c Press Enter or click OK 2 Select the printer you wa...

Page 36: ...network You can choose to use the default printer nickname or assign a name that is easier for you to remember You will need an Ethernet cable to connect the printer to the network and an available port where the printer can physically connect to the network Use a new network cable when possible to avoid potential problems caused by a damaged cable Preparing to set up the printer on a wireless net...

Page 37: ...nch the wireless utility of the computer network adapter and then look for the network name If you cannot find the SSID or the security information for your network then see the documentation that came with the access point or contact your system support person To find the WPA WPA2 preshared key or passphrase for the wireless network see the documentation that came with the access point see the Em...

Page 38: ...s network adapter Using the Push Button Configuration method 1 From the printer control panel navigate to Network Ports Network x Network x Setup Wireless Wireless ConnectionSetup Wi Fi Protected Setup Start Push Button Method 2 Follow the instructions on the printer display Using the Personal Identification Number PIN method 1 From the printer control panel navigate to Network Ports Network x Net...

Page 39: ... or passphrase network mode and channel 4 Click Submit 5 Turn off the printer and then disconnect the Ethernet cable Then wait for at least five seconds and then turn the printer back on 6 To verify if your printer is connected to the network print a network setup page Then in the Network Card x section see if the status is Connected Verifying printer setup When all hardware and software options a...

Page 40: ...etwork printing configuration 1 From the home screen navigate to Reports Network Setup Page 2 Check the first section of the network setup page and confirm that the status is Connected IfthestatusisNot Connected thentheLANdropmaynotbeactive orthenetworkcablemaybemalfunctioning Consult a system support person for a solution and then print another network setup page Additional printer setup 40 ...

Page 41: ...al size is 215 9 x 359 9 mm 8 5 x 14 17 inches and is loaded only in the multipurpose feeder and manual feeder 1 From the home screen navigate to Paper Menu Universal Setup Units of Measure select a unit of measure 2 Touch Portrait Width or Portrait Height 3 Select the width or height and then touch Loading the 250 and 550 sheet tray The printer has one 250 sheet tray Tray 1 with an integrated man...

Page 42: ... guide at the back of the tray to extend it 2 1 3 Squeeze and then slide the length guide tab to the correct position for the size of the paper being loaded 2 1 1 Note Use the paper size indicators on the bottom of the tray to help position the guide Loading paper and specialty media 42 ...

Page 43: ...e bottom of the tray to help position the guides 5 Flex the sheets back and forth to loosen them and then fan them Do not fold or crease the paper Straighten the edges on a level surface 6 Load the paper stack with the recommended printable side faceup 7 Place the paper guides securely against the edges of the paper Loading paper and specialty media 43 ...

Page 44: ... two sided duplex printing Note There are different ways for loading letterhead depending on the mode of printing One sided printing using a letterhead Two sided printing using a letterhead A B C A B C Load envelope with the flap side up and against the right side of the paper guide 2 Feed paper into the manual feeder only to the point where its leading edge can contact the paper guides Note To ac...

Page 45: ...optional 550 sheet tray and supports the same paper types and sizes The only differences are the look of the guide tabs and the location of the paper size indicators CAUTION POTENTIAL INJURY To reduce the risk of equipment instability load each tray separately Keep all other trays closed until needed 1 2 3 1 Length guide tab 2 Paper size indicator 3 Width guide tab Loading paper and specialty medi...

Page 46: ... the multipurpose feeder latch to the left 2 Open the multipurpose feeder 3 Pull the multipurpose feeder extender Note Guide the extender gently so that the multipurpose feeder is fully extended and open Loading paper and specialty media 46 ...

Page 47: ...lex a stack of envelopes back and forth to loosen them and then fan them Straighten the edges on a level surface Warning Potential Damage Never use envelopes with stamps clasps snaps windows coated linings or self stick adhesives These envelopes may severely damage the printer 5 Locate the maximum paper fill indicator and tab Note Make sure the paper or specialty media is below the maximum paper f...

Page 48: ...its loosely in the multipurpose feeder and is not bent or wrinkled 7 From the printer control panel set the paper size and type in the Paper menu to match the paper loaded in the tray Linking and unlinking trays The printer links trays when the specified paper size and type are the same When a linked tray becomes empty paper feeds from the next linked tray To prevent trays from linking assign a un...

Page 49: ...eb Server 1 Open a Web browser and then type the printer IP address in the address field Notes View the printer IP address on the printer home screen The IP address appears as four sets of numbers separated by periods such as 123 123 123 123 If you are using a proxy server then temporarily disable it to load the Web page correctly 2 Click Settings Paper Menu Custom Names 3 Select a custom name and...

Page 50: ... Paper is the factory default paper type for all user defined custom names 3 Touch Configuring a custom name Using the Embedded Web Server 1 Open a Web browser and then type the printer IP address in the address field Notes View the printer IP address on the printer home screen The IP address appears as four sets of numbers separated by periods such as 123 123 123 123 If you are using a proxy serv...

Page 51: ...gned specifically for laser printers Print a test page on the letterhead being considered for use before buying large quantities Before loading letterhead flex fan and straighten the stacks to prevent sheets from sticking together Page orientation is important when printing on letterhead Source Printing Printable side Paper orientation Trays One sided Faceup Load the sheet with the top edge enteri...

Page 52: ...the bottom edge entering the printer first Multipurpose feeder One sided Facedown Load the sheet with the top edge entering the printer first Multipurpose feeder Two sided Faceup Load the sheet with the bottom edge entering the printer first Note Check with the manufacturer or vendor to determine whether or not the preprinted letterhead is acceptable for laser printers Paper and specialty media gu...

Page 53: ...or 25 cotton Use only new envelopes from undamaged packages To optimize performance and minimize jams do not use envelopes that Have excessive curl or twist Are stuck together or damaged in any way Have windows holes perforations cutouts or embossing Have metal clasps string ties or folding bars Have an interlocking design Have postage stamps attached Have any exposed adhesive when the flap is in ...

Page 54: ...ighten the edges on a level surface Paper guidelines Select the correct paper or specialty media to reduce printing problems For the best print quality try a sample of the paper or specialty media before buying large quantities Paper characteristics The following paper characteristics affect print quality and reliability Consider these characteristics when evaluating new paper stock Weight The pri...

Page 55: ...per is recommended Fiber content Most high quality xerographic paper is made from 100 chemically treated pulped wood This content provides the paperwith ahigh degreeofstabilityresultinginfewerpaperfeedingproblems and betterprintquality Papercontaining fibers such as cotton can negatively affect paper handling Unacceptable paper The following paper types are not recommended for use with the printer...

Page 56: ... that all recycled paper will feed well Lexmark consistently tests its printers with recycled paper 20 100 post consumer waste and a variety of test paper from around the world using chamber tests for different temperature and humidity conditions Lexmark has found no reason to discourage the use of today s recycled office papers but generally the following property guidelines apply to recycled pap...

Page 57: ...ve a 650 sheet duo tray which consists of a 550 sheet tray and an integrated 100 sheet multipurpose feeder The 550 sheet tray of the 650 sheet duo tray supports the same paper sizes as the optional 550 sheet tray The integrated multipurpose feeder supports different paper sizes types and weights Paper size and dimension Standard 250 sheet tray Manual feeder 650 sheet duo tray 550 sheet tray ADF Sc...

Page 58: ...n to 216 x 356 mm 8 5 x 14 in X 1 3 X 1 3 X X Universal 148 x 210 mm 5 8 x 8 3 in to 216 x 356 mm 8 5 x 14 in 1 2 1 2 1 2 X X 4 1 The paper source supports paper size without size sensing 2 Universal is supported in the standard 250 and optional 550 sheet trays only if the paper size is from 148 x 215 9 mm 5 83 x 8 5 in to 215 9 x 355 6 mm 8 5 x 14 in 3 Universal is supported in the multipurpose f...

Page 59: ... optional 550 sheet trays only if the paper size is from 148 x 215 9 mm 5 83 x 8 5 in to 215 9 x 355 6 mm 8 5 x 14 in 3 Universal is supported in the multipurpose feeder and manual feeder only if the paper size is from 76 2 x 127 mm 3 x 5 in to 215 9 x 359 9 mm 8 5 x 14 17 in 4 Universal is supported in duplex mode only if the width is from 210 mm 8 27 in to 215 9 mm 8 5 in and the length is from ...

Page 60: ...ay 550 sheet tray ADF Scanner glass Two sided printing 550 sheet tray Multipurpose feeder Paper Plain Recycled Glossy Bond Letterhead Preprinted Colored Light Heavy Custom Type x Card stock X Labels Paper X Envelope X X X X Paper and specialty media guide 60 ...

Page 61: ... a With a document open click File Print b Click Properties Preferences Options or Setup c Adjust the settings if necessary d Click OK Print For Macintosh users a Customize the settings in the Page Setup dialog 1 With a document open choose File Page Setup 2 Choose a paper size or create a custom size to match the paper loaded 3 Click OK b Customize the settings in the Print dialog 1 With a docume...

Page 62: ...u choose between a faster print speed or a higher toner yield Max Yield is the factory default setting Max Speed This lets you print in either black or color depending on what is set in the printer driver The printer prints in color unless Black Only is selected in the printer driver Max Yield This lets you switch from black to color based on the color content found on each page Frequent color mod...

Page 63: ...ot print files for which you do not have printing permissions 1 Insert a flash drive into the USB port Notes A flash drive icon appears on the printer home screen when a flash drive is inserted If you insert the flash drive when the printer requires attention such as when a jam has occurred then the printer ignores the flash drive If you insert the flash drive while the printer is processing other...

Page 64: ...inted and then touch Print Notes Do not remove the flash drive from the USB port until the document has finished printing If you leave the flash drive in the printer after leaving the initial USB menu screen then touch Held Jobs on the home screen to print files from the flash drive Supported flash drives and file types Notes High speed USB flash drives must support the full speed standard Low spe...

Page 65: ...ype Use To Max Invalid PIN Limit the number of times an invalid PIN can be entered Note When the limit is reached the print jobs for that user name and PIN are deleted Confidential Job Expiration HoldprintjobsinthecomputeruntilyouenterthePINfromtheprintercontrol panel Note The PIN is set from the computer It must be four digits using the numbers 0 9 Repeat Job Expiration Print and store print jobs...

Page 66: ...ry after printing Repeat and Reserve jobs are held in the printer until you delete them For Windows users 1 With a document open click File Print 2 Click Properties Preferences Options or Setup 3 Click Print and Hold 4 Select the print job type Confidential Repeat Reserve or Verify and then assign a user name For a confidential print job also enter a four digit PIN 5 Click OK or Print 6 From the p...

Page 67: ...as 123 123 123 123 If you are using a proxy server then temporarily disable it to load the Web page correctly 2 Click Configuration Other Settings tab Security Confidential Print Setup 3 Modify the settings Set a maximum number of PIN entry attempts When a user exceeds that number all of the jobs for that user are deleted Set an expiration time for confidential print jobs When a user has not print...

Page 68: ...ad to return to the home screen Canceling a print job from the computer For Windows users 1 Open the printers folder and then select your printer 2 From the print queue select the print job you want to cancel and then delete it For Macintosh users 1 From System Preferences in the Apple menu navigate to your printer 2 From the print queue select the print job you want to cancel and then delete it P...

Page 69: ...hoto paper or thin media such as magazine clippings into the ADF tray Place these items on the scanner glass The ADF indicator light comes on when the paper is loaded properly 2 If you are loading a document into the ADF tray then adjust the paper guides Note To avoid a cropped image make sure the size of the original document and the size of the copy paper are the same 3 From the printer control ...

Page 70: ...home screen navigate to Copy Content Photo 3 From the Content Source menu select the appropriate setting that best matches the original photo 4 Touch Copy It Note If you have more photos to copy then place the next photo on the scanner glass and then touch Scan the next page 5 Touch Finish the Job Copying on specialty media Copying on transparencies 1 Load an original document faceup short edge fi...

Page 71: ...y to Manual Feeder 4 Place the letterhead faceup top edge first into the multipurpose feeder 5 Select the size of the letterhead and then touch Letterhead Copy It Creating a copy shortcut using the printer control panel 1 From the home screen touch Copy 2 Adjust the copy settings and then touch Save As Shortcut Note If you change the settings after the copy shortcut has been created then the setti...

Page 72: ...anner glass The ADF indicator light comes on when the paper is loaded properly 2 If you are loading a document into the ADF tray then adjust the paper guides 3 From the home screen navigate to Copy Copy from select the size of the original document 4 Touch Copy to and then select the tray that contains the paper type you want to use 5 Touch Copy It Copying different paper sizes Use the ADF to copy...

Page 73: ...er duplexing 1 Load an original document faceup short edge first into the ADF tray or facedown on the scanner glass Notes Do not load postcards photos small items transparencies photo paper or thin media such as magazine clippings into the ADF tray Place these items on the scanner glass The ADF indicator light comes on when the paper is loaded properly 2 If you are loading a document into the ADF ...

Page 74: ...light comes on when the paper is loaded properly 2 If you are loading a document into the ADF tray then adjust the paper guides 3 From the home screen navigate to Copy Content 4 Touch the button that best represents the content type of the document you are copying Text The content of the original document is mostly text or line art Text Photo The original document is a mixture of text graphics and...

Page 75: ...t the paper guides 3 From the home screen navigate to Copy enter the number of copies Collate select the preferred order of pages Copy It Placing separator sheets between copies 1 Load an original document faceup short edge first into the ADF tray or facedown on the scanner glass Notes Do not load postcards photos small items transparencies photo paper or thin media such as magazine clippings into...

Page 76: ...ADF tray then adjust the paper guides 3 From the home screen navigate to Copy Paper Saver select the output you want Copy It Note If Paper Saver is set to Off then the Print Page Borders option is unavailable Placing information on copies Placing a header or footer on pages 1 Load an original document faceup short edge first into the ADF tray or facedown on the scanner glass Notes Do not load post...

Page 77: ... tray then adjust the paper guides 3 From the home screen navigate to Copy Overlay select an overlay message Note The message choices are Urgent Confidential Copy Custom and Draft 4 Touch Copy It Canceling a copy job Canceling a copy job while the original document is in the ADF When the ADF begins processing a document touch Cancel Job on the printer control panel Canceling a copy job while copyi...

Page 78: ...s not in one of the trays then Paper size not found appears and prompts to load a paper in a tray manual feeder or multipurpose feeder Scale This option lets you scale the document from 25 to 400 of the original document size You can also set automatic scaling When copying to a different paper size such as from legal size to letter size paper set the Copy from and Copy to paper sizes automatically...

Page 79: ...nter Photo Film The original document is a photo from film Press The original document was printed using a printing press Color This option lets you set the output to either color or monochrome for the scanned image Advanced Duplex This option lets you specify the document orientation whether documents are one sided or two sided and how documents are bound Save As Shortcut This option lets you sav...

Page 80: ...Time Page number Paper Saver This option lets you print two or more pages of an original document on the same page Paper Saver is also called N up printing where N stands for the number of pages For example 2 up would print two pages of your document on a single page and 4 up would print four pages of your document on a single page Advanced Imaging Thisoption letsyouadjust theAuto Center Backgroun...

Page 81: ...Adjust ADF Skew This option lets you straighten scanned images that are slightly skewed when received from the ADF tray Copying 81 ...

Page 82: ...address book Setting up the printer to e mail Setting up the e mail function 1 Open a Web browser and then type the printer IP address in the address field Notes View the printer IP address on the printer home screen The IP address appears as four sets of numbers separated by periods such as 123 123 123 123 If you are using a proxy server then temporarily disable it to load the Web page correctly ...

Page 83: ...ect type the e mail subject 3 Touch Message type your message 4 Adjust the e mail settings Note If you change the settings after the e mail shortcut has been created then the settings are not saved 5 Touch Save As Shortcut 6 Type a unique name for the shortcut and then touch 7 Verify that the shortcut name is correct and then touch OK If the shortcut name is incorrect then touch Cancel and then re...

Page 84: ...r thin media such as magazine clippings into the ADF tray Place these items on the scanner glass The ADF indicator light comes on when the paper is loaded properly 2 If you are loading a document into the ADF tray then adjust the paper guides 3 Press then enter the shortcut number using the keypad and then touch To enter additional recipients touch and then enter the e mail address or shortcut num...

Page 85: ...omes on when the paper is loaded properly 2 If you are loading a document into the ADF tray then adjust the paper guides 3 From the home screen navigate to E mail Recipient s type the e mail address 4 Touch Subject type the e mail subject 5 Touch Message type your message Changing the output file type 1 Load an original document into the ADF tray or on the scanner glass 2 From the home screen navi...

Page 86: ...inal Size This option lets you set the paper size of the documents you are going to e mail When Original Size is set to Mixed Sizes you can scan an original document that contains mixed paper sizes letter and legal size pages Darkness This option lets you adjust how light or dark your scanned documents are in relation to the original document Resolution This option lets you adjust the output quali...

Page 87: ...Color Laser The original document was printed using a color laser printer Inkjet The original document was printed using an inkjet printer Magazine The original document is from a magazine Newspaper The original document is from a newspaper Other The original document was printed using an alternate or unknown printer Photo Film The original document is a photo from film Press The original document...

Page 88: ...he paper or you can pick a particular edge Edge Erase also removes whatever is within the area selected leaving nothing on that portion of the scan Advanced Imaging Thisoptionletsyouadjust theBackgroundRemoval ColorBalance ColorDropout Contrast JPEGQuality MirrorImage Negative Image Scan Edge to Edge Shadow Detail Sharpness and Temperature settings before you e mail the document Adjust ADF Skew Th...

Page 89: ...o not set up this product or make any electrical or cabling connections such as the fax feature power cord or telephone during a lightning storm Notes The following connection methods are applicable only in some countries or regions During the initial printer setup clear the fax function check box and any other function you plan to set up later and then touchContinue The indicator light may blink ...

Page 90: ...mation Using the printer control panel for fax setup When the printer is turned on for the first time a series of start up screens appear If the printer has fax capabilities then the Fax Name and Fax Number screens appear 1 When the Fax Name screen appears do the following a Enter the name to be printed on all outgoing faxes b Enter the fax name and then touch Submit 2 When the Fax Number screen a...

Page 91: ...nd of the telephone cable that came with the printer to the port of the printer 2 Connect the other end of the telephone cable to an active analog wall jack Tips for this setup You can set the printer to receive faxes automatically Auto Answer On or manually Auto Answer Off If you want to receive faxes automatically Auto Answer On then set the printer to pick up on any number of rings that you wan...

Page 92: ...e telephone wall jack PHONE LINE To connect 1 Connect one end of the telephone cable that came with the printer to the port of the printer 2 Connect the other end of the telephone cable to an active analog wall jack 3 Connect the answering machine to the port of the printer Faxing 92 ...

Page 93: ... calls two rings after the answering machine For example if the answering machine picks up calls after four rings then set the printer to pick up after six rings This way the answering machine picks up calls first and your voice calls are received If the call is a fax then the printer detects the fax signal on the line and takes over the call If you subscribe to a distinctive ring service provided...

Page 94: ...en make sure that you set the correct ring pattern for the printer Otherwise the printer does not receive faxes even if you have set it to receive faxes automatically If you have only one telephone number on your line then you need to set the printer to receive faxes manually Auto Answer Off When you answer the telephone and you hear fax tones press 9 or the manual answer code on the telephone to ...

Page 95: ...and ensure a quality connection you need to install a DSL filter for the analog devices fax machine telephone answering machine in your network Interference causes noise and static on the telephone failed and poor quality faxes for the printer and slow Internet connection on your computer Note Contact your DSL provider to obtain a DSL filter To install a filter for the printer 1 Connect the line p...

Page 96: ...t one end of the telephone cable that came with the printer to the port of the printer 2 Connect the other end of the cable to the port labeled Phone Line 1 or Phone Port on the VoIP adapter Note The port labeled Phone Line 2 or Fax Port is not always active VoIP providers may charge additional cost for activation of the second phone port 3 Connect the telephone to the port of the printer Faxing 9...

Page 97: ...hone into the splitter Note Make sure you use a phone splitter not a line splitter To make sure that you are using the correct splitter plug an analog telephone into the splitter and then listen for a dial tone Scenario 4 Digital telephone service through a cable provider Setup 1 Printer is connected directly to a cable modem 1 Connect one end of the telephone cable that came with your printer to ...

Page 98: ...lug the phone splitter into the Phone Line 1 or Phone Port and then plug the printer and telephone into the splitter Make sure you use a phone splitter not a line splitter To make sure that you are using the correct splitter plug an analog telephone into the splitter and then listen for a dial tone Setup 2 Printer is connected to a wall jack cable modem is installed elsewhere in the facility 1 Con...

Page 99: ...J 11 plug If the wall jack or equipment in your facility is not compatible with this type of connection then you need to use a telephone adapter An adapter for your country or region may not come with your printer and you may need to purchase it separately There may be an adapter plug installed in the port of the printer If you are using a telephone adapter or a facility that has a cascaded or ser...

Page 100: ...he wall jack 3 If you want to connect another device telephone or answering machine to the same wall jack and if the device has a non RJ 11 connector then connect it directly to the telephone adapter Notes The port of the printer may have an adapter plug for use with the adapter Do not remove the plug from the port of the printer In some countries or regions the printer may not come with a telepho...

Page 101: ...ems and answering machines The F port is for telephones N F N Connect the printer to any of the N ports PHONE LINE N F N 1 Connect one end of the telephone cable that came the printer to the port of the printer 2 Connect the other end of the telephone cable to the RJ 11 adapter and then connect the adapter to an N port Faxing 101 ...

Page 102: ...nnect the other end of the telephone cable to an active analog telephone wall jack 3 Change the distinctive rings setting to match the setting you want for the printer to answer Note The factory default setting for distinctive rings is On This sets the printer to answer single double and triple ring patterns a From the home screen navigate to Settings Fax Settings Analog Fax Setup Answer On b Sele...

Page 103: ...The printer can be set to automatically adjust for daylight saving time 1 Open a Web browser and then type the printer IP address in the address field Notes View the printer IP address on the printer home screen The IP address appears as four sets of numbers separated by periods such as 123 123 123 123 If you are using a proxy server then temporarily disable it to load the Web page correctly 2 Cli...

Page 104: ...river or the Universal Fax Driver For more information go to http support lexmark com To use the fax option with the PostScript driver configure and enable it in the Configuration tab For Macintosh users 1 With a document open choose File Print 2 Select the printer 3 Enter the recipient fax number and then configure other fax settings if necessary 4 Send the fax job Sending a fax using a shortcut ...

Page 105: ... recipient Note You can only search for one name at a time 4 Touch the name of the recipient and then touch Fax It Sending a fax at a scheduled time 1 Load an original document faceup short edge first into the ADF tray or facedown on the scanner glass Notes Do not load postcards photos small items transparencies photo paper or thin media such as magazine clippings into the ADF tray Place these ite...

Page 106: ...ut and then enter the fax number Notes To create a multiple number shortcut enter the fax numbers for the group Separate each fax number in the group with a semicolon 4 Assign a shortcut number Note If you enter a number that is already in use then you are prompted to select another number 5 Click Add Creating a fax destination shortcut using the printer control panel 1 From the home screen touch ...

Page 107: ... the ADF tray Place these items on the scanner glass The ADF indicator light comes on when the paper is loaded properly 2 If you are loading a document into the ADF tray then adjust the paper guides 3 From the home screen touch Fax and then enter the fax number 4 From the Darkness area touch or to adjust the darkness setting of the fax 5 Touch Fax It Viewing a fax log 1 Open a Web browser and then...

Page 108: ...emory 1 On the home screen touch Cancel Jobs The Cancel Jobs screen appears 2 Touch the job or jobs you want to cancel Only three jobs appear on the screen touch the down arrow until the job you want appears and then touch the job you want to cancel 3 Touch Delete Selected Jobs The Deleting Selected Jobs screen appears the selected jobs are deleted and then the home screen appears Holding and forw...

Page 109: ...umbers separated by periods such as 123 123 123 123 If you are using a proxy server then temporarily disable it to load the Web page correctly 2 Click Settings Fax Settings 3 From the Fax Forwarding menu select Print Print and Forward or Forward 4 From the Forward to menu select Fax E mail FTP LDSS or eSF 5 In the Forward to Shortcut field enter the shortcut number where you want the fax forwarded...

Page 110: ...iginal document was printed using a mono laser printer Color Laser The original document was printed using a color laser printer Inkjet The original document was printed using an inkjet printer Magazine The original document is from a magazine Newspaper The original document is from a newspaper Other The original document was printed using an alternate or unknown printer Photo Film The original do...

Page 111: ... lets you view the first page of the image before it is included in the fax When the first page is scanned the scanning is paused and a preview image appears Note This option appears only when a working printer hard disk is installed Delayed Send This option lets you send a fax at a later time or date Advanced Imaging This option lets you change or adjust the Background Removal Color Balance Color...

Page 112: ... such as magazine clippings The scanner lets you scan documents directly to a File Transfer Protocol FTP server Only one FTP address may be sent to the server at a time When an FTP destination has been configured by your system support person the name of the destination becomes available as a shortcut number or it is listed as a profile under the Held Jobs icon An FTP destination could also be ano...

Page 113: ...tcut name and number are correct and then touch OK If the name or number is incorrect then touch Cancel and then reenter the information If you enter a number that is already in use then you will be prompted to select another number Scanning to an FTP address Scanning to an FTP address using the printer control panel 1 Load an original document faceup short edge first into the ADF tray or facedown...

Page 114: ...scanner lets you scan documents directly to a computer or a flash drive The computer does not have to be directly connected to the printer for you to receive images when scanning to a computer You can scan the document back to the computer over the network by creating a scan profile on the computer and then downloading the profile to the printer Scanning to a computer using the Embedded Web Server...

Page 115: ...n the list Note The scanner scans and sends the document to the directory you specified 8 View the file from the computer Note The output file is saved in the location or launched in the program you specified Setting up Scan to Computer Notes This feature is supported only in Windows Vista or later Make sure your computer and printer are connected to the same network 1 Open the printers folder and...

Page 116: ...rent settings as a shortcut by assigning a shortcut name Note Selecting this option automatically assigns the next available shortcut number Original Size This option lets you set the paper size of the documents you are going to scan When Original Size is set to Mixed Sizes you can scan an original document that contains mixed paper sizes letter and legal size pages Darkness This option lets you a...

Page 117: ...nt is a mixture of text graphics and photos Select from the following content sources Black White Laser The original document was printed using a mono laser printer Color Laser The original document was printed using a color laser printer Inkjet The original document was printed using an inkjet printer Magazine The original document is from a magazine Newspaper The original document is from a news...

Page 118: ...you can pick a particular edge Edge Erase also removes whatever is within the area selected leaving nothing on that portion of the scan Advanced Imaging Thisoptionletsyouadjust theBackgroundRemoval ColorBalance ColorDropout Contrast JPEGQuality MirrorImage Negative Image Scan Edge to Edge Shadow Detail and Sharpness settings before you scan the document Custom Job This option lets you combine mult...

Page 119: ...mo Asset Report Event Log Summary Active NIC Standard Network1 Standard USB SMTP Setup Miscellaneous Security Settings Confidential Print Erase Temporary Data Files Security Audit Log Set Date and Time Settings Help Manage Shortcuts Option Card Menu2 General Settings Copy Settings Fax Settings E mail Settings FTP Settings Flash Drive Menu OCR Settings Print Settings Print All Guides Copy Guide E m...

Page 120: ... View the status of the maintenance kit Paper menu Default Source menu Use To Default Source Tray x Multipurpose Feeder Manual Paper Manual Envelope Set a default paper source for all print jobs Notes The 650 sheet duo tray must be installed in order for Multipurpose Feeder to appear as a menu setting in the Paper menu Tray 1 standard tray is the factory default setting Only installed paper source...

Page 121: ... using the linked tray Tray x Type Plain Paper Card Stock Transparency Recycled Labels Glossy Bond Letterhead Preprinted Colored Paper Light Paper Heavy Paper Rough Cotton Custom Type x Specify the type of paper loaded in each tray Notes Plain Paper is the factory default setting for Tray 1 Custom Type x is the factory default setting for all other trays If available a user defined name appears in...

Page 122: ...nu item applies only when the multipurpose feeder MP Feeder is installed The multipurpose feeder does not automatically detect paper size The paper size value must be set MP Feeder Type Plain Paper Card Stock Transparency Recycled Glossy Labels Bond Envelope Letterhead Preprinted Colored Paper Light Paper Heavy Paper Rough Cotton Custom Type x Specify the paper type loaded in the multipurpose feed...

Page 123: ...Custom Type x Specify the paper type being manually loaded Note Plain Paper is the factory default setting Manual Envelope Size 7 3 4 Envelope 9 Envelope 10 Envelope DL Envelope C5 Envelope B5 Envelope Other Envelope Specify the envelope size being manually loaded Note 10 Envelope is the U S factory default setting DL Envelope is the international factory default setting Manual Envelope Type Envel...

Page 124: ...e card stock loaded Notes Normal is the factory default setting The options appear only if card stock is supported Transparency Texture Smooth Normal Rough Specify the relative texture of the transparencies loaded Note Normal is the factory default setting Recycled Texture Smooth Normal Rough Specify the relative texture of the recycled paper loaded Note Normal is the factory default setting Gloss...

Page 125: ...efault setting Light Texture Smooth Normal Rough Specify the relative texture of the light paper loaded Note Normal is the factory default setting Heavy Texture Smooth Normal Rough Specify the relative texture of the heavy paper loaded Note Normal is the factory default setting Rough Cotton Texture Rough Specify the relative texture of the cotton paper loaded Custom x Texture Smooth Normal Rough S...

Page 126: ...ded Note Normal is the factory default setting Bond Weight Light Normal Heavy Specify the relative weight of the bond paper loaded Note Normal is the factory default setting Envelope Weight Light Normal Heavy Specify the relative weight of the envelope loaded Note Normal is the factory default setting Letterhead Weight Light Normal Heavy Specify the relative weight of the letterhead loaded Note No...

Page 127: ...s the paper type Bond Loading Duplex Off Determine and set two sided printing for all print jobs that specify Bond as the paper type Letterhead Loading Duplex Off Determine and set two sided printing for all print jobs that specify Letterhead as the paper type Preprinted Loading Duplex Off Determine and set two sided printing for all print jobs that specify Preprinted as the paper type Colored Loa...

Page 128: ...ossy Rough Cotton Labels Envelope Associatea paper or specialtymediatypewitha factory defaultCustom Type x name or a user defined custom name created in the Embedded Web Server or MarkVisionTM Professional Notes Paper is the factory default setting for Custom Type x The custom media type must be supported in the selected tray or feeder in order to print from that source Recycled Paper Card Stock T...

Page 129: ...6 360 mm Set the portrait width Notes If the width exceeds the maximum then the printer uses the maximum width allowed 8 5 inches is the U S factory default setting You can increase the width in 0 01 inch increments 216 mm is the international factory default setting You can increase the width in 1 mm increments Portrait Height 3 14 17 inches 76 360 mm Set the portrait height Notes If the height e...

Page 130: ...rs and when there is more than one network option installed Shortcut List Print a report containing information about configured shortcuts Fax Job Log Print a report containing information about the last 200 completed faxes Notes This menu item appears only when Enable Job Log is set to On in the Fax Settings menu This menu is supported only in some printer models Fax Call Log Printa report contai...

Page 131: ...er to connect to a network Notes Auto is the factory default setting This menu item appears only if an optional network adapter is installed Standard Network or Network x menu Note Only active ports appear in this menu Use To Energy Efficient Ethernet Enable Disable Reduce power consumption when the printer receives no data from the Ethernet network Note Enable is the factory default setting PCL S...

Page 132: ...mory in the printer the size of the other link buffers and whether Resource Save is set to On or Off To increase the maximum size range for the Network Buffer disable or reduce the size of the parallel serial and USB buffers The printer automatically restarts when the setting is changed from the control panel Job Buffering Off On Auto Temporarily store print jobs in the printer hard disk before pr...

Page 133: ...adapter Network Address UAA LAA View the network addresses Job Timeout 0 10 225 seconds Set the amount of time it takes for a network print job to be canceled Notes 90 seconds is the factory default setting A setting value of 0 disables the timeout If a value between 1 and 9 is selected then Invalid appears on the display and the value is not saved Banner Page Off On Allow the printer to print a b...

Page 134: ...t setting Enable FTP TFTP Yes No Enablethebuilt inFTP server which letsyou sendfilestotheprinterusing FileTransfer Protocol Note Yes is the factory default setting Enable HTTP Server Yes No Enable the built in Web server Embedded Web Server When enabled the printer can be monitored and managed remotely using a Web browser Note Yes is the factory default setting WINS Server Address View or change t...

Page 135: ...tory default setting Wireless menu Note This menu is available only in printers connected to a wireless network or printer models that have a wireless network adapter To access the menu navigate to Network Ports Network x Network x Setup Wireless Use To Wi Fi Protected Setup Start Push Button Method Start PIN Method Establish a wireless network and enable network security Notes Start Push Button M...

Page 136: ...cryption method for the wireless network AppleTalk menu To access the menu navigate to either of the following Network Ports Standard Network Standard Network Setup AppleTalk Network Ports Network x Network x Setup AppleTalk Use To Activate Yes No Enable or disable AppleTalk support Note No is the factory default setting View Name Show the assigned AppleTalk name Note The AppleTalk name can be cha...

Page 137: ... communication following the conventions defined by the NPA protocol Notes Auto is the factory default setting Auto sets the printer to examine data determine the format and then process it appropriately The printer automatically restarts when changing the setting from the printer control panel The menu selection is then updated USB Buffer Disabled Auto 3K to maximum size allowed Set the size of t...

Page 138: ...ation Note 25 is the default SMTP gateway port Primary SMTP Gateway Port Secondary SMTP Gateway Secondary SMTP Gateway Port SMTP Timeout 5 30 Specify the amount of time in seconds before the server stops trying to send an e mail Note 30 is the factory default setting Reply Address Specify a reply address of up to 128 characters in the e mail sent by the printer Use SSL Disabled Negotiate Required ...

Page 139: ...ut Notes Login failures specifies the number of failed login attempts before users are locked out Settings range from 1 to 10 attempts 3 attempts is the factory default setting Failure time frame specifies the time frame during which failed login attempts can be made before users are locked out Settings range from 1 to 60 minutes 5 minutes is the factory default setting Lockout time specifies how ...

Page 140: ...ow means a server certificate is requested If no certificate is provided then the session proceeds normally If a bad certificate is provided then it will be ignored and the session proceeds normally Never means no server certificate is requested Minimum PIN Length 1 16 Limit the digit length of the personal identification number PIN Note 4 is the factory default setting Confidential Print menu Use...

Page 141: ...tly in use by the file system All permanent data on the printer hard disk are preserved such as downloaded fonts macros and held jobs Note This menu appears only when a formatted working printer hard disk is installed Use To Wiping Mode Auto Specify the mode for erasing temporary data files Automatic Method Single pass Multiple pass Mark all disk space used by a previous print job This method does...

Page 142: ...fault setting If the security audit log is activated then the severity value of each event is recorded 4 is the factory default setting Set Date and Time menu Use To Current Date and Time View the current date and time settings for the printer Manually Set Date and Time input date time Enter the date and time Notes Manually setting the date and time sets Enable NTP to No The wizard lets you set th...

Page 143: ... panel Embedded Web Server menu settings and device statistics reports Note Show estimates is the factory default setting Eco Mode Off Energy Energy Paper Paper Minimize the use of energy paper or specialty media Notes Off is the factory default setting This resets the printer to its factory default settings When setting Eco Mode to Energy or Paper performance may be affected but print quality is ...

Page 144: ...inese Japanese Custom Key x Specify a language and custom key information for the printer keyboard Paper Sizes U S Metric Specify the unit of measurement for paper sizes Notes U S is the factory default setting Initial setting is determined by your country or region selection in the initial setup wizard Scan to PC Port Range port range Specify a valid port range for printers behind a port blocking...

Page 145: ...y default setting for Left side Date Time is the factory default setting for Right side Displayed Information continued Black Toner Cyan Toner Magenta Toner Yellow Toner Fuser Transfer Module Customize the displayed information for the supplies Select from the following options When to display Do not display Display Message to display Default Alternate Default text entry Alternate text entry Notes...

Page 146: ...rd Copy Scan to Network My Shortcut Add or remove icons that appear on the home screen For each icon select from the following options Display Do Not Display Notes Display is the factory default setting for Copy Fax E mail FTP Search Held Jobs Held jobs USB Drive Forms and Favorites Card Copy Scan to Network and MyShortcut menus Do not display is the factory default setting for Change language Cop...

Page 147: ...ory default setting Allow Custom Job Scans On Off Scan multiple jobs to one file Notes On is the factory default setting This menu item appears only when a printer hard disk is installed Scanner Jam Recovery Job level Page level Specify how a scanned job should be reloaded if a paper jam occurs in the ADF Notes Job level is the factory default setting If Job level is selected then the entire job m...

Page 148: ... more energy but may require longer warm up times Select the lowest setting if the printer shares an electrical circuit with room lighting or you notice lights flickering in the room Select a high setting if the printer is in constant use Under most circumstances this keeps the printer ready to print with minimum warm up time Timeouts Hibernate Timeout Disabled 1 3 hours 6 hours 1 3 days 1 2 weeks...

Page 149: ...efault setting Wait Timeout is available only when the printer is using PostScript emulation This has no effect on PCL emulation print jobs Timeouts Job Hold Timeout 5 255 Set the amount of time in seconds the printer waits for user intervention before it holds jobs that requireunavailable resources and continues to print other jobs in the print queue Notes 30 is the factory default setting This m...

Page 150: ... of the Sleep button Notes Sleep is the factory default setting Touch anywhere on the display or press a button on the control panel to exit Sleep or Hibernate mode Press and Hold Sleep Button Do Nothing Sleep Hibernate Determinehowtheprinter whileinidlestate reactstoa longpress of the Sleep button Notes Do Nothing is the factory default setting Touch anywhere on the display or press a button on t...

Page 151: ...sided to 2 sided Specify whether an original document is two sided or one sided and then specify whether the copy should be two sided or one sided Note 1 sided to 1 sided is the factory default setting This setting is selected when using a one sided original document for a one sided copy job Paper Saver Off 2 up Portrait 2 up Landscape 4 up Portrait 4 up Landscape Copy two or four sheets of a docu...

Page 152: ...tory default setting Transparency Separators On Off Place a sheet of paper between transparencies Note On is the factory default setting Separator Sheets Off Between Copies Between Jobs Between Pages Place a sheet of paper between pages copies or jobs Note Off is the factory default setting Separator Sheet Source Tray x Multipurpose Feeder Specify the paper source for the separator sheet Note Tray...

Page 153: ... Allow priority copies On Off Allow interruption of a print job to copy a page or document Note On is the factory default setting Custom Job scanning On Off Scan a document that contains mixed paper sizes into a single copy job Notes Off is the factory default setting This menu item appears only when a formatted working printer hard disk is installed Allow Save as Shortcut On Off Save custom copy ...

Page 154: ...ginal document Note Off is the factory default setting Shadow Detail 4 to 4 Adjust the amount of shadow detail visible on a copy Note 0 is the factory default setting Adjust ADF Skew Auto Off On Correct slight skew in the scanned image Note Auto is the factory default setting Scan edge to edge Off On Specify if the original document is scanned edge to edge Note Off is the factory default setting S...

Page 155: ...er an incoming fax job and to dial a fax number Press 0 on the numeric keypad to go directly to the Manual Fax function Memory Use All receive Mostly receive Equal Mostly send All send Define the allocation of non volatile memory between sending and receiving fax jobs Note Equal is the factory default setting Cancel Faxes Allow Don t Allow Specify whether canceling of fax jobs is allowed Note Allo...

Page 156: ... page Notes Off by default is the factory default setting for Fax Cover Page Off is the factory default setting for all other menu items Fax Send Settings Use To Resolution Standard Fine 200 dpi Super Fine 300 dpi Ultra Fine 600 dpi Specify quality in dots per inch dpi A higher resolution gives better print quality but increases the fax transmission time for outgoing faxes Note Standard is the fac...

Page 157: ...or two sided scanning Note Off is the factory default setting Content Type Text Graphics Text Photo Photo Specify the content of the original document Note Text is the factory default setting Content Source Black White Laser Color Laser Inkjet Photo Film Magazine Newspaper Press Other Specify how the original document was produced Note Color Laser is the factory default setting Darkness 1 9 Lighte...

Page 158: ...as Shortcut On Off Save fax numbers as shortcuts in the printer Note On is the factory default setting Dial Mode Tone Pulse Specify the dialing sound Note Tone is the factory default setting Max Speed 2400 4800 9600 14400 33600 Specify the maximum speed in baud at which faxes are sent Note 33600 is the factory default setting Custom Job scanning On Off Scan a document that contains mixed paper siz...

Page 159: ...e original document Note Off is the factory default setting Negative Image Off On Create a negative image of the original document Note Off is the factory default setting Shadow Detail 4 to 4 Adjust the amount of shadow detail visible Note 0 is the factory default setting Adjust ADF Skew Auto Off On Correct slight skew in the scanned image Note Auto is the factory default setting Scan edge to edge...

Page 160: ...ble resources Note None is the factory default setting Rings to Answer 1 25 Specify the number of rings before answering an incoming fax job Note 3 is the factory default setting Auto Answer Yes No Set the printer to receive faxes automatically Note Yes is the factory default setting Manual Answer Code 0 9 Manually enter a code on the telephone number pad to begin receiving a fax Notes 9 is the fa...

Page 161: ...ble forwarding of received faxes to another recipient Note Print is the factory default setting Forward to Fax E mail FTP LDSS eSF Specify the type of recipient to which faxes are forwarded Notes Fax is the factory default setting This menu item is available only from the printer Embedded Web Server Forward to Shortcut Enter the shortcut number which matches the recipient type Fax E mail FTP LDSS ...

Page 162: ...Feeder Specify the source of the paper used for printing logs Note Tray 1 is the factory default setting Logs Display Remote Station Name Dialed Number Specify whether printed logs display the dialed number or the station name or fax name returned Note Remote Station Name is the factory default setting Enable Job Log On Off Enable access to the Fax Job log Note On is the factory default setting En...

Page 163: ... Server Setup menu Fax Mode sends the fax job to a fax server for transmission Use To To Format Enter specific fax information using the control panel Reply Address Subject Message SMTP Setup Specify SMTP setup information Primary SMTP Gateway Specify SMTP server port information Secondary SMTP Gateway Image Format PDF pdf XPS xps TIFF tif Specify the image format Note PDF pdf is the factory defau...

Page 164: ...ortrait is the factory default setting Original Size Letter Legal Executive Folio Statement Oficio Mexico Universal Auto Size Sense Mixed Sizes A4 A5 A6 JIS B5 Custom Scan Size x Book Original Business Card 4 x 6 in 3 x 5 in Specify the size of the original document Note Mixed Sizes is the U S factory default setting A4 is the international factory default setting Use Multi Page TIFF On Off Provid...

Page 165: ...e specified maximum size are not sent E mail Server Setup Size Error Message Send a message when an e mail is greater than the configured size limit E mail Server Setup Limit destinations Specify a domain name such as a company domain name and then limit e mail destinations only to that domain name Notes E mail can be sent only to the specified domain The limit is one domain E mail Server Setup We...

Page 166: ... is the factory default setting Content Source Black White Laser Color Laser Inkjet Photo Film Magazine Newspaper Press Other Specify how the original document was produced Note Color Laser is the factory default setting Color Off On Specify whether the printer captures and transmits content in color Note On is the factory default setting Resolution 75 dpi 150 dpi 200 dpi 300 dpi 400 dpi 600 dpi S...

Page 167: ...Set the quality of a text image in relation to file size and quality of the image Note 75 is the factory default setting Text Photo Default 5 90 Set the quality of a text or photo image in relation to file size and the quality of the image Note 75 is the factory default setting Photo Default 5 90 Set the quality of a photo image in relation to file size and the quality of the image Note 50 is the ...

Page 168: ...document that contains mixed paper sizes Notes Off is the factory default setting This menu item appears only when a formatted working printer hard disk is installed Scan Preview On Off Specify whether a preview appears on the display for scan jobs Notes Off is the factory default setting This menu item appears only when a formatted working printer hard disk is installed Allow Save as Shortcut On ...

Page 169: ...nt Note Off is the factory default setting Shadow Detail 4 to 4 Adjust the amount of shadow detail visible on a scanned image Note 0 is the factory default setting Adjust ADF Skew Auto Off On Correct slight skew in the scanned image Note Auto is the factory default setting Scan edge to edge Off On Specify whether the original document is scanned edge to edge Note Off is the factory default setting...

Page 170: ...rmatted working hard disk is installed Off is the factory default setting for Secure PDF and Searchable PDF Secure PDF requires you to enter your password twice Content Type Text Graphics Text Photo Photo Specify the content of the original document Note Text Photo is the factory default setting Content Source Black White Laser Color Laser Inkjet Photo Film Magazine Newspaper Press Other Specify h...

Page 171: ...x Book Original Business Card 3 x 5 in 4 x 6 in Specify the size of the original document Note Letter is the U S factory default setting A4 is the international factory default setting Sides Duplex Off Long edge Short edge Specify the orientation of the original documents loaded in the ADF for two sided scanning Note Off is the factory default setting JPEG Quality Best for content 5 90 Set the qua...

Page 172: ...Transmission Log Print log Do not print log Print only for error Specify whether to print the transmission log Note Print log is the factory default setting Log Paper Source Tray x Multipurpose Feeder Specify a paper source when printing FTP logs Note Tray 1 is the factory default setting FTP bit Depth 1 bit 8 bit Enable the Text Photo mode to have smaller file sizes by using 1 bit images Note 8 b...

Page 173: ...age Off On Create a negative image of the original document Note Off is the factory default setting Shadow Detail 4 to 4 Adjust the amount of shadow detail visible on a scanned image Note 0 is the factory default setting Adjust ADF Skew Auto Off On Correct slight skew in the scanned image Notes Auto is the factory default setting This menu item is supported only in some printer models Scan edge to...

Page 174: ...ression Off is the factory default setting for Secure PDF and Searchable PDF Secure PDF requires you to enter your password twice Content Type Text Graphics Text Photo Photo Specify the content of the original document Note Text Photo is the factory default setting Content Source Black White Laser Color Laser Inkjet Photo Film Magazine Newspaper Press Other Specify how the original document was pr...

Page 175: ... size of the original document Note Letter is the U S factory default setting A4 is the international factory default setting Sides Duplex Off Long edge Short edge Specify the orientation of the original documents loaded in the ADF for two sided scanning Note Off is the factory default setting JPEG Quality Best for content 5 90 Set the quality of a JPEG photo image in relation to file size and qua...

Page 176: ...t that contains mixed paper sizes Note Off is the factory default setting Scan Preview On Off Specify whether a preview appears on the display for scan jobs Notes Off is the factory default setting This menu item appears only when a formatted working printer hard disk is installed Background Removal 4 to 4 Adjust the amount of background visible on a copy Note 0 is the factory default setting Colo...

Page 177: ...ture 4 to 4 Specify warm or cool outputs Cool values generate a bluer output than the default while warm values generate a redder output than the default Note 0 is the factory default setting Print Settings Copies 1 999 Specify a default number of copies for each print job Note 1 is the factory default setting Paper Source Tray x Multipurpose Feeder Manual Paper Manual Envelope Set a default paper...

Page 178: ...g Paper Saver Border None Solid Print a border on each page image Note None is the factory default setting Paper Saver Ordering Horizontal Reverse Horizontal Reverse Vertical Vertical Specify the positioning of multiple page images Notes Horizontal is the factory default setting Positioning depends on the number of page images and whether they are in portrait or in landscape orientation Separator ...

Page 179: ...ting to print data in the non printable area defined by the Normal setting the printer clips the image at the boundary Whole Page allows the image to be moved into the non printable area defined by the Normal setting Whole Page only affects pages printed using a PCL 5e interpreter This setting has no effect on pages printed using the PCL XL or PostScript interpreter Printer Usage Max Yield Max Spe...

Page 180: ...lt for all print jobs Notes 1 sided is the factory default setting You can set two sided printing from the printer software For Windows users Click File Print and then click Properties Preferences Options or Setup For Macintosh users Choose File Print and then adjust the settings from the Print dialog and pop up menus Duplex Binding Long Edge Short Edge Define binding for duplexed pages in relatio...

Page 181: ...12 Up 16 Up Print multiple pages on a single sheet of paper Notes Off is the factory default setting When the number of pages per sheet is selected each page is scaled so that the number of pages you want can be displayed on the sheet Paper Saver Ordering Horizontal Reverse Horizontal Reverse Vertical Vertical SpecifytheorderinwhichpagesareprintedonasinglesheetwhenusingPaperSaver Notes Horizontal ...

Page 182: ... and flow charts Note Off is the factory default setting Color Saver On Off Reduce the amount of toner used for graphics and images Notes Off is the factory default setting On overrides the Toner Darkness setting RGB Brightness 6 to 6 Adjust the brightness of the output Note 0 is the factory default setting RGB Contrast 0 5 Adjust the contrast of the output Note 0 is the factory default setting RG...

Page 183: ...olor conversions Select from the following options US CMYK Euro CMYK Vivid CMYK Off Note US CMYK is the U S factory default setting Euro CMYK is the international factory default setting Color Adjust Initiate a recalibration of color conversion tables and allow the printer to make adjustments for color variations in output Spot Color Replacement Assign specific CMYK values to named spot colors Not...

Page 184: ...ng Log Action at Near Full None E mail Current Log E mail Delete Current Log E mail Delete Oldest Log Post Current Log Post Delete Current Log Post Delete Oldest Log Delete Current Log Delete Oldest Log Delete All Logs Delete All But Current Set how the printer responds when the hard disk is nearly full Notes None is the factory default setting The value defined in Log Near Full Level determines w...

Page 185: ...installing a flash memory card in the printer The flash memory option card must not be read write or write protected This menu item appears only when a non defective flash memory card is installed Delete Downloads on Disk Delete Now Do Not Delete Delete downloads from the printer hard disk including all held jobs buffered jobs and parked jobs Notes Delete Now sets the printer to delete the downloa...

Page 186: ... Print annotations in a PDF Note Do Not Print is the factory default setting PostScript menu Use To Print PS Error On Off Print a page containing the PostScript error Note Off is the factory default setting Lock PS Startup Mode On Off Enable users to disable the SysStart file Note Off is the factory default setting Font Priority Resident Flash Disk Establish the font search order Notes Resident is...

Page 187: ... available to any option Font Name Courier 10 Identify a specific font and where it is stored Note Courier 10 is the factory default setting Symbol Set 10U PC 8 12U PC 850 Specify the symbol set for each font name Notes 10U PC 8 is the US factory default setting 12U PC 850 is the international factory default setting A symbol set is a set of alphabetical and numeric characters punctuation and spec...

Page 188: ...each page Notes 60 is the US factory default setting 64 is the international default setting The printer sets the amount of space between each line based on the Lines per Page Paper Size and Orientation settings Select the paper size and orientation before setting Lines per Page PCL Emulation Settings A4 Width 198 mm 203 mm Set the printer to print on A4 size paper Notes 198 mm is the factory defa...

Page 189: ...s the Select Paper Feed command This selection appears only when it is selected by the PCL 5e interpreter 0 199 allows a custom setting to be assigned Tray Renumber View Factory Defaults MPF Default 8 T1 Default 1 T2 Default 4 T3 Default 5 T4 Default 20 T5 Default 21 Env Default 6 MPaper Default 2 MEnv Default 3 Display the factory default setting assigned to each tray drawer or feeder Tray Renumb...

Page 190: ...rs Zapf Chancery NewSansMTCS NewSansMTCT New SansMTJA NewSansMTKO Set the default font for HTML documents Note The Times font is used in HTML documents that do not specify a font Use To Font Size 1 255 pt Set the default font size for HTML documents Notes 12 pt is the factory default setting Font size can be increased in 1 point increments Scale 1 400 Scale the default font for HTML documents Note...

Page 191: ...ling Anchor Top Left Best Fit Anchor Center Fit Height Width Fit Height Fit Width Scale the image to fit the selected paper size Notes Best Fit is the factory default setting When Auto Fit is set to On Scaling is automatically set to Best Fit Orientation Portrait Landscape Reverse Portrait Reverse Landscape Set the image orientation Note Portrait is the factory default setting Help menu Menu item ...

Page 192: ...g color quality issues Print Defects Guide Provides help in resolving repeating defects in copies or prints Information Guide Provides help in locating additional information Supplies Guide Provides information about ordering supplies Understanding the printer menus 192 ...

Page 193: ...ting suggestions such as printing on both sides of the paper and printing multiple pages on one side of a single sheet of paper For information on how you can quickly save paper and energy using one printer setting see Using Eco Mode on page 194 Using recycled paper As an environmentally conscious company Lexmark supports the use of recycled office paper produced specifically for use in laser prin...

Page 194: ...lt settings for all settings associated with Eco Mode Off supports the performance specifications of the printer Energy Reduce energy use especially when the printer is idle Printer engine motors do not start until it is ready to print You may notice a short delay before the first page is printed The printer enters Sleep mode after one minute of inactivity Energy Paper Use all the settings associa...

Page 195: ... low power saving mode Notes Three days is the default amount of time before the printer enters Hibernate mode Make sure to wake the printer from Hibernate mode before sending a print job A hard reset or a long press of the Sleep button wakes the printer from Hibernate mode If the printer is in Hibernate mode then the Embedded Web Server is disabled 1 From the home screen navigate to Settings Gene...

Page 196: ...r goes into a reduced power state or into Ready state Note This feature is available only in network printers or printers connected to print servers Using the Embedded Web Server 1 Open a Web browser and then type the printer IP address in the address field Notes View the printer IP address on the printer home screen The IP address appears as four sets of numbers separated by periods such as 123 1...

Page 197: ... recycle Recycling Lexmark products To return Lexmark products for recycling 1 Go to www lexmark com recycle 2 Find the product type you want to recycle and then select your country or region from the list 3 Follow the instructions on the computer screen Note Printer supplies and hardware not listed in the Lexmark collection program may be recycled through your local recycling center Contact your ...

Page 198: ...rk for reuse or recycling One hundred percent of the empty cartridges returned to Lexmark are either reused or demanufactured for recycling Boxes used to return the cartridges are also recycled To return Lexmark cartridges for reuse or recycling follow the instructions that came with your printer or cartridge and use the prepaid shipping label You can also do the following 1 Go to www lexmark com ...

Page 199: ...ring simple print jobs Non volatile memory Your printer may use two forms of non volatile memory EEPROM and NAND flash memory Both types are used to store the operating system device settings network information and bookmark settings and embedded solutions Hard disk memory Some printers have a hard disk drive installed The printer hard disk is designed for printer specific functionality This lets ...

Page 200: ... data are completely erased is to physically destroy each hard disk where data is stored Erasing volatile memory Thevolatilememory RAM installedinyourprinterrequires apowersourcetoretaininformation Toerasethebuffered data simply turn off the printer Erasing non volatile memory Erase individual settings device and network settings security settings and embedded solutions by following these steps 1 ...

Page 201: ...ard disk Highly confidential information should be wiped using this method 4 Touch Yes to proceed with disk wiping Notes A status bar will indicate the progress of the disk wiping task Disk wiping can take from several minutes to more than an hour during which the printer will be unavailable for other user tasks 5 Touch Back Exit Config Menu The printer will perform a power on reset and then retur...

Page 202: ...ryption process Doing so may result in loss of data Disk encryption can take from several minutes to more than an hour during which the printer will be unavailable for other user tasks A status bar will indicate the progress of the disk wiping task After the disk has been encrypted the printer will return to the Enable Disable screen 5 Touch Back Exit Config Menu The printer will perform a power o...

Page 203: ...the printer warranty 1 Make sure that the printer is turned off and unplugged from the electrical outlet CAUTION SHOCK HAZARD To avoid the risk of electrical shock when cleaning the exterior of the printer unplug the power cord from the electrical outlet and disconnect all cables from the printer before proceeding 2 Remove paper from the standard bin multipurpose feeder and manual feeder 3 Remove ...

Page 204: ...d or scanned images 1 Slightly dampen a soft lint free cloth or paper towel with water 2 Open the scanner cover 3 Clean all the areas shown and then let them dry 1 White underside of the ADF cover 2 White underside of the scanner cover 3 Scanner glass 4 ADF glass 4 Close the scanner cover Maintaining the printer 204 ...

Page 205: ... Details Estimated number of remaining pages The estimated number of remaining pages is based on the recent printing history of the printer Its accuracy may vary significantly and is dependent on many factors such as actual document content print quality settings and other printer settings The accuracy of the estimated number of remaining pages may decrease when the actual printing consumption is ...

Page 206: ...parts and may deliver unpredictable results if third party supplies or parts are used Imaging component usage beyond the intended life may damage your Lexmark printer or its associated components Ordering toner cartridges Notes The estimated cartridge yield is based on the ISO IEC 19798 standard Extremely low print coverage for extended periods of time may negatively affect actual yield and may ca...

Page 207: ...ation on countries located in each region visit www lexmark com regions Ordering imaging kits Item All countries and regions Black imaging kit 700Z1 Color imaging kit 700Z5 Ordering a maintenance kit Notes Using certain types of paper may require more frequent replacement of the maintenance kit The fuser and transfer module are included in the maintenance kit and can also be individually ordered a...

Page 208: ...ste toner bottle 1 Top door 2 Waste toner bottle 3 Right side cover 4 Front door 1 Unpack the replacement waste toner bottle 2 Open the front door CAUTION HOT SURFACE The inside of the printer might be hot To reduce the risk of injury from a hot component allow the surface to cool before touching Maintaining the printer 208 ...

Page 209: ...3 Open the top door 4 Remove the right side cover Maintaining the printer 209 ...

Page 210: ...e toner bottle and then remove the waste toner bottle 6 Seal the used waste toner bottle in the enclosed packaging For more information see Recycling Lexmark products on page 197 7 Insert the replacement waste toner bottle Maintaining the printer 210 ...

Page 211: ...8 Insert the right side cover 9 Slide and hold the release latch on the right side of the printer and then slowly close the top door 10 Close the front door Maintaining the printer 211 ...

Page 212: ...maging kit 1 Open the front door CAUTION HOT SURFACE The inside of the printer might be hot To reduce the risk of injury from a hot component allow the surface to cool before touching 2 Open the top door Maintaining the printer 212 ...

Page 213: ...lifting the handles and then gently pulling them away from the imaging kit 4 Remove the right side cover 5 Press the green levers on each side of the waste toner bottle and then remove the waste toner bottle Maintaining the printer 213 ...

Page 214: ...ull out the imaging kit 8 Unpack the replacement black and color imaging kit Notes The color imaging kit includes the imaging kit and the cyan magenta yellow and black developer units The black imaging kit includes the imaging kit and the black developer unit 9 Seal the used imaging kit in the bag that the replacement imaging kit came in Maintaining the printer 214 ...

Page 215: ...enta and yellow developer units Dispose only the black developer unit 10 Gently shake the yellow cyan magenta and black developer units side to side 11 Remove the red packing strip and the attached fabric from the developer units 12 Gently insert the yellow cyan magenta and black developer units Maintaining the printer 215 ...

Page 216: ...r slot 13 Remove the red packing strip from the imaging kit Warning Potential Damage Do not touch the shiny photoconductor drum under the imaging kit Doing so may affect the quality of future print jobs 14 Align and then insert the imaging kit Maintaining the printer 216 ...

Page 217: ... firmly push the blue levers down until the imaging kit fits into place Note Make sure that the imaging kit is fully seated 16 Insert the waste toner bottle 17 Insert the right side cover Maintaining the printer 217 ...

Page 218: ...18 Insert the toner cartridges 19 Slide and hold the release latch on the right side of the printer and then slowly close the top door 20 Close the front door Maintaining the printer 218 ...

Page 219: ...exmark toner cartridge is not covered under warranty Note A reduced print quality may result from using non Lexmark toner cartridges 1 Open the top door 2 Remove the toner cartridge by lifting the handle and then gently pulling it away from the imaging kit Maintaining the printer 219 ...

Page 220: ...tridge down until it fits into place 5 Slide and hold the release latch on the right side of the printer and then slowly close the top door 6 Seal the used toner cartridge in the bag that the replacement toner cartridge came in For more information see Recycling Lexmark products on page 197 Maintaining the printer 220 ...

Page 221: ...ty defect occurs or when damage occurs to the printer 1 Open the front door CAUTION HOT SURFACE The inside of the printer might be hot To reduce the risk of injury from a hot component allow the surface to cool before touching 2 Open the top door Maintaining the printer 221 ...

Page 222: ...rtridge handle and then gently pull it from the imaging kit 4 Remove the right side cover 5 Press the green levers on each side of the waste toner bottle and then remove the waste toner bottle Maintaining the printer 222 ...

Page 223: ...it stops 7 Press down the blue lever and then grasp the green handles on the sides to pull out the imaging kit Warning Potential Damage Do not touch the underside of the imaging kit Doing so could damage the imaging kit 8 Remove the used developer unit Maintaining the printer 223 ...

Page 224: ...ntly shake the replacement developer unit side to side before removing it from its packaging 10 Remove the red shipping cover from the developer unit 11 Insert the developer unit Maintaining the printer 224 ...

Page 225: ...nsert the imaging kit 13 Gently but firmly push the blue levers down until the imaging kit fits into place Note Make sure that the imaging kit is fully seated 14 Replace the waste toner bottle Maintaining the printer 225 ...

Page 226: ...15 Insert the right side cover 16 Insert the toner cartridges 17 Slide and hold the release latch on the right side of the printer and then slowly close the top door Maintaining the printer 226 ...

Page 227: ...rom the printer before moving it Lift the printer off the optional tray and then set it aside instead of trying to lift the tray and printer at the same time Note Use the handholds located on both sides of the printer to lift it Warning Potential Damage Damage to the printer caused by improper moving is not covered by the printer warranty Moving the printer to another location The printer and its ...

Page 228: ...Shipping the printer When shipping the printer use the original packaging Maintaining the printer 228 ...

Page 229: ...as an actual display would work on a printer control panel Setting up e mail alerts Configuretheprintertosendyoue mailalertswhen thesuppliesaregettingloworwhenthepaperneedstobechanged or added or when there is a paper jam 1 Open a Web browser and then type the printer IP address in the address field Notes View the printer IP address on the printer home screen The IP address appears as four sets of...

Page 230: ...s in the TCP IP section in the Network Ports menu The IP address appears as four sets of numbers separated by periods such as 123 123 123 123 If you are using a proxy server then temporarily disable it to load the Web page correctly 2 Click Settings Print Settings Supply Notifications 3 From the drop down menu for each supply select one of the following notification options Notification Descriptio...

Page 231: ... a Web browser and then type the printer IP address in the address field Notes View the printer IP address in the TCP IP section in the Network Ports menu The IP address appears as four sets of numbers separated by periods such as 123 123 123 123 If you are using a proxy server then temporarily disable it to load the Web page correctly 2 Click the Copy Printer Settings 3 To change the language sel...

Page 232: ...ptions include the display language custom sizes and messages and network port menu settings All downloads stored in the RAM are deleted Downloads stored in the flash memory or in a printer hard disk are not affected From the home screen navigate to Settings General Settings Factory Defaults Restore Now Managing the printer 232 ...

Page 233: ... jam Doing so could permanently damage the fuser Avoiding jams Load paper properly Make sure paper lies flat in the tray Correct loading of paper Incorrect loading of paper Do not remove a tray while the printer is printing Do not load a tray while the printer is printing Load it before printing or wait for a prompt to load it Do not load too much paper Make sure the stack height is below the maxi...

Page 234: ...it Do not use paper that has been cut or trimmed by hand Do not mix paper sizes weights or types in the same tray Make sure the paper size and type are set correctly on the computer or printer control panel Store paper according to manufacturer recommendations Understanding jam messages and locations When a jam occurs a message indicating the jam location and information to clear the jam appears o...

Page 235: ... and then remove the jammed paper 4 Front door x page jam open front door 20y xx Open the front door and then remove the jammed paper 5 Duplex area x page jam open front door to clear duplex 23y xx Open the front door and then remove the jammed paper 6 Tray x x page jam open tray x 24y xx Pull out the indicated tray and then remove the jammed paper 7 Multipurpose feeder x page jam clear multipurpo...

Page 236: ... x page jam clear standard bin 203 xx 1 Open the top door 2 Firmly grasp the jammed paper on each side and then gently pull it out Note Make sure all paper fragments are removed Clearing jams 236 ...

Page 237: ...e hot To reduce the risk of injury from a hot component allow the surface to cool before touching a If there is a jammed paper under the fuser then firmly grasp the paper on each side and then gently pull it out Note Make sure all paper fragments are removed Clearing jams 237 ...

Page 238: ...ll the green lever to open the fuser cover c If there is a jammed paper in the fuser then hold down the fuser cover and then remove the paper Note Make sure all paper fragments are removed Clearing jams 238 ...

Page 239: ...ar the message and continue printing For non touch screen printer models select Next Clear the jam press OK and then press to confirm x page jam open front door to clear fuser 202 xx 1 Open the front door CAUTION HOT SURFACE The inside of the printer might be hot To reduce the risk of injury from a hot component allow the surface to cool before touching Clearing jams 239 ...

Page 240: ...2 Open the top door Clearing jams 240 ...

Page 241: ...3 Pull the green lever to open the fuser cover 4 Hold down the fuser cover and then remove the jammed paper Note Make sure all paper fragments are removed Clearing jams 241 ...

Page 242: ... to clear the message and continue printing For non touch screen printer models select Next Clear the jam press OK and then press to confirm x page jam open front door 20y xx 1 Open the front door CAUTION HOT SURFACE The inside of the printer might be hot To reduce the risk of injury from a hot component allow the surface to cool before touching Clearing jams 242 ...

Page 243: ...h to clear the message and continue printing For non touch screen printer models select Next Clear the jam press OK and then press to confirm x page jam open front door to clear duplex 23y xx 1 Open the front door CAUTION HOT SURFACE The inside of the printer might be hot To reduce the risk of injury from a hot component allow the surface to cool before touching Clearing jams 243 ...

Page 244: ...rom the printer control panel touch to clear the message and continue printing For non touch screen printer models select Next Clear the jam press OK and then press to confirm x page jam open tray x 24y xx 1 Pull out the tray completely Note The message on the printer display indicates the tray where the jammed paper is located Clearing jams 244 ...

Page 245: ...it out Note Make sure all paper fragments are removed 3 Insert the tray 4 From the printer control panel touch to clear the message and continue printing For non touch screen printer models select Next Clear the jam press OK and then press to confirm Clearing jams 245 ...

Page 246: ...3 Insert the tray 4 From the printer control panel touch to clear the message and continue printing For non touch screen printer models select Next Clear the jam press OK and then press to confirm x page jam clear multipurpose feeder 250 xx 1 Push the paper release lever in the multipurpose feeder to access the jammed paper and then gently pull out the paper Note Make sure all paper fragments are ...

Page 247: ...2 Flex the sheets back and forth to loosen them and then fan them Do not fold or crease the paper Straighten the edges on a level surface 3 Reload paper into the multipurpose feeder Clearing jams 247 ...

Page 248: ...rinting For non touch screen printer models select Next Clear the jam press OK x page jam open automatic feeder top cover 28y xx 1 Remove all original documents from the ADF tray Note The message is cleared when the pages are removed from the ADF tray 2 Open the ADF cover 3 Firmly grasp the jammed paper on each side and then gently pull it out Clearing jams 248 ...

Page 249: ...ten the edges of the original documents then load the documents into the ADF and then adjust the paper guide 6 From the printer control panel touch to clear the message and continue printing For non touch screen printer models select Next Clear the jam press OK Clearing jams 249 ...

Page 250: ...nd then select Finished changing paper on the printer control panel to clear the message and continue printing For non touch screen printer models press to confirm Note Make sure the paper size and type are specified in the Paper menu on the printer control panel Cancel the print job Change paper source to paper type paper size Try one or more of the following Load the correct size and type of pap...

Page 251: ...rder a toner cartridge If necessary select Continue to clear the message and continue printing For non touch screen printer models press to confirm Color cartridge nearly low 88 xy If necessary select Continue on the printer control panel to clear the message and continue printing For non touch screen printer models press to confirm Color cartridge very low x estimated pages remain 88 xy You may n...

Page 252: ...elect Continue to ignore the message and continue printing For non touch screen printer models press to confirm Cancel the current print job Disk full 62 Try one or more of the following From the printer control panel touch Continue to clear the message and continue processing Delete fonts macros and other data stored in the printer hard disk Install a printer hard disk with larger capacity Disk m...

Page 253: ...t memory for Flash Memory Defragment operation 37 Try one or more of the following From the printer control panel select Continue to stop the defragmentation and continue printing For non touch screen printer models press to confirm Delete fonts macros and other data from the printer memory Install additional printer memory Insufficient memory some Held Jobs were deleted 37 The printer deleted som...

Page 254: ...ring Try one or more of the following Load the indicated tray or feeder with the correct size and type of paper To use the tray with the correct paper size or type select Finished loading paper on the printer control panel For non touch screen printer models press to confirm Note If the printer finds a tray that has the correct paper type and size then it feeds from that tray If the printer cannot...

Page 255: ...rol panel to clear the message and continue printing Cancel the current job Load Manual Feeder with custom type name Try one or more of the following Load the feeder with the correct size and type of paper Depending on your printer model touch Prompt each page paper loaded or press on the printer control panel to clear the message and continue printing Cancel the current job Load Manual Feeder wit...

Page 256: ...y soon For more information visit the Lexmark support Web site at http support lexmark com or contact customer support and then report the message If necessary select Continue on the printer control panel to clear the message and continue printing For non touch screen printer models press to confirm Memory full 38 Try one or more of the following From the printer control panel select Cancel job to...

Page 257: ...d life may damage your Lexmark printer or its associated components Warning Potential Damage Use of third party supplies or parts can affect warranty coverage Damage caused by the use of third party supplies or parts may not be covered by the warranty To accept any and all of these risks and to proceed with the use of non genuine supplies or parts in your printer press and hold and the button on t...

Page 258: ...nue to clear the message For non touch screen printer models press to confirm Remove paper from standard output bin Remove the paper stack from the standard bin Replace color cartridge 0 estimated pages remain 88 xy Replace the indicated toner cartridge to clear the message and continue printing For more information see the instruction sheet that came with the supply Note If you do not have a repl...

Page 259: ...r the last successful scan job Select Finish job without further scanning and then press to end the last successful scan job Note This does not cancel the scan job All successfully scanned pages will be processed further for copying or e mailing Select Restart Job and then press to restart the scan job with the same settings from the previous scan job Select Cancel Job and then press to clear the ...

Page 260: ...ace maintenance kit 0 estimated pages remain 80 xy The printer is scheduled for maintenance For more information visit the Lexmark support Web site at http support lexmark com or contact your service representative and then report the message Replace missing color cartridge 31 xy Install the indicated toner cartridge to clear the message For more information see the Replacing supplies section of t...

Page 261: ...want any print jobs to be restored For non touch screen printer models press to confirm Scanner automatic feeder cover open Close the ADF cover Scanner disabled by admin 840 01 Print without the scanner or contact your system support person Scanner disabled Contact system administrator if problem persists 840 02 From the printer control panel try one or more of the following Select Continue with s...

Page 262: ...rint server For more information visit the Lexmark support Web site at http support lexmark com Standard USB port disabled 56 From the printer control panel select Continue to clear the message For non touch screen printer models press to confirm Notes The printer discards any data received through the USB port Make sure the USB Buffer menu is not set to Disabled Supply needed to complete job Try ...

Page 263: ...ue on the printer control panel to clear the message and continue printing For non touch screen printer models press to confirm Type imaging kit nearly low 84 xy Note The type can be a black imaging kit or a black and color imaging kit If necessary select Continue on the printer control panel to clear the message and continue printing For non touch screen printer models press to confirm Type imagi...

Page 264: ...en printer models press to confirm Weblink server not set up Contact system administrator From the printer control panel press to clear the message Note If the message appears again then contact your system support person Solving printer problems Basic printer problems on page 264 Option problems on page 267 Paper feed problems on page 269 Basic printer problems The printer is not responding Actio...

Page 265: ... turned off by a switch or breaker Is the electrical outlet turned off by a switch or breaker Turn on the switch or reset the breaker Go to step 7 Step 7 Check if the printer is plugged into any surge protectors uninterruptible power supplies or extension cords Is the printer plugged into any surge protectors uninterruptible power supplies or extension cords Connect the printer power cord directly...

Page 266: ...it for about 10 seconds and then turn the printer back on Is the printer working The problem is solved Contact customer support Printer display is blank Action Yes No Step 1 Press the Sleep button on the printer control panel Does Ready appear on the printer display The problem is solved Go to step 2 Step 2 Turn off the printer then wait for about 10 seconds and then turn the printer back on Do Pl...

Page 267: ...ical outlet and then turn on the printer Is the internal option properly installed in the controller board Go to step 3 Connect the internal option to the controller board Step 3 Print a menu settings page and then check to see if the internal option is listed in the Installed Features list Is the internal option listed in the menu settings page Go to step 4 Reinstall the internal option Step 4 a ...

Page 268: ...the paper size indicators on the tray If you are printing on custom size paper then make sure that the paper guides rest against the edges of the paper Make sure the paper is below the maximum paper fill indicator Make sure paper lies flat in the tray b Check if the tray closes properly Is the tray working The problem is solved Go to step 2 Step 2 a Turn off the printer then wait about 10 seconds ...

Page 269: ...to scroll to On or Auto c Touch Submit Do pages reprint after a jam The problem is solved Contact customer support Paper frequently jams Action Yes No Step 1 a Pull out the tray and then do one or more of the following Make sure paper lies flat in the tray Check if the paper size indicators on the paper guides are aligned with the paper size indicators on the tray Check if the paper guides are ali...

Page 270: ...For more information see Avoiding jams on page 233 b Follow the recommendations and then resend the print job Do paper jams still occur frequently Contact customer support The problem is solved Paper jam message remains after jam is cleared Action Yes No Check the entire paper path for jammed paper a Remove any jammed paper b From the printer control panel touch Continue to clear the message Does ...

Page 271: ... may contain a formatting error or invalid data Delete the print job and then send it again For PDF files generate a new PDF and then print it again If you are printing from the Internet then the printer may be reading multiple job titles as duplicates and deleting all jobs except the first one For Windows users a Open the Print Properties folder b FromthePrintandHolddialog selectthe Keepduplicate...

Page 272: ... The problem is solved Step 4 Check if the flash drive is supported For more information on tested and approved USB flash drives see Supported flash drives and file types on page 64 Does the error message still appear Go to step 5 The problem is solved Step 5 Check if the USB port is disabled by the system support person Does the error message still appear Contact customer support The problem is s...

Page 273: ... the paper type b Resend the print job Did the job print from the correct tray or on the correct paper The problem is solved Go to step 4 Step 4 a Check if the trays are not linked b Resend the print job Did the job print from the correct tray or on the correct paper The problem is solved Contact customer support Large jobs do not collate Action Yes No Step 1 a From the Finishing menu on the print...

Page 274: ...F file and then resend the print job Do the files print The problem is solved Go to step 2 Step 2 a Open the document you want to print in Adobe Acrobat b Click File Print Advanced Print As Image OK OK Do the files print The problem is solved Contact customer support Printing slows down Notes When printing using narrow paper the printer prints at a reduced speed to prevent damage to the fuser The ...

Page 275: ...print after clearing the message Do the jobs print The problem is solved Go to step 4 Step 4 a Check if the ports USB serial or Ethernet are working and if the cables are securely connected to the computer and the printer Note For more information see the setup documentation that came with the printer b Resend the print job Do the jobs print The problem is solved Go to step 5 Step 5 a Turn off the...

Page 276: ...is solved Go to step 3 Step 3 a Remove held jobs stored in the printer memory b Resend the print job Did the job print The problem is solved Go to step 4 Step 4 a Disable the Page Protect feature From the printer control panel navigate to Settings General Settings Print Recovery Page Protect Off b Resend the print job Did the job print The problem is solved Go to step 5 Step 5 a Check if the cable...

Page 277: ...d the print job Do the trays link correctly The problem is solved Go to step 2 Step 2 a Fromtheprintercontrol panel setthepapersizeandtypeinthePaper menu to match the paper loaded in the trays to be linked Note The paper size and type must match for trays to be linked b Resend the print job Do the trays link correctly The problem is solved Contact customer support Unexpected page breaks occur Acti...

Page 278: ...ter Go to step 2 Select a font that is supported by the printer Step 2 Check if the fonts installed on the computer are supported by the printer Are the fonts installed on the computer supported by the printer The problem is solved Contact customer support Clipped pages or images Leading edge Trailing edge ABCDE ABCDE ABCDE Action Yes No Step 1 a Move the width and length guides in the tray to the...

Page 279: ... specify the paper size from Printing Preferences or from the Print dialog b Resend the print job Is the page or image clipped Go to step 4 The problem is solved Step 4 a Remove and then reinstall the imaging kit Warning Potential Damage Do not expose the imaging kit to direct light for more than 10 minutes Extended exposure to light may cause print quality problems Warning Potential Damage Do not...

Page 280: ...y problems Warning Potential Damage Do not touch the underside of the imaging kit This could damage the imaging kit b Resend the print job Did the gray background disappear The problem is solved Contact customer support Horizontal voids appear on prints Leading edge Trailing edge Action Yes No Step 1 a Make sure your software program is using a correct fill pattern b Resend the print job Do horizo...

Page 281: ... on prints Contact customer support The problem is solved Incorrect margins on prints ABCD ABCD ABCD Action Yes No Step 1 a Move the width and length guides in the tray to the correct positions for the paper size loaded b Resend the print job Are the margins correct The problem is solved Go to step 2 Step 2 From the printer control panel set the paper size in the Paper menu to match the paper load...

Page 282: ...per type and weight match the type and weight of the paper in the tray Go to step 3 Specify the paper type and weight from the tray settings to match the paper loaded in the tray Step 3 a Depending on your operating system specify the paper type and weight from Printing Preferences or from the Print dialog b Resend the print job Is the paper still curled Go to step 4 The problem is solved Step 4 a...

Page 283: ...ray Change the paper loaded in the tray to match the paper size specified in the tray settings Step 3 a Depending on your operating system specify the paper type and weight from Printing Preferences or from the Print dialog b Resend the print job Do print irregularities still appear Go to step 4 The problem is solved Step 4 Check if the paper loaded in the tray has texture or rough finishes Are yo...

Page 284: ...tting b Resend the print job Is the print still too dark Go to step 3 The problem is solved Step 3 a Fromtheprinter control panel set thepaper type texture andweight in the Paper menu to match the paper loaded in the tray b Resend the print job Is the tray set to the type texture and weight of the paper loaded Go to step 4 Change the paper loaded in the tray to match the paper type texture and wei...

Page 285: ... Is the print still too dark Go to step 7 The problem is solved Step 7 Replace the imaging kit and then resend the print job Is the print still too dark Contact customer support The problem is solved Print is too light Action Yes No Step 1 a From the Quality menu on the printer control panel select Color Adjust b Resend the print job Is the print still too light Go to step 2 The problem is solved ...

Page 286: ...t still too light Go to step 5 The problem is solved Step 5 Make sure that the paper has no texture or rough finishes Are you printing on textured or rough paper From the printer control panel set the paper texture in the Paper menu to match the paper loaded in the tray Go to step 5 Step 6 a Load paper from a fresh package Note Paper absorbs moisture due to high humidity Store paper in its origina...

Page 287: ...ace the imaging kit and then resend the print job Is the printer still printing blank pages Contact customer support The problem is solved Printer is printing solid black pages Action Yes No Step 1 a Remove and then reinstall the imaging kit Warning Potential Damage Do not expose the imaging kit to direct light for more than 10 minutes Extended exposure to light may cause print quality problems Wa...

Page 288: ... mm 1 48 in 78 5 mm 3 09 in 95 mm 3 74 in 2 Take note of the distance and then contact customer support or your service representative The problem is solved Shadow images appear on prints ABCD ABCD ABCD ABCD Leading edge Trailing edge Action Yes No Step 1 Checkifthepaperloadedinthetrayhasthecorrectpapertypeandweight Is paper with the correct paper type and weight loaded in the tray Go to step 2 Lo...

Page 289: ...s Contact customer support The problem is solved Skewed print ABCDE ABCDE ABCDE Action Yes No Step 1 a Move the width and length guides in the tray to the correct positions for the size of the paper loaded b Resend the print job Is the print still skewed Go to step 2 The problem is solved Step 2 a Check if you are printing on a paper that is supported by the tray b Resend the print job Is the prin...

Page 290: ...ay settings Step 3 a Load paper from a fresh package Note Paper absorbs moisture due to high humidity Store paper in its original wrapper until you use it b Resend the print job Do streaked horizontal lines appear on prints Go to step 4 The problem is solved Step 4 a Remove and then reinstall the imaging kit Warning Potential Damage Do not expose the imaging kit to direct light for more than 10 mi...

Page 291: ...m the tray settings to match the paper loaded in the tray Change the paper loaded in the tray to match the paper size specified in the tray settings Step 3 a Load paper from a fresh package Note Paper absorbs moisture due to high humidity Store paper in its original wrapper until you use it b Resend the print job Do streaked vertical lines appear on prints Go to step 4 The problem is solved Step 4...

Page 292: ...maging kit to direct light for more than 10 minutes Extended exposure to light may cause print quality problems Warning Potential Damage Do not touch the underside of the imaging kit This could damage the imaging kit b Resend the print job Does fog or shading disappear from the prints The problem is solved Go to step 2 Step 2 Replace the imaging kit and then resend the print job Does fog or shadin...

Page 293: ... prints Action Yes No Replace the imaging kit and then resend the print job Do toner specks appear on prints Contact customer support The problem is solved Transparency print quality is poor Action Yes No Step 1 From the printer control panel set the paper type in the Paper menu to match the paper loaded in the tray Is the paper type for the tray set to Transparency Go to step 2 Set the paper type...

Page 294: ...b Do vertical voids appear on prints Go to step 3 The problem is solved Step 3 Check if you are using a recommended type of paper a Load paper source with a recommended type of paper b Resend the print job Do vertical voids appear on prints Go to step 4 The problem is solved Step 4 a Remove and then reinstall the imaging kit Warning Potential Damage Do not expose the imaging kit to direct light fo...

Page 295: ...nformation of your operating system How does the printer know what color to print When a user prints a document information describing the type and color of each object is sent to the printer The color information is passed through color conversion tables that translate the color into the appropriate amounts of cyan magenta yellow and black toner needed to produce the color you want The object inf...

Page 296: ...from the Quality menu on the printer control panel These are also available from the Color Samples page of the Embedded Web Server Selecting any sample set generates a multiple page printout consisting of hundreds of colored boxes Either a CMYK or RGB combination is located on each box depending on the table selected The observed color of each box is obtained by passing the CMYK or RGB combination...

Page 297: ...e original file Note The color conversion tables used in Auto Color Correction mode generally approximate the colors of a standard computer monitor However because of technology differences that exist between printers and monitors there are many colors that can also be affected by monitor variations and lighting conditions Action Yes No Step 1 a Set Color Correction to Off Note When the printer co...

Page 298: ...e 300 Copier does not respond Action Yes No Step 1 Check if an error or status message appears on the display Does an error or status message appear Cleartheerrororstatus message Go to step 2 Step 2 Check if the power cord is plugged into the printer and a properly grounded electrical outlet Is the power cord plugged into the printer and a properly grounded electrical outlet Go to step 3 Connect t...

Page 299: ...ity output Step 3 If dark marks appear on prints then clean the scanner glass and the ADF glass using a clean lint free cloth dampened with water Is the scanner glass clean Go to step 4 See Cleaning the scanner glass on page 204 Step 4 Send a print job and then check for print quality problems a From the General Settings menu adjust the Eco Mode settings b From the Copy menu adjust the Darkness se...

Page 300: ...adjust the settings of the following Sharpness Increase the sharpness setting Contrast Increase the contrast setting b Resend the copy job Do prints have missing or faded text Go to step 9 The problem is solved Step 9 Check for washed out or overexposed output a From the Copy screen adjust the settings of the following Background Removal Reduce the current setting Darkness Increase the current set...

Page 301: ...g b Resend the print job Do copies print properly The problem is solved Contact customer support Solving fax problems Caller ID is not shown Action Yes No Contact your telephone company to check if your telephone line is subscribed to the caller ID service Notes If your region supports multiple caller ID patterns then you may have to change the default setting There are two settings available FSK ...

Page 302: ...es Ready appear on the display Go to step 4 Turn on the printer and then wait until Ready appears on the display Step 4 Check the printer connections If applicable check if the cable connections for the following equipment are secure Telephone Handset Answering machine Are the cable connections secure Go to step 5 Securely connect the cables Step 5 a Check the telephone wall jack 1 Plug the teleph...

Page 303: ...alog phone service or the correct digital connector Go to step 7 Connect the printer to an analog phone service or the correct digital connector Step 7 Check for a dial tone Did you hear a dial tone Go to step 8 Try calling the fax number to make sure that it is working properly If the telephone lineisbeing used by another device then wait until the other device is finished before sending a fax If...

Page 304: ...n Yes No Step 1 Check the tray or feeder If empty then load paper in the tray or feeder Can you receive faxes The problem is solved Go to step 2 Step 2 Check the ring count delay settings a Open a Web browser and then type the printer IP address in the address field Notes View the printer IP address on the printer home screen The IP address appears as four sets of numbers separated by periods such...

Page 305: ... the original document faceup short edge first into the ADF tray or facedown on the scanner glass in the upper left corner Note Do not load postcards photos small items transparencies photo paper or thin media such as magazine clippings into the ADF tray Place these items on the scanner glass Can you send faxes The problem is solved Go to step 3 Step 3 Set up the shortcut number properly Check if ...

Page 306: ...ch Next e Select a time zone and then touch Next f Select Fax and E mail and then touch Next Are fax and e mail functions set up The problem is solved Contact customer support Received fax has poor print quality Action Yes No Step 1 Ask the person who sent you the fax to a Check if the quality of the original document is satisfactory b Increase the fax scan resolution if possible c Resend the fax ...

Page 307: ... c In the Max Speed menu click one of the following 2400 4800 9600 14400 33600 d Click Submit and then resend the fax Is the fax print quality satisfactory The problem is solved Go to step 3 Step 3 Replace the toner cartridge When Cartridge low 88 xy appears replace the cartridge and then resend the fax Is the fax print quality satisfactory The problem is solved Contact customer support Solving sc...

Page 308: ...ical outlet Step 4 Check if the electrical outlet is turned off by a switch or breaker Is the electrical outlet turned off by a switch or breaker Turn on the switch or reset the breaker Go to step 5 Step 5 Check if the printer is plugged into any surge protectors uninterruptible power supplies or extension cords Is the printer plugged into any surge protectors uninterruptible power supplies or ext...

Page 309: ...selected in the destination configuration settings Is the Append time stamp or Overwrite existing file check box selected in the destination configuration settings Contact customer support SelecttheAppendtime stamp or Overwrite existing file check box in the destination configuration settings Scanner unit does not close Action Yes No Check if there are obstructions in the scanner unit a Lift the s...

Page 310: ...t of the document or photo Make sure the document or photo is loaded facedown on the scanner glass in the upper left corner Is the document or photo loaded correctly Go to step 5 Place the document or photo facedown on the scanner glass in the upper left corner Step 5 Send a print job and then check for print quality problems From the General Settings menu adjust the Eco Mode settings From the Cop...

Page 311: ...ep 1 Make sure the printer is turned on and that Ready appears on the printer display before scanning a job Does Ready appear before scanning the job Go to step 3 Go to step 2 Step 2 Turn off the printer then wait for about 10 seconds and then turn the printer back on Is there an error message on the printer display Clear the error message Go to step 3 Step 3 Check the cable connections between th...

Page 312: ...s separated by periods such as 123 123 123 123 b Click Settings Apps Apps Management System tab Log c From the Filter menu select an application status d From the Application menu select an application and then click Submit Does an error message appear in the log Go to step 2 Contact customer support Step 2 Resolve the error Is the application working now The problem is solved Contact customer sup...

Page 313: ...us is Connected Note If the status is Not Connected then the connection may be intermittent or the network cable may be defective Contact your system support person for a solution and then print another network setup page c Open a Web browser and then type the printer IP address d Press Enter Does the Embedded Web Server open The problem is solved Go to step 4 Step 4 Check if the cable connections...

Page 314: ...brary of manuals support documentation drivers and other downloads to help you solve common problems E mail You can send an e mail to the Lexmark team describing your problem A service representative will respond and provide you with information to solve your problem Live chat You can chat directly with a service representative They can work with you to solve your printer problem or provide assist...

Page 315: ...ence to a product program or service is not intended to state or imply that only that product program or service may be used Any functionally equivalent product program or service that does not infringe any existing intellectual property right may be used instead Evaluation and verification of operation in conjunction with other products programs or services except those expressly designated by th...

Page 316: ...erms are trademarks or registered trademarks of these companies Albertus The Monotype Corporation plc Antique Olive Monsieur Marcel OLIVE Apple Chancery Apple Computer Inc Arial The Monotype Corporation plc CG Times Based on Times New Roman under license from The Monotype Corporation plc is a product of Agfa Corporation Chicago Apple Computer Inc Clarendon Linotype Hell AG and or its subsidiaries ...

Page 317: ...or current values Waste from Electrical and Electronic Equipment WEEE directive The WEEE logo signifies specific recycling programs and procedures for electronic products in countries of the European Union We encourage the recycling of our products If you have further questions about recycling options visit the Lexmark Web site at www lexmark com for your local sales office phone number India E Wa...

Page 318: ...rature 15 6 to 32 2 C 60 to 90 F Shipping temperature 40 to 43 3 C 40 to 110 F Storage temperature and relative humidity 2 to 35 C 34 to 95 F 8 to 80 RH Laser notice The printer is certified in the U S to conform to the requirements of DHHS 21 CFR Chapter I Subchapter J for Class I 1 laser products and elsewhere is certified as a Class I laser product conforming to the requirements of IEC 60825 1 ...

Page 319: ...zione al raggio laser FARE Usynlig laserstråling når kassettene tas ut og sperren er satt ut av spill Unngå eksponering for laserstrålen NIEBEZPIECZEŃSTWO niewidzialne promieniowanie laserowe podczas usuwania kaset i blokady Należy unikać naświetlenia promieniem lasera ОПАСНО Невидимое лазерное излучение при извлеченных картриджах и снятии блокировки Избегайте воздействия лазерных лучей Pozor Nebe...

Page 320: ...ntries or regions 3 days The amount of time the printer waits after a job is printed before it enters Hibernate mode can be modified between one hour and one month Off mode If this product has an off mode which still consumes a small amount of power then to completely stop product power consumption disconnect the power supply cord from the electrical outlet Total energy usage It is sometimes helpf...

Page 321: ...n recommended cables or by unauthorized changes or modifications to this equipment Unauthorized changes or modifications could void the user s authority to operate this equipment Note To assure compliance with FCC regulations on electromagnetic interference for a Class B computing device use a properly shielded and grounded cable such as Lexmark part number 1021231 for parallel attach or 1021294 f...

Page 322: ... comply with the applicable FCC Part 68 rules and requirements adopted by the ACTA A compliant telephone cord and modular plug is provided with this product It is designed to be connected to a compatible modular jack that is also compliant See your setup documentation for more information TheRingerEquivalenceNumber REN isusedtodeterminethenumberofdevicesthatmaybeconnectedtoatelephone line Excessiv...

Page 323: ...rogram this information into your fax machine Notice to users of the Canadian telephone network This product meets the applicable Industry Canada technical specifications The Ringer Equivalence Number REN is an indication of the maximum number of terminals allowed to be connected to a telephone interface The terminus of an interface may consist of any combination of devices subject only to the req...

Page 324: ...ty Code 6 obtainable from Health Canada s Web site www hc sc gc ca rpb The term IC before the certification registration number only signifies that the Industry Canada technical specifications were met Industry Canada Canada Cet appareil est conforme à la norme RSS 210 d Industry Canada Son fonctionnement est soumis aux deux conditions suivantes 1 cet appareil ne doit pas provoquer d interférences...

Page 325: ...th Telecom s telepermit requirements are dependent on the equipment associated with this device The associated equipment shall be set to operate within the following limits for compliance to Telecom s specifications There shall be no more than 10 call attempts to the same number within any 30 minute period for any single manual call initiation and The equipment shall go on hook for a period of not...

Page 326: ...ing the CE mark are in conformity with the protection requirements of EC Council directives 2004 108 EC 2006 95 EC 1999 5 EC and 2009 125 EC on the approximation and harmonization of the laws of the Member States relating to electromagnetic compatibility safety of electrical equipment designed for use within certain voltage limits radio equipment and telecommunications terminal equipment and on th...

Page 327: ...tional Technology Hungária Kft 8 Lechner Ödön fasor Millennium Tower III 1095 Budapest HUNGARY A declaration of conformity to the requirements of the Directives is available upon request from the Authorized Representative This product satisfies the Class B limits of EN 55022 and safety requirements of EN 60950 1 Products equipped with 2 4GHz Wireless LAN option are in conformity with the protectio...

Page 328: ...ote on direktiivin 1999 5 EY oleellisten vaatimusten ja muiden sitä koskevien direktiivin ehtojen mukainen Français Par la présente Lexmark International Inc déclare que l appareil ce produit est conforme aux exigences fondamentales et autres dispositions pertinentes de la directive 1999 5 CE Magyar Alulírott Lexmark International Inc nyilatkozom hogy a termék megfelel a vonatkozó alapvetõ követel...

Page 329: ...er referred to in this statement as Remarketer Limited warranty Lexmark warrants that this product Is manufactured from new parts or new and serviceable used parts which perform like new parts Is during normal use free from defects in material and workmanship If this product does not function as warranted during the warranty period contact a Remarketer or Lexmark for repair or replacement at Lexma...

Page 330: ...ur area contact Lexmark on the World Wide Web Remote technical support is provided for this product throughout its warranty period For products no longer covered by a Lexmark warranty technical support may not be available or only be available for a fee Extent of limited warranty Lexmark does not warrant uninterrupted or error free operation of any product or the durability or longevity of prints ...

Page 331: ...atory terms in the Intellectual Property Rights IPR Disclosure of Certicom Corp at the IETF for Elliptic Curve Cryptography ECC Cipher Suites for Transport Layer Security TLS implemented in the product or service The use of this product or service is subject to the reasonable non discriminatory terms in the Intellectual Property Rights IPR Disclosure of Certicom Corp at the IETF forTLS Elliptic Cu...

Page 332: ... subject to the reasonable non discriminatory terms in the Intellectual Property Rights IPR Disclosure of Certicom Corp at the IETF for Algorithms for Internet Key Exchange version 1 IKEv1 implemented in the product or service Notices 332 ...

Page 333: ...imaging copy options 80 e mail options 88 fax options 111 scan screen 118 answering machine setting up 91 AppleTalk menu 136 applications home screen 20 understanding 19 attaching cables 34 available internal options 25 avoiding jams 57 avoiding paper jams 233 B black and white printing 61 blocking junk faxes 107 buttons touch screen using 16 C cables Ethernet 34 USB 34 cancel button printer contr...

Page 334: ...ing the scanner glass 77 copy options Adjust ADF Skew 81 advanced duplex 79 advanced imaging 80 collate 78 copies 78 cover page setup 80 create booklet 80 custom job 80 darkness 78 header footer 80 overlay 80 paper saver 80 Save As Shortcut 79 separator sheets 80 sides duplex 78 copy quality adjusting 74 copy screen content source 79 content type 79 options 78 79 Copy Settings menu 150 copy troubl...

Page 335: ...fax setup 90 modifying confidential print settings 67 231 networking settings 229 problem accessing 312 scanning to a computer using 114 setting up e mail alerts 229 Embedded Web Server Security Administrator s Guide where to find 229 Embedded Web Server Security Administrator s Guide where to find 202 emission notices 317 320 321 322 324 327 encrypting the printer hard disk 201 enlarging a copy 7...

Page 336: ...ts using the Embedded Web Server 106 creating shortcuts using the printer control panel 106 distinctive ring service 102 fax setup 90 forwarding faxes 109 holding faxes 108 making a fax lighter or darker 107 sending a fax at a scheduled time 105 setting the date and time 103 setting the fax number 102 setting the outgoing fax name 102 viewing a fax log 107 FCC notices 320 322 327 file name scan op...

Page 337: ...ol panel 14 L labels paper tips 53 letterhead copying on 71 loading multipurpose feeder 51 loading trays 51 line filter 95 LINE port 34 linking trays 48 49 Load paper source with custom string 254 Load paper source with custom type name 254 Load paper source with paper size 254 Load paper source with paper type paper size 255 Load Manual Feeder with custom string 255 Load Manual Feeder with custom...

Page 338: ...estimate 205 O optional card installing 30 options 550 sheet tray 32 650 sheet duo tray 32 firmware cards 25 memory card 28 memory cards 25 options copy screen copy from 78 edge erase 79 margin shift 79 scale 78 options touch screen copy 78 79 e mail 86 87 fax 110 FTP 116 ordering imaging kits 207 maintenance kit 207 toner cartridges 206 waste toner bottle 208 original size e mail options 86 scan ...

Page 339: ...s on wrong paper 273 jobs do not print 275 Large jobs do not collate 273 multiple language PDF files do not print 274 paper curl 282 paper frequently jams 269 print job takes longer than expected 276 printing slows down 274 tray linking does not work 277 unexpected page breaks occur 277 printer 35 configurations 11 minimum clearances 10 models 11 moving 10 227 selecting a location 10 shipping 228 ...

Page 340: ...ce kit 0 estimated pages remain 80 xy 260 Replace missing color cartridge 31 xy 260 Replace missing type imaging kit 31 xy 260 Replace missing or unresponsive type imaging kit 31 xy 257 Replace missing waste toner bottle 82 xy 260 Replace unsupported color cartridge 32 xy 260 Replace unsupported type imaging kit 32 xy 261 Replace waste toner bottle 82 xy 261 Restore held jobs 261 Scanner automatic...

Page 341: ...le 82 xy 260 Replace unsupported color cartridge 32 xy 260 Replace unsupported type imaging kit 32 xy 261 Replace waste toner bottle 82 xy 261 reports viewing 229 Reports menu 130 reserve print jobs printing from a Macintosh computer 66 printing from Windows 66 resolution e mail options 86 fax options 109 scan options 116 resolution fax changing 106 Restore held jobs 261 restoring factory default ...

Page 342: ... e mail functions 305 Setup menu 179 shipping the printer 228 shortcuts creating copy screen 71 e mail 82 e mail screen 83 fax destination 106 FTP address 113 FTP destination 112 showing icons on the home screen 19 sides duplex copy options 78 sleep button printer control panel 14 Sleep Mode adjusting 195 SMTP server not set up Contact system administrator 262 SMTP Setup menu 138 Some held jobs we...

Page 343: ... 275 Large jobs do not collate 273 multiple language PDF files do not print 274 paper curl 282 paper frequently jams 269 print job takes longer than expected 276 printing slows down 274 tray linking does not work 277 unexpected page breaks occur 277 troubleshooting print quality blank pages 286 characters have jagged edges 278 clipped pages or images 278 gray background on prints 279 horizontal vo...

Page 344: ...ver Internet Protocol VoIP fax setup 96 VoIP adapter 96 volatile memory 199 erasing 200 volatility statement of 199 W waste toner bottle ordering 208 replacing 208 Waste toner bottle nearly full 82 xy 264 Weblink server not set up Contact system administrator 264 wiping the printer hard disk 201 Wireless menu 135 wireless network configuration information 36 wireless network setup using the Embedd...

Reviews: