background image


DSS-1000 User Manual 


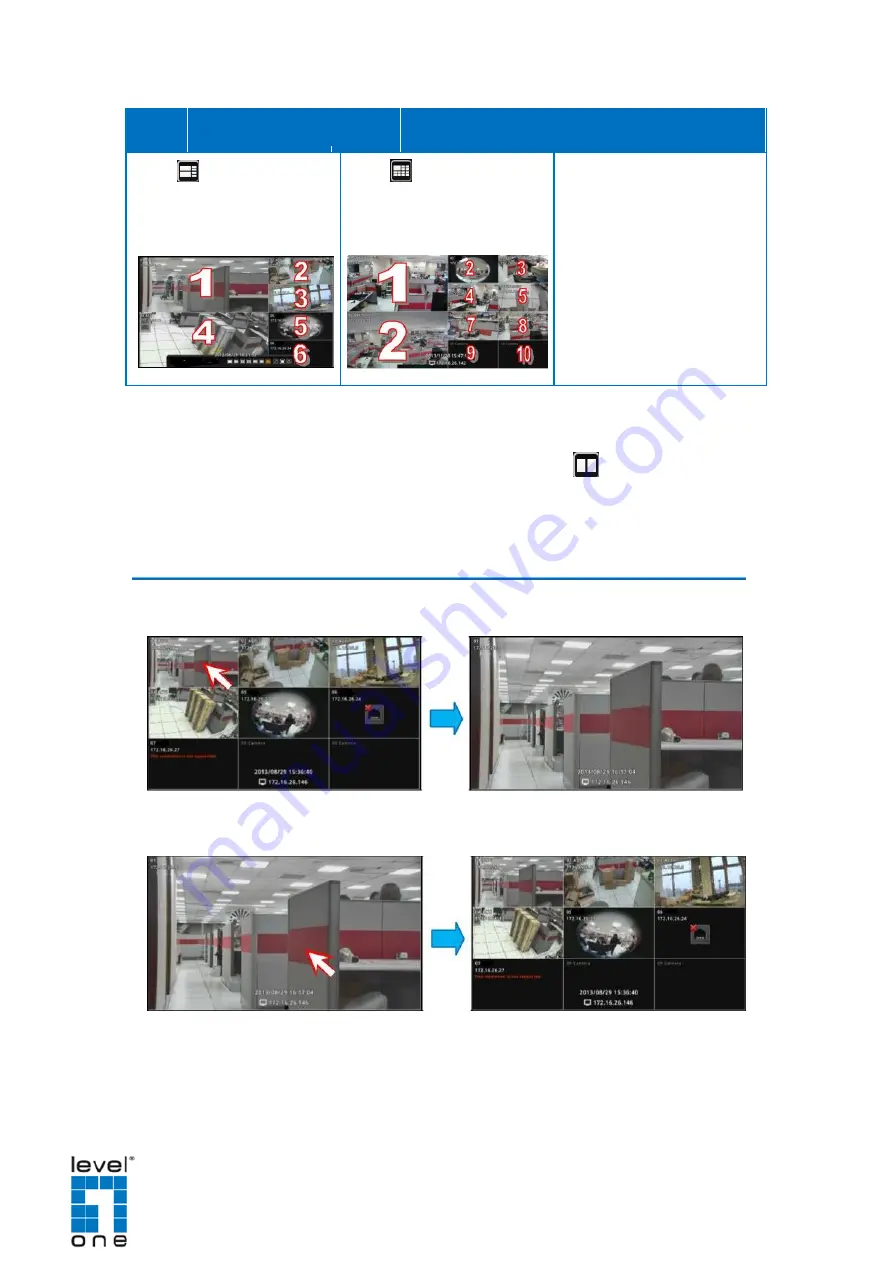
Layout 2+4 


Layout 2+8 


Click 

to display 8 

Click 

to display 10 


channels at a time on a 2+4 

channels at a time on a 2+8 


layout. 


layout. 


To view succeeding channels, click the layout icon again. For example, if viewing on a 


2-channel layout, and you want to view the next 2 channels, click  


Viewing Channels in Full Screen 


Double-click a channel to view the channel in full screen. 


Double-click again to switch back to the previous layout. 


30 

Summary of Contents for DSS-1000

Page 1: ...DSS 1000 User Manual For V1 02 09 Firmware Ver 2014 10 03...

Page 2: ...s subject to change without notice The English version of this document is the official one for all purpose All the translated versions are provided as a convenience Any discrepancies or differences c...

Page 3: ...h can be determined by turning the equipment off and on the user is encouraged to try to correct the interference by one or more of the following measures Reorient or relocate the receiving antenna In...

Page 4: ...ng DSS on a daily basis System Administrators are expected to know the fundamentals of IP surveillance system integration and to own the administrative privileges to install and configure all the devi...

Page 5: ...r 16 Connecting to Local Display 17 Local Display via HDMI Connection 17 Local Display via Composite Connection 17 Connecting the Cameras 18 1 3 Accessing DSS 1000 19 Local Access 19 Remote Access 19...

Page 6: ...up Screen 42 The Setup Screen 42 2 6 Configuring System Settings 43 System Information 43 Module 44 Date and Time 44 Automatically Set the Date and Time 44 Manually Change the Date and Time 45 Sync Da...

Page 7: ...8 2 10 Rebooting the Device 69 Chapter 3 Remote Management 70 3 1 Accessing DSS 1000 Remotely 71 How to Access DSS 1000 71 Accessing From a Network with DHCP Server 71 Accessing From a Network without...

Page 8: ...8 Setting the IP Address Manually 98 Obtaining the IP Address Automatically 98 Configuring Port Mapping 99 3 6 Configuring the Cameras 99 Adding Cameras 101 Searching Cameras to Add 101 Adding Cameras...

Page 9: ...Upgrading the Firmware 124 Saving Backup Settings 125 Restoring Backed Up Settings 126 Troubleshooting 127 3 10 Managing the System Log 128 3 11 Rebooting the Device 128 Chapter 4 Installation and Ma...

Page 10: ...cribes the package contents device overview and the connection architecture Connecting Devices Describes how to connect DSS 1000 to other devices and how to use the bundled accessories Accessing the D...

Page 11: ...DSS 1000 User Manual 1 1 Introduction Package Contents DSS 1000 Screw Packs x 2 Cable Straps Mounting Bracket Power Adaptor Terminal Block Quick Installation Guide 11...

Page 12: ...has started The LED turns off and lights up again when the restoration completes and DSS 1000 is ready for use 3 Reset Button Use to restore DSS 1000 to its factory default setting NTSC and PAL Switch...

Page 13: ...64 MJPEG H 264 Resolution Up to 2 megapixels Up to 10 megapixels DSS 1000 conforms to the display standard of composite and 1080p HDMI monitors Therefore to reserve as much computing power for DSS 100...

Page 14: ...s 30 fps 30 fps 30 fps 1280 x 720 30 fps 9 channels 12 channels 16 channels 25 fps 16 fps 12 fps 6 channels 6 channels 1 3M 4 channels 30 fps 30 fps 1 16 channels Decode I Frame 1280 x 1024 30 fps 9 c...

Page 15: ...14...

Page 16: ...or on page 16 NOTE This step may be skipped if a Power over Ethernet PoE switch or injector will be connected to DSS 1000 2 Connect a monitor to DSS 1000 via HDMI or Composite port connection see Conn...

Page 17: ...tor must be connected to the supplied terminal block before use To do this follow the procedures below 1 Loosen the screws of the 12V and GND pins of the power terminal block 2 Take note that the powe...

Page 18: ...n at one time These display outputs can be referred to as the local display or the local client Local Display via HDMI Connection Connect an HDMI monitor 1080p to the HDMI port of DSS 1000 using an HD...

Page 19: ...r a mobile client To connect a camera do the following 1 Connect the camera to a PoE switch within in the same network segment as DSS 1000 using an Ethernet cable 2 Configure the IP address of the cam...

Page 20: ...er with Internet Explorer users can access DSS 1000 web interface by typing the IP address of DSS 1000 without installing any client program beforehand Logging in is as simple as visiting a website Us...

Page 21: ...g pen 2 Power on DSS 1000 either by connecting the power adaptor or connecting DSS 1000 to a PoE switch 3 Continue to press the Reset button for 5 seconds or when the Factory Default LED lights green...

Page 22: ...el patrolling and resetting the channel position Accessing the Setup Screen Describes how to access the Setup menu using the on screen keyboard to login and an overview of the Setup menu Configuring S...

Page 23: ...ted Cable is unplugged Connected DSS 1000 comes with a default static IP address of 192 168 0 200 If your network has a DHCP server DSS 1000 will automatically switch the connection type to DHCP and b...

Page 24: ...lly assigned an IP address so users do not need to change anything If the network does not have a DHCP server DSS 1000 uses its default IP address of 192 168 0 200 Change the IP Address on Network wit...

Page 25: ...en LAN showsActivated the IP address configuration is complete Step 3 Add Cameras 1 On the Setup screen click Camera Search Cameras NOTE To add cameras by IP address or connect to camera via RTSP prot...

Page 26: ...ameras To validate specific camera models that can be integrated visit our website 3 Click one or more camera model s Selected cameras are displayed in orange NOTE By default a maximum of nine cameras...

Page 27: ...The Live View screen appears with the added cameras By default information such as the camera name IP address etc are displayed on the local display For security purposes these information may be hidd...

Page 28: ...pported Local display supports camera resolution of up to 1920 x 1080 only If the resolution exceeds this value this message is displayed The compression is not supported Local display supports H 264...

Page 29: ...over the icon displays the icon name See Changing the Layout on page 29 2 Sequence Patrol Sequence Patrol allows users to view the one or more channels at a time and patrols with a specific interval t...

Page 30: ...ut 2 Layout 4 Click to display one Click to display 2 Click to display 4 channel on full screen channels at a time channels at a time Layout 9 Layout 12 Layout 16 Click to display 9 Click to display 1...

Page 31: ...ime on a 2 8 layout layout To view succeeding channels click the layout icon again For example if viewing on a 2 channel layout and you want to view the next 2 channels click Viewing Channels in Full...

Page 32: ...t Sequence Patrol 2 Enter the interval time in seconds using the on screen keyboard see Using the On Screen Keyboard on page 34 Then click OK 3 Sequence Patrol starts To stop the patrol click Repositi...

Page 33: ...DSS 1000 User Manual Repositioned Channels To reset the default channel position click 32...

Page 34: ...the account name and password through a remote client computer 1 2 Item Description 1 Remember Me Check to allow the system to remember the account name Users just need to enter the password to login...

Page 35: ...uire character or numeric input such as account name password etc Using the mouse click the keys on the on screen keyboard to enter characters or numbers The type of on screen keyboard that appears ma...

Page 36: ...control panel is enabled only when a PTZ or zoom camera is selected Although the panel appears when a non PTZ zoom camera is selected all the controls are disabled Digital PTZ is available on all came...

Page 37: ...to 5 fastest 6 Zoom Control Click the icons to zoom in or zoom out the camera view 7 Focus Mode Click the icon to toggle between modes Auto Focus Manual Focus When Manual Focus is selected the Near Fo...

Page 38: ...ab 1 2 5 3 4 Item Description 1 PTZ Control Click the tab to display the page Tab PTZ see 2 4 Using the PTZ Control Panel on page 33 Preset Points Tour see Setting Tours on page 39 2 Go to Preset Clic...

Page 39: ...b 4 Click the icon turns orange Then click a preset point number to assign NOTE Numbers in red are already configured when red numbers are selected the original preset setting will be overridden with...

Page 40: ...3 The Login Screen on page 33 for details Then click the Preset Point Tab 1 2 5 3 4 Item Description 1 PTZ Control Click the tab to display the page Tab PTZ see page 33 Preset Points see page 37 Tour...

Page 41: ...u Panel then click You must login as an administrator to have PTZ control access see 2 3 The Login Screen on page 33 for details 2 Click the Tour tab 3 Click 4 Select the tour ID and type the desired...

Page 42: ...ys to change the order sequence of preset points Or to remove a preset point from the tour click 7 When done click Save to complete the tour configuration How to Delete Tours 1 On the Tour page tab cl...

Page 43: ...Login screen appears see 2 3 The Login Screen on page 33 The Setup Screen After a successful login the Setup screen appears 1 3 2 4 Item Description 1 Setup Menu Click a tab to display the submenu 2...

Page 44: ...00 can be modified To modify the System Name click the box and use the on screen keyboard to enter the characters NOTE The system name can be up to 10 alphanumeric characters only Firmware System firm...

Page 45: ...stream performance take note of the Decoding Limitation on page 13 Date and Time The Date and Time page allows you to manually change the system date and time or sync with an NTP server Automatically...

Page 46: ...On the Setup screen click System Date and Time 2 Click the system date and time button 3 Modify the date and time 1 2 2 3 4 Item Description 1 Month and Year Select the month and year from the box 2...

Page 47: ...to confirm if synchronization is successful NOTE If the NTP Server is a domain name make sure the IP setting and DNS setting of the system gateway are correct To delete NTP Server To delete an NTP se...

Page 48: ...rs to show or hide information such as the IP address system date and time or event trigger icons on the Live View screen On the Setup screen click System Local Display By default all options are enab...

Page 49: ...nnel For security reasons it is recommended to uncheck this function to hide the IP address from showing on the local display Show camera event trigger If checked an event trigger icon such as motion...

Page 50: ...s Viewing the Network Information On the Setup screen click Network The network information such as the Hardware Address MAC address Speed Connection Type IP Address Subnet Mask Gateway DNS Setting an...

Page 51: ...HCP Connection On a DHCP network the DHCP server assigns the IP address automatically By default DSS 1000 will automatically switch to DHCP connection mode and be assigned an IP address However if thi...

Page 52: ...HCP connection perform the following procedures to obtain the IP address 1 On the Setup screen click Network Network Connection 2 On Connection Type select DHCP 3 Leave the default DNS Setting as Auto...

Page 53: ...nection and streaming properties It has two page tabs Basic Displays the connection properties such as the IP address HTTP port User Name account and Password used to access the camera You can also us...

Page 54: ...o add several cameras at the same time you can search the cameras connected to the network and choose up to 4 9 12 or 16 cameras to connect to DSS 1000 The maximum number of cameras to be added varies...

Page 55: ...the camera Inaccessible The camera account or password may be different from what you have entered on Account and Password fields So that camera cannot be accessed In Use The camera is already added...

Page 56: ...nt to connect to 1 On the Setup screen click Camera 2 Click on an empty channel number from the left panel and click Add Camera Manually 3 On Name type a name you want to use to identify the camera ma...

Page 57: ...s At this point nothing is shown on the Display window yet 6 Click Save Once camera settings are saved the camera Live View is shown on the Display window TIP Use the Duplicate button to add another c...

Page 58: ...you want to use to identify the camera maximum of 32 alphanumeric characters no spaces nor symbols This name is saved only on DSS 1000 and does not affect the settings on the camera side 4 Enter the...

Page 59: ...ty cameras which support the standard RTSP 1 On the Setup screen click Camera 2 Click on an empty channel number from the left panel and click Add Camera Manually RTSP 3 On Name type a name you want t...

Page 60: ...ith almost similar camera settings to another channel see Duplicating Cameras on page 59 Duplicating Cameras Use this function to add another camera with almost the same camera settings as the selecte...

Page 61: ...DSS 1000 User Manual 2 Available channels are shown under To Check the box es of the channel s to copy the camera settings to 3 Click Duplicate 60...

Page 62: ...onnection properties click the Basic tab Modify the Name IP Address HTTP Port port used by remote IE clients User Name and Password as needed NOTE The Name is the camera name displayed on DSS 1000 Thi...

Page 63: ...hat for local viewing only up to 2 megapixels 1920 x 1080 is supported Frame Rate This is the amount of frame per second of the video stream You can modify the frame rate as needed Bitrate Mode UnderC...

Page 64: ...oating while the video quality will be stable and follows the quality standard set by the Quality user The user can choose either Hig only for H 264 quality The higher is the quality level the more bi...

Page 65: ...E All video streams will be lost for a few seconds until the reconnection is finished Deleting Cameras Cameras can be removed one at a time or all cameras at the same time On the Setup screen click Ca...

Page 66: ...d 7 days a week However the beep sound must be enabled and configured separately Scheduling Network Video Loss Trigger 1 On the Setup screen click Schedule 2 Select the camera from the camera list pan...

Page 67: ...ver the time table to select the day and time period 5 When done click Save TIP Instead of manually modifying the event trigger on all cameras users can copy the schedule to other channels See Copying...

Page 68: ...d from the network or when an encoder loses its video source do the following 1 On the Setup screen click Event 2 Click Network Loss or Video Loss and then click Set 3 Check Beep to enable the beep so...

Page 69: ...beep settings on all cameras one by one users can copy the settings to other channels 1 After setting the event schedule or beep settings click Copy The Copy Schedule window appears 2 Check to select...

Page 70: ...booting the Device 1 On the Setup screen click Power 2 Click Reboot 3 When the confirmation message appears click OK to restart NOTE All video streams will be lost for a few seconds until DSS 1000 com...

Page 71: ...layout Accessing the Setup Screen Provides an overview of the Setup menu Configuring System Settings Describes how to view and modify the system settings such as date and time language and how to filt...

Page 72: ...oder other than H 264 can be properly viewed on a remote client i e Web Client but cannot be viewed on the local display After the initial configurations and installation further management or advance...

Page 73: ...he user interface on the web browser If you already know the IP address of DSS 1000 open the web browser and directly type the IP address on the address bar TIP The quickest way to know the IP address...

Page 74: ...hat the computer must be within the same network segment For example the computer must have an IP address of 192 168 0 X where X is any number between 1 255 except 200 and Subnet Mask of 255 255 255 0...

Page 75: ...word in the Setup Wizard or see 3 7 Configuring User Access on page 115 1 2 3 Item 1 Language The default user interface language is English To change the language select the preferred language from t...

Page 76: ...ra connection All settings can still be modified in the Setup screen 1 Click Next 2 Set the date and time by one of the following options Select the Time Zone Sync with an NTP Server Click the Local S...

Page 77: ...account name and password for access are already filed with default values If you want to add camera from other manufacturers or the camera has different account and password modify these values as n...

Page 78: ...t of cameras connected on the network appears Click on a camera to select it By default you can select up to 9 cameras to add Selected cameras are highlighted in orange 7 Click Next to continue 8 Clic...

Page 79: ...t List Displays connection and event notifications Indicates the camera has been connected 2 Indicates the camera is disconnected Indicates motion is detected The number indicates the area where motio...

Page 80: ...et the channel position Click to hide reveal the blue title bar of each channel 6 Click to disconnect all channels Click to switch between Decode I frame Auto Drop Frame modes By default the live view...

Page 81: ...View display area Double click a camera from the list to view it on the next available channel window Double click All Cameras to view all cameras on the Live View display area NOTE DSS 1000 does not...

Page 82: ...the mouse icon over the channel window scroll the mouse wheel up or down to zoom in or zoom out the image Or to zoom in on an area click and drag the mouse to box the area to magnify The red box indic...

Page 83: ...to display 2 Click to display 4 channel on full screen channels at a time channels at a time Layout 9 Layout 12 Layout 16 Click to display 9 Click to display 12 Click to display 16 channels at a time...

Page 84: ...e time users may want to view one channel in full screen or two channels at a time and scroll through all the channels alternately To do this follow the procedures below 1 Select the desired window la...

Page 85: ...view the cameras as how users will see it on the local client display Click to sync the local Live View based on the current remote client display Reconnecting the Cameras If there is a need to refres...

Page 86: ...rs in the middle of the channel window when the camera is selected Use the mouse or the PTZ Control Panel to do PTZ functions see Using the PTZ Control Panel on page 87 Pan Tilt Zoom in Zoom out To pa...

Page 87: ...e image 3 The whole camera view is shown on the lower right corner and the zoomed area is indicated by a red box The red box indicates the area that is zoomed in 4 Drag the red box over the image to p...

Page 88: ...rols speed on the sliders 2 Pan Speed Drag the slider to adjust the pan speed 1 slowest to 5 fastest 3 Tilt Speed Drag the slider to adjust the tilt speed 1 slowest to 5 fastest 4 Zoom Control Click t...

Page 89: ...ed first in the Camera Setup screen see 3 6 Configuring the Cameras on page 99 1 4 2 5 3 Item Description 1 Preset Point Click to view preset point 1 16 buttons or to view preset point Back Next 17 32...

Page 90: ...amera list panel Decode I frame Auto Drop Frame Select Decode I frame to save computing power With this function DSS 1000 decodes only the I frames so the frame rate of each channel becomes 1 fps This...

Page 91: ...h details such as IP address and camera model When the mouse goes over to the camera list panel the scroll bars appear to enable users to scroll through the camera details Hide Toolbar Click Hide Tool...

Page 92: ...nual 3 3 The Setup Screen Click the Setup tab to access the Setup screen Click an icon from the Home menu or a page tab to access the menu page System Network Menu Camera Schedule Event Maintenance Us...

Page 93: ...ave button at the bottom of the screen to apply and save changes NOTE The system name can be up to 10 alphanumeric characters spaces and symbols are not allowed Firmware System firmware version Serial...

Page 94: ...n click System Date and Time 2 On Time Zone select the desired time zone The system date and time automatically changes according to the current date and time of the time zone 3 If applicable check th...

Page 95: ...ange while the current date is in yellow 4 Time Select the hour minute and second from the corresponding boxes 4 When done click OK to save Sync Date and Time with NTP Server 1 On the Setup screen cli...

Page 96: ...The Module page allows users to select the maximum number of cameras that can be connected to DSS 1000 Options are 4 channel 9 channel 12 channel and 16 channel mode Language To change the language of...

Page 97: ...Show system IP address If checked the system IP address is displayed on the bottom of the Live View screen Show camera name If checked the camera name is displayed on the upper left corner of the chan...

Page 98: ...etwork Information On the Setup screen click Network The network information such as the Hardware Address MAC address Speed Connection Type IP Address Subnet Mask Gateway DNS Setting and Primary and S...

Page 99: ...address automatically By default DSS 1000 will automatically switch to DHCP connection mode and be assigned an IP address However if this does not happen users need to manually change the Connection T...

Page 100: ...Network Connection 2 On Connection Type select DHCP 3 Leave the default DNS Setting as Auto 4 Click Save Configuring Port Mapping By default DSS 1000 port number is 80 To change this value click Netwo...

Page 101: ...1000 User Manual To add cameras click Add See Adding Cameras on page 101 To add cameras with almost the same setting as an existing channel see Duplicating Cameras on page 106 To delete cameras see 1...

Page 102: ...s appear only in PTZ and zoom cameras only See Setting Preset Points on the Remote Client on page 112 Adding Cameras There are two ways to add cameras for viewing by manually entering the IP address o...

Page 103: ...DSS 1000 User Manual 3 Click Search Cameras 102...

Page 104: ...cameras to select it The number of cameras that you can select depends on the channel mode selected in Module see Module on page 95 Selected cameras are highlighted in orange NOTE The Status column s...

Page 105: ...or Add Camera Manually ONVIF Add Camera Manually If your network does not have a DHCP server perform this step to connect a camera Add Camera Manually ONVIF If the camera is a 3 rd party camera which...

Page 106: ...nd RTSP Port by default 554 If you do not know the URI of the camera click to select from the most common manufacturers on the list Once a manufacturer is selected its URI is filled up on the field If...

Page 107: ...d then modify afterwards However to use this function there must be at least one available channel without a connected camera 1 Select the camera you want to duplicate from the table and then click Du...

Page 108: ...DSS 1000 User Manual 107...

Page 109: ...S 1000 e g location of Name camera etc This name is not saved or shown on the camera side The maximum length is 32 alphanumeric characters symbols and spaces are not allowed IP Address Enter the camer...

Page 110: ...frame per second of the video stream You can modify the frame rate as needed UnderConstant Bit Rate mode CBR the camer stable bitrate regardless of the complexity of the scene Under this mode the vid...

Page 111: ...l use to achieve the target quality Under VBR mode it is possible to adjust the GOP length that is the occurrence rate of I frames By default there is one I frame per second For example in case of 30f...

Page 112: ...Setup screen click Camera 2 If the camera list table is not shown click All Cameras or Camera List 3 On the camera list table click the camera s to delete Click as many cameras as needed 4 Click Dele...

Page 113: ...appears on the display window 3 Pan tilt and zoom the camera to the desired area To pan and tilt click the mouse on the display window to move the direction of the camera available on PTZ cameras only...

Page 114: ...ation on DSS 1000 is not synced with the tour configuration on the camera side 1 On the Setup screen click Camera 2 Before creating a tour the preset points must be created first see Setting Preset Po...

Page 115: ...reset point sequence drag a preset point up or down the list 8 When done click Save How to Delete Tours On the Preset Tour page tab of the selected camera click the corresponding Delete icon of the pr...

Page 116: ...View Setup Access and Remote Access To setup access permissions perform the following 1 Create a group See below 2 Add users to the group See Adding Users on page 117 3 Set the access rights See Gran...

Page 117: ...er the group Name up to 32 characters and Description up to 128 characters NOTE The group name can be up to 32 alphanumeric characters symbols and spaces are not allowed 4 Click OK The new group appea...

Page 118: ...r a user name The name can be up to 63 alphanumeric characters symbols are not allowed Password Enter the password that will be used by the user to log into DSS 1000 Confirm Password Re type the passw...

Page 119: ...cess permission options are Live Permission for Live View Live View access is always enabled Setup Permission to access the Setup screen from both the local and remote client Granting this access enab...

Page 120: ...roups and Users Except for the Administrator group all user defined groups and users can be modified To modify a group or user click the corresponding Edit button To delete a group or user click the c...

Page 121: ...eek However the beep sound must be enabled and configured separately Scheduling Network Loss Trigger 1 On the Setup screen click Schedule 2 Select the camera from the camera list panel 1 2 Item Descri...

Page 122: ...ticular day from time selection click the day A lock icon appears In the example below Saturday and Sunday are locked so both days are not included in the time selection 6 When done click Save TIP Ins...

Page 123: ...click Event 2 Click on Network Loss or Video Loss 3 Check Beep to enable the beep sound 4 Set the beep duration and the number of beeps to sound when the event is triggered 5 Click OK 6 Click Save to...

Page 124: ...dule or beep settings click Copy The Copy Schedule window appears 2 The current camera is highlighted in orange Click the Copy From button This sets the current camera as the source 3 Select camera s...

Page 125: ...e from the website 2 On the Setup screen click Maintenance Firmware Upgrade 3 Click Browse and then browse for the downloaded firmware file upg 4 Click Update to start the upgrade WARNING Do not resta...

Page 126: ...2 Click Backup 3 A pop up message appears DSS 1000 creates a backup file of the whole system settings as Backup_ yyyymmdd nvr file Save the file to the hard disk or to a USB disk connected to the remo...

Page 127: ...creen click Maintenance Settings Backup Restore 2 Click Browse Then browse for the backed up file Backup_ yyyymmdd nvr 3 Click Restore 4 A confirmation message appears click OK to continue 5 When done...

Page 128: ...export an error report tgz to be sent to the Customer s Help Desk CHD for troubleshooting purposes 1 On the Setup screen click Maintenance Troubleshooting 2 Click Export An error report error_report...

Page 129: ...ate 3 To filter by source of activity check or uncheck the filter under Log Type Or select the options under Other Conditions for more filtering options 4 Click Search to start the search 5 To save th...

Page 130: ...1 How to Surface Mount DSS 1000 can be mounted on a straight wall or on a table or pedestal For wall installation it is recommended to install DSS 1000 with the HDMI and Composite connectors facing d...

Page 131: ...directly installed between a VESA mount and a monitor 1 Place the device in between a VESA mount 10 x 10 and the monitor with the top side of the device facing the monitor while the bottom side facing...

Page 132: ...n hold poles with 1 to 2 diameter 1 With the smooth side outwards insert the supplied cable straps through the holes A B C D NOTE Use the inner A and D holes if mounting on a pole with 1 dia and D hol...

Page 133: ...DSS 1000 User Manual 4 Align DSS 1000 to the mount with the Ethernet port side up and HDMI port side down 5 Attach the 4 supplied long screws to secure DSS 1000 to the mount 132...

Page 134: ......

Reviews: