background image

1.  Read 

“Safety inspection checklist” on page iv

and 

“Installation guidelines” on page 41

to ensure that you 

work safely.

2.  Touch the static-protective package that contains the component to any unpainted metal surface on the 

server; then, remove it from the package and place it on a static-protective surface.

Watch the procedure 

A video of this procedure is available at YouTube: 

https://www.youtube.com/playlist?list=PLYV5R7hVcs- 

AU3iY3F7lq3qfqr5caGbIu

.

Procedure

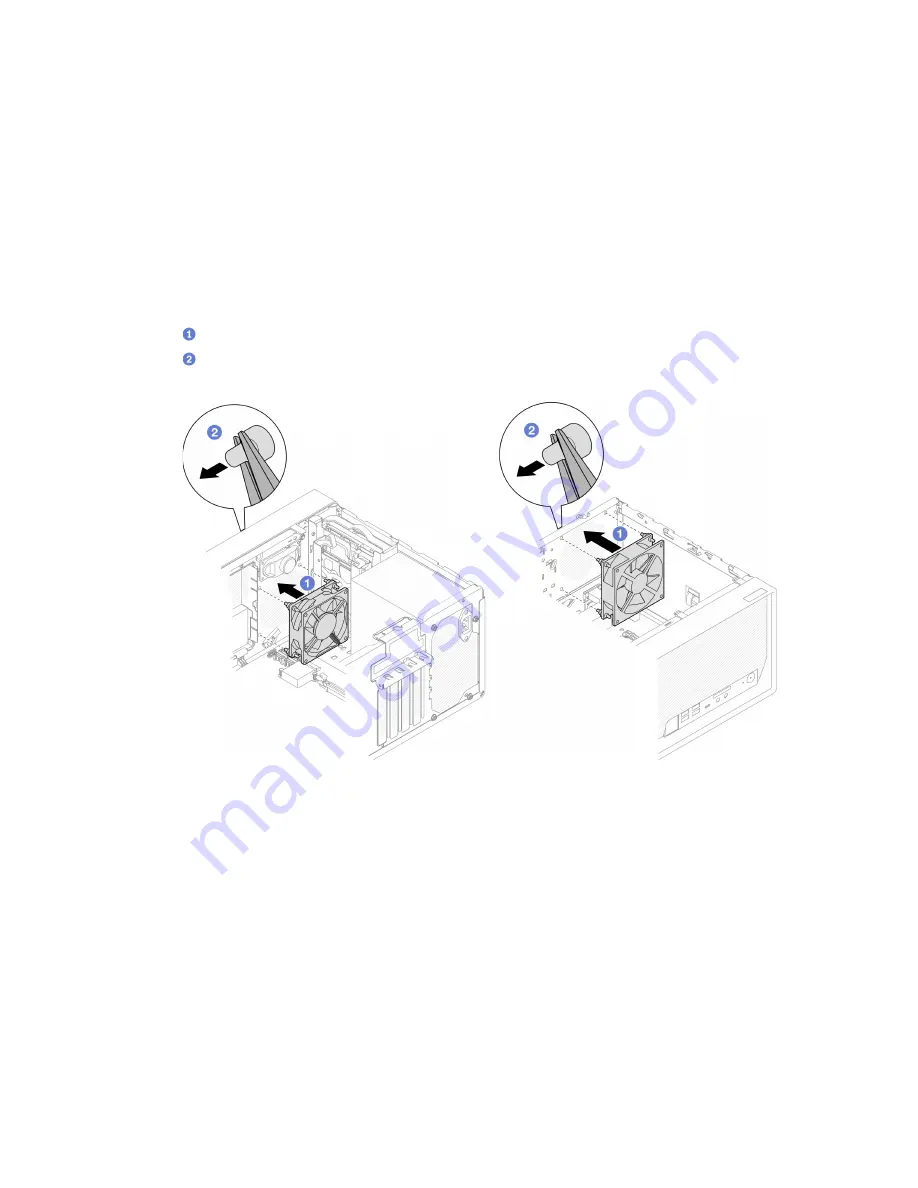
Step 1.  Install the front fan or rear fan. 

a. 

Align the four rubber mounts on the fan with the corresponding holes on the chassis.

b. 

With a pair of pliers, gently pull the tips of the four rubber mounts though the holes until the 

fan is secured to the chassis. 

Figure 63. Installing the front fan or the rear fan

Note:

Make sure the rubber mounts are fully pulled out of the holes to secure the fans steadily 

to the chassis. 

82

ThinkSystem ST50 V2 Maintenance Manual

Summary of Contents for ThinkSystem ST50 V2

Page 1: ...ThinkSystem ST50 V2 Maintenance Manual Machine Types 7D8J and 7D8K ...

Page 2: ...ddition ensure that you are familiar with the terms and conditions of the Lenovo warranty for your server which can be found at http datacentersupport lenovo com warrantylookup First Edition March 2022 Copyright Lenovo 2022 2022 LIMITED AND RESTRICTED RIGHTS NOTICE If data or software is delivered pursuant to a General Services Administration GSA contract use reproduction or disclosure is subject ...

Page 3: ...47 Drive and drive cage replacement 49 Drive bay locations 49 Simple swap drive and drive cage bay 1 2 replacement 50 Simple swap drive and drive cage replacement bay 3 62 Optical drive and drive cage replacement 70 Fan replacement 79 Remove the fan front and rear 79 Install the fan front and rear 81 Front bezel replacement 83 Remove the front bezel 83 Install the front bezel 85 Front panel replac...

Page 4: ...roblem determination procedures 159 List of POST error messages 160 Resolving suspected power problems 163 Resolving suspected Ethernet controller problems 163 Troubleshooting by symptom 164 Power on and power off problems 164 Memory problems 165 Hard disk drive problems 166 Monitor and video problems 167 Optional device problems 168 Intermittent problems 169 Network problems 170 Observable proble...

Page 5: ...ligheidsvoorschriften Ennen kuin asennat tämän tuotteen lue turvaohjeet kohdasta Safety Information Avant d installer ce produit lisez les consignes de sécurité Vor der Installation dieses Produkts die Sicherheitshinweise lesen Prima di installare questo prodotto leggere le Informazioni sulla Sicurezza Les sikkerhetsinformasjonen Safety Information før du installerer dette produktet Antes de insta...

Page 6: ...fety of Electronic Equipment within the Field of Audio Video Information Technology and Communication Technology Lenovo assumes you are qualified in the servicing of equipment and trained in recognizing hazards energy levels in products Important Electrical grounding of the server is required for operator safety and correct system function Proper grounding of the electrical outlet can be verified ...

Page 7: ...to the safety of any non Lenovo alterations 4 Check inside the server for any obvious unsafe conditions such as metal filings contamination water or other liquid or signs of fire or smoke damage 5 Check for worn frayed or pinched cables 6 Make sure that the power supply cover fasteners screws or rivets have not been removed or tampered with Copyright Lenovo 2022 2022 v ...

Page 8: ...vi ThinkSystem ST50 V2 Maintenance Manual ...

Page 9: ...nd provide flexible expansion capabilities for the future The server comes with a limited warranty For details about the warranty see https support lenovo com us en solutions ht503310 For details about your specific warranty see http datacentersupport lenovo com warrantylookup Identifying your server When you contact Lenovo for help the machine type and serial number information helps support tech...

Page 10: ...tower and rack form factors You can change the server from tower form factor to rack form factor by installing the tower to rack conversion kit For instructions on how to install the tower to rack conversion kit refer to the documentation that comes with the conversion kit Specifications The following information is a summary of the features and specifications of the server Depending on the model ...

Page 11: ...44 Storage expansion Two 3 5 inch drive bays one for optional one 2 5 inch drive bay optional one ODD bay and one M 2 drive Drive bay 1 3 5 inch hard disk drive or solid state drive Drive bay 2 Optional One 2 5 inch hard disk drive or solid state drive Drive bay 3 Optional One 3 5 inch hard disk drive or solid state drive ODD drive bay Optional One 9mm slim SATA Optical disk drive M 2 drive Option...

Page 12: ...r of the server One 1 GbE RJ 45 Ethernet connector with Intel I219 LM Two DisplayPort connectors 4K 60MHz One serial connector One audio line out port Note Supported by Windows Client OS only Supported by processor with integrated graphic feature only See the Processor section at Specifications on page 2 for more information Network One 1 GbE RJ 45 Ethernet connector with Intel I219 LM See Rear vi...

Page 13: ... or RSTe mode RAID RSTe mode supports RAID 0 1 and 5 Hardware RAID The server supports RAID level 0 and 1 The RAID adapter should be installed in PCIe slot 1 The following RAID adapter options are available for this server ThinkSystem 4350 8i SAS SATA 12Gb HBA ThinkSystem RAID 5350 8i PCIe 12Gb Adapter For a list of supported adapters see https static lenovo com us en serverproven index shtml Note...

Page 14: ...um 5 0 Bel Operating Typical 5 4 Bel Maximum 5 4 Bel Sound pressure level LpAm Idling Typical 25 dBA Maximum 37 dBA Operating Typical 40 dBA Maximum 40 dBA Notes 1 These sound levels were measured in controlled acoustical environments according to procedures specified by ISO 7779 and are reported in accordance with ISO 9296 2 The declared acoustic sound levels are based on the following configurat...

Page 15: ...culate contamination Attention Airborne particulates including metal flakes or particles and reactive gases acting alone or in combination with other environmental factors such as humidity or temperature might pose a risk to the device that is described in this document Risks that are posed by the presence of excessive particulate levels or concentrations of harmful gases include damage that might...

Page 16: ...trument Society of America Research Triangle Park North Carolina U S A 2 The derivation of the equivalence between the rate of copper corrosion growth in the thickness of the corrosion product in Å month and the rate of weight gain assumes that Cu2S and Cu2O grow in equal proportions 3 The derivation of the equivalence between the rate of silver corrosion growth in the thickness of the corrosion p...

Page 17: ...rrent advisories is available at the following location https datacentersupport lenovo com product_security home Power on the server The server can be turned on power LED on in any of the following ways Press the power button Before the operating system starts running you can press Enter to enter Startup Interrupt Menu In this menu a few options are available for various purposes Press Esc to resu...

Page 18: ...tem if supported by your operating system Press the power on button to start an orderly shutdown if supported by your operating system Press and hold the power button for more than 4 seconds to force a shutdown 10 ThinkSystem ST50 V2 Maintenance Manual ...

Page 19: ...igure 3 Front view Table 3 Front view 1 Slim SATA optical disk drive optional 2 Front panel See Front panel on page 11 for more information 3 Front thermal sensor Front panel Some crucial key controls connectors and LEDs are located on the front panel of the server The following illustration shows the controls connectors and LEDs on the front panel of the server Copyright Lenovo 2022 2022 11 ...

Page 20: ...2 connector 2 Drive activity LED white 6 Two USB 3 1 Gen1 connectors 3 Mic in connector Windows Client OS only 7 Two USB 3 2 Gen 2 connectors 4 Headset connector Windows Client OS only Notes USB 3 2 Gen 1 5 Gbps 640 MB s USB 3 2 Gen 2 10 Gbps 1280 MB s 1 Power button with power status LED white 12 ThinkSystem ST50 V2 Maintenance Manual ...

Page 21: ...ector is only supported by Windows Client OS 4 Headset connector Plug in headset with microphone to this connector A standard headphone or microphone can also be plugged into the connector Note This connector is only supported by Windows Client OS 5 USB Type C 3 2 Gen2 connector One USB Type C 3 2 Gen2 connector on the front panel that is available for a device that require USB 2 0 or 3 0 connecti...

Page 22: ...l disk drive 11 Drive bay 1 One 3 5 inch SATA drive 4 Front bezel 12 Power supply unit 5 3V CMOS battery CR2032 13 PCIe slot 1 3 6 SATA 1 4 connectors 14 PCIe adapter retainer 7 Front fan 15 Cage bar 8 Mono amplifier speaker 16 Rear fan Optional components Rear view Refer this section to identify important components on the rear of the server 14 ThinkSystem ST50 V2 Maintenance Manual ...

Page 23: ...11 DisplayPort 1 connector Supported by processor with integrated graphic feature only 5 Kensington lock 12 Serial port connector 6 Power cord connector 13 Audio line out connector Windows Client OS only 7 Two USB 3 2 Gen1 connectors Notes USB 3 2 Gen 1 5 Gbps 640 MB s USB 3 2 Gen 2 10 Gbps 1280 MB s 1 Padlock loop This loop is available for installing a padlock See Server locks on page 17 for mor...

Page 24: ...an Ethernet cable to this connector for a LAN This connector comes with LED for status indication Table 9 Ethernet connector LED behavior Color Description Yellow The network is connected and active Orange The network bandwidth is 1Gb Green The network bandwidth is 100MB 10 11 DisplayPort connectors Connect a DisplayPort compatible video device such as a monitor to this connector Supported by proc...

Page 25: ...ear of the server and is operated with a key or combination The cable lock also locks the buttons used to remove the server cover This is the same type of lock used with many notebook computers You can order an integrated cable lock directly from Lenovo by searching for Kensington at http datacentersupport lenovo com Figure 7 Kensington style cable lock Padlock This server comes with a padlock loo...

Page 26: ...Figure 8 Padlock System board components The illustration in this section shows the component locations on the system board Figure 9 System board components 18 ThinkSystem ST50 V2 Maintenance Manual ...

Page 27: ...nnector 12 SATA power 2 connector 25 Intrusion switch connector 13 Front fan connector RAID adapters Use this information to locate the connectors on the optional RAID adapters Figure 10 Connectors on SATA SAS RAID adapter 8i Note The RAID adapter should be installed in PCIe slot 1 Internal cable routing Some of the components in the server come with internal cables meant for specific connectors C...

Page 28: ...ore removing the cables will damage the cable sockets on the system board which are fragile Any damage to the cable sockets might require replacing the system board Figure 11 Pressing the release tab to disengage the connector Figure 12 Squeezing the release tabs at both sides to disengage the connector 20 ThinkSystem ST50 V2 Maintenance Manual ...

Page 29: ...ive bay 1 Cable From To 1 1st 3 5 or 2 5 HDD SATA cable 185 mm Bay 1 drive signal connector SATA 1 connector 2 1st 3 5 and 2 5 HDD Power Cable 300 mm 80 mm Bay 1 drive power connector SATA power 2 connector Make sure to follow the Cable routing guidelines in Internal cable routing on page 19 For the system board connector locations see System board components on page 18 Chapter 2 Server components...

Page 30: ...connector SATA 2 connector 2 1st 3 5 and 2 5 HDD Power Cable 300 mm 80 mm Bay 2 drive power connector and bay 1 drive power connector SATA power 2 connector Make sure to follow the Cable routing guidelines in Internal cable routing on page 19 For the system board connector locations see System board components on page 18 22 ThinkSystem ST50 V2 Maintenance Manual ...

Page 31: ... cable 1 latch 520 mm Bay 3 drive signal connector SATA 3 connector 2 Slim ODD second 3 5 inch drive and 2 5 inch drive power cable 300 mm 210 mm 110 mm Bay 3 drive power connector SATA power 1 connector Make sure to follow the Cable routing guidelines in Internal cable routing on page 19 For the system board connector locations see System board components on page 18 Chapter 2 Server components 23...

Page 32: ... cable 1 latch 520 mm Optical disk drive signal connector SATA 4 connector 2 Slim ODD second 3 5 inch drive and 2 5 inch drive power cable 300 mm 210 mm 110 mm Optical disk drive power connector SATA power 1 connector Make sure to follow the Cable routing guidelines in Internal cable routing on page 19 For the system board connector locations see System board components on page 18 24 ThinkSystem S...

Page 33: ...ble 1 Connector for the RAID adapter connector C0 See RAID adapters on page 19 2 Connectors for the drives Cable routing for three drives with the RAID adapter Note The RAID adapter should be installed in PCIe slot 1 Figure 18 Cable routing for three drives with the RAID adapter Table 16 Cable routing for three drives with the RAID adapter Cable From To 1 Mini SAS HD to 4 SATA 7 pin cable 1a cable...

Page 34: ...0 mm Bay 2 drive power connector and bay 1 drive power connector SATA power 2 connector 3 Slim ODD second 3 5 inch drive and 2 5 inch drive power cable 300 mm 210 mm 110 mm Bay 3 drive power connector SATA power 1 connector Make sure to follow the Cable routing guidelines in Internal cable routing on page 19 For the system board connector locations see System board components on page 18 26 ThinkSy...

Page 35: ...apter 1b cable labeled as 2 Bay 3 drive signal connector 2 1st 3 5 and 2 5 HDD Power Cable 300 mm 80 mm Bay 2 drive power connector and bay 1 drive power connector Note Depending on server configuration SATA power 2 connector 3 Slim ODD second 3 5 inch drive and 2 5 inch drive power cable 300 mm 210 mm 110 mm Bay 3 drive power connector SATA power 1 connector Make sure to follow the Cable routing ...

Page 36: ... pin SATA connector for processor power Processor power connector Note The 2x2 pins marked in grey are for 300W PSU 2 Micro fit to 1X15P and 1X4P Y splitter power cable 15 pin connector for system power System power connector Note 1 and 2 are parts of the same Y splitter cable Make sure to follow the Cable routing guidelines in Internal cable routing on page 19 For the system board connector locat...

Page 37: ...front fan and rear fan Table 19 Cable routing for the heat sink and fan module From To 1 Front fan cable Front fan connector 2 Rear fan cable Rear fan connector Make sure to follow the Cable routing guidelines in Internal cable routing on page 19 For the system board connector locations see System board components on page 18 Chapter 2 Server components 29 ...

Page 38: ...e routing for the heat sink and fan module for processor with TDP lower than 95W Figure 23 Cable routing for the heat sink and fan module for processor with 95W TDP Table 20 Cable routing for the heat sink and fan module From To 1 Heat sink and fan module cable Processor heat sink fan power connector 30 ThinkSystem ST50 V2 Maintenance Manual ...

Page 39: ...Make sure to follow the Cable routing guidelines in Internal cable routing on page 19 For the system board connector locations see System board components on page 18 Chapter 2 Server components 31 ...

Page 40: ...intrusion switch Figure 24 Cable routing for the intrusion switch Table 21 Cable routing for the intrusion switch From To 1 Intrusion switch cable Intrusion switch connector For the system board connector locations see System board components on page 18 32 ThinkSystem ST50 V2 Maintenance Manual ...

Page 41: ...22 Cable routing for the thermal sensor From To 1 Thermal sensor cable Thermal sensor connector Note If applicable place the thermal sensor cable under the M 2 drive Make sure to follow the Cable routing guidelines in Internal cable routing on page 19 For the system board connector locations see System board components on page 18 Chapter 2 Server components 33 ...

Page 42: ...for the mono amplifier Table 23 Cable routing for the mono amplifier From To 1 Mono amplifier cable Mono amplifier connector Make sure to follow the Cable routing guidelines in Internal cable routing on page 19 For the system board connector locations see System board components on page 18 34 ThinkSystem ST50 V2 Maintenance Manual ...

Page 43: ...or the power button with LED Table 24 Cable routing for the power button with LED From To 1 Power button with LED cable Power button with LED connector Make sure to follow the Cable routing guidelines in Internal cable routing on page 19 For the system board connector locations see System board components on page 18 Chapter 2 Server components 35 ...

Page 44: ...ing of parts for your server Figure 28 Server components The parts listed in the following table are identified as one of the following Tier 1 customer replaceable unit CRU Replacement of Tier 1 CRUs is your responsibility If Lenovo installs a Tier 1 CRU at your request with no service agreement you will be charged for the installation Tier 2 customer replaceable unit CRU You may install a Tier 2 ...

Page 45: ...e for your server 2 Click Parts 3 Enter the serial number to view a listing of parts for your server 1 Intrusion switch 2 Optical disk drive 3 Bezel kit including the optical disk drive bezel and latch 4 Fan kit including the front fan and rear fan 5 Cable kit including the mono amplifier thermal sensor and the power button cable 6 Chassis with front bezel and server cover 7 3 5 inch hard disk dri...

Page 46: ...listing continued Index Description Tier 1 CRU Tier 2 CRU FRU Consumable and Structural parts 20 Heat sink and fan module for processor with 95W TDP 21 3V CMOS battery CR2032 38 ThinkSystem ST50 V2 Maintenance Manual ...

Page 47: ... Standards Association CSA For units intended to be operated at 115 volts Use a UL listed and CSA certified cord set consisting of a minimum 18 AWG Type SVT or SJT three conductor cord a maximum of 15 feet in length and a parallel blade grounding type attachment plug rated 15 amperes 125 volts For units intended to be operated at 230 volts U S use Use a UL listed and CSA certified cord set consist...

Page 48: ...40 ThinkSystem ST50 V2 Maintenance Manual ...

Page 49: ...ing static sensitive devices on page 43 Make sure the components you are installing are supported by the server For a list of supported optional components for the server see https static lenovo com us en serverproven index shtml When you install a new server download and apply the latest firmware This will help ensure that any known issues are addressed and that your server is ready to work with ...

Page 50: ...er is still running Note See the system specific instructions for removing or installing a hot swap drive for any additional procedures that you might need to perform before you remove or install the drive After finishing working on the server make sure you reinstall all safety shields guards labels and ground wires System reliability guidelines Review the system reliability guidelines to ensure p...

Page 51: ...indoor humidity and increase static electricity Always use an electrostatic discharge wrist strap or other grounding system While the device is still in its static protective package touch it to an unpainted metal surface on the outside of the server for at least two seconds This drains static electricity from the package and from your body Remove the device from the package and install it directl...

Page 52: ...er supports independent mode only Independent mode provides high performance memory capability You can populate all channels with no matching requirements Individual channels can run at different DIMM timings but all channels must run at the same interface frequency Make sure to adhere to the following rules All memory modules installed should be identical in type and capacity Do not mix memory mo...

Page 53: ...n E3 23XX up to 3200 MT s Pentium Gold up to 2666 MT s 16GB 2Rx8 Xeon E3 23XX up to 2933 MT s Pentium Gold up to 2400 MT s CMOS battery CR2032 replacement Follow this procedure to remove and install the CMOS battery CR2032 Remove the CMOS battery CR2032 S002 CAUTION The power control button on the device and the power switch on the power supply do not turn off the electrical current supplied to th...

Page 54: ...cycle or discard the battery as instructed by local regulations About this task Attention Read Safety inspection checklist on page iv and Installation guidelines on page 41 to ensure that you work safely Turn off the server and peripheral devices and disconnect the power cords and all external cables see Power off the server on page 9 If the server is in a rack remove it from the rack See Remove t...

Page 55: ...32 Consider the following when replacing the CMOS battery in the server When replacing the CMOS battery you must replace it with another CMOS battery of the same type from the same manufacturer After replacing the CMOS battery make sure to reconfigure the server and reset system date and time To avoid possible danger make sure to read and follow the safety statements Lenovo has designed this produ...

Page 56: ...s lithium and can explode if not properly used handled or disposed of Do not Throw or immerse into water Heat to more than 100 C 212 F Repair or disassemble Dispose of the battery as required by local ordinances or regulations S005 CAUTION The battery is a lithium ion battery To avoid possible explosion do not burn the battery Exchange it only with the approved part Recycle or discard the battery ...

Page 57: ... Figure 31 Installing the CMOS battery After you finish 1 Reset date time and all the passwords 2 Proceed to complete the parts replacement see Complete the parts replacement on page 158 Drive and drive cage replacement Follow this procedure to remove and install a drive or a drive cage Drive bay locations See the following illustration for the locations of drive bays and the types of drives suppo...

Page 58: ...Safety inspection checklist on page iv and Installation guidelines on page 41 to ensure that you work safely Turn off the server and peripheral devices and disconnect the power cords and all external cables see Power off the server on page 9 If the server is in a rack remove it from the rack See Remove the server from the rails on page 137 Remove any locking device that secures the server such as ...

Page 59: ...and lift the drive assembly out of the drive bay Figure 33 Removing drive assembly from drive bay 1 Remove the simple swap drive assembly from drive bay 2 a Pinch the retainer handles b Lift the drive assembly out from the drive bay Figure 34 Removing drive assembly from drive bay 2 Chapter 3 Hardware replacement procedures 51 ...

Page 60: ... 3 5 inch drive from the retainer Figure 35 Removing a 3 5 inch drive from the retainer Note Depending on the configuration the 3 5 inch drive may be the model in the illustration below Remove a 2 5 inch drive from the retainer Figure 36 Removing a 2 5 inch drive from the retainer 52 ThinkSystem ST50 V2 Maintenance Manual ...

Page 61: ...ive surface Make sure the type of drives to be installed is supported Following are the types supported 3 5 inch simple swap hard disk drive or solid state drive in drive bay 1 and drive bay 3 2 5 inch simple swap solid state drive in drive bay 2 For a complete list of supported optional devices for the server see https static lenovo com us en serverproven index shtml If there are more than one dr...

Page 62: ...Step 1 Install a 3 5 inch or 2 5 inch drive to the retainer a Slightly tear both sides of the retainer apart b Align the four holes on the drive with the corresponding pins on the retainer then fit the drive into the retainer Note The drive connectors should face the retainer handles Install a 3 5 inch drive into the retainer 54 ThinkSystem ST50 V2 Maintenance Manual ...

Page 63: ... a 3 5 inch drive into the retainer Note Depending on the configuration the 3 5 inch drive may be the model in the illustration below Install a 2 5 inch drive into the retainer Chapter 3 Hardware replacement procedures 55 ...

Page 64: ...etainer Step 2 Face the retainer handles upward and push the drive assembly into the drive bay Press the drive assembly firmly to ensure it is seated correctly Install 3 5 inch drive assembly into drive bay 1 56 ThinkSystem ST50 V2 Maintenance Manual ...

Page 65: ...ay 2 Figure 41 Install 2 5 inch drive assembly into drive bay 2 Step 3 Connect the signal and power cable to the system board see Internal cable routing on page 19 After you finish 1 Complete the parts replacement see Complete the parts replacement on page 158 Chapter 3 Hardware replacement procedures 57 ...

Page 66: ... checklist on page iv and Installation guidelines on page 41 to ensure that you work safely Turn off the server and peripheral devices and disconnect the power cords and all external cables see Power off the server on page 9 If the server is in a rack remove it from the rack See Remove the server from the rails on page 137 Remove any locking device that secures the server such as a Kensington lock...

Page 67: ...rive cage out from the chassis Figure 42 Removing drive cage from drive bay 2 Step 3 Remove the bay 1 drive cage a From outside of the chassis remove the screw that secures the bay 1 drive cage to the chassis b From inside of the chassis remove the screw that secures the bay 1 drive cage to the chassis c Pull the bay 1 drive cage out from the chassis Chapter 3 Hardware replacement procedures 59 ...

Page 68: ...stall the bay 1 drive cage bay 2 drive cage S002 CAUTION The power control button on the device and the power switch on the power supply do not turn off the electrical current supplied to the device The device also might have more than one power cord To remove all electrical current from the device ensure that all power cords are disconnected from the power source About this task Attention Read Sa...

Page 69: ...From the inside of the chassis fasten the screw that secures the bay 1 drive cage to the chassis c From the outside of the chassis fasten the screw that secures the bay 1 drive cage to the chassis Figure 44 Installing drive cage to bay 1 Step 2 Install the bay 2 drive cage Align the four hooks on both drive cages and attache bay 2 drive cage to bay 1 drive cage then slide the bay 2 drive cage down...

Page 70: ...wap drive from bay 3 S002 CAUTION The power control button on the device and the power switch on the power supply do not turn off the electrical current supplied to the device The device also might have more than one power cord To remove all electrical current from the device ensure that all power cords are disconnected from the power source About this task Attention Read Safety inspection checkli...

Page 71: ...te The heat sink and processor could be very hot To avoid burning yourself wait for a few minutes after turning off the server before you remove the server cover b If applicable remove the optical drive see Remove an optical drive on page 70 c Remove the optical drive cage from the chassis see Remove the optical drive cage on page 75 Step 2 Remove the 3 5 inch drive a Slide the drive retainer out ...

Page 72: ...to be installed is supported Following are the types supported 3 5 inch simple swap hard disk drive or solid state drive in drive bay 1 and drive bay 3 2 5 inch simple swap solid state drive in drive bay 2 For a complete list of supported optional devices for the server see https static lenovo com us en serverproven index shtml If there are more than one drives to be installed determine installati...

Page 73: ...tainer apart Note Position the drive connectors on the opposite side of the retainer handles b Align the four holes on the drive with the corresponding pins on the retainer then fit the drive into the retainer c Slide the drive into the drive cage Figure 48 Installing a 3 5 inch drive to the drive cage Note Depending on the configuration the 3 5 inch drive may be the model in the illustration belo...

Page 74: ... LXPML RAID_setup html Remove the drive cage bay 3 Follow this procedure to remove a simple swap drive cage from bay 3 S002 CAUTION The power control button on the device and the power switch on the power supply do not turn off the electrical current supplied to the device The device also might have more than one power cord To remove all electrical current from the device ensure that all power cor...

Page 75: ... cage on page 75 d If applicable remove the 3 5 inch drive from the 3 5 inch drive cage see Remove a simple swap drive bay 3 on page 62 Step 2 Remove the 3 5 inch drive cage from the optical drive cage a Remove the screw that secures the 3 5 inch drive cage to the optical drive cage Reserve the screw to be used for reinstalling the 3 5 inch drive cage b Slide the optical drive cage to separate it ...

Page 76: ...e that contains the component to any unpainted metal surface on the server then remove it from the package and place it on a static protective surface Watch the procedure A video of this procedure is available at YouTube https www youtube com playlist list PLYV5R7hVcs AU3iY3F7lq3qfqr5caGbIu Procedure Step 1 Optional Install the EMI shielding included in the component packaging to the chassis Note ...

Page 77: ...ith the corresponding hooks on the 3 5 inch drive cage then lower the optical drive cage onto the 3 5 inch drive cage and slide the optical drive forward until it secures into place Note Make sure the four hooks on both drive cages are fully engaged b Fasten the captive screw to secure the two drive cages together Figure 51 Installing the 3 5 inch drive cage to the optical drive cage Chapter 3 Har...

Page 78: ...work safely Turn off the server and peripheral devices and disconnect the power cords and all external cables see Power off the server on page 9 If the server is in a rack remove it from the rack See Remove the server from the rails on page 137 Remove any locking device that secures the server such as a Kensington lock or a padlock Place the server on its side with the cover up Watch the procedure...

Page 79: ...out the retainer to disengage it from the optical drive b Slide the retainer downward and remove it from the optical drive Figure 53 Removing optical drive retainer Step 4 Optional Pull the optical drive bezel away to remove it from the optical drive Chapter 3 Hardware replacement procedures 71 ...

Page 80: ... the shield to the opening on the front bezel b Pivot the shield towards the front bezel until it snaps into place Figure 55 Installing the optical drive bay shield 3 If you are instructed to return the component or optional device follow all packaging instructions and use any packaging materials for shipping that are supplied to you Install an optical drive Follow this procedure to install an opt...

Page 81: ...ther than those specified herein might result in hazardous radiation exposure About this task Attention Read Safety inspection checklist on page iv and Installation guidelines on page 41 to ensure that you work safely Touch the static protective package that contains the component to any unpainted metal surface on the server then remove it from the package and place it on a static protective surfa...

Page 82: ...lot on the optical drive then insert the pin into the slot b Insert the rest two pins on retainer to the corresponding slots on the optical drive Figure 57 Installing the retainer to the optical drive Step 3 Optional Align the optical drive bezel with the slots on the optical drive then insert the bezel into the optical drive 74 ThinkSystem ST50 V2 Maintenance Manual ...

Page 83: ...tch snaps into place Figure 59 Installing the optical drive Step 5 Connect the signal and power cable to the system board see Internal cable routing on page 19 After you finish 1 Proceed to complete the parts replacement see Complete the parts replacement on page 158 Remove the optical drive cage Follow this procedure to remove the optical drive cage Chapter 3 Hardware replacement procedures 75 ...

Page 84: ... server from the rails on page 137 Remove any locking device that secures the server such as a Kensington lock or a padlock Place the server on its side with the cover up Watch the procedure A video of this procedure is available at YouTube https www youtube com playlist list PLYV5R7hVcs AU3iY3F7lq3qfqr5caGbIu Procedure Step 1 Make preparation for this task a Remove the server cover see Remove the...

Page 85: ...ny packaging materials for shipping that are supplied to you Install the optical drive cage Follow this procedure to install the optical drive cage S002 CAUTION The power control button on the device and the power switch on the power supply do not turn off the electrical current supplied to the device The device also might have more than one power cord To remove all electrical current from the dev...

Page 86: ...o of this procedure is available at YouTube https www youtube com playlist list PLYV5R7hVcs AU3iY3F7lq3qfqr5caGbIu Procedure Step 1 Make sure the cage bar is installed in the chassis To install the cage bar see Install the server cover on page 146 Step 2 If necessary install the 3 5 inch drive assembly to the optical drive cage See Simple swap drive and drive cage replacement bay 3 on page 62 Step...

Page 87: ...move and install the front fan or rear fan Note For heat sink and fan module replacement see Heat sink and fan module replacement on page 92 Remove the fan front and rear Follow this procedure to remove the front fan or rear fan S002 CAUTION The power control button on the device and the power switch on the power supply do not turn off the electrical current supplied to the device The device also ...

Page 88: ...dlock Place the server on its side with the cover up Watch the procedure A video of this procedure is available at YouTube https www youtube com playlist list PLYV5R7hVcs AU3iY3F7lq3qfqr5caGbIu Procedure Step 1 Make preparation for this task a Remove the server cover see Remove the server cover on page 143 Note The heat sink and processor could be very hot To avoid burning yourself wait for a few ...

Page 89: ...mponent or optional device follow all packaging instructions and use any packaging materials for shipping that are supplied to you Install the fan front and rear Follow this procedure to install the front fan or rear fan S002 CAUTION The power control button on the device and the power switch on the power supply do not turn off the electrical current supplied to the device The device also might ha...

Page 90: ...ilable at YouTube https www youtube com playlist list PLYV5R7hVcs AU3iY3F7lq3qfqr5caGbIu Procedure Step 1 Install the front fan or rear fan a Align the four rubber mounts on the fan with the corresponding holes on the chassis b With a pair of pliers gently pull the tips of the four rubber mounts though the holes until the fan is secured to the chassis Figure 63 Installing the front fan or the rear...

Page 91: ...cedure to remove the front bezel S002 CAUTION The power control button on the device and the power switch on the power supply do not turn off the electrical current supplied to the device The device also might have more than one power cord To remove all electrical current from the device ensure that all power cords are disconnected from the power source About this task Attention Read Safety inspec...

Page 92: ...ny locking device that secures the server such as a Kensington lock or a padlock Place the server on its side with the cover up Watch the procedure A video of this procedure is available at YouTube https www youtube com playlist list PLYV5R7hVcs AU3iY3F7lq3qfqr5caGbIu 84 ThinkSystem ST50 V2 Maintenance Manual ...

Page 93: ...ezel After you finish If you are instructed to return the component or optional device follow all packaging instructions and use any packaging materials for shipping that are supplied to you Install the front bezel Follow this procedure to install the front bezel S002 CAUTION The power control button on the device and the power switch on the power supply do not turn off the electrical current supp...

Page 94: ...e three plastic tabs on the bottom of the front bezel with the corresponding slots on the front of the chassis b Pivot the front bezel towards to chassis until it snaps into place Figure 66 Installing the front bezel After you finish Proceed to complete the parts replacement see Complete the parts replacement on page 158 Front panel replacement Follow this procedure to remove and install the front...

Page 95: ...is in a rack remove it from the rack See Remove the server from the rails on page 137 Remove any locking device that secures the server such as a Kensington lock or a padlock Place the server on its side with the cover up Watch the procedure A video of this procedure is available at YouTube https www youtube com playlist list PLYV5R7hVcs AU3iY3F7lq3qfqr5caGbIu Procedure Step 1 Make preparation for...

Page 96: ...Figure 67 Disconnecting the power button from the system board Step 3 Remove the screw the secures the front bezel to the chassis 88 ThinkSystem ST50 V2 Maintenance Manual ...

Page 97: ...rew the secures the front bezel to the chassis Step 4 Remove the front panel a Rotate the left end of the front panel away from the chassis b Remove the front panel from the chassis Chapter 3 Hardware replacement procedures 89 ...

Page 98: ... supplied to you Install the front panel Follow this procedure to install the front panel S002 CAUTION The power control button on the device and the power switch on the power supply do not turn off the electrical current supplied to the device The device also might have more than one power cord To remove all electrical current from the device ensure that all power cords are disconnected from the ...

Page 99: ...uTube https www youtube com playlist list PLYV5R7hVcs AU3iY3F7lq3qfqr5caGbIu Procedure Step 1 Install the front panel a There is a small tab on the right side of the front panel Place the tab behind the front panel slot on the chassis b Align the guide hole and screw hole on the front panel with the guide pin and screw slot on the chassis then install the front panel to the chassis Note Make sure ...

Page 100: ...stall the front bezel on page 85 2 Proceed to complete the parts replacement see Complete the parts replacement on page 158 Heat sink and fan module replacement Follow this procedure to remove and install the heat sink and fan module Remove the heat sink and fan module trained technician only Follow this procedure to remove the heat sink and fan module This procedure must be executed by a trained ...

Page 101: ...that secures the server such as a Kensington lock or a padlock Place the server on its side with the cover up Watch the procedure A video of this procedure is available at YouTube https www youtube com playlist list PLYV5R7hVcs AU3iY3F7lq3qfqr5caGbIu Procedure Step 1 Make preparation for your task a Remove the server cover see Remove the server cover on page 143 Note The heat sink and processor co...

Page 102: ...sen screw 3 e Fully loosen screw 4 f Fully loosen screw 3 Notes 1 Gently remove the four screws to avoid any possible damage to the system board 2 Always keep the four screws attached to the heat sink and fan module 3 Do not touch the thermal grease while handling the heat sink and fan module Loosening the screws on the heat sink and fan module for processor with TDP lower than 95W 94 ThinkSystem ...

Page 103: ...W TDP Figure 74 Loosening the screws on the heat sink and fan module for processor with 95W TDP Step 5 Evenly lift the heat sink and fan module and remove it from the system board After you finish 1 If applicable install a new heat sink and fan module see Install the heat sink and the fan module trained technician only on page 96 Chapter 3 Hardware replacement procedures 95 ...

Page 104: ...wer source About this task Attention 1 Read Safety inspection checklist on page iv and Installation guidelines on page 41 to ensure that you work safely 2 Touch the static protective package that contains the component to any unpainted metal surface on the server then remove it from the package and place it on a static protective surface Watch the procedure A video of this procedure is available a...

Page 105: ...screw 3 Note Do not touch the thermal grease while handling the heat sink and fan module Tightening the screws on the heat sink and fan module for processor with TDP lower than 95W Figure 75 Tightening the screws on the heat sink and fan module for processor with TDP lower than 95W Tightening the screws on the heat sink and fan module for processor with 95W TDP Chapter 3 Hardware replacement proce...

Page 106: ...n should be installed on the rear side of the chassis Align the four fan screws to the screw holes on the rear side of the chassis and fasten the screws to secure it Figure 77 Installing the heat sink fan to the rear of the chassis Step 5 Connect the heat sink fan cable to the system board see Internal cable routing on page 19 98 ThinkSystem ST50 V2 Maintenance Manual ...

Page 107: ...task Attention Read Safety inspection checklist on page iv and Installation guidelines on page 41 to ensure that you work safely Turn off the server and peripheral devices and disconnect the power cords and all external cables see Power off the server on page 9 If the server is in a rack remove it from the rack See Remove the server from the rails on page 137 Remove any locking device that secures...

Page 108: ...trusion switch cable from system board Step 3 Remove the intrusion switch a Remove the screw that secures the intrusion switch to the chassis b Remove the intrusion switch from the chassis 100 ThinkSystem ST50 V2 Maintenance Manual ...

Page 109: ...er switch on the power supply do not turn off the electrical current supplied to the device The device also might have more than one power cord To remove all electrical current from the device ensure that all power cords are disconnected from the power source About this task Attention 1 Read Safety inspection checklist on page iv and Installation guidelines on page 41 to ensure that you work safel...

Page 110: ...witch into the bracket until it click into place Figure 80 Assembling the intrusion switch Step 2 Install the intrusion switch a Align the intrusion switch to the slot on the chassis b Fasten the screw to secure the intrusion switch to the chassis Figure 81 Installing the intrusion switch Step 3 Connect the intrusion switch cable to the system board see Internal cable routing on page 19 After you ...

Page 111: ...server and peripheral devices and disconnect the power cords and all external cables see Power off the server on page 9 If the server is in a rack remove it from the rack See Remove the server from the rails on page 137 Remove any locking device that secures the server such as a Kensington lock or a padlock Place the server on its side with the cover up Watch the procedure A video of this procedur...

Page 112: ...2 drive Step 3 Remove the M 2 drive a Lift the retainer post away from the M 2 drive retainer b Rotate the rear end of the M 2 drive to an angle and remove the M 2 drive from the system board 104 ThinkSystem ST50 V2 Maintenance Manual ...

Page 113: ...r switch on the power supply do not turn off the electrical current supplied to the device The device also might have more than one power cord To remove all electrical current from the device ensure that all power cords are disconnected from the power source About this task Attention Read Safety inspection checklist on page iv and Installation guidelines on page 41 to ensure that you work safely T...

Page 114: ...be placed under the M 2 drive a Position the M 2 drive at an angle and insert it to the M 2 connector b Place down the M 2 drive onto the M 2 drive retainer c Insert the retainer post into the retainer to secure the M 2 drive in place Figure 84 Installing the M 2 drive After you finish 1 If necessary reinstall the 2 5 inch drive to the drive bay 2 see Install a simple swap drive bay 1 2 on page 53...

Page 115: ...he server from the rails on page 137 Remove any locking device that secures the server such as a Kensington lock or a padlock Place the server on its side with the cover up Watch the procedure A video of this procedure is available at YouTube https www youtube com playlist list PLYV5R7hVcs AU3iY3F7lq3qfqr5caGbIu Procedure Step 1 Make preparation for this task a Remove the server cover see Remove t...

Page 116: ...rd and lift it out of the chassis Figure 86 Removing the M 2 drive retainer After you finish 1 Install a new M 2 drive retainer see Install the M 2 drive retainer on page 109 2 If you are instructed to return the component or optional device follow all packaging instructions and use any packaging materials for shipping that are supplied to you 108 ThinkSystem ST50 V2 Maintenance Manual ...

Page 117: ... Installation guidelines on page 41 to ensure that you work safely Watch the procedure A video of this procedure is available at YouTube https www youtube com playlist list PLYV5R7hVcs AU3iY3F7lq3qfqr5caGbIu After you finish Step 1 Align the M 2 drive retainer with the three slots on chassis and lower the retainer into the chassis then slide the retainer toward the 2 5 inch drive to secure it in p...

Page 118: ...3 Proceed to complete the parts replacement see Complete the parts replacement on page 158 110 ThinkSystem ST50 V2 Maintenance Manual ...

Page 119: ...the rails on page 137 Remove any locking device that secures the server such as a Kensington lock or a padlock Place the server on its side with the cover up Memory modules are sensitive to static discharge and require special handling In addition to the standard guidelines of Handling static sensitive devices on page 43 Always wear an electrostatic discharge strap when removing or installing memo...

Page 120: ...eturn the component or optional device follow all packaging instructions and use any packaging materials for shipping that are supplied to you Install a memory module Follow this procedure to install a memory module S002 CAUTION The power control button on the device and the power switch on the power supply do not turn off the electrical current supplied to the device The device also might have mo...

Page 121: ...nother Do not stack memory modules directly on top of each other during storage Keep the gold memory module connector contacts from touching anything Handle memory modules with care never bend twist or drop a memory module Watch the procedure A video of this procedure is available at YouTube https www youtube com playlist list PLYV5R7hVcs AU3iY3F7lq3qfqr5caGbIu About this task Step 1 Locate the me...

Page 122: ...114 ThinkSystem ST50 V2 Maintenance Manual ...

Page 123: ...ve cage was removed reinstall it to the chassis see Install the optical drive cage on page 77 3 Reconfigure the memory module if necessary 4 Proceed to complete the parts replacement see Complete the parts replacement on page 158 Mono amplifier speaker replacement Follow this procedure to remove and install the mono amplifier speaker Remove the mono amplifier speaker Follow this procedure to remov...

Page 124: ...erver such as a Kensington lock or a padlock Place the server on its side with the cover up Watch the procedure A video of this procedure is available at YouTube https www youtube com playlist list PLYV5R7hVcs AU3iY3F7lq3qfqr5caGbIu Procedure Step 1 Make preparation for this task a Remove the server cover see Remove the server cover on page 143 Note The heat sink and processor could be very hot To...

Page 125: ...the mono amplifier a Remove the screw that secures the mono amplifier to the chassis b Slide out the mono amplifier from the bracket and remove it from the chassis Figure 92 Removing the mono amplifier After you finish Chapter 3 Hardware replacement procedures 117 ...

Page 126: ...urrent from the device ensure that all power cords are disconnected from the power source About this task Attention 1 Read Safety inspection checklist on page iv and Installation guidelines on page 41 to ensure that you work safely 2 Touch the static protective package that contains the component to any unpainted metal surface on the server then remove it from the package and place it on a static ...

Page 127: ...t are supported but the installation and removal procedures are the same Note For a list of the supported PCIe adapters see https static lenovo com us en serverproven index shtml Remove a PCIe adapter Follow this procedure to remove a PCIe adapter S002 CAUTION The power control button on the device and the power switch on the power supply do not turn off the electrical current supplied to the devi...

Page 128: ...tps www youtube com playlist list PLYV5R7hVcs AU3iY3F7lq3qfqr5caGbIu Procedure Step 1 Make preparation for this task a Remove the server cover see Remove the server cover on page 143 Note The heat sink and processor could be very hot To avoid burning yourself wait for a few minutes after turning off the server before you remove the server cover Step 2 Disconnect all PCIe adapter cables from the sy...

Page 129: ...r After you finish 1 Install another PCIe adapter if necessary see Install a PCIe adapter on page 122 Otherwise install a bracket to cover the vacancy on the chassis and close the retainer Chapter 3 Hardware replacement procedures 121 ...

Page 130: ...ION The power control button on the device and the power switch on the power supply do not turn off the electrical current supplied to the device The device also might have more than one power cord To remove all electrical current from the device ensure that all power cords are disconnected from the power source About this task Attention Read Safety inspection checklist on page iv and Installation...

Page 131: ...tium processor supports up to PCI Express 3 0 When installing PCIe x8 x16 adapter to PCIe Slot 3 the PCIe adapter performance might be degraded due to the bandwidth of PCIe slot 3 x4 For a list of the supported PCIe adapters see https static lenovo com us en serverproven index shtml The PCIe adapter might look different from the illustration Make sure to read and follow the documentation that come...

Page 132: ...e 2 Step 3 Install the PCIe adapter a Align the PCIe adapter to the slot then gently press both ends of the PCIe adapter until it is securely seated in the slot with the retaining clip clicks into the locked position b Rotate the PCIe adapter retainer towards the chassis until it snaps into locked position 124 ThinkSystem ST50 V2 Maintenance Manual ...

Page 133: ...procedure to remove and install the power button with LED Remove the power button with LED Follow this procedure to remove the power button with LED S002 CAUTION The power control button on the device and the power switch on the power supply do not turn off the electrical current supplied to the device The device also might have more than one power cord To remove all electrical current from the de...

Page 134: ... a Remove the server cover see Remove the server cover on page 143 Note The heat sink and processor could be very hot To avoid burning yourself wait for a few minutes after turning off the server before you remove the server cover b Remove the front bezel see Remove the front bezel on page 83 c Remove the front panel see Remove the front panel on page 86 Step 2 Remove the power button with LED fro...

Page 135: ...rotective package that contains the component to any unpainted metal surface on the server then remove it from the package and place it on a static protective surface Watch the procedure A video of this procedure is available at YouTube https www youtube com playlist list PLYV5R7hVcs AU3iY3F7lq3qfqr5caGbIu Procedure Step 1 Install the power button with LED a Tilt the power button and insert the ta...

Page 136: ...d grounded electrical outlet source Connect any equipment that will be attached to this product to properly wired outlets sources When possible use one hand only to connect or disconnect signal cables Never turn on any equipment when there is evidence of fire water or structural damage The device might have more than one power cord to remove all electrical current from the device ensure that all p...

Page 137: ...Remove any locking device that secures the server such as a Kensington lock or a padlock Place the server on its side with the cover up Watch the procedure A video of this procedure is available at YouTube https www youtube com playlist list PLYV5R7hVcs AU3iY3F7lq3qfqr5caGbIu Procedure Step 1 Make preparation for this task a Remove the server cover see Remove the server cover on page 143 Note The ...

Page 138: ...ove the power supply unit from the chassis a Press the release tab to disengage the power supply from the chassis b Slide out the power supply unit then lift it out of the chassis Figure 101 Removing the power supply unit After you finish 130 ThinkSystem ST50 V2 Maintenance Manual ...

Page 139: ...nt when there is evidence of fire water or structural damage The device might have more than one power cord to remove all electrical current from the device ensure that all power cords are disconnected from the power source S002 CAUTION The power control button on the device and the power switch on the power supply do not turn off the electrical current supplied to the device The device also might...

Page 140: ...o server drive configuration See Specifications on page 2 for more information Watch the procedure A video of this procedure is available at YouTube https www youtube com playlist list PLYV5R7hVcs AU3iY3F7lq3qfqr5caGbIu Procedure Step 1 Lower the power supply into the chassis and slide it toward the opening on the rear side of chassis until the release tab snaps into place Figure 102 Installing th...

Page 141: ...ment on page 50 3 Proceed to complete the parts replacement see Complete the parts replacement on page 158 Processor replacement trained technician only Use the following procedures to remove and install a processor This procedure must be executed by a trained technician Attention Before you begin replacing a processor make sure that you have an alcohol cleaning pad part number 00MP352 and gray th...

Page 142: ...ocedure A video of this procedure is available at YouTube https www youtube com playlist list PLYV5R7hVcs AU3iY3F7lq3qfqr5caGbIu Procedure Step 1 Make preparation for this task a Remove the server cover see Remove the server cover on page 143 Note The heat sink and processor could be very hot To avoid burning yourself wait for a few minutes after turning off the server before you remove the server...

Page 143: ... and follow all available packaging instructions or Install the processor that you removed to the replacement system board 1 Install the removed processor to the replacement system board see Install the processor trained technician only on page 135 2 Package the defective system board and return it to Lenovo To prevent any shipping damage reuse the packaging of the new system board and follow all ...

Page 144: ... processor to be installed was removed from another system board wipe the thermal grease from the processor with an alcohol cleaning pad and dispose of the cleaning pad after all of the thermal grease is removed Note If you are applying new thermal grease on the top of the processor make sure to do it after the alcohol has fully evaporated 2 Apply the thermal grease on the top of the processor wit...

Page 145: ...see Install the heat sink and the fan module trained technician only on page 96 2 If necessary reinstall the optical drive cage see Install the optical drive cage on page 77 3 Proceed to complete the parts replacement see Complete the parts replacement on page 158 Server replacement Follow this procedure to remove the serve from rack or install the server to rack This procedure must be executed by...

Page 146: ...ltages with hazardous energy might cause heating when shorted with metal which might result in spattered metal burns or both About this task Attention Read Safety inspection checklist on page iv and Installation guidelines on page 41 to ensure that you work safely Turn off the server and peripheral devices and disconnect the power cords and all external cables see Power off the server on page 9 Wa...

Page 147: ... b Lift the server out of the tray Figure 109 Removing the server from the rails After you finish 1 Place the server on its side with the cover up 2 To install the server to the rails see Install the server to the rails on page 139 Install the server to the rails Follow this procedure to install the server to the rails Chapter 3 Hardware replacement procedures 139 ...

Page 148: ... cause heating when shorted with metal which might result in spattered metal burns or both About this task Attention Read Safety inspection checklist on page iv and Installation guidelines on page 41 to ensure that you work safely Turn off the server and peripheral devices and disconnect the power cords and all external cables see Power off the server on page 9 Note To install rails to rack see th...

Page 149: ...e 111 Installing the rubber safety pads to the tray Step 3 Orient the server to have the server cover facing up and the front bezel facing the front of the rails then align the server with the brackets and the tab on the front of the tray and gently place the server on the tray Chapter 3 Hardware replacement procedures 141 ...

Page 150: ... server into the rack cabinet a Lift the rail latches on both sides b Gently slide and push the tray into the rack cabinet Figure 113 Installing the server into the rack cabinet Step 5 Secure the tray with two M6 x 16 screws to the front of the rack cabinet 142 ThinkSystem ST50 V2 Maintenance Manual ...

Page 151: ...ove the server cover Follow this procedure to remove the server cover S002 CAUTION The power control button on the device and the power switch on the power supply do not turn off the electrical current supplied to the device The device also might have more than one power cord To remove all electrical current from the device ensure that all power cords are disconnected from the power source Chapter...

Page 152: ...server such as a Kensington lock or a padlock Place the server on its side with the cover up Watch the procedure A video of this procedure is available at YouTube https www youtube com playlist list PLYV5R7hVcs AU3iY3F7lq3qfqr5caGbIu Procedure Step 1 Place the server on its side with the cover up Step 2 Remove the serve cover a Use a screwdriver to remove the two screws that secure the server cove...

Page 153: ...Push the latch on the cage bar until the cage bar is disengaged from the chassis b Rotate the cage bar and remove it from the chassis Figure 116 Removing the cage bar After you finish If you are instructed to return the component or optional device follow all packaging instructions and use any packaging materials for shipping that are supplied to you Chapter 3 Hardware replacement procedures 145 ...

Page 154: ...ght cause heating when shorted with metal which might result in spattered metal burns or both About this task Attention Read Safety inspection checklist on page iv and Installation guidelines on page 41 to ensure that you work safely Ensure that all adapters and other components are installed and seated correctly and that you have not left loose tools or parts inside the server Ensure that all int...

Page 155: ... side of the chassis and rotate the cage bar toward the front of the chassis until the cage bar is secured in place Figure 117 Installing the cage bar Step 2 Install the serve cover a Align the server cover to the slots on the side of the chassis Ensure that all the tabs on the cover align are engaged with chassis properly then slide the cover towards the front bezel until it snaps in place b Use ...

Page 156: ...system board trained technician only Follow this procedure to remove the system board This procedure must be executed by a trained technician S002 CAUTION The power control button on the device and the power switch on the power supply do not turn off the electrical current supplied to the device The device also might have more than one power cord To remove all electrical current from the device en...

Page 157: ...move the front bezel on page 83 d If applicable remove the optical drive see Remove an optical drive on page 70 e If applicable remove the optical drive cage see Remove the optical drive cage on page 75 f If applicable remove the cage bar see Step 3 in Remove the server cover on page 143 g If necessary remove the rear fan see Remove the fan front and rear on page 79 h If necessary remove the M 2 d...

Page 158: ...Removing the system board from the chassis After you finish 1 Install a new system board see Install the system board trained technician only on page 150 2 If you are instructed to return the component or optional device follow all packaging instructions and use any packaging materials for shipping that are supplied to you Install the system board trained technician only Follow this procedure to i...

Page 159: ... any unpainted metal surface on the server then remove it from the package and place it on a static protective surface Watch the procedure A video of this procedure is available at YouTube https www youtube com playlist list PLYV5R7hVcs AU3iY3F7lq3qfqr5caGbIu Procedure Step 1 Install the system board a Tilt the system board and align the connectors with the corresponding opening on the front of th...

Page 160: ...drive on page 105 7 If applicable reinstall the rear fan see Install the fan front and rear on page 81 8 If applicable reinstall the cage bar see Step 1 in Install the server cover on page 146 9 If necessary reinstall the optical drive cage see Install the optical drive cage on page 77 10 If necessary reinstall the optical drive see Install an optical drive on page 72 11 Reinstall the front bezel ...

Page 161: ...enu is displayed then select the USB flash drive and press Enter The server will start up from the USB flash rive Step 7 Update VPD SMBIOS with the following AMIBIOS DMI Editor commands AMIDEEFIx64 efi option1 option2 optionX Options SP String Update the System Machine Type and Model Number Example fs0 amideefix64 efi sp 7Y48CTO1WW SS String Update the System Serial Number Example fs0 amideefix64 ...

Page 162: ...ils on page 137 Remove any locking device that secures the server such as a Kensington lock or a padlock Place the server on its side with the cover up Watch the procedure A video of this procedure is available at YouTube https www youtube com playlist list PLYV5R7hVcs AU3iY3F7lq3qfqr5caGbIu Procedure Step 1 Make preparation for this task a Remove the server cover see Remove the server cover on pa...

Page 163: ...cable Step 3 Remove the thermal sensor a Press the release tab on the thermal sensor to release it from the chassis b Remove the thermal sensor from the chassis Figure 124 Removing the thermal sensor Chapter 3 Hardware replacement procedures 155 ...

Page 164: ...isconnected from the power source About this task Attention 1 Read Safety inspection checklist on page iv and Installation guidelines on page 41 to ensure that you work safely 2 Touch the static protective package that contains the component to any unpainted metal surface on the server then remove it from the package and place it on a static protective surface Watch the procedure A video of this p...

Page 165: ... 2 Connect the thermal sensor cable to the system board To locate the connector on the system board see Internal cable routing on page 19 Figure 126 Connecting the thermal sensor cable After you finish Chapter 3 Hardware replacement procedures 157 ...

Page 166: ... see Install the CMOS battery CR2032 on page 47 3 Properly route and secure the cables in the server Refer to the cable connecting and routing information for each component 4 Reinstall the server cover see Install the server cover on page 146 5 If the server was removed from the rack previously put it back into the rack see Install the server to the rails on page 139 6 Reconnect external cables a...

Page 167: ...e Power supply overload BIOS password changed BIOS Setup data changed Chassis intrusion Password retry count exceeded SATA device configuration changed BIOS updated Option ROM over Shadow RAM size Hard disk password changed PCI Mem Conflict System event log cleared General problem determination procedures Use the information in this section to resolve problems if the event log does not contain spe...

Page 168: ...ystem Note A short beep lasts about 0 4 second while a long one lasts about 0 9 second If the problem is solved after an adapter is removed from the server but recurs after it is reinstalled suspect the adapter If the problem recurs when the adapter is replaced with a different one try the original adapter in a different PCIe slot If the problem appears to be a networking one while the server pass...

Page 169: ...ding optical drive and M 2 drive Notes 1 Change the drive SATA connectors will cause this error 2 The M 2 drive detected is limited to the M 2 drive connected to the system board M 2 slots 3 To clear this error from the list of POST events go to Setup Utility and select Save Changes and Exit 0162 Setup data integrity check failure This error message indicates the checksum of BIOS Setup data in NVR...

Page 170: ...rror from the list of POST events go to Setup Utility and select Save Changes and Exit 8997 System firmware has detected the system configuration may exceed the power supply capacity The required amount of power of the present system configuration is more than the power supply could afford This error will be displayed when the system algorithm determines that present power consumption exceeds the ...

Page 171: ...ontroller device driver readme file Complete the following steps to try to resolve suspected problems with the Ethernet controller Step 1 Make sure that the correct device drivers which come with the server are installed and that they are at the latest level Step 2 Make sure that the Ethernet cable is installed correctly The cable must be securely attached at all connections If the cable is attach...

Page 172: ... connectors 2 See the documentation that comes with the optional embedded hypervisor device for setup and configuration information 3 Make sure that software that is installed in the device works on another server to ensure that the device works properly 4 Check https static lenovo com us en serverproven index shtml to validate that the embedded hypervisor device is supported by the server 5 Make ...

Page 173: ...wer button for five seconds c Power on the server d If the server fails POST and the power button does not work disconnect the power cord for 20 seconds then reconnect the power cord and power on the server 2 If the problem persists or if you are using an ACPI aware operating system suspect the system board Memory problems Follow this procedure to resolve issues related to memory Displayed system ...

Page 174: ...If the server comes with LXPM Lite go to Diagnostics HDD test to perform diagnostics on the drives Replace the drive that is displayed as faulty Otherwise skip to the next step 5 Remove the drives until the system reaches minimal drive requirement then add one drive and restart the server and repeat the step if the problem does not recur If the problem occurs after addition of a drive replace it S...

Page 175: ...eo Incorrect characters are displayed on page 167 Screen is blank on page 167 Screen goes blank when you start some application programs on page 168 The monitor has screen jitter or the screen image is wavy unreadable rolling or distorted on page 168 Incorrect characters are displayed Complete the following steps until the problem is solved 1 Verify that the language and locality settings are corr...

Page 176: ...ors make sure that the distance between the monitor and any external diskette drive is at least 76 mm 3 inches b Non Lenovo monitor cables might cause unpredictable problems 2 Disconnect and reconnect the monitor cable 3 Replace the following components one at a time in the order shown restarting the server each time a Monitor cable b Monitor c Video adapter if one is installed d Trained technicia...

Page 177: ...g steps until the problem is solved 1 Check the system event log and resolve any related problems To view the system event log go to Setup Utility and select Security System Event Log View System Event Log 2 Make sure that The device is supported by the server see https static lenovo com us en serverproven index shtml The latest version of corresponding driver is installed The device is seated cor...

Page 178: ...he system event log go to Setup Utility and select Security System Event Log View System Event Log 2 If the reboot occurs after the operating system starts disable any automatic server restart ASR utilities such as the Automatic Server Restart IPMI Application for Windows or any ASR devices that are installed 3 Look into the event logs for an event code that indicates a reboot See Event logs on pa...

Page 179: ...2 Trained technician only Make sure that the processor is installed properly 3 Replace the following components one at a time in the order shown and restart the server after each replacement a Trained technician only processor b Trained technician only system board Server is unresponsive POST is complete and operating system is running Complete the following steps until the problem is solved If yo...

Page 180: ...emoved one at a time and restart the server after each addition until the problem occurs Replace the device that causes the problem If the system fails to restart there might be a problem with the system board Call Lenovo support Unusual smell Complete the following steps until the problem is solved 1 Any unusual smell might come from newly installed devices Examine the devices to identify the sou...

Page 181: ...dapter or memory the server might have a memory address conflict The software is designed to operate on the server Other software works on the server The software works on another server 2 If you receive any error messages while you use the software see the information that comes with the software for a description of the messages and suggested solutions to the problem 3 Contact your place of purc...

Page 182: ...174 ThinkSystem ST50 V2 Maintenance Manual ...

Page 183: ...witch on page 99 c Remove the front bezel see Remove the front bezel on page 83 d If applicable remove the optical drive see Remove an optical drive on page 70 e If applicable remove the optical drive cage see Remove the optical drive cage on page 75 f If applicable remove the cage bar see Step 3 in Remove the server cover on page 143 g If necessary remove the rear fan see Remove the fan front and...

Page 184: ...After disassembling the server recycle the unit in compliance with local regulations 176 ThinkSystem ST50 V2 Maintenance Manual ...

Page 185: ... try to solve the problem yourself Check all cables to make sure that they are connected Check the power switches to make sure that the system and any optional devices are turned on Check for updated software firmware and operating system device drivers for your Lenovo product The Lenovo Warranty terms and conditions state that you the owner of the Lenovo product are responsible for maintaining an...

Page 186: ...ion such as error messages and logs As an alternative to calling Lenovo Support you can go to https support lenovo com servicerequest to submit an Electronic Service Request Submitting an Electronic Service Request will start the process of determining a solution to your problem by making the pertinent information available to the service technicians The Lenovo service technicians can start workin...

Page 187: ...ew editions of the publication Lenovo may make improvements and or changes in the product s and or the program s described in this publication at any time without notice The products described in this document are not intended for use in implantation or other life support applications where malfunction may result in injury or death to persons The information contained in this document does not aff...

Page 188: ...e bays with the largest currently supported drives that are available from Lenovo Maximum memory might require replacement of the standard memory with an optional memory module Each solid state memory cell has an intrinsic finite number of write cycles that the cell can incur Therefore a solid state device has a maximum number of write cycles that it can be subjected to expressed as total bytes wr...

Page 189: ...ference suppression devices that are supplied with the monitor Additional electronic emissions notices are available at http thinksystem lenovofiles com help index jsp Taiwan BSMI RoHS declaration Taiwan import and export contact information Contacts are available for Taiwan import and export information Appendix B Notices 181 ...

Page 190: ...182 ThinkSystem ST50 V2 Maintenance Manual ...

Page 191: ......

Page 192: ......

Reviews: